The Warrior of Light (Tank Classes | Ranged DPS Classes | Melee DPS Classes | Caster Classes | Healer Classes | Limited Jobs)
Scions of the Seventh Dawn
Nations of Hydaelyn: The Eorzean Alliance | Ishgard | Dragon Hordes | Othard and Hingashi | Sharlayan and Thavnair | Tural
Other Realms: The Void | The First | The World Unsundered (Pandæmonium) | Ultima Thule
Garlond Ironworks | Hildibrand Allies | Other Allies (Hydaelyn | G'raha Tia)
Antagonists: Ascians (Emet-Selch) | Garlean Empire (Gaius van Baelsar | Zenos yae Galvus | Bozjan Garleans)
Primals | Raid Antagonists (Omega | The Twelve) | Other Antagonists
Class and Job Questlines: Disciples of War (Tank | Melee | Ranged) | Disciples of Magic | Disciples of the Hand | Disciples of the Land
Races: Playable Races | Beast Tribes
Seasonal Event NPCs
As the story has advanced beyond the point of hiding plot twists for Stormblood, there are unmarked spoilers below, you have been warned.
Othard is a continent across the eastern seas on the other side of the Garlean Empire consisting of several various countries with their own ways of life and cultures, taking inspiration heavily from the Far East. The proper landmass of Othard consists of Doma, the Azim Steppe, Nagxia, and Dalmasca. The Ruby Sea sits between Othard proper and the island nation of Hingashi.
Doma is a proud nation of Samurai and Ninja that makes up the provinces of Yanxia and Nagxia who were subjugated by the Garlean Empire roughly twenty-five years before the beginning of 1.0. Though broken and subjugated, after the player's successful victory over Gaius Van Baelsar at the end of A Realm Reborn's storyline and spurred by rumors that Emperor Solus Zos Galvus had succumbed to age and a war of succession was brewing, the Domans led by lord Kaien launched a rebellion to liberate their country, only to be brutally ground under the heel of Zenos and the Garlean's advanced firepower. The following crackdown on any form of rebellion left Kaien dead, his son and successor Hien missing, and sent several refugees across the sea to Eorzea, the only land they knew they were safe from Garlean oppression.
The Azim Steppe is a massive landmass to the north of Doma populated by countless Xaela tribes. The Steppes are a brutal but free place where only the strongest can survive, Xaela raiding parties are common and both man and animal often seeks nothing more than to kill you. In spite of that, several Xaela tribes survive strong enough to have permanent settlements and be in situations that can generally be called "Thriving".
The Ruby Sea is an inlet that divides the continent of Othard from the neighboring island chain continent of Koshu. The Ruby Sea is inhabited by several groups, most prominently the Confederacy, a group of pirates who tax all who cross through on the way to Doma and Hingashi with what they refer to as "the Ruby Tithe", though are affable so long as one doesn't try to weasel their way out. The Sea is also home to the isolationist villages of the Raen Au Ra and the Kojin beastmen, who live in bubble cities deep under the water that they thrive in thanks to the blessing of the Kami granting them underwater breathing. And even further within, something even stranger lurks...
Kugane is a trader port territory on the island of Rasho, part of Hingashi Shogunate. The city of Kugane is known for being a gate to the Far East as it's the easiest way to access the Ruby Sea and Doma beyond. While the rest of the island chain is xenophobic and violently isolationist, Kugane is its only port open to outsiders, as such the city itself is firmly neutral and allows all walks of life to be present, even that of the Garleans. Attempting to disrupt the local law in any way is known to result in Disproportionate Retribution. While not technically a part of Othard, it's grouped here due to its close proximity and the role it plays in Stormblood's story.
Dalmasca is a nation on the south of the continent, divided from the rest of Othard by the Skatay Range mountains. It is comprised of the Dalmasca Desert which makes up most of its territory, as well as the jagged cliffs of Greylic's Bend and the dense Golmore Jungle. Dalmasca flourished for centuries as a hub of trade between East and West, but 30 years ago it was conquered by the Garlean Empire as their first step into Othard.
Nagxia is a jungle nation of which little is known about, beyond that the dense jungles mean large cities have never flourished there. It has yet to be visited in-game and is only rarely mentioned.
In the later events of Stormblood, the liberated Doma becomes a stalwart ally of the Eorzean Alliance. Under Lord Hien's leadership, a Doman Alliance is also forged alongside the Confederacy, the Kojin of the Blue, and the Xaela tribes of the Azim Steppe. While an envoy was sent to Sui-no-Sato, they refused membership, preferring to be left alone by the outside world.
Doma

- Day in the Limelight: Doma's culture gets extensive focus in the Doman Enclave Restoration quests in which the Warrior donates efforts to help stimulate the nation's recovery following its liberation from Yotsuyu's reign of terror.
- Despair Event Horizon: When you first arrive in Yanxia, you find the populace scared witless of the very idea of attempting to fight back against the Empire and reclaim their homeland. Much like the Ala Mhigans, most who grew up under Imperial rule, particularly under viceroy Yotsuyu's cruel reign, came to believe that life in chains was preferable to whatever fate awaited those who rebelled.
- Fantasy Counterpart Culture: Yanxia's landscape is based heavily on the mountainous regions of China, but its culture is Japanese, mirroring the Nara era where Chinese influence was at an all time high.
- Ironic Name: The themes of Yanxia, "A Father's Pride" and "A Mother's Pride", become ironic when you learn that Yotsuyu was born in Namai and had neither after her parents' deaths. Her subsequent abuse at the hands of her aunt and uncle twisted Yotsuyu into the hateful, sadistic Witch of Doma. As if to underscore the point, "Wayward Daughter", her battle theme as the primal Tsukuyomi, features a forboding rock version of the themes' melody.
- Leitmotif:
- The day theme for Yanxia is "A Father's Pride
 " while the night theme is "A Mother's Pride". Both themes strongly feature Chinese and Japanese instruments as well as the sleepy village that Namai used to be prior to the Garlean occupation. This leitmotif is also worked into many other themes in the Far East, such as the dungeon themes for Doma Castle and the Swallow's Compass.
 - Meanwhile, the Doman Enclave uses a rearrangement of Doma's theme from Final Fantasy VI that also serves as Hien's character music as the nation's heir and ruler once Yotsuyu is driven out.
- The day theme for Yanxia is "A Father's Pride
- Hope Is Scary: Zenos' and Yotsuyu's reign of terror has left the Domans terrified of even hoping there is a chance to resist. Isse's response to Yugiri trying to get the villagers of Namai out of imperial custody all but spells this out to her. And yet, her and the Warrior's example is enough to inspire Isse and the other villagers to make a stand against Zenos despite knowing full well that it's likely to get them killed.Isse: [to Yugiri] You are Lord Hien's retainer? Trained to fight without fear and obey without purpose? Well, we're not! We're lost and afraid! We hate this-all of this-but we can't do a damn thing to change it! And trying will only make it worse. It's a pathetic existence... but it's all we've got. And when people come here pretending it can be different, it-it doesn't help, alright!?
- Occupiers Out of Our Country: For twenty-five years, Doma was an Imperial province, its own king and his retainers even fighting for Garlemald's banner. But they still jumped at the first chance of liberty that they could. By the time Stormblood begins, the Warrior of Light and the Scions show up to help them retake their country.
- Urban Ruins: Much of Doma lies in ruins after Lord Kaien's failed attempt at overthrowing the Garlean occupiers following Zenos and the XIIth Legion's arrival in the nation. The Doman Enclave Restoration quests have the Warrior donate to efforts to rebuild the eponymous heart of the nation and slowly watch the nation get back on its feet.
- Wutai: Doma strongly resembles the Nara era of Japan, when Chinese influence on the nation was at an all-time high. Its mountainous regions and steppe rice paddies further resemble that of China's and its people's clothes and customs are less modern compared to that of Hingashi's. Furthermore, Chinese dishes like baos can be found among the vendors at the Ten Thousand Stalls. Prior to Garlean occupation, Doma was famous for its proud samurai warriors like Gosetsu, though it also has a small army of shinobi.
Hien Rijin
Voiced by: Katsuyuki Konishi (JP), Andrew Koji (EN), Boris de Mourzitch (FR), Matthias Scherwenikas (DE)

Discipline: Samurai
The young heir to the throne of Doma, Hien is a charismatic leader, beloved by his people. Together with Gosetsu and Yugiri, he spurred his people to rise up against their Garlean oppressors. But when the rebellion was crushed, Lord Hien vanished without a trace…
- Absurdly Sharp Blade: His katana is sharp enough to shear clean through a magitek armor in a single stroke, as shown when he arrives with the Xaela of the Azim Steppe to aid in the liberation of Ala Mhigo.
- Anchored Ship: The short story "Ever After" make it clear he and Cirina are in love, but his obligations to Doma and hers to the Mol prevent them from acting on their feelings.
- Asskicking Leads to Leadership: Hien's goal when you meet him is to participate in the Naadam, a ritual contest of fighters, and win to enlist all of the Xaela tribes of the Azim Steppe in fighting the Empire. If you still doubt how badass he is, during the ending of Stormblood and the Siege of Ala Mhigo the strike team lead by he and Yugiri is the only one shown making progress throughout the dungeon and ends up being the one that gets closest to the throne room that isn't the Warrior of Light's own team.
- Because Destiny Says So: He's convinced he and the Warrior of Light were fated to meet, that destiny purposely brought them in his life, and says so a few times in the story.
- Big Damn Heroes: When the Eorzean Alliance begins to get torn apart by Garleans in flying magitek armor during the Siege of Ala Mhigo, Hien and Yugiri arrive out of nowhere with a detachment of Doman forces on riding yol and begin to slice the Imperial air support to ribbons allowing the Alliance to break down the door to the palace and begin the attack in full. Alphinaud can't help but wonder if he deliberately waited till the last second, though he's quick to dismiss the idea, saying that he's not Vidofnir.
- Birds of a Feather: With the Warrior of Light. They find out they have a lot in common and bond extremely fast, quickly becoming very close to each other. It's actually lampshaded once or twice.
- The Chains of Commanding: Part of his character arc after the 4.0 MSQ missions of Stormblood is dealing with being the leader of the Doman people. Specifically, dealing with the weight and consequences of his decisions. Choosing to show mercy to Yotsuyu instead of having her executed is what Hien believed to be the right thing to do, but then he realizes that he was causing needless suffering amongst his people by doing it. During the Physical Ranged DPS questline of Endwalker, this decision comes back to bite him when people believe that the blasphemy that is going after their returned citizens is a kamui meant to bring the wicked back to the land of the dead. While it's not true, the distrust that Hien has gathered as a result of all his previous decisions means his reassurances and arguments carry no weight.
- Dude Magnet: A running gag has members of the all male Buduga tribe fawning over him.
- Early-Bird Cameo: Hien can be seen in the distance arriving in Reunion with Cirina during the Azim Steppe's introductory cutscene, three quests before he is properly introduced.
- Embarrassing Nickname: Shun, as Hien laments that "a man should not be called by his childhood name!" Besides his parents, the only persons to call him as such are Gosetsu and the Warrior of Light, doubling it as an Affectionate Nickname.
- Establishing Character Moment: The Warrior of Light is escorted by Gosetsu and Yugiri to the top of a hill where Hien is sitting. With his back still turned, Hien asks if Gosetsu and Yugiri would have his blade or his head, demonstrating the lengths that he's willing to go for the sake of his people. When Hien is told that his people want to fight the Empire, Hien admits that it's all but impossible, but resolves to do it because it's what his people want. He then stands and turns, causing a remix of Cyan's theme from Final Fantasy VI to start playing. All of this establishes Hien as one of the Royals Who Actually Do Something in Eorzea.
- Genghis Gambit: He pulls this with, appropriately, the Xaela tribes of the Azim Steppe to unite them under a single banner after winning the Naadam and fight against the Garleans.
- Guest-Star Party Member: As of 6.4, he joins the player in Duty Support runs of Bardam's Mettle. 6.5 adds The Burn and The Ghimlyt Dark. In those, he follows in Gosetsu's footsteps and acts as the tank unless the player is the tank themselves, in which case he sits out of The Burn, or goes DPS SAM in Ghimlyt Dark.
- Hot-Blooded: Up to a moderate point, but it's clearly there. The guy is more than willing to enter into a scrap with the tribes of the Azim Steppe to prove the worth of the Doman people. That, and it would be pretty fun for him.
- Humble Hero: Willing to hunt gulo gulo, look for lost lambs, listen to stories and haul goods. He's not ashamed to admit his ignorance (or 'wield it as weapon', as Magnai puts it).
- The Good King: He devotes himself tirelessly to the restoration of Doma and the happiness of its people once he returns to reclaim his throne. Despite his inexperience, he proves to be a wise and wily ruler at home in both political and military matters. Part of his character arc is dealing with the consequences of his actions, all of which come from a genuine desire to help Doma regain its former glory, even if he can't quite stick the landing with a few of them.
- In Love with Your Carnage: A rare heroic and sane example. After winning the Naadam, he breathlessly tells Warrior of Light they were absolutely magnificent (if not a bit terrifying), obviously in awe.
- It's All Junk: Hien realizes this while reminiscing about the past on the eve of the Battle of Doma, and decides he's willing to flood his father's castle to give the Domans a better chance at winning their freedom.
- Leitmotif: He's introduced with a remix of Cyan's theme from Final Fantasy VI, and it serves as a song that shows up around him thereafter. Fitting, considering it was used to represent all of Doma in both VI and XIV.
- Like Brother and Sister: Aside from their master/servant relationship, he seems to be like this with Yugiri.
- Master Swordsman: Fast and skilled enough with his blade to cut a bullet out of the air, and only drawing his sword after it was already fired.
- Modest Royalty: His armor lacks the pomp and flourish one would expect of a prince.
- Mythology Gag: To Final Fantasy VI. But not to Cyan, as might be expected. Rather, his late father Kaien is a reference to Cyan (right down to the name, as the official pronunciation for Cyan is actually Ky-an, (it's a hard C like cayenne pepper)). Hien is a reference to Cyan's son, Shun/Owain.
- Nice Guy: Polite, honorable and friendly, never raises his voice in anger even to his enemies, takes losses (in small contests) with grace and bows to the Warrior of Light in gratitude upon their first meeting.
- Oblivious to Love: He is confused about why the men of the all-male Buduga tribe are so fascinated by watching him do manual labor for them.
- Parental Substitute: He sees Gosetsu as a sort of father figure and was around him ever since he was a child.
- Promoted to Playable; You play as him briefly during the first phase of the fight against Elidibus in 4.56. All you can do is Hold the Line until the Warrior of Light shows up.
- Rightful King Returns: He is the crown prince of Doma and later its ruler after the Scions help the Doman Liberation Front take Yotsuyu down. Following his return, the people of Doma all bow to him in reverence, but he tells them to lift their heads as there is much work to be done.
- Royals Who Actually Do Something: He fights to free his homeland, including on the frontlines if need be. He's even willing to take place in the battle for control of the Steppes if it means gaining some allies.
- Samurai: Was trained since his childhood, often by Gosetsu and with other young samurai. Accordingly, he remarks that Hien's time in the wilderness seems to have sharpened his skills.
- Samurai Ponytail: Sports a nice one, but it looks like he's in need of a brush.
- Shaming the Mob: In the role quest "The Devoted Daughter", a mob formed by Kisei come to Hien and demand that he turn over the returnees from the prisoner exchange to be killed by the Blasphemy Izanami, under the delusion that she is a goddess Balancing Death's Books. Hien flatly refuses and shames them for wanting to kill innocent people who's only "crime" was being Made a Slave by The Empire.
- Ship Tease: He has feelings for Cirina but their duties to their separate people keep them from acting on them. With the Warrior of Light. They bond extremely fast, and become quite close as a result, quite a few of their interactions seemingly bearing romantic subtext.
- Shoot the Dog: He's willing to flood Doma Castle to trap his enemies. As Hien puts it, a castle can be rebuilt, but a civilization can't. Even the Garleans are in shock at how far Hien is willing to go. To a few of them, they're actually impressed.
- Signature Move: "Crush Weapon", where after channeling his aether to coat his katana, Hien swings once and consumes his target in a dark red Pillar of Light.
- Tragic Keepsake: It's unclear whether he kept it but he and the Warrior of Light find a unused, sheathed blade in the ruins of Monzen. He notes that he sparred with the boy who wielded it when they were young and that said boy never had a chance to draw it.
- Universally Beloved Leader: Hien is very much loved by his citizens and pretty much everyone who meets him. His return to Doma is met with instant bows of supplication and respect. None of the Domans save Yotsuyu ever seems to have an unkind word for him. This becomes deconstructed in Endwalker's Physical Ranged DPS Role Quests, where a good number of Domans bear resentment towards him for sparing an amnesiac Yotsuyu back in Patch 4.3, in spite of all the atrocities she's committed against them, leading them to seek solace in the Blasphemy Izanami. Hien is forced to acknowledge how his actions back then hurt his people, and strives to do better.
- Warrior Prince: In addition to being the crown prince of Doma, he is a skilled and accomplished Samurai. He even manages to hold his own against Zenos for a short while in the quests between Stormblood and Shadowbringers.
- The Wise Prince: Honorable and often gives good, heartfelt advice to his companions.
- "X" Marks the Hero: The brave and beloved leader of the Doman Liberation Front has a large X-shaped scar on his right shoulder and over his right eye.
Yugiri Mistwalker
Voiced by: Rina Sato (JP), Paulette Ivory (EN, Los Angeles cast), Sian Blake (EN, London cast), Eleanor Matsuura (EN, London recasting), Marie Zidi (FR), Marianne Graffam (DE)
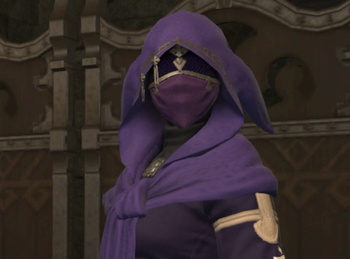

Discipline: Ninja
An Au Ra refugee from the far off Garlean-held nation of Doma, Yugiri arrives in Eorzea with a small fleet of refugees after a failed rebellion saw most of their country burned to the ground in response. She joins the Scions of the Seventh Dawn near the end of the 2.2 quest chain to repay the Scions for helping the Refugees find a new home in Revenant's Toll.
- Ascended Extra: Yugiri was a somewhat important character in A Realm Reborn, but her late inclusion meant she had little time to do much, which was topped off by her being forced to be put aside for most of Heavenward. Come Stormblood, and she's one of the central characters to the entire expansion, and is treated a major character.
- Bodyguarding a Badass: She's the retainer and main confidante to Hien, who's one of the few who can hold his own (however briefly) against Zenos (or an Ascian in his body).
- The Bus Came Back:
- She returned once Ninja became a playable class, to help the newly formed Crystal Braves investigate The Mole in the Immortal Flames. She also pulls a Big Damn Heroes moment in Northern Thanalan when the player confronts said mole.
- The bus comes 'round again in 3.5, with a second re-casting of the character's English actor, after the murder of the first replacement was fully resolved in the British courts.
- Cute Monster Girl: When she loses her mask at the end of 2.55, revealing her face for the first time. Tataru even flat out claims that she's cute looking.
- Draconic Humanoid: She is an Au Ra, a draconic race (in appearance) not common to Eorzea before the refugees from Doma came.
- Dual Wielding: She wields two knives.
- The Faceless: When she first arrives in Eorzea she decides it best to keep her mask on because as far as the Eorzeans are aware, she's the only one of her race, the Au'Ra, on the continent at the time of 2.4; She'd rather not complicate things by weirding people out. The end of 2.55 reveals her without her mask on, showing off the horns and scales on her face. When asked about her mask, she simply says that it was lost during her struggle to help Tataru escape when they were attacked.
- This comes up again in Doma's role quest story in Endwalker. She finds a replacement mask and uses it as a disguise when the two of you visit her home town.
- Guest-Star Party Member: Until returning to Othard to help liberate it, she's all but an official Scion of the Seventh Dawn, and helps out with various and sometimes clandestine missions.
- As of 6.4, she becomes a more traditional version of the trope, joining the player for Duty Support runs of Doma Castle. 6.5 adds The Burn (but not if the player is DPS), and The Ghimlyt Dark (but only if the player is healer).
- Healing Hands: When she aids you in battle, she uses a unique healing Ninjutsu to restore your HP if it's low.
- Honor Before Reason: Well, more like her home country and people before reason. She's already willing to do whatever it takes as a ninja to fight against the Garlean rule of Doma, but the more they cross the line, the more she admits that she's close to just trying to kill everyone responsible despite her usual rationality. This all flies out the window when Zenos returns to Doma, causing her to attempt to assassinate him on impulse with severe repercussions.
- Kung-Fu Wizard: Her She-Fu knife skills come complete with ninja magic as well.
- Ninja: Confirmed to be a master one by the refugees she guards, it was implied she was the only one that escaped Doma, but with the advent of the Ninja class, it's shown that multiple others escaped.
- Offscreen Moment of Awesome: Pulls a Big Damn Heroes to save Tataru when she is attacked by the Crystal Braves at the end of 2.55, helping her become one of the few Scions to come out unscathed by the ordeal. We never get to see it, but she loses her mask in the process.
- O.O.C. Is Serious Business: Yugiri is constantly shown to be a mostly level-headed person who prefers to take her time if possible. When she learns Zenos is in Doma in Stormblood, she becomes desperate enough to try and turn the tide of the Doman Occupation that she ropes the Warrior of Light into trying to assassinate Zenos. It doesn't work.
- Put on a Bus:
- Takes a temporary leave at the end of the 2.2 story quest to teach the Limsans true Ninjutsu instead of the imitation they and Thancred have been using. She returns once the Ninja job is added in 2.4, and she continues to pop up in the story throughout Heavensward, notably coming along with you in Raubahn's rescue and generally playing a part in the segments surrounding Ul'dah.
- She hops back on the bus for the Heavensward patch cycle (3.1-3.4), and there's speculation this may have had something to do with the murder of Sian Blake not long after Heavensward's release. She's most conspicuously absent during the end of 3.4, where all of the major Scions to date - including Krile, who's new to the team, and Alisaie, Yda and Papalymo, who had been missing for some time - vow to re-dedicate themselves to the cause in the wake of Minfilia leaving Eorzea for good. Happily, she does return again in 3.5 and remains for almost the entirety of Stormblood.
- Raven Hair, Ivory Skin: Partly because of her Raen Au Ra heritage, and evident after losing her mask.
- Regenerating Mana: In certain battles where she teams up with you, she'll use Goad on you to boost your TP regeneration if it gets too low.
- Revenge Before Reason: As a shinobi, Yugiri's entire means of dealing with the Garlean threats among others is infiltration and information; she doesn't get as far as she does in the story without these skills and a fair amount of patience. But the moment she sees an opportunity to assassinate Zenos personally, with the help of the Warrior of Light, she takes it with a desperate and impassioned attempt, throwing aside her knowledge and the excess warnings of her comrades who have seen Zenos beat the Warrior of Light and commits to it. The result: they fail utterly, and the Scion presence in Doma becomes known to the empire, losing the heroes their most important advantage. Nice Job Breaking It, Hero.
- Secret A.I. Moves: During the final battle of Stormblood where she, Hien, and Lyse battle Elidibus in Zenos' body, she and two clones of herself all use the Ninja Level 3 Limit Break, Chimatsuri. Naturally, having three Level 3 Limit Breaks go off at once would be far too strong for any Warrior of Light to use in a boss fight.
- She-Fu: As a ninja those sort of skills are to be expected.
- Shipper on Deck: Based on the Chronicles of Light book, Yugiri ships Cirina and Hien hard.
- Undying Loyalty: Yugiri believes in Hien and his vision for a restored Doma free of Garlean occupation to the point of being banished from her homeland of Sui-no-Sato forever. Although she misses her home dearly, she is one of his most loyal and capable retainers.
- You Can't Go Home Again: Yugiri was raised in Sui-no-Sato on the sea floor of the Ruby Sea where it is clear that outsiders are not welcome. As a young girl Yugiri and another child of the village slipped out and had a chance encounter with Hien. His stories of Garlean oppression stuck with her. Certain that the Garleans would come for Sui-no-Sato one day, she returned to the village and tried to convinced everyone of the same, but they'd have none of it. Unsatisfied with this, Yugiri eventually slipped out again to become a shinobi in hopes of gaining the power she needed to defend her home. The Ruby Princess didn't take kindly to the news and forbade her return despite the protests of Yugiri's parents.
Gosetsu Daito
Voiced by: Yosuke Akimoto (JP), Nigel Betts (EN), Thierry Desroses (FR), Bernd Vollbrecht (DE)
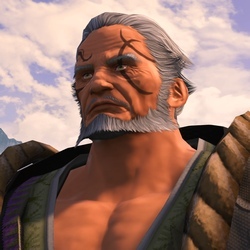
Epithet: Gosetsu Everfall
Discipline: Samurai (Tank), Shugenja (Conjurer, Endwalker)
A Roegadyn Samurai who rowed his way from Doma looking for Yugiri and the Doman refugees that accompanied her.
- The Atoner:
- Gosetsu has been under Imperial thumb for 25 years and under Hien's father lord Kaien, he was served in the Garlean army fighting for their banner until the failed rebellion when the First Emperor died.
- One of the main reasons he is taking care of Tsuyu is because he is aware that Doma had failed Yotsuyu in the past, and that they are just as responsible as the Garleans for causing her to become so twisted.
- Because Destiny Says So: Gosetsu is a deeply religious man who believes in the guidance of the kami. He believes that if something happens, the kami have ordained it for a reason. He protects the amnesiac Yotsuyu, treating her as he would his own daughter, after they both survive the collapse of Doma Castle because of this. When she perishes at Castrum Fluminis, Gosetsu hunches over and breaks down over why the kami would decree this to happen.
- Big Damn Heroes: During the final battle of Endwalker's Ranged DPS Role Quest, when Izanami threatens to overwhelm the Warrior of Light, Hien and Yugiri, Gosetsu rushes in and turns the tide with his newly learned White Magic.
- Big Fun: Absolutely massive and tends to make sure his presence is known.
- Blood from the Mouth: After Yotsuyu shoots him. Despite the implications otherwise (the situation looked grim enough even without the gunshots), he survives.
- Book Ends: Is introduced to the story bemoaning how his empty stomach seems a trifling concern next to the gravity of matters at hand. He similarly closes out the 4.0 Story complaining of how anti-climactic it is that hunger is his main concern after surviving his Heroic Sacrifice.
- Bruiser with a Soft Center: Gosetsu may be a bold and boisterous samurai, but he's also a deeply compassionate man with absolute loyalty to his liege and country. When Yotsuyu loses her memories and reverts to an innocent, amnesiac girl, Gosetsu cares for her as though she were his own child, even selling his prized sword for the sake of getting money to secure passage for them back to Doma and let her indulge her love of dango. He weeps upon Yotsuyu's death despite the atrocities she commited against his people and is the only one to do so.
- Captured on Purpose: When Yotsuyu threatens to kill a pair of old villagers, Goestsu offers himself in their place and lets himself be captured. It was all a ruse to buy the Warrior of Light and their companions some time to undermine the Empire's operations in the Ruby Sea while Goestsu himself tries to learn of Yotsuyu's plans.
- Death Seeker: In an unguarded moment, he admits to feeling ashamed he survived what he sees as his unforgivable failures and that he's considered killing himself to atone. It's further implied he seeks a honorable death in service to his lord to escape that shame.
- Deliberate Values Dissonance: When you first meet the Dotharl, Gosetsu is horrified at their lack of Due to the Dead due their particular beliefs in reincarnation and idea that a corpse is just a corpse, and that they'll just dump the body of a fallen tribesman into the desert for the scavengers. When the reincarnation ideals are better explained to him, he openly insults them (though mostly due to a failure to understand, having come from a society that values honor and remembrance) and gets glared out by every member of the tribe (and given the Dotharl's nature, he's lucky they didn't attack him for it).
- Dented Iron: Unfortunately, the events of Stormblood push his ridiculous toughness beyond its limit. He survives being shot repeatedly and being trapped inside the collapsing Doma Castle - which leads to him (and Yotsuyu) being washed out to sea and eventually turning up on a deserted island. When the Scions catch up with him in 4.2, however, it's clear that the ordeal has left Gosetsu badly weakened, and it seems unlikely he'll ever be able to return to his duties as a samurai of Doma. By the end of 4.3's main story quests, he gives up his position altogether to spend his remaining days Walking the Earth.
- Discard and Draw: During the Endwalker role quests that take place in Doma, it's revealed that during his pilgrimage, he learned a form of conjury through his ascetic training, possibly geomancy like Kyokuho from the Astrologian job quests. While he can no longer fight with a katana as he was once able to, Gosetsu's new healing magic turns the tide in the fight against Izanami.
- Establishing Character Moment: The man crosses the stormy seas in a rowboat, pulls into Vesper Bay, asks a nearby dock worker if he's in Eorzea (terrifying the poor man with his Large Ham mannerisms), then muses that he hadn't eaten once the entire trip, shrugs it off and takes a step forward... and promptly passes out, face first, from the exhaustion and hunger. A perfect sign that this guy is quite a bit more than eccentric... and it doesn't devalue him being a badass in the least.
- Guest-Star Party Member: As of 6.4, he joins for Bardam's Mettle and Doma Castle... as the player's tank if they're on anything else. Much like how Haurchefant and Aymeric could be DPS-spec'd Gladiators, he's a Tank-spec'd Samurai.
- Heroic Sacrifice: At the end of the attack on Doma Castle with Yotsuyu defeated and the castle coming down around them Gosetsu catches a massive piece of ceiling to prevent it from crushing everyone. As he bids them to escape Yotsuyu grabs her gun and shoots wildly, running out of ammo, but shooting Gosetsu in the process. After everyone escapes the last of his strength leaves him and he and Yotsuyu are presumed crushed to death by the ceiling. Ultimately subverted as they both survive.
- Important Haircut: After Yotsuyu's death, Gosetsu shaves his head bald to formally retire as a samurai and begin his journey of prayer for the fallen.
- Large Ham: His boisterous presence is matched only by the complete lack of volume control in his voice and hamminess in which his lines are delivered.
- Load-Bearing Hero: Is left behind holding up Doma Castle's collapsing roof so the WoL and company can escape. He survives, thanks to the collapse sending him and Yotsuyu into a river to get swept away from the carnage.
- Made of Iron:
- This man crossed rough seas and thousands of malms, constantly rowing without rest or food, and the first thing he does is carry on a several minute long boisterous conversation with a local about his purpose there, pauses long enough to note his hunger as though he's merely forgotten to have lunch between breakfast and dinner. And its only after he attempts to take a few more steps does he finally pass out, only to be back on his feet in mere hours after a bit of rest and food courtesy of Urianger and the Scions residing at the Waking Sands location, and immediately setting off for Mor Dhona. The man is on the Manderville tier of sheer endurance and strength.
- It is taken to ridiculous extremes in the end of 4.0, where he manages to hold up a collapsing ceiling for several minutes even after Yotsuyu shot him several times. And he still lives after that, though not without lasting damage. But the fact he survived at all is a testament to how insanely durable he is.
- Taken to a logical conclusion as of Patch 6.4. As noted above, Gosetsu is the tank for Bardam's Mettle and Doma Castle if the player is anything else.
- Master Swordsman: He is one of the finest swordsmen Doma has to offer, defeating ten of the Sekiseigumi's best in a row.
- My Greatest Failure: The night before the attack on Doma Castle, Gosetsu confides in Hien and the Warrior of Light the two greatest failures he's suffered in his life. The first being when their nation was conquered by the Empire and the second being the failed rebellion during Garlemald's war of succession. Both times, Gosetsu considered taking his own life to atone for the shame.
- Non-Standard Character Design: Despite being a Roegadyn Gosetsu lacks the species' characteristic square nose or eyes, and his skin color is closer to stereotypically human than we're used to from Roegadyn. When he was first introduced it led to questions if he was a Half-Human Hybrid of Hyur and Roegadyn, but
 Word of God stepped in before Stormblood launched to confirm that he just looks different because Othard Roegadyn are of their own clan with their own characteristics.
 - No Indoor Voice: Gosetsu tends to shout and all around be a boisterous person.
- Not What It Looks Like: While the Scions are visiting Gosetsu, Tsuyu comes in and tells him to take off his clothes. Alisaie is quick to accuse Gosetsu of sleeping with an amnesiac Yotsuyu, which he strongly denies. Tsuyu then innocently clarifies that she needs to wash the bedridden Gosetsu because he stinks, causing the twins to laugh.
- Outliving One's Offspring: Gosetsu once had a wife and daughter he loved dearly, but outlived both of them as they died while he was serving out his conscription in the Garlean army. One of the reasons that Gosetsu is so protective of the amnesiac Yotsuyu is how her child-like Amnesiac Dissonance reminds him of the daugher he lost.
- Samurai: Gosetsu is a high-ranking samurai of Doma loyal to Hien.
- Secretly Dying: Hien theorizes that due to all the battles he's been through, as well as his age, his health is quickly getting worse, and wants him to spend his last days along Yotsuyu.
- Stepford Smiler: For all his boasting and jovial exterior, Gosetsu is a deeply scared man physically and emotionally. He outlived his wife and daughter, who died while he was serving out his conscription in the Garlean army. He was helpless as his liege was killed by Zenos and watched Hien nearly die while trying to protect him. He sobs uncontrollably while deep in his cups the night before the raid on Doma Castle. The Chronicles of Light anthology reveals that Gosetsu has some Death Seeker tendencies, as he wishes to be reunited with his wife and daughter. He's even frustrated and angry when he's saved from death by a good samaritan after dreaming of his wife, daughter, and Tsuyu waiting for him in the afterlife.
- Submissive Badass: As good a warrior as he is, Gosetsu follows the order of his lord and master Hien. Even if Gosetsu disagrees with Hien's proposals at first, he'll still do what Hien wants, because honor demands it.
- Sympathy for the Devil: In 4.2 and later, he is seen taking care of an amnesia riddled Yotsuyu since her new self reminds him of his daughter while also feeling sympathy for the hell that Yotsuyu went through when she was growing up. Even after Yotsuyu regains her old personality and summoned a primal, Gosetsu still shows her sympathy after her death.
- Unwitting Instigator of Doom:
- His request of a persimmon instead of gruel while he's recovering in 4.3 causes the amnesiac Yotsuyu to wander off to Namai in search of one. Given the people's fear and hatred of her, this goes about as one would expect and partly accelerates the return of her memories.
- Inverted. He unknowingly mitigates a boss mechanic in the 4.3 story trial by showing unconditional kindness to "Tsuyu" during her bout of amnesia. The care and affection he showed Yotsuyu caused her to subconsciously manifest a phantom image of him to defend her from the image of Zenos she was using to tap into The Power of Hate. This gives the Warrior of Light and their party time to strike down this phantom Zenos, neutering the power of her Nightbloom attack.
- You Remind Me of X: The main reason Gosetsu becomes attached to Yotsuyu in 4.2 is because she reminds him of his deceased daughter. When Yotsuyu herself dies in 4.3, Gosetsu becomes incredibly distraught.
- Wandering the Earth: After 4.3 he shaves his head and announces his intention to wander the land offering his prayers to the fallen.
Yotsuyu goe Brutus
Voiced by: Shizuka Itō (JP), Naoko Mori (EN), Sabrina Marchese (FR), Yesim Meisheit (DE)

Epithet: Orphan of the Naeuri,
Widow of Sashihai, the Witch of Doma
The Acting Imperial Viceroy of Othard after the Garlean conquest of Doma. Despite her beautiful, regal and stoic appearance, Yotsuyu is a cruel, merciless tyrant who often abuses her authority to commit horrible atrocities against the Doman people under the guise of squelching rebellions because of her deep burning hatred for them, despite being Doman herself.
- Alas, Poor Villain: Despite all that she's done, the protagonist expresses sorrow at her death in 4.3. She even asks why they are sad, as the "Witch of Doma" is finally dead, then wonders if Gosetsu found the persimmon she gave him to be sweet before dying.
- Abusive Parents: After her biological parents died, she was left in the care of relatives who treated her poorly; her adoptive mother, in particular, abused her horribly until she was of age to be betrothed (to an older man who was a mean drunk) and sent to a brothel after becoming widowed. When Asahi brought his parents to Doma to restore Yotsuyu's memories after she is stricken with amnesia, her adoptive mother is quick to berate her again before her father suggests selling her back into sexual servitude...shortly before Yotsuyu buries a dagger in them.
- Amnesiac Dissonance: After losing her memories, Yotsuyu's psyche reverts to that of a sweet and naive child attached to Gosetsu at the hip. This stuns everyone when they meet her again, as she bears no resemblance to the sadistic, conniving tyrant they met earlier. When Yotsuyu has flashbacks to how she cruelly mistreated the Yanxia villagers as they confront her, she begs their forgiveness for what she vaguely remembers doing even though she doesn't have the full context of those memories.
- Bad Guys Do the Dirty Work: Downplayed. After Asahi sas Brutus taunts the Warrior of Light for being unable to kill him due to him being an emissary of peace, the Warrior of Light slowly walks towards him with a look of anger on his/her face... And then, after having shot Yotsuyu for channeling the primal Tsukuyomi and then kicking her while she's down for good measure, she runs him through with Tsukuyomi's swords.
- Because You Were Nice to Me: Yotsuyu is dumbstruck by the kindness Gosetsu showed to her after she regains her memories, believing herself unworthy of it after everything she's done to him. She's very nearly Driven to Suicide over it, only for her abusive foster parents to mash her Trauma Button, completely restoring Yotsuyu's memories and driving her to murder them. She then decides to commit Suicide by Cop by transforming herself into the primal Tsukuyomi to force the Warrior of Light to kill her, but not before killing Asahi as well.
- Berserk Button: The very idea of being made to kneel and grovel again is enough to send her into a rage.
- Beyond Redemption: The heroes largely feel this way about her for her sadism and wanton cruelty toward Doma, storming Doma Castle with the intent of either capturing or killing her. But Gosetsu says otherwise when he and Yotsuyu survive the collapse of the castle, believing that the kami must have spared them for a reason. But Yotsuyu does this to herself once she regains her memories after Gosetsu's kindness gives her a My God, What Have I Done? moment, going out via Suicide by Cop against the Warrior of Light.
- Boomerang Bigot: She's particularly cruel and hateful to Domans for her apparently petty sadism grounded upon her Freudian Excuse, despite being Doman herself. It is later revealed that her Freudian Excuse is well-grounded, since her adoptive family was every bit as abusive as she claims, marrying her off to an abusive rich drunk and then selling her to a brothel after she became a widow. The owner of the brothel she was sent to by her father knew she was a broken victim who shouldn't have been in such a position, but she attracted so many customers that he prostituted her anyway despite her lack of consent, with nobody ever so much as lending her a hand out of the miserable life she went through. One can understand why she has no love for her fellow countrymen, especially once the rebellion recruited her as an expendable spy asset to service Garleans for information.
- Broken Tears: With her reign ended and her final scheme thwarted, a wounded Yotsuyu can only lie on the floor and weep as Doma Castle crumbles around her.
- Bulletproof Vest: Her kimono hides in it a layer of Garlean carbon fiber, incredibly durable by modern armor standards. This extra layer of protection is what saved her life when Hien seemingly cut her down.
- The Dog Bites Back:
- The first people she kills upon regaining her memories in 4.3 are her Abusive Parents. Considering how they provided the very upbringing that turned Yotsuyu into the ruthless sadist she is now and were at that very moment railing about her getting them moved back to Doma, with her adoptive father musing about selling her into sex slavery again, to her face, they completely and utterly deserved it. It's quite telling how absolutely no one shows any form of sympathy toward their deaths, with Hien only musing how willing Asahi was to throw their lives away.
- She was turned into a primal through the Kojin mirror and crystal troves provided by Asahi, who had intended to sacrifice her in a Xanatos Gambit to reignite the conflict with Doma on Elidibus's behalf. She proceeds to out-gambit Asahi by keeping the last of her strength to skewer him with Tsukuyomi's swords.
- Don't You Dare Pity Me!: She backhands Grynewaht in a rage for daring to show concern after she was manhandled and threatened by Zenos.
- Driven to Suicide:
- She attempts to commit jigai when she regains her memories, rather then face Gosetsu, who has every right to hate her for what she did to him. The presence of her foster parents not only stops her from going through with it but reignites all her original hatred.
- Note that despite apparently reclaiming her evil nature, Yotsuyu notes over the course of her battle with the Warrior of Light, as the tide turns against her, that her defeat was inevitable, as another failure in her wretched life. Or consider that she willingly becomes a primal, to provoke and face off against a being with an incredible track record as a primal slayer. Though Yotsuyu makes overtures of rejoining Garlemald and damning Doma once more, her actions also have strong overtones of a Suicide by Cop via the Warrior of Light.
- Dying as Yourself: She reverts back to her human form after being defeated as a primal, dying moments later.
- Dying Moment of Awesome: She catches Asahi off guard and impales him with Tsukuyomi's swords, excruciatingly lifting him into the air with them while taunting him for granting her "the gift of vengeance", and says this to Asahi, before they both die.Yotsuyu: These people... our people... they ignore the corruption that festers beneath the surface. Cast aside that which is dirty and broken. Speak not of things which would disrupt their dreary little lives. Like you, Asahi... Always pretending not to see... You were the first... The first I swore to kill.
[Asahi coughs up blood, which lands on Yotsuyu's palm as she continues holding Asahi in the air above her with Tsukuyomi's swords]
Yotsuyu: Ahhh... Such bliss. I had thought my hunger insatiable... but now... now I am satisfied. You should feel honored, dear brother. I saved the last of my strength just... for you. - Empty Eyes: She had these before being sold into the brothel and afterward, the former brothel owner remarked that it attracted even more clients to her than otherwise.
- Establishing Character Moment: Like Zenos, her first introduction establishes her cruelty. After getting a villager to swear loyalty to Garlemald, she has him kill one of his fellow villagers suspected of a crime. Once he does, she orders him to kill his parents for being too old to work. He turns on her and is gunned down before he can shoot, Yotsuyu casually picks up the pistol and contemplates killing the parents herself. Only the arrival of Gosetsu prevents their deaths.
- Everyone Has Standards: After her memories come back in 4.3, she's about to slit her own throat after realizing that for all of Gosetsu's kindness, she has done horrible things and made everyone suffer, considering herself undeserving of redemption. Unfortunately for everyone involved, her parents take this time to show up again and proceed to harass her all over, resulting in her murdering them and being driven to become a primal.
- Evil Is Hammy: When showing her colors as the "Witch of Doma", Yotsuyu hams it up to the extreme as she rants and raves about her hatred for Doma and her desire to crush it under her heel. She's especially hammy just before summoning a primal into herself to become Tsukuyomi, Lady of the Moon.Yotsuyu: [to Hien] You and your people are MINE to govern, MINE to PUNISH!
- Face of an Angel, Mind of a Demon: Yotsuyu is a very beautiful and elegant woman. She's also an incredibly cruel and sadistic tyrant.
- Foil: She is one to Fordola. Both are women who have sided with Garlemald against their home countries due to the mistreatment they received from their countrymen. Both are The Dreaded in their respective homelands. Both are the Arc Villain of their respective land. Both come to regret their actions after specific events occur (Fordola is forced to shell a battlefield that killed not only enemies but her own men, including her best friends. With the power of her artificial Echo, she sees the Warrior of Light's past and is dumbstruck by the fact that they aren't broken after everything they've experienced. Yotsuyu is nursed back to health by a mortal enemy whom she tortured and tormented. However, they differ in that while Fordola wants to drag Ala Mhigo kicking and screaming into what she believes will be greatness and prosperity under Garlean rule, Yotsuyu simply wishes to see Doma burn to the ground. And while Fordola ultimately performs a Heel–Face Turn and begins to serve as a weapon against primals with her artificial Echo (admittedly as a Boxed Crook), Yotsuyu feels that she has done far too much to be redeemed and commits Suicide by Cop against the Warrior of Light.
- Freudian Excuse:
- Her reason for being extremely ruthless and a sadist is due to her upbringing in her childhood. After becoming an orphan, Yotsuyu was made to labor in the fields by her Evil Aunt and denied an education. As a young woman, her adoptive parents married her off to an abusive drunk who beat her constantly solely for the dowry he could provide. When her husband died, she was taken away again to work off his debts at a pleasure house. Then she was used by the Doman Liberation Front as an expendable spy to glean info from the Garleans she serviced. After surviving an assassination attempt intended for Zenos, she snaps and decides to escape her past life and exact revenge on those who wronged her by becoming a double agent. Despite this, the sheer scale of her atrocities committed upon the Doman people makes it hard for the protagonists to sympathize with her.
- Even so, they can't help but be angry when they find the brothel owner that she was sold to and he explains he knew that she wasn't fit for the profession but that, despite lacking her consent, men would flock for the chance due to how beautiful and soullessly doll-like she was.
- Freudian Excuse Is No Excuse: When Hien learns of her past, he makes it clear he understands her grievances with Doma and that it failed her. However, he also bluntly states it does not justify her actions and her horrible treatment of the Doman people during the Garlean occupation. As a result, he agrees that if she never regains her memories, he'll spare her life since she is no longer the monster she was, but that if she does regain them and shows no remorse, he will kill her.
- Go Out with a Smile: She passes away in the middle of 4.3 with a smile on her face, having finally satisfied her thirst for vengeance after killing Asahi.
- Good Smoking, Evil Smoking: The tyrant of Doma smokes from a long, ornate pipe. It's also a part of her primal mechanic where she'll exhale smoke from her pipe and the party has to destroy them before they combine and cause heavy damage to the whole party.
- Heel–Face Door-Slam: Just as she looks like she may live life as Tsuyu, Asahi manipulates her back into evil and dies in the following hours after a vicious battle with the Warrior of Light, but not before she finally kills her parents and Asahi for being the ultimate cause of her suffering. With her vengeance sated she dies content.
- He's Back!: A villainous example, after regaining her memory and agreeing to Asahi's plan she announces her intent to destroy Doma loudly and proudly in her old kimono.
- Hime Cut: The classically Japanese beauty Yotsuyu has the haircut to match her appeal.
- I Need a Freaking Drink: Yotsuyu's opinion on visiting a Doman fishing village, calling it squalor under her breath.
- It's All About Me: Given the decrepit state of Doma by the time the Scions arrive to assist the Doman Liberation Front, it's clear that Yotsuyu cares about nothing but her own amusement in tormenting the helpless citizens under her heel. When the attack to re-take Doma Castle begins, her words heavily imply she thinks the entire Doman rebellion is aimed at making her suffer.
- It's Personal: Her animosity is aimed at Domans and Domans alone. After having Grynewaht execute some Kojin, she remarks that killing ten thousand Kojin won't satisfy her sadistic urges as much as a single Doman.
- I've Come Too Far: During the final battle with her, even though Gosetsu would protect her after all she's done, she feels she has fallen too far for redemption and continues to fight a battle against the Warrior of Light she is sure she will die in.
- Locked into Strangeness: After being defeated as Tsukuyomi and returning to her human form, her hair briefly turns completely white. It turns back to black when she finally dies.
- Misplaced Retribution:
- She vents the fury and sadism born of her awful life on Domans, and any Doman will do. It's never enough, however, and she indicates she has every intention to keep killing and torturing until there are no Domans left. When she actually gets around to killing the people responsible for her terrible circumstances (i.e. her parents and brother) she admits she's satisfied and dies shortly after happy.
- A minor moment is after Zenos painfully reprimands her for her failure in handling Doma, she slaps Grynewaht out of frustration.
- Motive Rant: When she's finally captured after the Warrior of Light sieges Doma Castle, Yotsuyu reveals her backstory; unloved and sold away by her family twice—first to a drunken, abusive husband, then to a pleasure house—she came to despise Doma for what she sees as it turning its back on her, and upon rising up within the Garlean Empire as a spy and seeing a crying, injured Doman lying on the road, she found herself delighted by the sight, and so resolved to crush Doma and its people so she could keep feeling that rush.
- My God, What Have I Done?: When her memories come back to her, she remembers all the horrible things she had done to her people and decides to kill herself out of shame. Subverted when her parents show up and start treating her like garbage again, which causes her old personallity to come back in full force and decides to become the very monster everyone made her out to be and starts off by killing her parents in cold blood.
- Non-Action Big Bad: While she is not afraid to get her hands dirty such as threatening to kill a pair of old villagers with a gun or stomping on Gosetsu's head, she doesn't do a whole lot herself since she has her soldiers do the heavy work. But, given the chance she's all to happy to put a bullet between her foes eyes herself. Yotsuyu eventually takes much more action in 4.3 by transforming into the primal, Tsukuyomi.
- One-Winged Angel: She transforms into the primal Tsukuyomi, using the supply of crystals Asahi hid in Castrum Fluminis.
- Pimping the Offspring: Yotsuyu was the victim of this at the hands of her abusive stepparents, her aunt and uncle. At an early age, she was married off to a drunkard named Sashihai who physically and sexually abused her in exchange for a dowry. When he died, Yotsuyu's aunt and uncle sold her to a brothel, where she was forced to service men against her will until she was left a Broken Bird. The first thing Yotsuyu's stepparents talk about when they see her again for the first time in years is how much money they could make selling her back into sex slavery. Small wonder that she murders them soon afterward.
- The Quisling: She is a Doman woman who had signed on as a spy for its Garlean conquerors and has even taken to using her adoptive brother's Garlean surname Brutus over their traditional Doman name Naeuri.
- Red and Black and Evil All Over: Her kimono is primarily black with red trimming.
- Red Baron: She's known as the Witch of Doma for her relentless cruelty and tyranny as the country's acting viceroy under Garlean rule.
- Red Spider Lilies of Mourning: Yotsuyu is strongly associated with spider lilies. She tortures Doman citizens and is willing to force a man to kill his friend and then his parents for nothing but her own amusement. She wears a spider lily in her hair and her kimono is the same blood red color of the red spider lily. After transforming into the primal Tsukuyomi, her signature attack is "Nightbloom", which conjures a field of red spider lilies that all explode with the power of her hatred. As it becomes clear that she will die in battle against the Warrior of Light, she mutters that a flower will bloom on the site of her demise.
- Redemption Equals Death:
- By killing Asahi in her final moments Yotsuyu ultimately torpedos the plans of her brother and Elidibus to reignite the conflict between Garlemald and Doma, sparing her countrymen another bloody war.
- According to Yoshi-P, this was also ultimately why Yotsuyu survived; it was Yotsuyu who was meant to be redeemed in the end not Tsuyu, and Gosetsu's role was to bring this to fruition. Despite dying she dies finally knowing the kindness of other people which had eluded her for her entire life, and in the end dies with her lust for vengeance ended while thinking of Gosetsu.
- Roaring Rampage of Revenge: This fuels her destruction of her own homeland. She feels she lost everything because of her own country and its government, and she seemingly won't be satisfied until Doma has been well and truly annihilated.
- Sadist: The pain and death of Domans is more or less all Yotsuyu lives for. Oddly enough, this applies exclusively to the people of Doma; when she has a trio of Kojin executed for desertion, she finds herself frustratingly unfulfilled by the sight. It ends up that this was mostly Guilt by Association towards the cruelty she faced over the course of her life, when she kills her parents and her brother, she says aloud that she's finally, truly satisfied before letting herself pass on.Yotsuyu: No...no, it's no good. There's just no joy in it. No release. There needs to be some investment. They were negligent imbeciles deserving of punishment, but it was hardly personal. Ten thousand such Kojin could not satisfy me half so well as a single Doman.
- Sex Slave: She was sold into a brothel after her husband's death to pay off his debts, where she was consistently taken by other men despite clearly not being okay with it. His father musing about the thought of selling her to the brothel again was the final straw that reignited her memories.
- Slasher Smile: She makes a particularly wicked smile after she shoots Gosetsu in the back in Doma Castle, hoping to take everyone out with her as the ceiling collapses.
- So Beautiful, It's a Curse: The brothel owner might very well have shown pity on her if she wasn't attracting so much business with her beauty.
- Spanner in the Works: Towards Zenos, very unwittingly. He wanted to incite rebellion among the Doman just so he can find someone strong enough to fight. Though he gets a worthy opponent with the Warrior of Light, he makes it quite clear that she messed up with her petty sadism, reducing Doma to such a state that prior to the Warrior of Light there was no one in Doma that could put up said fight.
- Start of Darkness: Her highly painful upbringing set the stage, but Yotsuyu attributes a specific moment for turning her into the monster she became. It was when she happened upon a badly beaten Doman on the side of the road and felt a rush of exhiliartion at seeing his suffering. This is what awoke her sadistic tendencies and all the horrors that followed.
- Suicide by Cop: It's clear that she enters the battle with the Warrior of Light fully expecting to die. It's hammered home even harder after she has a vision of Gosetsu protecting her from Zenos.Gosetsu: You must survive Tsuyu! The kami spared us, and we cannot repay that boon with death!
Yotsuyu: Perhaps... But it is too late for me. There can be no redemption. A nightbloom shall flower here upon the site of my demise... - Sympathetic Murderer: While she's treated as anything but sympathetic for her cruelty to Doma, Yotsuyu's murder of her Abusive Parents shortly after Asahi is treated is in a much more positive light. Considering that her stepparents immediately jump to the idea of selling her back into sex slavery, no one mourns what happens to them. Asahi doesn't think twice about forcing them to see Yotsuyu, knowing full well that Yotsuyu will snap and kill his parents.
- Taking You with Me: Rigs Doma Castle to collapse upon its successful capture—with her still inside—and tries to kill Hien personally. When Hien cuts her down and Gosetsu attempts to hold up the ceiling so Hien, Yugiri, and the Warrior of Light can escape, she shoots him multiple times to ensure he goes down with her. In an extremely rare take on this trope, both of them end up surviving the attempt, albeit stranded on a deserted island.
- Played straight in 4.3, when she saves the last of her strength to kill Asahi after he gunned her down and started beating her to death.
- Then Let Me Be Evil: Even though she had reformed due to her time with Gosetsu even after her memories returned, being put face to face with her abusive parents causes her hatred for Doma to return, bringing her back to her old vindictive personality. A more fatalistic example occurs later during her boss fight. She knows Gosetsu feels there is redemption for her, but she believes she is too far gone and throws herself into a suicidal battle against the Warrior of Light.Yotsuyu: To the very depths I have sunk, my soul steeped in spite and rotten to the core. The self-righteous hide behind "justice". I need no such mask.
- Trademark Favorite Food: As an amnesiac, Yotsuyu shows a great fondness for dango. Gosetsu is dismayed by this fact, because she keeps spending what little money they have to their names on sweets. While Hien explains Tsuyu's condition to Asahi, he quips that she spends her days dreaming of dango.
- Tragic Villain:
- At the end of the day, this is what she is; her life was one incident after another of things out of her control, the death of her mother, adoption by her extremely abusive step-family, being sold to an abusive drunken husband, then ending up at a brothel where she was used like currency, all before she was in her 20s. When she was recruited as an expendable spy by the rebellion to service Garleans for information, joining the empire as a double agent started as less of a matter of revenge and more as just a matter of survival and to be somewhere she could belong, which still backfired as her nightmares as Tsukuyomi suggested that the Garleans were just as cruel to her, so she decided to be cruel right back.
- Even after getting amnesia and nearly getting a fresh start as Tsuyu, the machinations of her own brother result in her regaining her memories and contemplating suicide, and an extra dose of cruelty from her adoptive parents sends her into Then Let Me Be Evil, killing them and turning into a primal, who is slain by the Warrior of Light because her echoes of Gosetsu's kindness keeps her from amassing the power to strike them down, indicating the outcome was actually exactly what she wanted. After everything, and her lost second chances, even characters who suffered so much during her stint as the Witch of Doma mourn her passing.
- Trauma-Induced Amnesia: The end of 4.1 shows her losing her memory and acting like a child to Gosetsu's dismay. It's implied that the culmination of the lifelong trauma she has endured since her childhood and the head wound she suffered in the collapse of Doma Castle reverted her mind to her younger self.
- The Unfought: She is never fought since she has her lackeys do the bulk of the work until 4.3, where she transforms into the primal Tsukuyomi and is fought as a trial boss.
- Vocal Dissonance:
- In the English localization, Naoko Mori gives Yotsuyu a broad vocal range in her performance. Yotsuyu can go from speaking with a prim and proper voice to breathy and sultry to coarse and guttural all in the span of a single conversation, reflecting the many faces she's worn in the past from acting viceroy to seductress to the "Witch of Doma".
- Yotsuyu speaks in a higher, more child-like voice to illustrate her Amnesiac Dissonance from a cruel ruler to a sweet maiden. Her voice drops back to her original deeper and sultry tone after she regains her memories and decides to embrace her cruelty once again.
Epithet: Hakuro Whitefang, Hakuro the White
Discipline: Samurai
A Lupin Samurai of Doma, forced to serve in the Garlean military as Centurion of the Ferae Domitae - a unit consisting entirely of Lupin. After facing the Warrior of Light at the battle of Ala Mhigo, he is convinced to switch sides and rejoins Lord Hien in Doma.
- Beast Man: Hakuro is a Lupin, humanoid wolves hailing from Doma.
- Large and in Charge: Hakuro is huge and towers over his fellow Lupin soldiers, clearly showing who is the alpha of the pack.
- Might Makes Right: He initially doesn't believe you when told Hien is alive and Doma is freed, and is only convinced after you manage to beat him in combat.
- Mook–Face Turn: After the Warrior of Light and Alphinaud convince him and his soldiers that Doma is freed, they all switch sides to help the Eorzean Alliance win the battle for Ala Mhigo.
- Samurai: Hakuro is a fierce samurai of Doma and when convinced Hien is still alive, switches sides and loyally rejoins his lord.
Hingashi
- Civil War: The "Age of Blood" was a massive civil war between warring clans of Hingashi for supremacy over the island nation. The events are vividly remembered and recorded in history as a bloody, gruesome conflict that lasted six hundred years.note The Age of Blood was so horrible that the majority of Hingan citizens are content to live under the corrupt, decadent bakufu if it means avoiding yet another civil war.
- Disproportionate Retribution: Hingan culture dictates that the family and loved ones of major criminals are equally culpable, regardless of whether or not the perpetrator's family had anything to do with it. In the Samurai questline, Ugetsu's entire family is sentenced to death for his actions as a violent revolutionary conspiring to overthrow the bakufu. His teacher, Kogarashi, is ordered to commit seppuku but couldn't bring himself to do it and fled to Eorzea in search of a pupil to help right these wrongs under his real name, Musosai.
- Expy: Kugane is policed by the Sekiseigumi, a blatant send-up to The Shinsengumi who wear red instead of blue. As enforcers of the bakufu's will, they have the ability to extrajudicially execute any threats to the peace, with Hancock joking about the time he once saw a member of the Sekiseigumi cut a man in half right in front of him.
- Fantasy Counterpart Culture: Hingashi like Doma is based on Japan, but Hingashi itself takes queues from the Tokugawa Shogunate's strict isolation policy with the exception of Kugane which more resembles the clash of traditional Japanese culture with western influence that the Meiji Restoration brought.
- Greater-Scope Villain: In the Samurai DOW questline, it's revealed that the bakufu that governs Hingashi is incredibly corrupt, decadent and oppressive. The Big Bad of that questline Ugetsu committed acts of murder, treason and subterfuge to overthrow them, and several others joined his ranks with their own personal tales of being oppressed, from simply being stuck in a rigid caste system or watching their families be murdered or worse for unjust reasons. Even people loyal to the government, like Makoto and Musosai, agree with how corrupt it's become but refuse to overthrow it because it would result in another violent Age of Blood. She does, however, state that she and her men will work on changing things from the inside, although she admits that this may take several generations to pan out.
- The Spook: As a nation, not much of its origins are known. Historians have not found any evidence of Allagan occupation.
- Port Town: Kugane is a famous and wealthy one that connects Othard to the west.
- Wutai: Compared to Doma, which has strong Chinese influences in its design resembling the Nara-era period of Japan, Hingashi much more strongly resembles the post-Sengoku era of Japan under the Tokugawa shogunate. Its borders are highly restricted outside of a thriving trade city and is ruled by a corrupt bakufu with vast power as the only thing keeping the country from descending back into a horrible Civil War.
Hancock Fitzgerald
Voiced by: Masato Ishihara (JP), Ciarán Owens (EN), Thierry Kazazian (FR), Adam Nümm (DE)
An Ul'dahn man who has come to live in Kugane, representing Lolorito's East Aldenard Trading Company. He gives the Scions their base in the Ruby Bazaar during their stay in the city.
- Creepy Good: His dark sense of humor and offputting demeanor put the Scions on edge around him for a long time. Despite this, he continues to help them and even provides aid when he isn't asked, such as when he helps the Warrior complete a wild goose chase for a painfully rare and expensive bottle of wine at no benefit to himself.
- Dark and Troubled Past: He was born dirt poor in the money-obsessed Ul'dah and had to survive with nothing but his intellect. His fortunes changed when Lolorito heard of said intellect and tested him for a job, which is what eventually led him to Kugane.
- A Day in the Limelight: He hires the Warrior of Light to be his bodyguard in exploring and clearing out the Mount Rokkon Variant Dungeon in 6.45. In addition to providing commentary and exposition, the journal entries that accompany the end of each route shed light on Hancock's own history, such as his journey from Rags to Riches.
- Enlightened Self-Interest: Hancock is genuinely nice and helpful, but it's also clear that he's equally motivated by the opportunity to make more money due to his position as a powerful merchant in the East Aldenard Trading Company. By bankrolling the Scions' stay in Kugane as per Lolorito's orders, Hancock is able to make connections with the leaders of the Confederacy and Doma, opening previously closed markets and access to goods like the pearls at the bottom of the Ruby Sea.
- Friendship Moment: Has one with the Warrior of Light if they complete all twelve routes of Mount Rokkon. He takes his glasses off and confides in them his overall thoughts on Gorai's corruption and their similar pasts, as well his dream of collecting priceless treasures to share with the world. He himself notes he never opens up this much, but feels comfortable doing so with the Warrior of Light.
- Gagging on Your Words: In the quest "In Bad Taste", the Warrior of Light is cross to learn that the bottle of Suhd Viandja Rosé they hopped continents to get is nowhere near as valuable as the Wandering Dramaturge said it is. Not to mention that Hancock knew this and still made them counterfeit a bottle of Dalmascan Red to barter with Gegeruju. Hancock apologizes by offering a bottle of actual Dalmascan Red for free, but gags when he actually tries to say it.Hancock: Now take this bottle and consider it my apo-apolo-polo- Ahem! And consider it the last you'll get from me.
- Laughing at Your Own Jokes: He finds a dark joke he makes about a man he saw get cut in half by the Sekiseigumi hilarious, laughing his head off and slapping his knees even as the Scions look on in horror at his ability to make light of such a thing.
- Lovable Coward: In Mount Rokkon, he's quite clearly out of his element and will quickly run behind the Warrior of Light when the demons appear, but given the Warrior is essentially his bodyguard this is to be expected.
- Mr. Exposition: He teaches the Scions all about the way of life in Kugane. His comments and notes also offer a great deal of cultural context to what you encounter in Mt. Rokkon.
- Nice Guy: His ties to Lolorito (and general love of money) aside, Hancock is a pretty affable guy. When he just happens to be in Costa del Sol trying to sell Hingan wine while the Warrior of Light is there trying to find a specific rare wine and only has an empty bottle of one, when he learns who the bottle is for, he comes up with a plan to help the WoL out of the pickle they are in, completely free of charge, before going on his merry way.
- "Not So Different" Remark: How he views Gorai, once you complete the Mount Rokkon Exploration Log. He fully understands that Gorai grew up at the bottom rung of society like he did, and both grew into wealth late in their life. The major difference between them, however, is that Hancock had a better grasp on the value of wealth, and knows avarice is the downfall of the wealthy.
- Rags to Riches: Hancock spent his childhood in destitute poverty, scraping gil together in the backalleys of Ul'dah. But he garnered a reputation for his wit and resourcefulness, which caught the attention of Lolorito. Lolorito would then subject Hancock to a Secret Test of Character that Hancock passes by doubling the amount of gil Lolorito loaned him in a single day, convincing Lolorito to take Hancock under his wing. In the present, Hancock is the head of the Kugane branch of the East Aldenard Trading Company, making him an affluent and powerful merchant.
- Sheep in Sheep's Clothing: His unsettling dark humor, Sinister Shades, and ties to Lolorito make the Scions extremely wary at him for much of their first visit to Kugane. Despite all this, Hancock is genuine about his desire to help the Scions as per his boss' instructions and is nothing but affable to them. Given his love of money and making business connections, his attempts at sincerity come across as schmoozing, drawing distrust even when it isn't warranted.
- Suspiciously Specific Denial: When Tataru speeds the Scions on their way while volunteering to remain in Kugane for logistical purposes, Hancock remarks on just how quickly she's sending you back to Gyr Abania.Hancock: Personally I would have prefered to host you for a few days, but Tataru was adamant that you return on the first available ship. One could almost suspect she is eager to be rid of you...Idle musings, naught more. Purely hypothetical and most assuredly incorrect. She wants only the best for her dear friends, and is surely not motivated by hidden desires to go gallivanting about with her Hingan paramours...
Gyodo

A Namazunote merchant. The Scions meet him in Kugane while searching for information on the whereabouts of Gosetsu and Yugiri.
- The Cameo: Appears in the Level 68 Dragoon quest helping the Warrior of Light and Orn Khai on the path to Faunehm.
- Con Man: Very few of the deals he makes are sincere. Even after attempting to scam the Scions gets him punished, the Namazu beast tribe quests show he's still conning people.
- Didn't Think This Through: He makes it painfully obvious that he is fully intending to betray the Scions' trust in providing a boat to Doma and instead right into the Garleans' hands due to him being more concerned about the promise of money from the Garleans. The Scions decide to intentionally spring that trap so they can turn it around on him and capture him for questioning.
- The Informant: He deals in trading information among other things. However if he doesn't fear the person he's dealing with, or considers them gullible, he may try to trick potential buyers.
- Japanese Mythology: His race is based on the selfsame Namazu of Japan.
- Nothing Personal: Due to the increase in tensions between the Garlean Empire and the Confederacy, and demanding that Hingashi make the payment of the "Ruby Tithe" illegal, trading by sea has become harder for him. As such, he turned himself into an informant to the Garlean Consulate in Kugane, alerting them to anyone seeking sneak into Doma.
- Oh, No... Not Again!: When the Warrior of Light shows up again, he immediately abandons any ambitions he might have had regarding scamming the people nearby.
- In the Stormblood Dragoon quests, he's introduced to Orn Khai regarding legends of dragons in the Far East. When he shows up to the meeting and sees the Warrior is present, he rapidly insists that there will be no more betrayals.
- In the 4.1 Hildibrand mission, he's attempting to con Nashu as she's hunting down Hildy. Once the Warrior shows up, he freaks out and comes clean, not wanting a repeat performance of Lyse kicking him airborne after his attempt to turn them over to the Garleans.
- In the 4.2 main story line, he shows up again, once more offering high-priced information. Unfortunately for him, Alisaie is present, and hasn't forgotten him. She repeatedly makes mention of calling Lyse in, prompting frantic reassurance from Gyodo that he's on the level this time.
- He shows up in the level 63 Blue Mage quest where he apparantly conned Martyn out of everything he owned less than a minute after he reached Kugane. Once he learned that this was yet another friend of the Warriot of Light's, Goydo calmly returns the money he stole and exchanges a rare item for the items he could not return.
- Professional Butt-Kisser: When he isn't visibly afraid of the Warrior of Light he's presenting himself as the warriors humble and loyal friend without the slightest hint of subtlety.
- Weaksauce Weakness: For all Namazu, it would be tea. Tea has the same effect on Namazu that alcoholic beverages have to the average person. And it doesn't take much to send them into a drunken stupor, flopping on the ground like fish with Blank White Eyes.
Kageyama Shiratama
A Hingan merchant with dreams of grandeur and too much money. The villain of the Kugane Castle dungeon, the Stormblood Allied Beast Tribe questline, the Stormblood Blue Mage questline, and the patch 6.3 arc of Tataru's Grand Endeavor.
- Arc Villain: If something shady is going down in Kugane, it's likely he's the one behind it.
- Blatant Lies: During the Blue Mage quest line, he assures the Warrior of Light that he's turned over a new leaf. He hasn't.
- Do Not Taunt Cthulhu: The 6.3 Tataru quest has him using Tenzen's name and image, as well as cheap actors (and a cat) as stand-ins for the Four Lords to have Isshu pose as Tenzen and sell fake good luck charms. The Four Lords confront him in their raid forms, along with the Warrior of Light posing as Tenzen's descendant to get him to knock it off.
- Karma Houdini: He always gets off scot-free, even when his crime is attempting to usurp the bugyo of Kugane. From a gameplay standpoint, this is because none of the quests he's involved in are mandatory. From a story standpoint, it's likely because he's rich.
- Non-Action Big Bad: He's a merchant, not a fighter. Each time he's encountered, he has hired a mercenary to fight on his behalf. And once you defeat his hired goons, he surrenders without a fight.
The Ruby Sea (The Confederacy, Sui-no-Sato and the Auspices)
- Affably Evil: The Ruby Tithe is treated as a common way of life for traders seeking to go between Hingashi and Doma and most people treat it that way and end up on neutral or even good terms with the Confederacy, but a few quests make it clear they will brutally retaliate against anyone trying to smuggle themselves through without paying it, be it in dead traveling companions or a Finger in the Mail to the nearest Kugane embassy for hostage money.
- Asskicking Leads to Leadership: Literally. Becoming leader of the Confederacy requires reaching the 30th Floor of Heaven-on-High and defeating the guardian within.
- Hidden Depths: While the Confederacy appears to be just a band of pirates, they are actually dedicated to protecting the Ruby Sea, as well as the Allagan technology hidden within. Several of their members are actually members of the Onishishu, responsible for maintaining the aethernet in Othard and the machinery in Heaven-on-High.
- Not in This for Your Revolution: The Confederacy has no particular stake in whether or not Doma is liberated or not aside from the Garleans coming to rough them up every now and then. Lyse, Alisaie, and Hien have to convince Rasho that aiding in the battle for Doma Castle is worth the Confederacy's time, largely by convincing them that the Doman prisoners of war would make able crewmates for the Confederacy.
- The Pirates Who Don't Do Anything: Challenged in-universe. While the Confederacy has a fearsome reputation, in truth they have little to no control over the Ruby Sea while the Garlean Empire is around. The Empire leaves them be and allows them to prey on smaller ships solely because they don't see them as a threat, so long as it doesn't interfere with the Empire's own dealings. One of the main cruxes of the Ruby Sea storyline is challenging the pirates to find their pride and actually act like pirates against the Empire.
Rasho
Voiced by: Daichi Endo (JP), Matt Stokoe (EN), Emmanuel Bonami (FR), Matthias Scherwenikas (DE)

Epithet: Rasho Mastbreaker
Discipline: Lancer
- Asskicking Leads to Leadership: Enforced, to become leader of the Confederacy, Rasho had to clear the first thirty floors of Heaven-on-High, presumably by himself. That's no easy feat, even for the Warrior of Light.
- Neutral No Longer: After seeing the Warrior of Light prove themselves in getting the Red Kojin to abandon the Garleans, he mobilizes the Confederacy to free the fishing village of Isari and later to free Doma.
Tansui
Voiced by: Ryota Takeuchi (JP), Nigel Pilkington (EN), Benjamin Bollen (FR), Johann Fohl (DE)

Epithet: Tansui the Foxed
Discipline: Lancer
- Jerkass Has a Point: He's one of the people that opposes the mere idea of trying to fight the Garleans, even if it hurts to be unable to do much about it, but he does raise a point that the moment the Scions show up trying to convince them to fight, Garlemald's begun hunting down and killing Confederacy pirates for Yotsuyu's kicks. He's unknowingly right on the mark that death and destruction do tend to follow in the Scion's wake, even if incidentally.
- Hidden Elf Village: A secret undersea village whose inhabitants are fearful of the outside world and distrusting of outsiders.
- Team Switzerland: The ancestors of the residents of Sui-no-Sato retreated from the surface world to escape the conflicts and war that tore the lands that would become Doma apart. They're so insistent on their neutrality stance that the previous Ruby Princess permanently banished Yugiri for insisting that Sui-no-Sato aid the Doman Liberation Front.
- Beat The Curse Outof Him: The Ruby Princess is the second boss of Shisui of the Violet Tides, having been possessed by a voidsent who subsequently took over the palace. She returns to normal after the Warrior of Light beats her down.
- Body Double: Hisui is this to to the Princess. Since they happen to very closely resemble each other, Kurenai will masquerade as Hisui when she wishes to see the outside world, while Hisui takes her place as the Ruby Princess.
- Demonic Possession: The Princess is possessed by a Voidsent and turned into a pseudo-succubus, with the ablity to seduce players who don't open cursed chests that afflict them with the Old status.
- Decoy Leader: Hisui often serves as this to the princess, and is in fact the Ruby Princess the player fights and rescues.
- Enlightened Self-Interest: While Kurenai is working toward bettering life for her people by slowly introducing valuable goods from The Outside World, she is also personally curious about life outside of Sui-no-Sato and the Ruby Sea. While her duties prevent her from straying too far from her home, she hopes to learn more about the world outside through goods brought in through trade (with the Warrior of Light's help).
- King Incognito: The Hisui the player meets is actually Kurenai in disguise, while the princess fought in the dungeon is the real Hisui.
- Princesses Rule: There's no mention of a Ruby King or Queen, and the citizens act like the Princess is the only authority figure.
- Politically-Active Princess: Goes without saying given she's the ruler, but her citizens largely expect her to just sit in the Ruby Palace and enforce the status quo. A large part of her Custom Deliveries plotline is her attempts to sway the people away from tradition into joining the world at large by introducing beneficial things such as new medicine or shark harpoons.
- Reasonable Authority Figure: Kurenai realized long ago that Sui-no-Sato's quality of life is on a slow but steady decline due to being completely cut off from the outside world save what few goods they barter with Tamamizu. As such, she tries to gradually reintroduce products from the surface world to solve problems that her subjects could not solve on their own.
- Royals Who Actually Do Something: She's actively working to reintroduce her people to the outside world.
- Shout-Out: The princess and Sui-no-sato are a reference to the Japanese tale of Urashima Tarou. During the battle with the Ruby Princess, you can even open a box which can turn you old.
- Twin Switch: For the first part of the Sui-no-Sato subplot, you're led to believe that the person you're speaking to is Hisui, the handmaiden of the Ruby Princess. In truth, "Hisui" is actually Kurenai, having swapped places with her identical distant cousin so she can learn more about the outside world.
- Uncanny Family Resemblance: Kurenai attributes her and Hisui's nigh-identical appearance to the two being distant cousins.
- Walking Spoiler: See the number of spoilers above this one? Yeah, it's kinda hard to talk about them without spoiling The Reveal.
- Beat the Curse Out of Him: If an auspice becomes unbalanced, an exhausting battle can burn off the aramitama's excess and restore balance. Genbu has enlisted the Warrior of Light's aid so that they can fight the other Lords and quell the rage of their aramitama before it completely consumes them as it did Koryu.
- Berserk Button: The auspices all hold Tenzen's memory in the highest esteem, particularly the Four Lords who once traveled alongside him. The mere idea of anyone co-opting his identity for personal gain or otherwise disgracing his memory quickly drives Suzaku and Seiryu into a murderous frenzy. Byakko and Genbu are equally pissed, but remain rational enough to tell them not to resort to Cold-Blooded Torture when they hear about an imposter claiming to be Tenzen's descendant to sell useless good luck charms.
- Bunny-Ears Lawyer: Despite being revered as creatures of folklore and godlike power, the auspices are in fact quite goofy in private. Suzaku is easily charmed by a Con Man claiming to be her child fathered by Tenzen, Seiryu burnt himself on advent buns, and Byakko enjoys cracking groan-worthy puns. That said, they are beings of myth and legend capable of causing natural disasters at will.
- Elite Four: The Four Lords, auspices of great power who protect the regions of Othard and Hingashi.
- Family of Choice: The Four Lords refer to each other as brothers (and sister in the case of Suzaku) even though they're not tied by blood (as they're all different species of animal). The auspices in general gather in Reisen Temple for companionship, as many of them lost their place in the wild after attaining magical powers and sentience, while mortals often mistake them for creatures of folklore and hunt them.
- The Four Gods: The Four Lords are based on this, taking on the Japanese names of the divine beasts. Koryu is also taken into account, but has long since succumbed to the aramitama.
- Giver of Lame Names: The auspices refer to the magical process that elevates them into demigods with immense magical powers as "the change". Senri freely admits that it's not a particularly clever name.
- Glamour: Among their many powers is ability to cast illusions over themselves. However, trained priests and other magically-inclined people may see through them, as Suzaku recalls when a priest exposed her while she walked the town with Tenzen.
- Leitmotif: The battle themes of the Four Lords are all rearrangements of the melodies of "A Father's Pride" and "A Mother's Love", the themes of Yanxia and location of Doma. This reflects the groups ties to mankind through their departed friend Tenzen, a samurai born thousands of years before the nation's founding who inspired them all to become the guardians of the Ruby Sea.
- Long-Lived: A requirement to become an auspice is for an animal to live for a thousand years past the natural lifespan of their species.
- Monkey King Lite: One of the auspices is a monkey auspice named Qitian Dasheng (Sun Wukong's self-appointed title as the "Great Sage Equal to Heaven" in myth) who flies in on a cloud, uses a staff in battle, and even makes a clone of himself. He's referred to as a "great auspice" and is a folkloric hero to the children of Doma, as a young Hien once owned a plushie of Qitian Dasheng and prayed to it for hope and courage. He serves as the final boss of the Swallow's Compass as the guardian of the tamatebako to ensure its powerful time magics don't fall into the wrong hands. He can later been spoken to in Reisen Temple, where he admits that he's still far inferior to the Four Lords despite his many powers.
- Not So Above It All:
- The Four Lords generally carry themselves with a kind of majesty and austerity befitting their age and power. But in the Heavensturn 2022 event, Byakko fondly remembers eating advent cakes with Tenzen and the rest of the Four Lords. Genbu nearly choked to death on one, Seiryu burnt his mouth trying to swallow one whole, and Suzaku flailed about as she begged Tenzen to help the other two.
- In "An Auspicious Opportunity", the Four Lords consider their Heavensturn and Hatchingtide costumes to be the least conspicuous things they could possible change into, insisting that these disguises are foolproof. When a skeptical civilian calls out a bunch of imposters by saying that the Four Lords would never wear such ridiculous outfits, Soroban mutters that the Four Lords are wearing even more ridiculous outfits.
- Physical God: All auspices attain minor divinity, immortality, and considerable magical powers upon undergoing "the change". This has led many of them to be worshipped and revered as kami in their own right. The strongest of the auspices, the Four Lords, are each a walking natural disaster if they succumb to their aramitama. Byakko is able to unleash storms and tornadoes at will, Suzaku has command of an entire volcano, and Seiryu churns the raging seas in his battle with the Warrior of Light. That said, the stories about them depict them as nigh-unbeatable forces of nature, leading the Wandering Minstrel to take some "creative liberties" with his retelling of the Warrior's battle with them to make them seem more imposing, resulting in the Extreme versions of each trial.
- Shapeshifter: They usually spend most of their time in a Sleep-Mode Size similar to their original forms before becoming auspices. In addition to transforming into a much more imposing and combat-ready form when it's time for battle, they can also transform themselves into other shapes with their magic. In the 2022 Heavensturn celebrations, Byakko shows up in a white rabbit's costume from Hatchingtide indistinguishable from a Hyur or Elezen wearing one. The Warrior is visibly alarmed to see Byakko walking around in such a costume. Suzaku, Seiryu, and Genbu can also be met attending the Hatchingtide festivities in Gridania, again all in costumes.
- Sleep-Mode Size: The auspices normally hide their full power and true forms unless needed and will spend most of their time in forms similar to their original bodies before the change.
- Stronger with Age: The auspices' powers grow with age, as Suzaku did not develop her healing powers and ability to bring others Back from the Dead until thousands of years after Tenzen's death.
- Talking Animal: All of the auspices are shown able to communicate with the spoken races.
- Time Dissonance: Due to being so old, the auspices' perception of time is different from other mortal beings. Suzaku continues to mourn Tenzen's death as if it happened yesterday, and her grief and longing for him is what's driving her aramitama berserk. She's only able to percieve the present with unclouded eyes after the Warrior quells her aramitama by defeating her. Similarly, Genbu says it will only be a short time before his mind and soul finally pass onto the next world... that short time being five hundred years, much to Soroban's chagrin as they're Sharing a Body until that happens.
- Unstoppable Rage: Auspices have two halves to their souls, the aggressive an animalistic aramitama and the serene and calm nigimitama. If an auspice loses the balance between the two, the aramitama could overwhelm them and drive them into forces of chaos and destruction. This was the fate of Koryu, who nearly set the entire region aflame, and the fate of the other Four Lords if they're not aided.
- Unusually Uninteresting Sight: Generally no, but the Warrior of Light can treat them like one. Most of them actually appreciate this since the "Egads, a talking animal!" response tends to wear thin after a few hundred years.
- Uplifted Animal: If an animal lives to be one thousand years old, they undergo "the change" and become auspices, semi-divine creatures.
- Yōkai: They are based on the Yokai of Japanese folklore, specifically based on the legend that animals gain magical powers upon reaching a certain age.
Genbu
- "Come, blessed waters, to frolic and flow!"

One of the Four Lords. Genbu is among the oldest of the auspices and serves as their leader. It was he who contacted the Warrior of Light with an offer of treasures for their assistance.
- Badass Decay: In-Universe. Genbu was once the most powerful of the Four Lords according to Seni, but his advanced age and millennia of using his powers to maintain the wards sealing Koryu have drained him of his former glory.
- Cassandra Truth: After centuries of seeing disaster come and being unable to do anything to prevent it, a five hundred or so year old Genbu attempted to warn a human village of a coming landslide that would destroy everything. But because he couldn't yet speak their language, the villagers mistook his flailings as an entertaining dance and went on their way ignorant of the danger. Thankfully Tenzen arrived, able to understand Genbu and used his guile to evacuate the village to safety.
- Flipping Helpless: After his battle, Genbu reverts to normal and lands on his back, leaving him helpless until Tataru helps him up.
- Making a Splash: In battle, Genbu can manipulate water in several forms.
- Magic Staff: Genbu battles with a large wooden walking stick which he channels his water magic through.
- Only Sane Man: In a more literal sense. He is the only member of the Four Lords not in danger of succumbing to his aramitama by the events of the story, having instead focused his attention and power on maintaining the wards trapping Koryu.
- Passing the Torch: Following the death of his corporeal body at Koryu's hands, he winds up Sharing a Body with Soroban, who summoned him under the assumption that Genbu's soul would overwhelm his and cause a Death of Personality. In truth, the rigorous training Genbu put him through has made Soroban stronger than Genbu, leaving Genbu to name Soroban his successor as one of the Four Lords.
- Power Floats: While in his regular sea turtle form, Genbu floats in the air.
- Religious and Mythological Theme Naming: Takes his name from the Black Tortoise of The Four Gods.
- Seers: As early as one hundred years into his life, Genbu has had the power to see events from the future with perfect clarity. Most of his visions are of coming disasters. At first, he felt he could do nothing about them because he was just a turtle. After some time, he tried to warn people of his visions to no avail until he met Tensen and Byakko. He has summoned the Warrior of Light for aid because he has foreseen the other Lords go mad and destroy everything in the Ruby Sea and seeks to prevent it.
- Sharing a Body: His mind and spirit are summoned into Soroban's body in a last-ditch effort to reseal Koryu. To everyone's surprise, Soroban's soul is powerful enough to avoid being overwhelmed by Genbu's, resulting in them sharing a body.
Byakko
- “It begins. Receive of me my fury, children of man, and quell it!”

One of the Four Lords who helped the great hero Tenzen imprison the auspice Koryu beneath Hells’ Lid. Byakko is no longer in harmony with himself, and is in danger of succumbing to unfathomable rage unless someone can calm him down by beating the rage out of him.
- All of the Other Reindeer: Byakko was shunned by both man and beast because of his snow-white fur, considered to be a harbinger of doom.
- Arm Cannon: In his humanoid form, Byakko’s right “arm” functions as one of these, firing both gigantic laser beams and a Sphere of Destruction.
- Bishōnen Line: Byakko’s natural form is that of a gigantic white-furred tiger, but he takes on a humanoid form to face the Warrior of Light in battle. He reverts back to his tiger form upon being defeated.
- Blow You Away: He has power over wind, to the point where he can sweep the party up into a gigantic cyclone as part of his ultimate attack.“Tempest, surge!”
- Bullet Hell: His Unrelenting Anguish attack is a low-key example of this trope. The attack sends out three gradually-rotating lines of slow-moving bullets from the center of the arena. By themselves the bullets aren’t hard to avoid, but avoiding them while also dodging the rest of Byakko’s attacks is another story.
- Combat Compliment: When he starts getting low on health, Byakko will praise the Warrior of Light by saying that they’re stronger than he dared to hope.
- Face of a Thug: He's an enormous white tiger the size of a car in his Sleep-Mode Size. But he's one of the gentlest and most controlled of the Four Lords. When he and Tenzen stage a battle to convince a village to evacuate from an impending rock slide, Byakko is miffed that he has to play the part of a starved beast.
- Free-Fall Fight: The second phase of the battle begins with Byakko launching the party hundreds of feet into the air with a cyclone, and requires players to spend almost a minute dodging multiple attacks while helplessly plummeting to the ground. Getting hit by too many of these attacks will result in an instant party wipe when you reach the ground.
- Grievous Harm with a Body: One of Byakko’s attacks has him pick up a player and then slam them into the ground on the opposite side of the arena, away from the rest of the party. The other players need to invoke this trope by stacking up at the point of impact to split the damage, or else the grabbed player will die.
- Panthera Awesome: He’s a giant, godly tiger.
- Red and Black and Evil All Over: While Byakko himself doesn’t fit the color scheme, his Battle Aura and projectiles resemble seething red-and-black fire.
- Red Right Hand: Byakko’s right “arm” is actually his tiger form’s head attached to a ridiculously long neck. He can detach it to form a clone of his tiger form called Hakutei.
- Religious and Mythological Theme Naming: Takes his name from the White Tiger of The Four Gods, or at least, the Japanese version of the name.
- Sadly Mythtaken: The epic written about the Four Lords depicts the Byakko who traveled with Tenzen and the starving beast Tenzen fought as two separate beings. In actuality, Tenzen and Byakko staged that fight to evacuate a village that was about to be crushed by a rock slide. After reenacting the scene in the epic as part of the Heavensturn 2022 celebration, the Warrior can run into Byakko, who muses about the inaccuracies. But given the cheer the story inspires and its enduring message of lending a hand to those in need, he feels that it's enough that the auspices at Reisen Temple (and the Warrior, Tataru, and Soroban) know the truth.
- Shock and Awe: Several of his attacks involve raining lightning down onto the battlefield.“Lightning, sear!”
- Signature Attack: The Roar of Thunder. After stunning everyone with a roar, Byakko hurls the party high into the air with a cyclone and attacks them relentlessly from all sides as they plummet to the ground. Once they land, Byakko concludes the attack by firing a Sphere of Destruction at the party.
- Sphere of Destruction: Fell Swoop, which caps off Byakko’s ultimate attack.
- Wave-Motion Gun: Fire And Lightning has Byakko fire a giant red-and-black energy beam wide enough to cover a third of the battlefield.
Suzaku
- "Tenzen? Tenzen, 'tis I! Sheathe your sword, I beg of you!"
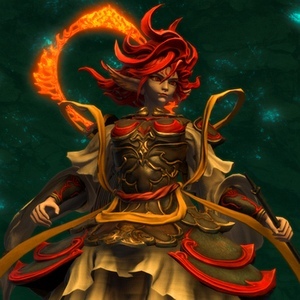
Another of the Four Lords who served as Tenzen's companions. Like Byakko before her, Suzaku is in danger of succumbing to the aramitama and must be pacified in battle by the Warrior of Light.
- Anguished Declaration of Love: During her fight she keeps attempting to tell Tenzen her true feelings. When she assumes human form she is less subtle about it.
- All Love Is Unrequited: She never confessed her feelings to Tenzen before he died because she had yet to gain enough power as an Auspice to take on a human form and by the time she could, he had been dead for ts. This lingering grief at never confessing her love combined with being unable to prevent his death has left her in a state of delirium far worse than Byakko's anger, especially when her Aramitama consumes her.
- Battle Theme Music: "Sunrise", a hauntingly beautiful song highlighting the pain Suzaku feels after Tenzen's passing and her desire to see him once more.
- Bishōnen Line: Suzaku is normally in a plain firebird state until the fighting begins, where she turns into a much large phoenix with elegant armor and a "mane" that's a deeper fiery red than her body, after a quarter of her health is drained she finally changes into her humanoid form. Her humanoid form is also the most human-looking out of the four, appearing as a very beautiful red haired woman with feathered ears.
- Berserk Button: She gets absolutely livid at the thought of someone replacing Tenzen during her aramitama-induced stupor.
- The Cuckoolander Was Right: Her insistence on seeing the Warrior as Tenzen during her trial isn't as crazy as it initially seems given the lore revealed about souls in Shadowbringers, and the retroactive implication that Tenzen is also one of the Warrior's previous incarnations.
- Color-Coded for Your Convenience: Her primary mechanic is to split the arena floor into four colors and symbols reminiscent of "Simon Says", with orbs matching those colors/symbols floating on the edge of the arena. When a bird add flies into an orb, the corresponding arena section detonates.
- Composite Character: Combining Suzaku with the Phoenix (see below) as the Suzaku of real life legend is not associated with resurrection.
- Delirious Misidentification: She mistakes the player for Tenzen in her aramitama-induced delirium.
- Doppleganger Attack: "Ashes to Ashes" has Suzaku create numerous lesser copies of herself called "Scarlet Ladies". If the Scarlet Ladies are not offed in time, they will proceed to nuke the arena with an undodgeable Herd-Hitting Attack will almost certainly wipe the party.
- Do Well, But Not Perfect: Inverted. Suzaku's enrage has an interesting condition: she normally has four "Simon Says" phases followed by an enrage version in her full fight, but if her HP is low enough, the next "Simon Says" will be replaced with the enrage version. You must either do the fight nearly perfect, or claw and scrape your way uphill to a victory. This is likely done to prevent more-skilled players from "carrying" the fight and force less-skilled players to learn the mechanics.
- Heroic BSoD: Dialogue during her fight suggests that Tenzen's death traumatized her severely, and that even after a long period has passed she was still consumed by her memory of Tenzen's final moments.
- Holy Halo: She gains one after crossing the Bishōnen Line.
- Humanoid Female Animal: She is the most human-looking of the Four Lords. Somewhat justified in that she was in love with Tenzen and wanted him to love her back, with her bird form being an obstacle to that.
- Interspecies Romance: She was deeply in love with Tenzen despite being a bird.
- Irony:
- During the fight, Suzaku thinks the Warrior of Light is Tenzen, who is attacking her because he has succumbed to some sort of madness. Many of her lines in battle are her trying to make Tenzen come to his senses and wake from his madness. Suzaku only thinks that Tenzen has lost it because she is being driven mad (by her Aramitama) and the Warrior of Light is fighting to bring her to her senses.
- Though she always appeared to be a glowing Phoenix, Suzaku never had the power of the mythical firebird while Tenzen was alive; it was only after his death that she gained power over life, including the ability to heal grievous wounds and revive one from death. Once her sanity is restored, she briefly muses on this irony, speculating that it may have been because of how desperately she wished she could have had those powers when Tenzen died that she eventually developed them in truth.
- Love Makes You Crazy: Her grief at losing Tenzen allowed the aramitama to take root, driving her to revere Tenzen so much that anyone who dared follow in his footsteps or remind her of him is seen as an enemy. During her battle, she's succumbed so deeply to madness that she can't tell the difference between the Warrior of Light and Tenzen.
- Magical Flutist: She uses a flute to activate her magic in her humanoid form.
- The Mourning After: She has been mourning the death of Tenzen for thousands of years!
- Me's a Crowd: She can create lesser versions of her firebird self as adds in her battle, and when she has crossed the Bishōnen Line she is always accompanied with one of these birds that will help with her attacks.
- My Greatest Failure: She is guiltridden over the fact that Tenzen had to protect her and her fellow Four Lords, and wished with all her might that she could have protected him instead.
- Kick Chick: When it comes to physical attacks, she will use her legs almost exclusively.
- Lost Lenore: She lost Tenzen a long time ago in the past and is still in mourning.
- The Phoenix: She's a godly firebird with the power to overcome death and raise others from the dead. Before she became an auspice, people mistook her for the firebird of legend. Ironically, it was only after losing Tenzen and undergoing the Change that she gained the powers of the firebird in truth.
- Playing with Fire: Nearly all of her attacks are fire-based in some way.
- Rapid-Fire Fisticuffs: Her humanoid form's tankbuster is a Chun-Li-esque series of rapid-fire kicks, followed by a telegraphed leg sweep that covers half the battlefield.
- Religious and Mythological Theme Naming: Takes her name from the Vermilion Bird of The Four Gods.
- Rhythm Game: Her Scarlet Melody phase transition has elements of this. Players must stand in a ring of eight circles and turn to face whichever direction an arrow on the floor of their respective circles is pointing, while a series of energy balls move from the edge of the arena toward Suzaku. Doing the mechanic right gives players a stacking buff to their damage output, while doing it wrong powers up Suzaku's subsequent Scarlet Fever attack.
- Signature Move:
- Scarlet Fever. After a protracted charging phase where Suzaku is an ember nestled in a magical lotus flower, she reveals her humanoid form as the flower blooms over the battlefield before playing her flute, consuming the area in phoenix fire.
- Phantom Flurry is a rapid series of blindingly fast kicks that finishes with a huge sweeping knockback effect, sending any players who survived the kicks hurtling over the ledge if they don't get out of the way in time. This is one of two of the Four Lords' spells that a Blue Mage can learn, the other being Genbu's Chelonian Gate.
- The Smurfette Principle: She is the only female among the Four Lords.
- There Is No Kill Like Overkill:
- Her enrage mechanic consists of her "Simon Says" section with all of the detonating floors as the same color, detonating the entire arena with a One-Hit Kill attack eight times in succession, while she slowcasts a party buster that is also a One-Hit Kill if that somehow doesn't do the job.
- When she hears about an imposter claiming to be Tenzen's descendant to sell useless trinkets to unsuspecting townsfolk, Suzaku proposes incinerating the Con Man before roasting his soul into ash.
Seiryu
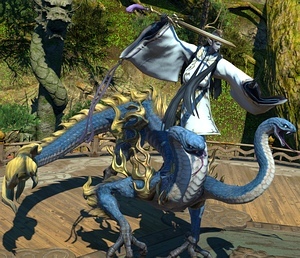
The last member of the Four Lords who served as Tenzen's companions. Unlike his companions before him, Seiryu plans to give into his aramitama in order to gain enough power to defeat Koryu on his own.
- The Archmage: His prowess with omnyodo and geomancy has led Hingan and Doman mages to declare him a god of geomancy. He backs up this title with his massive magical prowess, assailing the party with a variety of spells while his phase transition drowns an island in raging ocean water. He also summons a menagerie of shikigami to aid him, including previous Far Eastern bosses like Ootakemaru and Daidarabotchi.
- Battle Theme Music: "From the Dragon's Wake", a frantic instrumental of Japanese instruments underscored by a driving rock beat and an almost whimsical keyboard part to emphasize how Seiryu is throwing his physical and magical might at you with reckless abandon.
- Bishōnen Line: Unlike his compatriots he does not fight in his animal form, switching to his humanoid form from the get go.
- Cool Sword: He wields a tsurugi, a Japanese straight sword used more commonly in the Heian Era, where his court dress and onmyodo based powers come from.
- The Dark Side Will Make You Forget: Seiryu is so driven to defeat and surpass Tenzen that he gives in to the aramitama as the only means of fulfilling his oath by killing the one who killed Tenzen. After he's defeated and the aramitama is driven out, he remembers the real oath he made: to surpass Tenzen by becoming the benevolent god that he deserved to be. He also decides that starting a Friendly Rivalry with the Warrior of Light is the closest he can get to the other goal.
- Lord of the Ocean: Seiryu demonstrates enormous control over the seas, drowning an entire island for the second phase of his boss fight and trying to sweep the party into the water repeatedly to render players helpless. In the 2024 Heavensturn festivities, the Ryu Bugyo describes a story passed down in her family of a time when a raging storm threatened to sweep a seaside village out to sea. The villagers prayed desperately to Seiryu to quell the storm, even offering him a maiden as a sacrifice. Seiryu turned away the sacrifice and turned away the storm in response to their pleas, saving the village from destruction.
- Making a Splash: Most of his own techniques barring his summon magic use water to attack.
- Magic Knight: He wields both a sword and onmyodo to bare in his fight with the Warrior of Light.
- Our Centaurs Are Different: His body consists of a humanoid upper torso connected to a serpentine and draconic lower body.
- Our Dragons Are Different: He is not a dragon in the XIV sense, but rather a serpent. As with Japanese Mythology a snake who has accumulated great power can evolve and become a dragon and as such is Seiryu's motivation, to become a dragon worthy of worship with the power to safeguard his chosen.
- Orochi: In spite of his draconic name, Seiryu is closer to the Orochi of legend, his animal form being a serpent, and his humanoid form being a mix of a multi-headed serpent and a dragon, with his Signature Move calling a massive amount of snake heads to thrash about. His backstory in particular is almost word for word the myth of the Trope Namer, with the twist that Seiryu was always benevolent and whisked the maidens to safety instead of devouring them, and instead of being slain by the god (or primal in this case) Susano, Tenzen finds him and gives him a new start.
- Religious and Mythological Theme Naming: He takes his name from the Azure Dragon of The Four Gods.
- The Rival: He considered Tenzen his one true rival and is greatly disappointed Tenzen died before Seiryu became an auspice and he could challenge him once more.
- Sadly Mythtaken: The legends surrounding Seiryu remember him as a ryu, a Japanese draconic entity akin to the dragons found in Eorzea and Meracydia. In truth, Seiryu is closer to a snake or a serpent in his natural form. The Ryu Bugyo of the 2024 Heavensturn festivities is surprised to learn this, as her family claims she descended from one of the maidens offered to Seiryu as a Human Sacrifice.
- Signature Move: Dragon's Wake. After focusing, Seiryu will cast Strength of Spirit to incapacitate the party. Seiryu then floods the island, calling a horde of snakes to him before detonating his Sphere of Destruction.
- Snake People: In his humanoid form his torso becomes humanoid but underneath his lower half is a dragonic serpent with a pair of snakes attatched for good measure.
- Summon Magic: Seiryu is skilled in onmyodo and summons many shikigami to aid him in battle, from Oni, Tengu, Wanyuudou, and Daidarabotchi.
- Takes One to Kill One: Seiryu is under the delusion that he will be strong enough to defeat Koryu himself if he willingly succumbs to the Aramitama as Koryu had, making his battle all the more vital to restore his balance.
- Unwanted False Faith: When he was a young serpent the people of his island home believed him to be a kami and paid tribute to him and when disaster struck offered him young maidens as Human Sacrifice. Seiryu of course spirited them away but over time the cult that built around him began to grow disillusioned and sicced mercenaries on him claiming him to be a demon instead of a god.

Discipline: Samurai
The mortal leader and friend to all of the Four Lords. Thousands of years prior to the founding of Doma, he led them to save the Ruby Sea from an "oni", which turned out to be the fallen auspice Koryu. Tenzen would perish in sealing Koryu away, leaving his friends to mourn his loss.
- Cool Sword: The Phoenix Blade is a Flaming Sword and a magical artifact of immense power. With it and his own skills and strength, Tenzen defeated Seiryu, an auspice powerful enough to be mistaken for a kami, in single combat. In Endwalker, it's lent to the Scions in Sharlayan to help power the Ragnarok's Faster-Than-Light Travel to get the Scions to Ultima Thule.
- The Exile: He was banished from his village for possessing the strange ability to speak to animals via the Echo.
- Expy: The story of "The Tale of Tenzen", the most popular epic poem in the Far East, is a clear reference to ''Momotarō", with a young samurai gathering a group of animal compatriots and defeating an oni on a dangerous island. The difference here is that Tenzen gathered four companions, Byakko, Genbu, Suzaku, and Seiryu, rather than a dog, a pheasant, and a monkey. The "oni" was also a mad auspice named Koryu.
- Flaming Sword: True to its name, the Phoenix Blade he once wielded instantly bursts into flame when drawn from its scabbard.
- Fling a Light into the Future: The Four Lords speculate that the vision of him they see helping them seal away Koryu once again was actually his spirit that he kept inside the seal should it ever be broken. Even still, Suzaku and Seiryu notes that it wouldn't have worked without another warrior like him blessed with the Echo and the strength to help him restore the seal.
- The Gift: Like the Warrior of Light, Tenzen possessed the Echo, allowing him to understand Genbu's pleas before the latter learned to speak the tongue of man.
- Ideal Hero: In addition to being a magnificent fighter not unlike the Warrior of Light, Tenzen is described by the Four Lords to be a man of incredible compassion and empathy. His friends continue to guard the Ruby Sea thousands of years after his death to honor his memory.
- Master Swordsman: He bested Seiryu in combat thousands of years ago, humbling the serpent and driving him to try and surpass Tenzen in the years following.
- Mythology Gag: His name and appearance are both callbacks to the Tenzen of Final Fantasy XI.
- Only the Chosen May Wield: Tenzen's Phoenix Blade may only be wielded by a select few deemed worthy of its power... something Byakko neglects to mention when he tosses it to the Warrior while putting the fear of the kami into Kageyama. Luckily, the Warrior is worthy, but Byakko notes that the blade would have rejected them violently on the off-chance that they weren't.
- Posthumous Character: He's long-dead by the events of the story, but everything the Four Lords do is to honor his memory.
- Reincarnation:
- It is heavily implied that the Warrior of Light is a reincarnation of Tenzen, as the Four Lords have some difficulty telling the Warrior of Light and Tenzen apart, and an NPC in the following expansion mentions that every soul has a unique 'colour' to it, with some being able to recognise that colour regardless of its incarnation. This is further backed up by their shared manifestation of the Echo. This is further supported by them sharing the ability to understand and speak with some animals.
- Given that the Warrior of Light is the embodiment of the sundered Ascian Azem, it follows that Tenzen was an incarnation of Azem as well.
- Speaks Fluent Animal: Due to possessing the Echo, he was able to interpret Genbu's attempts to communicate and heed his warnings in order to evacuate a village before it was crushed by a landslide.
- Token Human: He was the only human (and thus mortal) member of the Four Lords and the group's leader. In addition to being the greatest fighter of them all, his compassion and empathy made him an inspiration to his immortal friends.

An incredibly powerful auspice who willingly succumbed to his aramitama in search of greater power. He was sealed away by Tenzen and the Four Lords thousands of years before the events of the story.
- Arc Villain: He's the main antagonist of the Four Lords storyline, though he does not appear in person until the very end of it.
- Generic Doomsday Villain: Koryu has no known goals besides gaining more power and razing everything before him. His life before he willingly succumbed to his aramitama is unknown, only that he seeks nothing but destruction. While the threat he poses creates tension in the storyline, he's ultimately more of an obstacle than a fully-realized character, as the quests mainly focus on the Four Lords coming to terms with their grieving of Tenzen.
- Kirin: Koryu uses the same model as the Kirin mount available to players, albeit several magnitudes larger, and resembles a draconic horse as appropriate to the myth.
- Leaking Can of Evil: Koryu's seal has begun to weaken in recent years. If the Four Lords can't get their act together and shore the failing seal up, it's only a matter of time before Koryu breaks free. Sure enough, he gets loose right after the Warrior of Light has finished calming the last of the Four Lords, though they manage to stuff him back into his can.
- Physical God: Koryu is so powerful that it took the Four Lords and Tenzen to just seal him away. Even then, it came at the cost of Tenzen's life. Genbu warns that Koryu will set the entire Ruby Sea ablaze should the raging auspice ever be freed. As if to the prove the point, the first thing he does after breaking free is killing Genbu in a single attack to prevent the Four Lords from sealing him away again.
- Religious and Mythological Theme Naming: He's named after the Yellow Dragon of the Center in Chinese mythology, the reincarnation of the Yellow Emperor at the center of the universe.
- The Unfought: The entire point of the Four Lords questline is to restore Byakko's, Suzaku's, and Seiryu's sanity in time to restore the seal on Koryu. Unfortunately, he breaks free right before they do, killing Genbu before they can fully restore the seal. But thanks to Soroban, the Warrior, and the spirit of Tenzen, Koryu is sealed away again for another few millenia without any fight besides a cutscene.
The Azim Steppe
- A Day in the Limelight: There are a lot of Xaela tribes (52 known and many more who may be living elsewhere), all of whom have a different culture and belief system and in some of the wilder cases, even biology (Like the Ejinn, who can hold their breath for nearly 12 hours without the blessing of the Kami like the Raen). Since they are so diverse, there's no way every single one could be covered, so the Steppes zone in Stormblood focuses mostly on the Mol, Oronir, Dotharl (And their Buduga allies), and Qestir, with small cameos of other tribes like the Goro and Dataqi here and there.
- After the End: It's left ambiguous, but there are a number of indications throughout the Steppes and especially throughout, and especially on the lower level of, Bardam's Mettle that the current Xaela clans are living around, beside and (in the case of the Dawn Throne) within the remnants of a much older, much more advanced culture of Au Ra. The exact nature of this and what might've happened isn't explored in full during the 4.0 Stormblood quests, but there are a few hints, such as the Dotharl having a belief that a certain set of incredibly advanced ruins is key to removing oneself from the rebirth cycle via suicide, should one wish it, as well as the Dusk Throne being in a dilapidated state compared to the Dawn Throne, and the Raen of Sui-no-Sato having "fled their enemies" long, long ago. 4.4 answers some of the questions and alludes to the answers to others; The ruins that can permanently kill a person? An Allagan-made aether siphon that drained The Burn to a lifeless husk, and would also likely devour the aether of any soul that dies near it. And given that, it's possible the ruins of Bardam's Mettle means Xaela were likely made tribal steppe-folk because the Allagans destroyed their society, or that they were an arm of the empire before it fell, and this would also make the Allagans the "enemies" the Raen mention.
- Always Identical Twins: The sidequest "Stranger Danger" has a child caretaker in the markets at the Reunion looking for any lost children separated from their parents. Two of children you encounter are identical twins from the Himaa tribe, in which one in every three pregnancies results in twins.
- Amazon Brigade: The Borlaaq are an all-female tribe of warriors. Breeding with men from other tribes is acceptable, but male children must be given up within a year of birth. Another tribe, the Iriq, follows the Borlaaq and adopts the male children given up by the women.
- The Buduga are the Spear Counterpart to the Borlaaq: an all-male tribe who add to their numbers by raiding and kidnapping male children, as shown in a FATE-chain in the Steppes. If the Warrior of Light is female, the Buduga you speak to seem to want as little to do with you as possible. On the other hand, they will admire the prowess of a male Warrior of Light and invite him to join them, and openly make passes at Hien and a male Warrior of Light leading to the general consensus among fans is that most, if not all, of the tribe is gay.
- Asskicking Leads to Leadership: Every few years the Xaela clans hold the Naadam, a contest in which the participating clans race and fight to be the first to claim a sacred spot of land called the ovoo. Whichever tribe manages to take and hold the ovoo is recognized as the Steppe’s dominant tribe, and their khan is honoured as the khagan. The Warrior of Light ends up in this position, technically, by the end of the Azim Steppes main quests.
- The Atoner: The Uyagir believe that their ancestors were greedy and overconsuming, and that they lorded over the other tribes. The gods punished them for their sins by unleashing a plague of giant beetles to destroy their civilization. Today, the Uyagir eke out humble lives within the caves dug out by those beetles as a way to atone for their ancestors’ actions.
- Blood Knight: All of the clans who focus on battle are this, but the Dotharl are the most bloodthirsty and combat loving, due to their belief system encouraging them to fight and die in glorious combat to reincarnate. Though their representation in the story is somewhat more nuanced, the official list of known tribes from Word of God states that they're extremely violent, prone to drawing first blood, and will happily participate in all out massacre that wipes out other clans. Part of the reason the several of the tribes (especially the Dotharl) agree to aid in the liberation of Doma is that a war is the perfect opportunity for them to revel in glorious combat.
- Elective Mute: The Qestir clan believes that all spoken words are lies, and so they never speak. Instead they communicate their intentions through gestures, body language, and writing if necessary.
- Fantasy Counterpart Culture: The Azim Steppe is Final Fantasy XIV’s version of Mongolia, and the various Xaela tribes—between living in yurts, being led by khans, having a nomadic lifestyle—are stand-ins for Mongolians.
- Foreshadowing: Temulun of the Mol seems to sense the gift of Hydaelyn on the Warrior of Light, implying they'll see the rise of greats and the fall of others, even if not from memory, and emphasizes that the stars will guide them as a traveler in a particularly focused manner. This seems to imply the rise of Doma and the fall of Zenos in Stormblood, but this can be taken all too literally with Shadowbringers as well, and especially given who the Warrior of Light is to the culture of the Xaela.
- Gender Is No Object: The Dotharl have no problem with women fighting alongside men or leading the clan, since their beliefs on Reincarnation allow for the possibility of warriors being reborn as members of the opposite sex.
- Horse of a Different Color: Any warrior who has overcome Bardam’s Mettle will have tamed a yol, a giant bird of prey, which they can ride into battle.
- Klingon Scientists Get No Respect: The Oronir look down on any man who isn’t strong enough to become a great hunter or warrior, no matter how important his occupation is to the clan’s survival. A chain of sidequests revolve around an Oroniri cook who is quite skilled at his profession by all accounts, but is treated like dirt by the other men of his clan for being weak.
- Maybe Magic, Maybe Mundane: It’s left ambiguous whether the Dotharl clan’s beliefs on Reincarnation are true or not. 2.2's explanation of the metaphysics of Hydaelyn's lifestream even do suggest it's possible. And revelations from both Shadowbringers and it's patch quests reveal that certain souls namely those with the echo are are able to reincarnate as they are formerly those of the ancients. With this in mind, it's quite possible most of the Dotharl are echo bearers. One side quest deals with the suicide of a Dotharl girl near the ruins of what the Dotharl believe will eliminate Xaela from the cycle of reincarnation. It is later revealed to be an Aether siphoning device which does imply that the Dotharl are able to reincarnate. Endwalker gives solid confirmation that reincarnation is not just a Dotharl belief, but the natural flow of the world. With this in mind and the Clap Your Hands If You Believe nature of Aether, the Dotharl may be subconsciously willing themselves to reincarnate within the clan over and over again.
- Merchant City: Reunion, a semi-permanent neutral settlement run by the Qestir clan. The various clans of the Steppe gather here to barter, trade, and share information with each other and with outsiders. The Qestir enforce Reunion’s neutrality by banishing anyone who tries to pick fights or stir up trouble.
- Polyamory: It is customary for the women of the Bayaqud tribe to take multiple husbands.
- Proud Warrior Race: Several of the clans place great emphasis on their hunting skills and fighting prowess, particularly the Oronir and the Dotharl. Hien's goal in the Azim Steppes main quest is to make use of this.
- Reincarnation: The Dotharl clan believes that their greatest warriors will be reborn if they die gloriously in battle. Their khan inspects every newborn baby and, if they recognize the spirit of someone who died, that baby is declared the reincarnation of that person and given the person’s name. A non-Dotharl can also be reborn into the tribe, if they died aiding the tribe. A side quest deals with with helping a young man in the tribe visit and do favors for an old woman in a different tribe that he and his tribe believe to be his mother from his past life.
- Rite of Passage: Anyone who wants to participate in the Naadam must first overcome Bardam’s Mettle, a rite of passage in which the warrior must venture to a sacred ground, overcome wild beasts and a series of trials, and finally defeat and tame a ferocious yol. Success will earn you recognition as one of the greatest warriors on the Steppe.
- Settling the Frontier: The Dataqi Chronicles, a 1.5 hour long FATE chain involves the Dataqi clan who come to the Steppe after their own lands were reduced to wasteland. It's up to the Warrior of Light (and friends) to help them out. It leads to them in all out war with the Matanga.
- Solar and Lunar: Au Ra worship the sun god Azim and the moon goddess Nhaama, with Xaela worship focused primarily on Nhaama. The only exceptions to this among the Xaela are the Oronir, who defer to Azim over Nhaama, and the Mol, who worship "the elder gods".
- Solid Gold Poop: Played realistically. The Bolir tribe collects the dung of animals and dry it to convert it into charcoal to sell to the other tribes.
- Stay in the Kitchen: Gender-inverted. It's traditional in the Dazkar tribe for men to care of the house and cook while the women head out to hunt. The men leave their homes so infrequently that they rarely meet anyone from outside of their tribe.
- Stern Sun Worshippers: The Oronir are this. They are the only tribe in the Steppe that primarily worships Azim over Nhaama, and the mightiest tribe to boot, winning the Naadam more often than not. They are in turn a proud and haughty people who literally look down on the other tribes from the elevated Dawn Throne.
- Walking Shirtless Scene: Members of the all-male Buduga clan wear clothes that partially cover their arms and legs but leave their torsos completely bare. It's a green version of the Shisui set basically a glorified swimsuit, noted to be extremely revealing even on men (of which the Budga consist entirely of)
Cirina of the Mol
Voiced by: Marie Miyake (JP), Jaimi Barbakoff (EN), Emmylou Homs (FR), Sophia Längert (DE)

Epithet: Cirina of the Laughing Reeds
Discipline: Archer
A friendly Au Ra of the Mol clan. She meets the Warrior of Light when they come to Reunion in search of Hien, whom she has been taking care of for some time.
- Anchored Ship: The short story "Ever After" make it clear she and Hien are in love, but his obligations to Doma and hers to the Mol prevent them from acting on their feelings.
- Badass Adorable: She's a sweet and friendly young woman (who uses the "cutest" of the four standard face types for female Au Ra), but she's also strong enough to be able to participate in the Nadaam.
- Beware the Nice Ones: Don’t let her friendly and non-confrontational disposition fool you: Cirina is a crack shot with that bow and puts it to good use during the Naadam. Make a lot of sense since she has to be tough enough to make it through Bardam's Mettle if she's even participating to begin with.
- In a more humurous manner, she is not above potentially using Namazu, a sentient species resembling catfish, as an ingredient in Buuz if she had her way, with an averted potential future revealing she and the kind hearted Mol would have wholeheartedly and joyfully slaughtered all the Namazu as a food source during a drought.
- Big Eater: A few tool tips and a fair bit of optional dialogue suggest very heavily that Cirnia is almost constantly hungry for buuz. During an early meeting with Gyoshin in one of the later parts of the Namazu quests has her privately fantasizing about catfish buuz before you speak to her and the Namazu minion quote reveals she is not above considering the Namazu themselves as an ingredient for Buuz, if it weren't for the Warrior of Light sponsoring them that is and averting a future where she uses a drought as an excuse to massacre them enmass for food .
- Florence Nightingale Effect: She developed feelings for Hien when she nursed him back to health when he escaped from Zenos after Doma's first rebellion.
- Magnetic Hero: She earns the respect of Sadu and Magnai, with the former even calling her a friend by the events of Endwalker, which is a standing of rare significance when it comes to Sadu, let alone the Dotharl tribe.
- Martial Pacifist: By her own word, the Mol hate conflict and would much rather avoid it, resulting in the other clans full of Proud Warrior Race Guys to ridicule the Mol as weak. But Cirina also says that while the Mol prefer peace, they are still born warriors like their fellow Xaela and won't hesitate to fight if they must. Then she leads the Mol into battle during the Naadam and makes it to the end with nary a scratch.
- Named Weapons: Her bow is "The Singing Rainbow", which she crafted herself.
- Nice Girl: She is genuinely involved in helping the Scions during their time in the Azim Steppe at every turn.
- Odd Friendship: She develops one with Sadu of all people. They may be very different but Sadu appreciates Cirina's company while hunting and is quite possessive of her.
- Rose-Haired Sweetie: She has pink hair and is unfailingly polite and kind to everyone she meets.
- Silk Hiding Steel: She is a friendly, faithful, demure young woman who isn't afraid to lead forces of her non-aggressive tribe on the front lines of the Naadam, even facing down such powerful and intimidating fighters like Magnai and Sadu. Also, she's able to participate in the Nadaam, meaning that she's a skilled enough archer to have completed one of the Xaela's most dangerous rites of passage.
- She is also called to serve as the military leader for the Eastern Alliance's forces in the Ilsabard Contingent above Sadu and Magnai. Admittingly, this is because the Mol have reign over the Xaela thanks to the Warrior of Light and Sadu demonstrates more power in the clashes in Garlemald, but she demonstrates competence and efficiency in her leadership.
Magnai of the Oronir
Voiced by: Taku Yashiro (JP), Dan Fraser (EN), Gilduin Tissier (FR), Florian Hoffmann (DE)
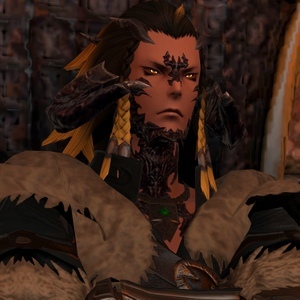
Epithet: Magnai the Older
Discipline: Warrior
The proud and arrogant khan of the Oronir, the most influential clan on the Steppe. Magnai’s clan has won the Naadam several times in a row, and he’s looking to maintain his winning streak. To that end he kidnaps the Warrior of Light and their allies after they successfully pass Bardam’s Mettle, seeking to use them for his own ends.
- A God Am I: While most Oronir believe that they are shards of Azim, it's believed the tribe's leader is Azim. Magnai has done a poor job of not letting this belief go to his head.
- Amazon Chaser: Played with. Magnai believes his "Nhaama" will be a gentle, ethereal maiden and for that reason automatically assumes Lyse and a female Warrior aren't her, though he checks anyway just to be sure. On the other hand, Y'shtola besting him in combat and generally showing her prowess has him apparently genuinely believing she might be the one, so who knows what is going on in his head.
- Asskicking Leads to Leadership: The leader of the Oronir is decided through a special ritualistic wrestling tournament akin to sumo called the Azim Bokh where the winner is declared the strongest and most fit to rule. Magnai has been the champion for years by the events of the story.
- Badass Arm-Fold: He keeps his arms folded at all times when not in battle, and is a powerful warrior.
- Berserk Button:
- He does not appreciate having his clan’s beliefs disparaged by outsiders, even in jest.
- Calling him "little sun" takes the wind out of his sails in an instant. Calling him "little sun" multiple times in a row makes him so angry that he flies into a blind rage.
- Break the Haughty: Y'shtola's withering rejection of him is brutal. The man practically deflates. Sadu, of course, loves it, and will never let him live it down.
- Butt-Monkey: In the ways of combat, Magnai is indeed very formidable. In the ways of love and finding a soulmate...not so much. It has become a Running Gag for Magnai to come across various women in the story that he suspects might be his soulmate, with each one bluntly turning him down, culminating with Y'shtola's utterly brutal put down.
- Death Glare: He gives Hien one so severe when the young prince makes a bit of fun out of his way of speaking that every single member of the entourage senses that he is more than capable of backing up his lofty talk.
- Dishing Out Dirt: His Broken Ridge Limit Break involves striking the ground with his axe, hitting it so hard that the earth fractures and giant stalagmites of rock and magma erupt from the ground. His Violent Earth attack also breaks the ground under the player’s feet.
- Embarrassing Nickname: When he tries to see if Y'shtola might be his soulmate, she flatly refuses him, calling him "little sun" because she finds him immature. Magnai is left stunned and Sadu finds it hilarious, quickly adopting the nickname. Magnai finds it so embarrassing that he immediately begins to throw down with Sadu after she starts chanting it in his face.
- Foe Romantic Subtext: Sadu, his main rival, is implied to be the One True Love he is looking for. Magnai once tried to gather every female Au Ra in the Steppe to find his partner, only for Sadu to be the only one not to show up because she can't stand how proud he is, and Magnai has despised her ever since and refuses to see past his grudge. A short story retelling this event, it turns out Sadu did show up to event, only to laugh at the whole thing. The two of them then fought for three days and returned to their homes unable to best the other.
- I Am Your Opponent: The second phase of the Naadam battle is heralded by him yanking you off the Ovoo (basically a control point) with the Holmgang skill. You have to defeat him (and the meddling Sadu) before you can claim it.
- I Gave My Word: He's not too happy about having to help Doma and the Warrior of Light fight a war against the Empire, but he promised to do so if he lost, and they proved their strength enough times for Magnai to keep his word.
- I Just Want to Be Loved: He tries very hard to find his fated person. With hilarious results.
- In Love with Your Carnage: In a case of Depending on the Writer, despite Magnai's certainty his Nhaama will be gentle and non-combative he gets very interested in Y'shtola after she bests him in battle. He askes if she's his Nhaama and is brutally shot down by her calling him "little sun" to his face.
- Irony: Magnai boasted about being an incarnation of Azim in front of the Warrior of Light, who turns out to be Azem, The Traveler of the Convocation of Fourteen, whose name likely inspired the origin of the legend of Azim the Sun Father.
- Limit Break: Broken Ridge, a variation of the Warrior’s level 3 Limit Break Land Waker. Unlike the latter, Broken Ridge is a powerful attack rather than a temporary shield for Magnai’s allies.
- Named Weapons: His weapons is the "Scale of the Father", a tribal heriloom axe said to be forged from the scale of Father Azim that was shed in combat with the Dusk Mother.
- One True Love: Magnai believes that he is the incarnation of Azim the Dawn Father, and that somewhere out there is a Xaela woman who is a matching incarnation of Nhaama the Dusk Mother. So far, he hasn't had any luck, though not from lack of trying.
- Pride: He is insufferably smug. Being called "little sun" by Y'shtola instantly deflates him, and Sadu rubbing salt in the wound instantly infuriates him.
- Resentful Outnumbered Sibling: Tales from the Storm reveals that he had many bossy older sisters, which is why he decided his Nhaama should be more docile. Encyclopaedia Eorzea Volume II would later specify his sisters number at five.
- Royal "We": He refers to himself with plural pronouns when not referring to himself as the Sun, both because he’s speaking for the Oronir clan as a whole and because he views himself as a personification of Azim the Sun Father.
- Sore Loser: He does not take losing the Naadam to the Warrior of Light well. The first time you visit him after the Naadam, he refuses to look at you and demands that you keep your business brief. He still holds respect for you however, and agrees to follow your orders should you have some for him, as seen during the liberation of Doma.
- Thinks Like a Romance Novel: Surprisingly for such an otherwise fierce and intimidating warrior, he has a firm belief in the notion of soulmates and is convinced all he need do is look his in the eye and the two of them will fall madly in love with one another.
- Villain Takes an Interest: For a given value of “villain”, anyway. He takes note of the Warrior of Light’s strength after they overcome the trials of Bardam’s Mettle, and has them kidnapped in an effort to make them fight on his behalf in the upcoming Naadam. His honor code (and desire to beat you down at the Naadam) is the only reason he lets you go.
Sadu of the Dotharl
Voiced by: Rie Tanaka (JP), Beatriz Romilly (EN), Emmylou Homs (FR), Melanie Blocksdorf (DE)

Epithet: Sadu Heavensflame
Discipline: Black Mage
The khatun of the Dotharl clan. Like all the Dotharl, she believes that she is the reincarnation of a great warrior who previously bore her name. She has a rivalry with khan Magnai of the Oronir, and intends to win the Naadam to take him down a peg.
- Ambiguously Bi: Has the same sensual reaction to a duel with a Warrior of Light of either gender, and in Endwalker has a number of comments implying attraction to females, and has a close relationship with Cirina.
- Anti-Hero: She's a Blood Knight to the highest order and revels in the fight, but she's firmly on the side of good despite that, helpfully aiding the Warrior, Hien, and in Endwalker, the Ilsabard Contingent without complaint.
- Black Mage: Called 'Spiritcaller' apparently, according to enemy tags and she uses Chulu (giant stone tablet things with faces) to cast powerful spells but she fits.
- Blood Knight: Being a Dotharl, she fits this. Her people believe that the soul burns brightest at the brink of death. She's at her happiest when locked in lethal combat with a Worthy Opponent like the Warrior of Light. But Sadu actually Deconstructs the idea of a society of Blood Knights during one conversation: she recognizes that the Dotharl way of life is unsustainable in the long-term, as their warlike ways and willingness to destroy other clans have made them many enemies, and their desire to die gloriously in battle has left the Dotharl with a dwindling population. When she joins the Ilsbardian Contingent in Endwalker, she calls a still-tempered Vergilia a worthy adversary and wants to see her recover so they can have a duel to the death next time.Sadu: [while casting Falling Dusk] AHAHAHA! May your screams fill the air!
- Colony Drop: Her Falling Dusk Limit Break drops a meteor on the battlefield. Should she manage to fire it off, it's a One-Hit Kill.
- Combat Sadomasochist: She finds as much joy in the pain of taking wounds as she does in inflicting them. Her one-on-one duel with the Warrior of Light has her in ecstasy as she gets back up after her health bar is depleted again and again, not wanting this "bliss" to end. When she finally does admit defeat, she's a Graceful Loser because of how much fun she had during the fight.
- Death Glare: Her entire tribe gives you one of these when Gosetsu calls their beliefs on reincarnation "Madness". Although they don’t get violent, the quiet staredown is more than intimidating.
- Does This Remind You of Anything?: The pleasure she derives from the carnage of a hard-fought battle is rather suggestive of something else.
- Even the Girls Want Her: In Endwalker, the fighting ladies of the Eorzean nations become quite enamoured with her. She's left quite at a loss at what to do with all the linkshells she was given after returning home from the Ilsabard contingent.
- Everyone Has Standards: Her motives for joining the Ilsabard contingent in Endwalker basically boil down to the fact that she wants the imperials to fight her of their own free will. She incapacitates Anima's tempered non-lethally and encourages them to recover and regain themselves so they can fight again. When Quintus orders a suicidal charge on Camp Broken Glass, she points out that the Ist legion fought of their own volition and deserved warrior's deaths, if only the contingent had posted sentries further out.
- Evil Laugh: She's very fond of this. Especially if it's at Magnai's expense, as shown when Y'shtola insults him and Sadu can't help but howl in laughter.
- The Gadfly: She loves getting under Magnai's skin, so much so that she's not even mad at the player when she loses the Nadaam to the Warrior of Light because she knows that Magnai's pride must be absolutely shattered at losing too. This is best seen in Patch 4.4, when she gleefully mocks Magnai after he gets brutally rejected by Y'shtola. Magnai gets called "little sun" to his face by Y'shtola, to which Sadu takes the opportunity to pour salt on the wound.Sadu: [Laughing] Little sun! Little sun! Does it pain you, little sun? Crave you salve to soothe the ache? Fire to sear the wound in your heart?
- Graceful Loser: She takes her losses against the Warrior in stride — as far as she's concerned, she had a great fight, and that's what matters.
- Kung-Fu Wizard: Her greatest attacks involving calling on the powers of the spirits for devastating spells akin to Eorzea's Black Magic. But she's not afraid to get up close in melee either, as seen during both the Naadam and her one-on-one rematch with the Warrior of Light.
- Limit Break: Her ultimate attack is "Falling Dusk", a spell that requries a lengthy charge time but calls down a meteor to blast everything in range for colossal damage. In fact, it's identical to the Black Mage's Level 3 Limit Break.
- Marathon Boss: When she duels the Warrior of Light one-on-one, she has four stacks of a buff that brings her back to full health when defeated. When you knock all those stacks off of her, she casts a spell to gain ten more. Thankfully, you only have to defeat her once more to end the battle, though it's implied that you continue fighting her off-screen while Y'shtola and Hien deal with Magnai.
- Mystical White Hair: She has pure white hair and is an extremely powerful Black Mage.
- Named Weapons: Her rod is "The Fallen Star", which is said to have been crowned with a fallen star by her incarnation three generations ago.
- Limit Break: Her 'Ritual of Falling Dusk' uses the same animation as the Black Mage's level 3 Limit Break, meteor.
- Odd Friendship: As of Endwalker, she reveals that she and Cirina have become close friends due to the latter's hunting prowess.
- The Only One Allowed to Defeat You: Talking to her post 4.5 after your fight against Elidibus-as-Zenos shows she's disappointed that someone else dared to defeat you and far as she's concerned, only she's allowed to claim victory over the Warrior of Light.
- Power Crutch: She draws power from creatures called Chuluu to fuel her strongest spells, most notably Falling Dusk. Slaying the Chuluu will prevent her from casting these spells.
- Psychotic Smirk: She's very given to sneering and mockery when it comes to her rival in the Steppe, but her countenance often crosses into this when in the midst of a particularly exhilarating battle.
- Reasonable Authority Figure: Compared to Magnai, she definitely comes off as much more approachable despite how violent and warlike she and her tribe are.
- Slasher Smile: You know the battle has begun in earnest when she starts showing those teeth.
- Smarter Than You Look: Although her bloodlust and penchant for fighting suggest otherwise, she possesses an extremely keen and insightful mind.
- Symbolic Blood: Invokes this when she joins the efforts in Garlemald during Endwalker. Since the Ilsabard Contingent is coming to help the imperials, she agrees to incapacitate the tempered non-lethally, and settles for spilling ceruleum from their magitek weapons.Sadu: Aye, aye, kill no man. I have not forgotten your instruction. I must settle for crushing the ironmen's toys. Their blue blood will feed my flames!
- The Rival: She has a fierce rivalry with Magnai over the fate of the steppe, as her goal is to reclaim the Dawn Throne won by the Oronir from their recent victory in the Nadaam. It even goes down to their beliefs, as the Dotharl favor Nhaama above all while Magnai believes himself to be the mortal incarnation of Azim. But it's implied that their animosity toward one another is rooted in something far more petty: namely Sadu turning Magnai down when he believed her his Nhaama.
- Token Evil Teammate: Downplayed, since her violent clan runs on Blue-and-Orange Morality and she is personally all too aware that its cultural warmongering is self-destructive, but she's probably the most bloodthirsty and ruthless character the Warrior of Light befriends in Stormblood. For all that she lacks in traditional heroism, she's firmly an ally rather than an enemy.
- Trial by Combat: Challenges the Warrior of the Light to a one-on-one duel in 4.4 to decide whether or not she'll acquiesce to Y'shtola's plans in the Steppe.
- Troll: She takes the time to get under Magnai's skin whenever the opportunity arises.
- Violence is the Only Option: A cursory knowledge of how Sadu likes to decide things is enough for all involved to prepare for a fight when asking her for a favour.
- Worthy Opponent: Mutually with the Warrior of Light. Fighting against them has Sadu openly state that she's having a lot of fun fighting the Warrior, and losing doesn't phase her because she genuinely enjoyed herself.
Dalmasca
- Ascended Extra: Dalmasca was mentioned a couple times in A Realm Reborn before becoming part of the story in Stormblood, mostly by the minor character Drest who lives in Eastern La Noscea.
- Earn Your Happy Ending: At the end of the "Save the Queen" questline, Bozja is freed from imperial rule after 30 years of occupation. Gabranth has (allegedly) been killed by one of his own, the thought-dead princess is actually still alive and just in hiding, and the kingdom can finally rebuild.
- The Bus Came Back: The Dalmascan Resistance returns at the end of patch 5.35 to aid the Bozjan Resistance.
- Mythology Gag: Besides geography the country is pretty much lifted wholesale from Final Fantasy XII, and its ancient history is lifted from Final Fantasy Tactics. And two of the known cities in Dalmasca, Valnain and Leá Monde, are from Vagrant Story.
- Fantasy Counterpart Culture:
- In the present day it is of the Middle East. It's a primarily desert kingdom that grew rich from trade owing to its key position between the European-inspired and Asian-inspired continents.
- Ancient Ivalice, the kingdom that once occupied the land Dalmasca now claims, was based on Middle Ages Europe just as Ivalice in Tactics was.
- Offscreen Moment of Awesome: While the Warrior of Light and Bozjan Resistance were busy at the Bozjan Southern Front, Dalmasca reclaimed Nalbina Fortress.
- Retcon: Early mentions of Dalmasca placed it on Ilsabard and said it was the first nation Garlemald ever conquered, 60 years ago. Come Stormblood it's now on Othard and was conquered 30 years ago. Encyclopedia Eorzea II changed the Ilsabard country Garlemald conquered 60 years ago to a place called Nhalmasque.

- Dead Person Impersonation: The leader of Dalmasca's resistance is described as a young woman calling herself Ashe, but the Princess Ashe lived 30 years ago; if she had survived Nalbina Fortress she definitely wouldn't be called young. Her personal guard during her attempted escape, Ba'Gamnan, states that he knows she's dead as well. It is ultimately subverted after finishing the Bozjan storyline, as the Field Notes you get reveals that Ashe's supposed assassination was actually carried out by a group led by Fran who was serving the royal family, and was intended to spirit her away where she could live in safety until the time came to restore the kingdom. Ba'Gamnan wasn't in on the plan, which is why he thought the Garleans were the ones who killed her when actually she was just made comatose by Fran's men.
- Deep Sleep: She was not really killed, but instead put to sleep for 30 years.
- The Ghost: The leader of the resistance is only mentioned by Fran, not seen.
- Legacy Character: The current Ashe isn't the real one, who died in Nalbina. Or at least that's what everyone thinks.
- Mythology Gag: She's pretty much the character of the same name from Final Fantasy XII. There are two main distinctions between them: this Ashe died when Dalmasca was conquered, and Rasler was her twin brother instead of her fiance. That there's someone else claiming to be Ashe now alludes to what Ghis said about Ashe in XII; if the Archadian Empire felt a need to use "Ashe's" political influence, any maiden bearing a passing resemblance to her could be presented to Dalmasca as the real thing.
- Posthumous Character: Ashe died trying to escape Nalbina during Garlemald's conquest. In reality she actually is alive, but this was kept hidden.
- Rebel Leader: Of Lente's Tears, the largest of Dalmasca's many resistance movements.
- Related in the Adaptation: In XII Rasler was Ashe's husband. In XIV he was her twin brother.
- Rightful King Returns: Being deliberately invoked by Fran, who has kept Ashe's survival secret for thirty years until the time is right.
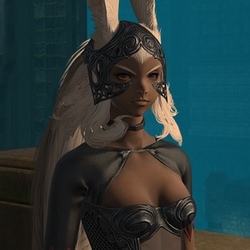
- Big Damn Heroes: She returns during the finale of the Save the Queen story to save Mikoto as she falls off an airship.
- Combat Stilettos: The impracticality is lampshaded by an in-game scholar who questions the choices of viera footwear for their jungle homeland.
- Defrosting Ice Queen: Fran warms up to the Warrior of Light as the storyline unfolds.Fran: I owe you an apology, <playername>. I was wrong to doubt you. Whether it be in a council room or on the field of battle, you have proven yourself more than worthy of the many praises the bards sing. I am glad to have counted you as an ally, for I would not wish you upon even my worst enemy.
- Early-Bird Cameo: For the Viera race as a whole. Fran's first appearance was before the Viera were announced as playable in Shadowbringers.
- Even the Girls Want HerRinok: The general's not too bad, once you're on her good side - her only good side being her backside...but you didn't hear that from me.
- Good is Not Nice: She is not exactly a friendly person, but she is firmly on the side of Dalmasca and the resistance.
- Honest Advisor: She is the Number Two to a woman claiming to be Princess Ashe, the last of the Dalmascan line. As we remember from Final Fantasy XII, Ashe is stubborn, bullheaded and resistant to compromise, and in order to temper the young Princess, Fran sets her up on an impossible task to teach her failure.
- The Lancer: To Ashe. She does most of the resistance's networking with other groups.
- Male Gaze: Inspires this both in and out of universe.
- Mythology Gag: Based on the character of the same name from Final Fantasy XII.
- Politically Incorrect Hero: Our first encounter with Fran has her treating Jenomis and his troupe as "those who would see [her] nation burn" for no other reason than that they are Garlean, and completely disregards the fact that - as the Warrior of Light can point out - they defected from the Empire long ago (and have never been anything more than performers to begin with). Even after agreeing to aid them, she continues to address Jenomis as "defector".
- Secret-Keeper: Fran is the only one who knows the truth about Ashe. According to her field notes she feels awful for keeping it a secret, but will continue to do so until the time is right for Dalmasca's sake.
- Secret Test of Character: Fran sends the Warrior of Light to beseech the aid of the Eorzean and Eastern alliances in exchange for her help in finding Orbonne Monastery, but her list of demands are lofty to say the least and ultimately rejected. However, her goal wasn't actually to see if the alliances would cave, but to see if the Warrior would even go through with it and thus prove worthy of her trust.


- Adaptational Heroism: While he initially seems to be the same merciless bounty hunter as his Final Fantasy XII incarnation, this Ba'Gamnan turns out to be a Fallen Hero seeking to Set Right What Once Went Wrong.
- Bad Boss: He shoots one of his own henchmen simply for making a bad joke. When the crew makes their departure, Ba'Gamnan doesn't even bother waiting for the guy he shot to get on board, forcing the man to jump towards the airship and hang on for dear life as they fly away.
- The Captain: He used to be a Dalmascan Captain under Rassler's command and his crew were a part of his unit as well.
- Composite Character: His background as a Dalmascan Captain who failed to protect the royal family mirrors that of Final Fantasy XII's Captain Basch fon Rosenburg, though he is otherwise still Ba'Gamnan.
- Failure Knight: As Captain of the Dalmascan army, he swore to protect Prince Rassler and his sister Ashe. Both siblings died during the Garlean Empire's attack on Nalbina Fortress and the city of Dalmasca, something Ba'Gamnan blamed himself for and would continue to do so for the next thirty years.
- Fallen Hero: He was a captain under Prince Rasler's command thirty years prior. When the Garlean empire attacked and killed Rassler and Ashe, Ba'Gamnan felt like he failed the people he was suppose to protect. He seeks the auracite to undo his mistakes, only to succumb to its power and view everyone as a Garlean, lashing out against them before transforming into a dragon and being slain by the Warrior of Light.
- Glowing Eyes of Doom: His eyes glow bright yellow after he succumbs to the auracite.
- Hostage for MacGuffin: Holds Ramza's father hostage and lets him go when the party gives him the auracite.
- I Let Gwen Stacy Die: Princess Ashe's death under his protection has haunted him for thirty years.
- Lame Pun Reaction: He responds to his henchmen making a bad joke by shooting him in the face.
- Lizard Folk: Being a bangaa, it's a given.
- Maniac Tongue: He licks his lips when fate is in his favor, giving everyone a good view of his long reptilian tongue.
- Mythology Gag: Is practically the same guy from Final Fantasy XII, though later developments in the story make him to be quite different from his original incarnation.
- Nice Job Breaking It, Hero: The Stinger for the raid storyline shows that Garlemald was able to discover the Clockwork City of Goug via a mole in the Prima Vista, who only found out about it because the troupe followed Ba'Gamnan to the Ridorana Lighthouse. In Goug, the Garleans discovered Construct 7 and its Tartarus device. So in attempting to take revenge against Garlemald, Ba'Gamnan managed only to hand the Empire a powerful weapon.
- Red Right Hand: His right arm swells to monstrous proportions after he succumbs to the auracite.
- Savage Piercings: He wears several large metal rings on his jaw and ears. The bangaa that holds Ramza's father at knifepoint has nearly double the amount of rings in the same places.
- Scaled Up: Ba’Gamnan is overwhelmed by the auracite and transforms into the mechanical dragon Yiazmat, becoming the final boss of the Ridorana Lighthouse.
- Set Right What Once Went Wrong: Believes the deaths of Ashe and Rassler was his own fault and seeks out the auracite in hopes of correcting his mistake. He went to great lengths to find an auracite and even held Ramza's father hostage for it.
- Tragic Keepsake: He wore a necklace entrusted to him by Prince Rassler to be delivered to Ashe once the captain helped her escape. He kept it when she died as a reminder of what happened and he never took it off, even when he was bathing.
- Tragic Villain]: He and his crew became criminals out of shame for failing their king when Garlemald invaded Dalmasca. Then he gets possessed by the auracite that was found in Rabanastre, and by the time your party finds him at the lighthouse, he is almost completely lost in a delusion that the war is still going on, and your party are Garleans. Eventually he is transformed into a monster and has to be put down.
- Walking Spoiler: While he does make a pretty big first impression, there is a lot more to him in his background that makes it hard to show without spoilers.

Discipline: Fusilier
- Adaptational Heroism: More even than Ba'Gamnan, seeing as he never becomes a boss fight. He even eventually joins the resistance.
- Ascended Extra: He has a much larger role in XIV than his counterpart from XII ever did, helping the heroes find Ba'Gamnan after he runs off, then introducing the heroes to Fran and the resistance, and then coming in at the last second to save the Bozjan Resistance from Queen Gunnhildr.
- Big Damn Heroes: In the Save the Queen storyline. Queen Gunnhildr has been summoned as a primal, the Bozjan Resistance's greatest soldiers have been tempered by her...and then Bwagi comes in out of nowhere to shoot Misija, thus causing Gunnhildr to disappear and creating an opening for everyone to retreat.
- Hidden Depths: His Field Notes document notes that he has a great interest in acting and entertaining people.
- Mr. Exposition: In Gangos, the player is given the option to ask him about Dalmasca, himself, and bangaa in general.
- Weak, but Skilled: Fusiliers use both swords and guns, but Bwagi had trouble mastering the blade. Fortunately, he makes up for it by being an amazing marksman.