Character page for the enemies (minions and main antagonists) of Kingdom Rush. Note that these entries are only for their appearance as enemies; tropes relating to their role as towers or heroes in other games should go on Kingdom Rush Towers or Kingdom Rush Heroes.
Return to the main character page here.
Villains and their minions
Orc Enemies
The first group of enemies faced in the main campaign. This group of enemies compose of Goblins, Orcs, Shamans, Ogres, Goblin Zappers, Orc Champions, Worg Riders, and Forest Trolls.
- Arch-Enemy: They are this to the Bandit enemies, being against them after the Bandits constantly kidnapping them and forcing them to play in their Gladiator Games. This makes their involvement in the game with them as Teeth-Clenched Teamwork.
- Carry a Big Stick: The Ogres and Forest Trolls wield massive clubs and trees respectively.
- Cool Helmet: Worn by the Orc Champions.
- Defeat Equals Explosion: Goblin Zappers blow up upon death.
- Elite Mook: The Orc Champions. They are the most powerful enemies in this group, with their nearly-invulnerable armor and strong attacks.
- Everyone Has Standards: They find the way that the bandits hold their Gladiator Games to be abhorrent.
- Fantastic Racism: The Orcs, Goblins and Ogres used to have this for each other, however, the raids by the bandits, as well as the heroism of Veruk, allowed them to tolerate each other and lay their grudges for each other to rest, forever. Currently, this is directed towards the humans (but mostly the bandits).
- Fire-Forged Friends: The Goblins, Orcs, and Ogres originally hated each other, and thought of themselves as superior to each other. This was until Veruk's heroism inspired all of them to forget about their feud and unite as one against the bandits who terrorised them.
- Foil: Physically, to the bandits, and humans in general. These tend to be very strong and stereotypically rather dim, whilst the humans (and in this case the bandits), are weak, but have very sharp minds, which allows them to set traps to capture them.
- Giant Mook: Downplayed with the Ogre, which is only somewhat big, but is encountered very early and has very high health and attack by that point of the game. Played straight with the Forest Troll, which is much tougher and among the biggest enemies in the game.
- Goggles Do Nothing: The Goblin Zappers.
- Healing Factor: Forest Trolls regenerate health in a similar manner to the mountain trolls.
- Heavily Armored Mook:
- Orcs are the first enemy in the game (and the series) to have armor. While low armor isn't impressive compared to later enemies, they are still dangerous in the early game as you cannot rely on archers and barracks to hurt them. Instead, magic is your best counter against these orcs.
- The Orc Champions have 80% physical armour. On the other side of the spectrum, the Worg Riders have 80% Magic Resistance.
- Horse of a Different Color: The Worg Riders are Orc Champions that rides the worg. They boast very high resistance and the Orc Champions will get off and move when its health hits 0.
- Mad Bomber: The Goblin Zappers.
- Malevolent Masked Men: The Shamans.
- Mook Medic: Shamans can heal other enemies.
- Our Goblins Are Different: The Goblins are the first enemies encountered in Kingdom Rush. They are very weak, but come in great numbers.
- The Goomba: The Goblins are the weakest enemies in Kingdom Rush.
- Our Orcs Are Different: The Orcs are the second enemies encountered in Kingdom Rush. They have light armor, allowing them to receive less damage from non-Mage Towers.
- Our Trolls Are Different: The Forest Trolls are distant cousins to the trolls encountered in the mountains. Like the trolls, they have regenerating health.
- Promoted to Playable: Goblins and Orcs are playable towers and heroes in Vengeance.
- Red Eyes, Take Warning: The Worgs of the Worg Riders. See Worg enemies below.
- Riddle for the Ages: The original reason as to why the Goblins, Orcs and Ogres started feuding each other is this. This later helped them put their differences to rest, and rally behind Veruk.
- Spikes of Villainy: The shoulder cladding of the Orc Champions have spikes on them.
- Zerg Rush: Goblins rely on numbers to be a threat.
Bandit Enemies
A common group of enemies faced in the main campaign. This group of enemies compose of Bandit, Brigand, Marauder, Raider, and Pillager.
- Cool Helmet: The Brigands, Marauders and Raiders all wear helmets.
- Cool Sword: The Pillagers wield some epic-looking swords.
- Devious Daggers: The Bandits wield knives as their primary weapon.
- Fat Bastard: Most of them seem rather portly, especially the Marauder and Pillager.
- Foil: Physically, to the orcs, and greenskins in general. These tend to have very sharp minds and stereotypically rather weak, whilst the greenskins, are very strong, but are said to be dim, which allows the bandits to set traps to capture the orcs.
- Giant Mook: Pillagers are huge and have tons of health and attack power. Marauders are also introduced this way in the early game, having high health at that point.
- Glass Cannon: Bandits have low health and no armor of any sort but are fast and deal huge damage to troops at the beginning parts of the game.
- Guest-Star Party Member: In Vengeance, they're available as mercernaries that can be hired in Lightseeker Camp.
- Heavily Armored Mook: Raiders boast 95% physical armour, tied for the highest in the entire series (discounting enemies that are immune to physical damage). Pillagers have 90% magic resistance instead.
- Humans Are Bastards: Not just to the player, but in-universe lore shows that they are also this to the Greenskins (Orcs, Goblins and Ogres), trapping them and forcing them to play in their Gladiator Games.
- Malevolent Masked Men: The Bandits and Pillagers were scarves that cover most of their faces.
- Mighty Glacier: The Pillagers are slow, heavily-armoured, and deal a lot of damage.
- Purple Is Powerful: The tattoos on the Pillagers are coloured purple.
- Spikes of Villainy: The Raiders wear spike armour and wield throwable spiked balls.
- Stone Wall: In contrast to Bandits, Brigands have good health and armor for a non-Giant Mook enemy but deal rather low damage.
- Tattooed Crook: The Pillagers have tattoos on their faces and torsos.
- Walking Shirtless Scene: Only the Raiders are ever shown to be wearing shirts.
- Weak, but Skilled: The Greenskins see them as this, being much weaker than them, but possessing a sharp enough mind to trap them and force them to fight each other.
- Weak to Magic: Only the Pillagers have any sort of magic resistance.
Dark Warrior Enemies
Another common group of enemies faced in the main campaign. This group of enemies compose of Shadow Archer, Dark Knight, Dark Slayer, Skeletons, Skeleton Knights, Necromancer, and Magma Elemental.
- Annoying Arrows: Courtesy of the Shadow Archers.
- Badass Long Robe: Worn by the Necromancers.
- Black Knight: The Dark Knight and Dark Slayers are Heavily Armored Mooks that deal high melee damage, and are essentially the Evil Counterpart to your Paladins.
- Cool Sword: The Dark Knights and Dark Slayers wield some awesome looking swords.
- Clown-Car Grave: Whenever any humanoid enemy dies in the last stages of the game, the Skeletons and Skeleton Knights spawn from a graveyard that's very close to the exit. Only the Skeleton Knights are a big deal in this case.
- Dark Is Evil
- Dem Bones: The Skeletons and Skeleton Knights respectively.
- Enemy Summoner: The Necromancer can create Skeletons and Skeleton Knights around them at any given time.
- Giant Mook: The Dark Slayers and the Magma Elementals.
- Heavily Armored Mook: The Dark Knights and Dark Slayers have 80% and 95% armour rating, respectively.
- In the Hood: The Shadow Archers and Necromancers wear sinister-looking hoods.
- Luckily, My Shield Will Protect Me: The Dark Knights have shields.
- Necromancer
- Promoted to Playable: Shadow Archers, Skeletons, and Dark Knights are playable towers and heroes in Vengeance.
Troll Enemies (+ Yeti)
An enemy group only encountered in the Mountain area. This group of enemies compose of Trolls, Troll Champion, Troll Chieftain, Troll Pathfinder, and Troll Breaker (and Yeti).
- Bigfoot, Sasquatch, and Yeti
- Evil Redhead: They all have red hair.
- Giant Mook: The Yetis and the Troll Breakers (sort of).
- Guest-Star Party Member: They're available in some of the Northern levels in Vengeance and you can hire them.
- Healing Factor: All of them have the ability to regenerate health over time.
- Improbable Weapon User: The Chieftain, Pathfinder and Breaker use a drumstick, sled and log as weapons, respectively.
- Light Is Not Good: The Yetis have white fur and are your enemies.
- Malevolent Masked Men: The Troll Chieftains were scary-looking masks.
- Mook Commander: Troll Chieftains can buff the speed and attack of other trolls around them.
- Our Trolls Are Different: These trolls are part of what's called the Ha'Kraj Nation, have blue skin, red hair, and regenerate health fairly quickly.
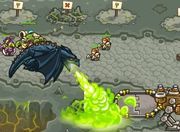
Demonic Enemies
An enemy group encountered in Vez'nan's lands and the Underworld. This group of enemies compose of Demon Spawn, Demon Lord, Demon Hound, Demon Imp, Demon Legion, Flareon, Gulaemon and Cerberus.
- Action Bomb: All of them explode on death which can damage troops.
- Airborne Mook: Demon Imps can fly over towers. Gulaemons are grounded but will fly over troops they encounter, although this is temporary and has a cooldown time.
- Bat Out of Hell: The Demon Imps could be considered this.
- Big Red Devil: The Demon Lords are a prime example of this trope.
- Contractual Boss Immunity: The Cerberus counts as a mini-boss, and are immune to Instant-kill abilities.
- Defeat Equals Explosion: Upon death, they explode to deal damage to anything around them.
- Degraded Boss: Cerberus initially appears as a Mini-Boss battle in Pit of Fire, but later on in Pandaemonium it appears twice on wave 10.
- Devil's Pitchfork: The Gulaemons wield tridents.
- Dungeon Bypass: Demon Spawn and Demon Hounds will randomly come out of the summoning circles on the ground of The Dark Tower level, with one of those circles being rather close to the episode.
- Fat Bastard: The Gulaemons.
- Flaming Sword: The Demon Legions wield these.
- Hell Hound: The Demon Hounds and Cerberus.
- Kevlard: Gulaemons are Fat Bastards and have more health than other non-boss demons.
- Meaningful Name: Gulaemons are named after Gula, the Spanish word for the deadly sin of Gluttony. Fittingly enough, they're all Fat Bastards.
- Mighty Glacier: The Gulaemons and Cerberus are very slow, powerful enemies.
- Mini-Boss: Cerberus is encountered at the end of Pit of Fire. It's powerful, fast, has a ton of HP along with armor, and has Contractual Boss Immunity to instant kill attacks.
- Mook Commander: The Demon Lords will grant infernal shields to other demonic enemies.
- Our Demons Are Different: Horned, red demons from the underworld. All of them explode on defeat.
- Playing with Fire: Flareons attack by throwing fireballs that burn your troops.
- Self-Duplication: Demon Legions can spawn a clone of themselves with the same amount of HP as the original.
- Suddenly-Harmful Harmless Object: The Cerberus is seen sleeping near one of the portals in Pit of Fire. On the very final wave, it wakes up and makes its way towards the exit.
- Taking You with Me: Their explosions can harm soldiers and heroes.
Worg Enemies
A common group of enemies faced in the main campaign. This group of enemies compose of Wulf, Worg, and Winter Wulf.
- Dark Is Evil: The Wulf and Worg enemies have very dark fur.
- Fragile Speedster: Wulves and Worgs are fast but don't have that much health. They do make up for it in numbers, however.
- Light Is Not Good: The Winter Wulf units are dangerous, white-furred enemies.
- No Body Left Behind: Oddly enough, they explode in a puff of black or grey smoke upon death instead of falling over.
- Red Eyes, Take Warning: The wulves have red eyes (if you look very closely).
- Savage Wolves: Packs of wolf-like enemies that are definitely not friendly.
- Zerg Rush: They tend to appear in large numbers each time, with the exception of Winter Wulves.
Flying Enemies
A group of enemies encountered throughout the campaign. These consist of Gargoyles and Rocket Riders.
- Airborne Mook
- Cool Helmet: Owned by the Rocket Riders.
- Cyborg: The Rocket Riders give off this vibe.
- Dark Is Evil: The Gargoyles.
- Defeat Equals Explosion: The Rocket Riders explode on death.
- Fangs Are Evil: The Gargoyles have visible fangs.
- The Goomba: The Gargoyles are very easy to kill.
- Jetpack: The Rocket Riders have some.
- Kryptonite Factor: They are affected by the Barbarians' Net Throw ability (Flash only).
- Nitro Boost: The Rocket Riders briefly have this ability when hit.
- Red Eyes, Take Warning: The Gargoyles.
Spider Enemies
A group of enemies encountered throughout the campaign. These include Giant Spider, Spider Matriarch, Spider Hatchling and Son of Sarelgaz.
- Elite Mook: Sons of Sarelgaz have a lot of health and they have both physical armor and magic resistance.
- Enemy Summoner: Spider Matriarchs lay eggs that hatch into three Spider Hatchlings.
- Fragile Speedster: The Spider Hatchlings.
- Giant Spider: All of them are pretty big, but the Sons of Sarelgaz take the cake by being as big as a tower themselves.
- The Goomba: The Hatchlings are ridiculously easy to kill.
- Guest-Star Party Member: In Vengeance, they're playable as special towers in Silveroak Outpost, and appropriately enough they spawn spiders as minions similar to a barracks tower.
- Heavily Armored Mook: The Sons of Sarelgaz are notably one of two enemies in the series to boast physical armor and magic resistance at the same time, the other being the Paragons.
- Mighty Glacier: The Sons of Sarelgaz are huge, heavy hitting, but thankfully, rather slow.
- Purple Is Powerful: The Sons of Sarelgaz, like their mother, are purple, and very difficult to beat.
- Red and Black and Evil All Over: The Giant Spiders have a red and black colour scheme.
Swamp Enemies
A group of enemies only encountered in Rotten Forest and Fungal Forest. These include Husk, Noxious Creeper, Mutated Hatchling, Tainted Treant, Swamp Thing and Rotshroom.
- Came Back Wrong: Whenever one of your barracks troops die, a Husk will rise up from a poison pool. Whenever one of your Earth Golems die, a Swamp Thing will rise up instead.
- The Corruption: What has affected and mutated all of them. It's revealed on the Ironhide Website that the forest was once a lush and lively place until the Diarchs of Varladul did a Deal with the Devil that cursed their kingdom and turned the Lush Forest into the Rotten Forest.
- Dungeon Bypass: In the Rotten Forest mini campaign, Tainted Treants will repeatedly pop up anywhere on the lane, bypassing a lot of towers if they pop up near your exit.
- Enemy Summoner: Just like Spider Matriarchs, Noxious Creepers spawn smaller spiders at a rapid rate.
- Fallen Hero: The Husks are your former troops, resurrected as monsters from the Poison Pools, while Tainted Treants were once guardians of the forest, who were corrupted by Greenmuck.
- Muck Monster: The Swamp Things are very much these.
- Mushroom Man: Rotshrooms are walking mushrooms with legs.
- Our Zombies Are Different: The husks are your former soldiers, their corpses corrupted by the forest into becoming your enemies.
- Poison Is Evil: The poison from Greenmuck created these things, and should your units fall they will be resurrected by the poison as Husks and Swamp Things.
- Purple Is Powerful: The Rotshrooms are purple.
- Shout-Out: The Swamp Things are a reference to... Swamp Thing.
- Underground Monkey: Noxious Creepers and their spawn are essentially stronger swamp versions of the Spider Matriarchs and Spider Hatchlings.
- When Trees Attack: Tainted Treants are moving trees with high armor.
Blackburn Enemies
A group of enemies only encountered in the Curse of Blackburn Castle mini-campaign. They include Zombies, Giant Rats, Wererats, Fallen Knights, Spectral Knights, Abominations, Werewolf, Lycans and Black Hags.
- Action Bomb: When Abominations are killed, they explode for massive damage in an area.
- Airborne Mook: Black Hags fly in a side-winding motion, unlike most other flying enemies that still follow the paths.
- Battle Aura: The Spectral Knights boost the attack damage of the Fallen Knights.
- Dark Is Evil: All of them embody this, whether through having darkly coloured skin/fur (Giant Rats and Werewolves), or through the clothes they wear (Wererats and Black Hags).
- Dungeon Bypass: The Zombies, Skeletons and Giant Rats can spawn from certain points along the maps. Zombies from various buildings and Zombie graves, Skeletons from Skeleton Piles (and some Necromancers that Guest Star in the Ancient Necropolis), and Giant Rats from Trash.
- Early-Bird Cameo: The Zombies, Abomination, Werewolves and Lycans all make appearances here before they make their appearances again in the Shadowmoon Campaign in Frontiers.note
- Fallen Hero: The Werewolves and Fallen Knights.
- Flesh Golem: The Abominations.
- Forced Transformation: Black Hags throw cursed magic at your forces, turning troops but not heroes into frogs. This is effectively a One-Hit Kill.
- Fragile Speedster: Giant Rats are fast and spread disease to your troops, but they have rather low HP.
- Giant Mook: Abominations are slow but have lots of health. Interestingly, their attack isn't too high for giant enemy standards, but the main danger is their tendency to spawn in numbers and their ability to explode on death.
- Instant Illness: Giant Rats and Wererats spread a Damage Over Time disease which also decreases damage dealt that immediately takes hold as soon as they hit your troops.
- Lightning Bruiser:
- Wererats move quickly and have a decent amount of health, and their main threat is their disease spreading that kills units and heroes in a jiffy while also halving afflicted units' damage output.
- Lycans. They're fast, damaging, can instakill your troops by turning them into werewolves, and have a good bit of health that constantly regenerates.
- Monstrous Humanoid: Abominations are very misshapen Flesh Golems made out of mutilated parts and limbs put together in the shape of a humanoid.
- Mook Commander: The mere presence of a Spectral Knight will boost the attack damage of nearby Fallen Knights.
- My Rules Are Not Your Rules: The Black Hags don't follow the normal paths, instead taking their own ones above everybody else on the maps.
- One-Hit Kill: The Black Hags turn your non-hero troops into toads, which die shortly after. Lycans have a chance to remove your troops by turning them into werewolves.
- Our Werewolves Are Different: They come in two flavours:
- Regular werewolves that are fallen heroes overcome by bloodlust upon being cursed.
- Lycans: They start as men but then transform into much more powerful were wolves who can spread lycanthropy to your troops.
- Our Werebeasts Are Different: There are two different types of werewolves, and then there are (of all things) wererats.
- Power Floats: The Spectral Knights float above the ground with a glowing purple hue.
- Purple Is Powerful: The Fallen and Spectral knights have a purple hue to them.
- Promoted to Playable: Zombies and Black Hags are playable as tower units in Vengeance.
- Rat Men: The Wererats.
- Resistant to Magic: Fallen Knights have extremely high magic resistance but lack any armor. This makes them tricky to defeat as they resurrect as a Spectral Knight when killed, which is completely immune to physical damage but Weak to Magic.
- Reviving Enemy: The Fallen Knights become Spectral Knights once you kill them, meaning you technically have to kill them twice unless you use the Arcane Wizard's Death Ray.
- Rodents of Unusual Size: The Giant Rats, obviously.
- Status Effects: Giant Rats and Wererats cause a poison-like effect on any units they hit and also decreases their damage dealt by afflicted units.
- Stone Wall: Abominations aren't too damaging for a Giant Mook thanks to their slow attack rate, but have low armor and sport a giant amount of health. Their most damaging ability in fact occurs when they die.
- Swarm of Rats: Both Giant Rats and Wererats tend to spawn in large numbers.
- Taking You with Me: When Abominations are killed, they explode for a massive amount of True Damage, enough to kill or severely wound most troops and heroes.
- Uncleanliness Is Next to Ungodliness: The Giant Rats and Wererats are so filth-ridden that their attacks spread a debilitating Instant Illness on your troops. The former can appear from trash piles while the latter are mentioned to revel in rot and decay.
- The Virus: Giant Rats and Wererats spread a disease to your troops that damages them over time. Lycans also spread lycanthropy to your troops, turning them into werewolves that don't give gold upon death.
- Was Once a Man: They were all regular human beings until Blackburn's attempt at ridding the place of evil corrupted them to wander the lands in a state of undeath.
- Weak to Magic: Spectral Knights are only vulnerable to magic attacks and are completely immune to physical damage. This makes them tricky to fight, as they spawn from Fallen Knights that are extremely magic resistant but lack physical armor.
- Wicked Witch: The Black Hags, with the hat, broom and magical abilities.
- You Dirty Rat!: The Giant Rats and by extension, the Wererats. Also taken quite literally as both of them spread disease on your troops.
- Zerg Rush: Zombies are weak and slow, but they are always spawned in massive numbers. Giant Rats also tend to spawn in numbers.
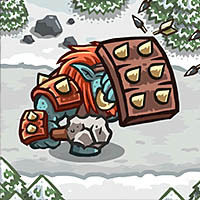
The Juggernaut

A gigantic golem monster built by Vez'nan forces to destroy the capital, is the first boss encountered in the main campaign.
- Arm Cannon: His left arm will sometimes open to shoot a giant missile at your troops.
- Art Evolution: Has gone through a noticeable one
 ◊ from the original to Vengeance, giving him more detail as well as Spikes of Villainy.
 - Golem: A colossal one, made of iron, he can even make smaller ones to attack.
- Horned Humanoid: His head is a giant horned helmet.
- Flunky Boss: He can spawn swarms of Golem Heads... sometimes far ahead on the path, meaning that, if you didn't level your back towers enough you can kiss your three stars goodbye.
- Promoted to Playable: In Vengeance, you can summon one to the battlefield with one of the special items.
- Rocket Punch: Its melee attack is this.
- Wake-Up Call Boss: Fitting, as this is the first boss and will teach you how you should deal with them.
J.T.

A titanic yeti who dwells nearby the Stormcloud Temple, he's the second boss of the main campaign.
- An Ice Person: Can cover nearby towers in ice, forcing you to thaw them via repeated clicks if you want to use them again.
- Bigfoot, Sasquatch, and Yeti: The boss of all the Yeti of Stormcloud Temple, and he's HUGE.
- Eating the Enemy: J.T. deals with soldiers, heroes, reinforcements and even elementals by just eating them. Your troops are later seen eating him in the Heroic and Iron Challenges, roasting his eyeballs over a campfire and his legs on a spit, turning above the campfire.
- Flunky Boss: He summons Yetis and Winter Wulves thoughout the final wave, until he dies.
- Ground Pound: His ice attack works like this. Also doubles as Weaksauce Weakness, as he stops for a few seconds to catch his breath after performing this attack.
- King Mook: Of the Yetis.
- Literally Shattered Lives: In his death animation he's frozen in his own ice and then shatters.
- Oh, Crap!: His last facial expression upon defeat.
- One-Hit Kill: His ability to eat soldiers and even heroes is this.
- Punny Name: "J.T." sounds a bit like "Yeti", which is exactly what he is.
Vez'nan

The evil dark lord who's attacking the kingdom and de facto Big Bad of the campaign, he's fought after all his troops in the last scenario, the Dark Tower.
- The Bad Guy Wins: In Vengeance, he succeeds in disposing of King Denas and taking over Linirea by the end of the game. Later on, he also succeeds at taking over Hammerhold, with nobody to rebel against him because his forces defeated King Malik in a Trial by Combat for the crown, fair and square.
- Big Bad: Of the first game and main campaign, though some of his actions influences other scenarios too.
- Big "NO!": When he returns to the realm of the living in Vengeance, he lets one out when he sees the state of his dark tower (the humans turned it into a happy amusement park).
- Clipped-Wing Angel: When you kill him he turns into a giant red demon, which is actually weaker than his human form as he can no longer use his special abilities. It's still a nasty surprise if you manage to nail him only when he's past halfway.
- Cool Crown
- Deal with the Devil: Implied to be the source of his powers, as he's later seen in Hell in another scenario. According to the Ironhide website, it was implied that he had sold his soul to the Demons, possibly before the Tear of Elynie was corrupted. His legions of undead are from a deal with the ancient ghosts (a.k.a. the Ghost Kings).
- Evil Mentor: Vengeance reveals that he was the mentor of Magnus Spellbane.
- Evil Sorcerer: A powerful wizard capable of blocking your towers with his magic.
- Evil Versus Evil: In Vengeance, all the mini-campaigns pit him against other evil beings like Polyx the Sage, The Winter Queen, and the Ghost Kings.
- Even Evil Has Standards: When the Ghost Kings demand the souls of half the living people in the now-conquered Linirea, even Vez'nan thinks it's too much. The fact that they never stated this in their bargain didn't help matters.
- Everyone Has Standards: Despite having a huge and powerful Dark Army and being generally willing to recruit powerful people into his troops, Vez'nan refuses to incorporate dinosaurs into his army out of Pragmatic Villainy. The dinosaurs' insatiable appetite and their insanely quick reproduction would spell disaster for his troops' supplies.
- Face–Heel Turn: He was a hero unit in Origins.
- Final Boss: Of the first game's main campaign.
- Glass Cannon: His first form only has 6666 health, which is extremely low for a boss (only Myconid has less). However, his regular attack is a One-Hit Kill.
- Goofy Print Underwear: When he was brought back from Hell in Vengeance, he comes back with nothing except his crown and a pair of boxers with skull prints on them.
- Guest-Star Party Member: In the final level of Vengeance, he becomes a helper in the scenery by being able to charge up energy balls that he'll throw at the front-most enemy on the screen when tapped. This changes to making his summoned demon do a Shockwave Stomp attack during the final battle itself.
- Hidden Depths:
- Vengeance shows that he's not totally a Bad Boss, since he allows his troops to actually stop, rest, and get a drink from the Dwarves' Brewery once they conquer it. He's also shown to be very resourceful and opportunistic, preferring to take over and use the Dwarves' facilities for his army instead of destroying them. Finally, his entire reason for invading Linirea turns out to be a darkly well-intentioned one.
- It's also revealed that he paid the pirates and scavengers from Frontiers to cause havoc, distracting the army of Hammerhold so that they won't be able to come to Linirea's aid, knowing that they would be called on by Denas and that fighting an army of that magnitude would be suicidal.
- When the Ancient Ghosts claim their due after Vez'nan's victory, they want the souls of his defeated enemies... as well as half of the living population of the kingdoms. Vez'nan is not happy with the second part.
- I Shall Taunt You: Keeps insulting and taunting the player for the whole stage from his balcony.
- Money Is Not Power: Discussed in Vengeance. He declares that the Dwarves were fools for valuing gold as real power.
- Number of the Beast: Let's see... his regular attacks deal at least 666 damage, he has 6666 health on Normal, and his demon form always has 6666 HP regardless of difficulty.
- One-Hit Kill: If confronted by ground troops, he'll simply erase them with his scepter... which deals at least 666 damage.
- O.O.C. Is Serious Business: It's telling that the Winter Queen is not to be trifled with when his orders in the level description eschew most of the evil hamminess and show serious, solemn concern.
- Pet the Dog: He was the only person to have ever shown respect or care for Malagar, and took him in as his apprentice when he saw the kind of potential that he had. This resulted in Malagar's Undying Loyalty to Vez'nan, and he attempted to take revenge for the latter's death at Linirea's hand.
- Pintsize Powerhouse: All the other bosses follow the Attack of the 50-Foot Whatever trope, his warlock form is barely bigger than a Necromancer, while his devil form is still smaller than most bosses.
- Shout-Out: Nearly everything he says, check out the main page for more examples.
- Soul Power: He's capable of draining souls in the first game for massive amounts of damage. In Vengeance, your Rain of Fire is replaced by Soul Impact, a powerful spell cast by Vez'nan himself, and the Vez'nan's Wrath item makes him do a Smart Bomb that kills all the mooks on the screen by destroying their souls.
- Summon Magic: Can open satanic red portals that summon Demon Spawn and Demon Hounds during the battle, all of which are closer to the exit than the original entrances.
- Villain Protagonist: You play as his dark forces in Kingdom Rush Vengeance, and he's essentially your superior there.
- Villainous Breakdown: In Vengeance, he loses his cool after a series of mishaps against the Northerners, as seen by the level introduction texts.
- Well-Intentioned Extremist: His motives in Vengeance were due to Linirea and King Denas not heeding his warnings by keeping a sealed Eldritch Abomination in his castle basement, and that Vez'nan wanted to destroy it for good. "The True Battle Begins Now", indeed.
- Your Soul Is Mine!: He can suck out your troops' souls.
Sarelgaz
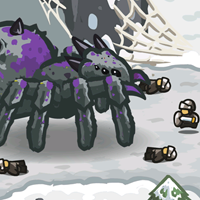
The Northern Spider Queen, this ancient arachnid behemoth was awakened by Vez'nan's magic. Is the boss of the stage "Lair of Sarelgaz".
- Damage-Sponge Boss: She is literally a huge bag of hit points, with no special abilities at all.
- Eating the Enemy: Whoever has the misfortune of fighting her face to face is Swallowed Whole.
- Giant Spider: Their queen, and is really colossal in size, with her children being about the size of a tower themselves.
- Hive Queen: Before facing her, you have to face her rather huge brood of Giant Spiders.
- One-Hit Kill: Instantly eats troops she encounters.
- Purple Is Powerful: She's mostly purple-colored and is the strongest of her race.
- Sealed Evil in a Can: Was sleeping in her frozen lair, then Vez'nan awoke her.
Gul'Thak

Legendary warchief of the orcs, rides a colossal boar in battle. Is the boss of the "Ruins of Acharoth" level.
- Beast of Battle: The Boar that he rides on.
- Full-Boar Action: Rides a colossal boar, which does all the fighting.
- King Mook: For the goblinoid faction.
- Noodle Incident: It's mentioned that his battle prowess is matched only by his terribly boring campfire stories, which you don't get to hear.
- Staff of Authority
The Kingpin
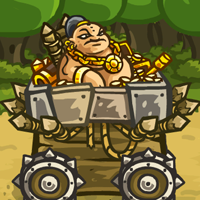
The leader of all the bandits, outlaws and ruffians of the realm. He's the boss of the "Bandit's Lair" stage.
- Bling of War: He wears a lot of gold while on his way out of his lair.
- Dirty Coward: While other bosses are marching toward the goal in order to defeat you, it's highly implied that the Kingpin is doing this merely to escape you and reform his band somewhere else.
- Fat Bastard: He's so obese he has to be carried around on a wooden platform on wheels.
- Gladiator Games: He held them using large beasts and Greenskins to fight each other, including Veruk, who later became the greatest hero for the Greenskins that he originally imprisoned.
- The Hedonist: Getting his minions to trap Greenskins in order to make them fight in Gladiator Games for his own amusement, screams of this trope.
- King Mook: For the outlaw enemies.
- Mighty Glacier: He's an insta-killing boss who really takes his time to get to the exit.
- One-Hit Kill: Crushes any unit he runs over.
- Screw This, I'm Outta Here: Pretty much what he's doing in the final wave, albeit very slowly.
- Spikes of Villainy: His wagon has pikes coming out of it, as well as spiked wheels.
Ulguk-Hai
Warchief of the trolls, bears a massive shield with him. Is the boss of the "Ha'Kraj Plateau" stage.
- The Bus Came Back: In Legends of Kingdom Rush, the Unblinded sacrifices himself to bring him back from the dead. Of course, thanks to the influence of the Overseer's cult, he comes back wrong as a part-eldritch crystal monstrosity.
- Carry a Big Stick: His weapon is a rudimental club with a stone head.
- The Conqueror: He is implied to be this, since the briefing for Ha'Kraj Plateau states that he united them under "his blood-red banner!".
- Evil Smells Bad: His Flavour Text (above) states that he has an awful breath.
- Evil Redhead: Like the trolls at his command.
- King Mook: Of the trolls.
- Large and in Charge: Like the other bosses he's a behemoth.
- Luckily, My Shield Will Protect Me: Carries around a colossal spiked shield. When not engaged in combat with another unit, he'll raise his shield, being invulnerable to all damage.
- Puzzle Boss: His shield makes him hard to damage, but whenever he runs into a melee fight he has to put away the shield, which means that you can whale on him with the other nearby towers as he fights.
- Spikes of Villainy: He wears spikes on his armour and his shield.
Greenmuck
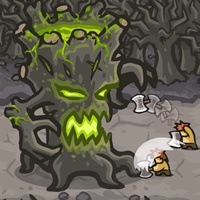
A giant treant source of the corruption and boss of the stage "Rotten Forest".
- The Corruption: The source that corrupts the entire forest.
- Flunky Boss: He summons plenty of Tainted Treants and Swamp Things throughout the last level.
- King Mook: Of the Fallen Treant and Swamp Things.
- Poisonous Person: His trunk is filled to the brim with the toxic junk that is spoiling the forest.
- Walking Wasteland: The effects of his presence in the forest.
- When Trees Attack: A colossal, poisonous treant.
Myconid
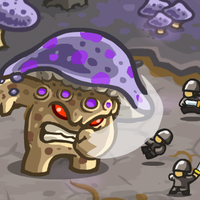
The ferocious leader of the rotshroom and boss of the "Fungal Forest" stage.
- Asteroids Monster: When he's killed in the Flash version, he splits into 25 Rotshrooms.
- Boxing Battler: His flavour text says that he has strong boxing skills.
- The Corruption: Similar to Greenmuck, though in this case, a fungal infestation instead.
- Exactly What It Says on the Tin: It's a myconid that's called Myconid.
- Flunky Boss: Spawns groups of Rotshrooms at a fast rate.
- Fragile Speedster: He has the second-lowest health of all the bosses in the series. To compensate, he's the fastest.
- King Mook: For the Rotshrooms.
- Meaningful Name: He's named after the Mushroom Man monsters from Dungeons and Dragons, due to being... a Mushroom Man monster.
- Mushroom Man: A giant walking mushroom.
- Purple Is Powerful: He's a big walking purple mushroom.
- Red Eyes, Take Warning
- Technicolor Toxin: Releases poisonous purple spores.
- Walking Wasteland: The effects of his presence in the forest. Unlike Greenmuck, he is causing a toxic mushroom infestation instead.
Moloch

The demon lord of Pandaemonium. Is the boss of the stage "Pandaemonium".
- Big Red Devil: He is one, sans wings.
- Demon Lords And Arch Devils: The demon king of Pandaemonium.
- The Dreaded: Everyone fears him, and there are tales about his badassery, including literally eating hot coals for breakfast.
- Horn Attack: How he deals with soldiers. It's a One-Hit Kill, but cannot spam it.
- Horns of Villainy
- King Mook: For all the demonic enemies encountered in the game.
- The Man Behind the Man: For Vez'nan.
- One-Hit Kill: Anybody on the receiving end of his head smash is destroyed, even heroes.
- Orcus on His Throne: Literally, he sits there on his throne for all the duration of the battle. As the last wave starts he stands up and walks toward your goal.
- Skyward Scream: Has one in his death animation as he explodes.
- Spikes of Villainy
- Use Your Head: His One-Hit Kill head smash kills all soldiers in an area around him.
Lord Blackburn
Once a powerful and just servant of goodness and justice, his quest for even more power to fight the evils of his land turned him in the very same things he set out to destroy. His kidnapping of the elderly King Banesti of Niroma makes him the Arc Villain of the Curse of Castle Blackburn mini-campaign, and the boss in "Castle Blackburn".
- A Father to His Men: He loved his citizens, and his citizens loved him back. He would have done anything to make sure they were safe, but in the end, he only made it far worse.
- Animated Armor: His backstory reveals that he's a ghost possessing a giant suit of armor, as his physical body is long gone after the ancient spell that was cast to "protect" his lands.
- Anti-Villain: All he wanted was power to stop his enemies, see below for details.
- Black Knight: His looks. A nice subversion if you were expecting a vampire to fit the gothic horror theme of the stages.
- Cool Helmet: One with curled horns on it.
- Face–Heel Turn: Again, he was one of the good guys.
- Fallen Hero: Much to the surprise and grief of your troops. According to the Ironhide Games website, this went into affect after his lands were attacked by brutal raiding parties, and his insistence on an ancient, dangerous spell, cast by the coven of white witches who served him. This resulted in The Corruption of his lands in the long term and forced him into a state of undeath, determined to finish what he started.
- Fate Worse than Death: Because of the spell cast onto him, his people and his lands, he is now forced to live in limbo between life and death, forever, never allowed to move from his current state at all.
- Feeling Their Age: He was getting old, and he was very much aware that it was diminishing his ability to fight the evils that would occasionally raid his lands. Because of this, he thought of himself as a failure, and poured over ancient scrolls in his family's library in order to find something, anything that could stop the evil from tainting his lands.
- Glowing Eyes
- Godzilla Threshold: The ancient spell he ordered the coven of white witches to perform to stop the evil from his lands was this. This resulted in the spell not being as clear cut as it seemed, and it turned Lord Blackburn's lands into the wasteland that was present in the present day.
- Gone Horribly Right: The spell that he ordered the white witches to perform on his lands worked, and evil never came near the lands again. However, this was only because of the spell corrupting the land and its inhabitants into monstrous beings, a place where nothing living would survive for long, meaning nobody would want to go there anyway.
- The Good King: Every single action he took was so that his citizens would be safe from the evil that surrounded the lands.
- Ground Pound: Uses this to disable all your towers around him and stun all troops around him.
- Heavily Armored Mook: Has the highest physical armour of all the bosses in the series, reducing 90% of incoming non-magical damage (discounting the Ancient Ghost that is immune to physical damage).
- He Who Fights Monsters: His search for power to destroy the evils plaguing his land turned him into one of the very evils he wanted to destroy. He spent much of life making sure that no evil would his lands an people, only for everything on that land, himself included to become evil in its place.
- History Repeats: Like Tristan and Umber before him, he was a ruler who resorted to dark magic to protect his kingdom, turning it into a haunted wasteland. Unlike the Diarchs of Varladul, Lord Blackburn had a more sympathetic reason for doing so.
- King Mook: He looks like a beefed up version of the Fallen Knights you've previously encountered.
- Knight Templar: Apparently the reason why he's trying to execute the foreign king.
- Married to the Job: He spent all of his time being devoted to the duty of protecting his people, never having time for anything else, least of all a family.
- No Ontological Inertia: He's the only boss in the first game who has all his minions die and the waves stop coming as soon as he goes down.
- Not Quite Dead: Due to the nature of the curse that he unwittingly had placed onto his lands, he is still partially alive, albeit in limbo and unable to properly move onto an afterlife. This is shown in the "Cursed Bargain" mini-campaign in Vengeance, where his suit of armour is on display, and still displays his soul when fully put together.
- Pride: A tragic example. He saw himself as the only thing that could protect his people from the evil that ravaged the lands, and stopped at nothing to prove this, from which he got to the ancient scrolls that had the spell that would curse him, his lands and his people. This eventually twisted into the way he rules over his lands to the present, kidnapping an elderly foreign king for the purpose of executing him on illogical charges.
- Purple Is Powerful
- Scary Impractical Armor: Which also means he's hard to damage with everything that's not magic.
- The Sleepless: When it became obvious that he was getting too old to protect his people for much longer, he spent countless sleepless nights to try and find anything that would be able to to do so in his place.
- Smoldering Shoes: All that's left of him upon death are his armoured boots and his axe.
- Spikes of Villainy
- Status Buff: His suit of armour in The Ancient Ghosts level of Vengeance provides this to your towers, with the full set giving your towers a 50% damage boost.
- Tin Tyrant: Fully clad in menacing armour and is definitely not a nice ruler anymore. The armor's not for show, either — it reduces 90% of incoming physical damage.
- Tragic Villain: He spent his entire life protecting his people, but when he got old, he was less and less able to achieve this. When his lands were razed and slaughtered by evil forces, he took the drastic action of asking the white witches to cast an ancient spell that would rid his lands of the evil forces. This caused The Corruption of everything on his lands, from the people, to the coven, and then himself. He's not even allowed to move onto an afterlife, living a state between life and death.
- With Great Power Comes Great Insanity: His quest for power led to him turning evil.
Elder Shaman
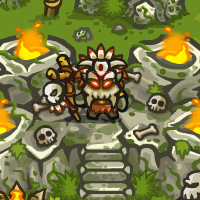
A goblin shaman that keeps taunting you as he sends his endless horde of army against you.
- Dem Bones: He has a lot of skulls on his podium.
- Healing Hands: He can summon a totem to heal enemies.
- I Shall Taunt You
- Magic Staff: That allows him to summon totems to assist his troops.
- Malevolent Masked Man
- No Name Given: Ironhide hasn't bothered to write any lore for this guy at all. He doesn't even have a name; the title Elder Shaman was coined by an administrator of the Kingdom Rush wiki and later become stuck.
- Orcus on His Throne: He never steps down to confront you directly. He instead gives either health or speed buffs to the enemies. The most direct thing he can do to hurt you is to set up a totem that burns you.
- Red Eyes, Take Warning
- Sprint Shoes: He can summon a totem to speed up enemies.
- The Unfought: You don't actually get to fight him, since his purpose is to aid the enemies in endless mode.
Desert Enemies
A group of enemies encountered in the desert and the beaches. This group of enemies compose of Desert Thugs, Dune Raider, Desert Archer, Sand Hound, War Hound, Immortals, Fallen, Executioner, Giant Scorpions, Giant Wasps, Giant Wasp Queens, Dune Terror, Sand Wraiths.
- Airborne Mook: Giant Wasps and Giant Wasp Queens are the early-game flying enemies.
- Annoying Arrows: Courtesy of the Desert Archers (like the Shadow Archers before them).
- Aquatic Mook: The Unique Enemy, the Gunboat at Port Tortuga, is an enemy unit that only appears briefly, and proceeds to go away if you don't destroy it.
- BFG: Several that target your troops and heroes on the map.
- From Nobody to Nightmare: It's controlled by a Desert Thug.
- Metal Slime: If you manage to destroy it, you get 100 gold in return.
- Asteroids Monster: When a Giant Wasp Queen is killed, about 6 Giant Wasps emerge from her.
- Enemy Summoner: The Sand Wraiths will summon a sarcophagus that spawns several Fallen. They also heal their allies and attack your units.
- The Executioner: The Executioner is a giant of a man with an executioner's hood and axe. True to form, his attack is a One-Hit Kill on any non-Hero Unit it hits.
- The Goomba: The Desert Thugs are the first enemies encountered and are the weakest enemies in the game.
- Heavily Armored Mook: Giant Scorpions have a 85% armor to go with a good amount of HP, necessitating magic towers to damage them.
- In the Hood: The Desert Archers, like the Shadow Archers before them, wear sinister-looking hoods.
- Kung Fu-Proof Mook: Dune Terrors cannot be attacked when they're underground, you need them to lure them out with barracks troops which causes them to surface and become vulnerable.
- Malevolent Masked Men: All of the human enemies here wear masks.
- Mighty Glacier: The Executioner instakills any non-hero units it hits but moves slowly.
- Mook Debut Cutscene: It's not so much a cutscene as it is a glorified animation, but the Executioner gets a pretty awesome one in Buccaneer's Den when he cuts down an entire path through a forest, revealing a new enemy entry point in the level.
- Multiple Life Bars: When an Immortal is killed, he'll turn into a Fallen and has to be killed again.
- Mummy: The Fallen are a mummy-like enemy. They either spawn when an Immortal dies or emerge from sarcophagus summoned by Sand Wraiths.
- No Body Left Behind: Just like the Wulves and Worgs, the Sand Hounds and War Hounds explode in a puff of black smoke upon death instead of falling over.
- One-Hit Kill: The Executioner instantly kills any troops it hits, although it cannot kill heroes.
- Sand Worm: Dune Terrors are essentially small versions of this that burrow underground and can only be attacked when they surface to attack your troops.
- Scary Scorpions: The Giant Scorpions are large, very durable, and can poison any units.
- Suspiciously Similar Substitute: The Desert Archers to the Shadow Archers, the Sand Hounds to the Wulves, and the War Hounds to the Worgs.
- Wicked Wasps: The Giant Wasps and Giant Wasp Queens. They are flying enemies, though they don't harm your troops.
Jungle Enemies
A group of enemies encountered in the jungles. This group of enemies compose of Jungle Spider, Jungle Matriarch, Spiderling, Savage Warriors, Savage Hunter, Witch Doctor, Earth Shaman, Spirit Shaman, Blood Trickster, Gorillon, Poukai Rider, Poukai, Parasyte, Reaper.
- Airborne Mook: The Poukai and Poukai Rider. While mounted Poukai are blocked by troops as the riders stop to attack them with javelins, the Poukai will immediately rush towards the exit once the rider dies.
- Arch-Enemy: They are the enemy to the Tuk'va Tribe, the tribe allied with you.
- Blowgun: The Savage Hunters use these with poison darts that poison your troops.
- Blood Magic: The Blood Trickster uses this to revive dead savages into Savage Zombies.
- Cannibal Tribe: The Ma'qwa Tribe, who are the main enemy in the jungle area. Their Savage Warriors will eat any fallen soldiers they killed (not Reinforcement or Heroes) and restore and add their health.
- Face Full of Alien Wing-Wong: The Parasyte's modus operandi is to latch onto a solider and quickly drain their health, and if this kills the soldier a Reaper hatches out. It doesn't cause Reapers to hatch from Skeletons or Sand Warriors, since both of them have no flesh to incubate.
- Face Hugger: Parasytes will latch onto your troops' faces and drain their health, if this kills the soldier it will spawn a Reaper.
- Giant Flyer: Poukai are birds that are large enough for the savages to ride.
- Giant Mook: Gorillons are huge gorillas with a lot of health and attack an area. Like most other giant enemies in the game, they're slow.
- Giant Spider: The Jungle Spider and the Jungle Matriarch, which are exclusive to the jungle area.
- Horse of a Different Color: Some of them ride Poukai into battle, hurling javelins at your troops. When killed, the rider dies and the Poukai attempst to rush towards the exit.
- Killer Gorilla: The Gorillons, who are the resident Giant Mooks controlled by Savage Warriors using a banana hung from a bamboo pole.
- Magic Staff: The Witch Doctors, Earth Shamans, Spirit Shamans and Blood Trickster all use these to battle you.
- Mighty Glacier: Gorillons hit hard and deal area damage, but thankfully move slowly.
- Malevolent Masked Men: All of the savages wear masks.
- Mook Commander: Witch Doctors have a healing aura that heals savages around them, Earth Shamans have an aura that provides armor to savages around them, and Spirit Shamans have an aura that provides magic resistance to savages around them.
- Mook Debut Cutscene: More like a glorified animation, but the Witch Doctors get two in Crimson Valley, clearing two paths for the other Savage Warriors and Jungle Spiders and Jungle Matriarchs to come through.
- Motivation on a Stick: The Gorillon's rider controls its mount by using a banana on a stick.
- Necromancer: The Blood Tricksters can resurrect enemy humanoid corpses into Savage Zombies. The only way to stop this is destroying the corpses like artilleries, silencing them, or letting the corpses disappear before they could reach them.
- Outside-Genre Foe: Most of the game's theme and enemies are from a Fantasy world... and then you have the sci-fi alien Parasytes and Reapers that came from the crashed alien ship.The men feel as if they're being hunted by something not of this world.
- Poisoned Weapons: The Savage Hunters shoot poisoned blowdarts at your troops.
- Shout-Out: Parasytes are basically a cross between facehuggers and headcrabs.
Cavern Enemies
A group of enemies encountered in the undergrounds. This group of enemies compose of Saurian Broodguard, Saurian Nightshade, Saurian Myrmidon, Saurian Razorwing, Saurian Quetzal, Saurian Blazefang, Saurian Darter, Saurian Brute, Saurian Savant, and Saurian Deathcoils.
- Airborne Mook: The Razorwings, and their King Mook, the Quetzals.
- Alien Blood: They have bluish blood.
- BFG: The Blazefangs possess these as weapons.
- Cool Sword: The Myrmidons have these.
- Disintegrator Ray: The Saurian Blazefangs' plasma shots have a chance to instantly disintegrate your troops for a One-Hit Kill.
- Giant Mook: Saurian Brutes are huge, have loads of health, deal insane amounts of damage to troops, but move very slowly.
- Imported Alien Phlebotinum: They were given technology from the Ancient (alien) Being, Xoguieth, after they tended to his wounds.
- Invisibility Cloak: The Saurian Nightshade can turn invisible when they reach half of their health, bypassing your defenses. However, though they cannot be targeted, they can still take damage, mostly from artillery.
- Life Drain: Saurian Myrmidons can bite your troops to replenish their health.
- Lizard Folk: The Saurian as the main enemy group in the caverns.
- Long-Range Fighter: The Saurian Deathcoils have a range of over half the map and their ranged attack is very painful at 100 damage. In contrast, their melee attack is far weaker at 10-22 damage.
- Man Bites Man: The Saurian Myrmidon will bite one of your troops to replenish some of its health.
- Mighty Glacier: Saurian Brutes have a ton of hit points and can deal extreme damage to your troops (especially with their Cool Energy Whips AoE attack). Fortunately, they move slowly.
- Mook Maker: The Quetzals lay eggs that create Razorwings.
- One-Hit Kill: The Blazefangs wield massive plasma guns that can occasionally kill your troops in one hit.
- Plasma Cannon: The Brutes wield a pair of enormous and deadly plasma whips.
- Reptiles Are Abhorrent: All of them are hostile Lizard Folk who support Lord Malagar.
- Sniper Rifle: Saurian Deathcoils wield a sniper rifle with a range of around half the screen.
- Stealthy Mook: The Saurian Nightshades will turn invisible at half HP to bypass your defences without being targeted. However, they're still vulnerable to Splash Damage.
- Summon Magic: The Savants create portals that Broodguards, Nightshades and Darters come out of, and they don't give any gold.
- Teleport Spam: The Darters teleport whenever they get hit.
- Turn Red: The Saurian Broodguard moves faster upon losing health.
- Useless Useful Spell: One of the Saurian Deathcoil's abilities is costing 2 lives if they leak. Thing is, they'll most likely be stationary and not move often as they fire away at your respawning troops, making it very hard for them to actually reach the exit.
Ocean Enemies
A group of enemies encountered only in the Rising Tides mini-campaign, collectively known as the Deep Devils. This group of enemies compose of Greenfin, Redspine, Blacksurge, Deviltide, Bluegale, and Bloodshell.
- Anti-Frustration Feature: The Blacksurge is mercifully unable to use its health-regenerating, troop-bypassing and invulnerability-granting shell withdraw ability when it's near the exit.
- Anti-Magic: The Bluegale is completely immune to magical damage.
- Aquatic Mook: All of them can travel through the water unlike most of your troops.
- Cthulhumanoid: Bluegales are these crossed with Fish People and have a fish tail. They're also very proficient in magic.
- Defend Command: The Blacksurge can retreat into its shell when low on health, preventing it from being attacked by troops while also healing itself.
- Inescapable Net: Downplayed, the Greenfin and Redspine can throw nets at your troops which stuns them for a brief period of time.
- Fish People: The Greenfin, Redspine, and Deviltide are fish-men.
- Giant Enemy Crab: Bloodshells are huge, heavily armoured crabs that have high HP and deal huge damage.
- Giant Mook: Bloodshells have extreme amounts of armour, a lot of HP, and deal massive damage when attacking.
- Heavily Armored Mook: Bloodshells have extreme amounts of physical armor (95%) and are immune to artillery.
- Javelin Thrower: Redspines throw javelins at your troops, dealing heavy amounts of physical damage from a range.
- No-Sell: The Bloodshell is immune to damage from Artillery, and the Bluegale is immune to magical damage.
- Status Effects: Greenfins and Redspines can stun your troops, Blacksurges can temporarily disable your towers, and Bluegales can prevent your towers from being selected.
- Weather Manipulation: The Bluegale can cast storms that damage your troops, prevents your towers within from being selected/upgraded and heal Deep Devils.
Shadowmoon Enemies
A group of enemies encountered only in the Shadowmoon mini-campaign. This group of enemies compose of Zombies, Ghouls, Bats, Werewolves, Abomination, Lycan, Ghost, Phantom Warriors, Jack O' Lantern, and Vampiresa.
- Action Bomb: When Abominations are killed, they explode for massive damage in an area.
- Airborne Mook: The bats are fast flying enemies that get even faster if the moon is out.
- Dungeon Bypass: Vampiresa are often spawned at a distance of a third to half the distance of the lane they're attacking.
- Giant Mook: Abominations are slow but have lots of health. Interestingly, their attack isn't too high for giant enemy standards, but the main danger is their tendency to spawn in numbers and their ability to explode on death.
- Kryptonite Factor: Vampiresas will instantly die if struck by Lucrezia's Spin Attack.
- Life Drain: Vampiresa can use a very damaging Life Drain on your troops, which also gives them back a huge amount of health.
- Lightning Bruiser: Lycans. They're fast, damaging, can instakill your troops by turning them into werewolves, and have a good bit of health that constantly regenerates.
- Metal Slime: Jack O' Lantern isn't easy to kill since he summons Zombies and Ghouls. However, killing him rewards the player 200 gold.
- Monstrous Humanoid: Abominations are very misshapen Flesh Golems made out of mutilated parts and limbs put together in the shape of a humanoid.
- Our Ghosts Are Different: Spirits that can only be harmed by magic, coming in both ghost form, and the Phantom Warriors.
- Our Ghouls Are Creepier: Ghouls are undead which are much faster than Zombies and will cannibalize on their victims.
- Our Vampires Are Different: Only appearing as one gender and having a weakness to the Spin Attack of Lucrezia.
- Our Werewolves Are Different: Coming in two varieties (see the Blackburn enemies section of the Kingdom Rush enemies for more).
- Our Zombies Are Different: The basic enemy units are Zombies, which are weak and move slowly but always appear in massive numbers.
- Red Eyes, Take Warning: The Ghouls, Bats and Lycans all have red eyes.
- Stone Wall: Abominations aren't too damaging for a Giant Mook thanks to their slow attack rate, but have low armor and sport a giant amount of health. Their most damaging ability in fact occurs when they die.
- Suspiciously Similar Substitute: The Phantom Warriors are almost identical to the Spectral Knights of the Curse of Castle Blackburn mini-campaign, being floating fighters that are only susceptible to magic attacks. Though, they don't have the empowering aura of the Spectral Knights note.
- Taking You with Me: When Abominations are killed, they explode for a massive amount of True Damage, enough to kill or severely wound most troops and heroes.
- To Serve Man: The ghouls cannibalize on the corpses of your troops.
- Wicked Stepmother: With the revelation that Lucrezia is Vasile's daughter, the Vampiressas can be seen as this, seeing as there's nothing to suggest that they and Lucrezia like each other. That and the fact that Lucrezia's Spin Attack kills them instantly.
- Zerg Rush: Zombies are weak and slow, but they are always spawned in massive numbers.
Lord Malagar
A sorcerer who picked up Vez'nan's staff at the end of the first game's main campaign. He later claimed the Hammer of Ages from Hammerhold to awaken his master, Umbra, setting off the events of Frontiers.
- The Apprentice: He was Vez'nan's loyal apprentice until the former's demise.
- Avenging the Villain: All of his actions in Frontiers was about taking revenge (see below) on Linirea for what they did to Vez'nan.
- Bait-and-Switch Boss: At first it seems that you're going to face him in combat in the final stage, only for Umbra to awaken and kill him.
- Because You Were Nice to Me: After being treated like dirt for several years, Vez'nan was the first person to recognize his potential and allowed him to join. Since then, he's become extremely loyal to Vez'nan.
- Beneath Suspicion: He was little more than a slave when he was tasked with spying on King Denas for Vez'nan.
- Big Bad: Of Frontiers main campaign.
- Disney Villain Death: How he dies.
- Dragon Ascendant: He gained Vez'nan's staff after his (first) death, and the power that came with it.
- Evil Is Not a Toy: After summoning Umbra, the force of the exploding crystal knocks him to an edge of a cliff. He begs for his master to save him... and Umbra blasts him down into the abyss.
- Evil Sorcerer
- From Nobody to Nightmare: It's revealed that he used to be little more than a slave until Vez'nan recognized his potential and allowed him to join the Dark Army. Even without the same dark magic that Vez'nan held, he did learn a few tricks like a demon-binding ceremony. And once he found the book about Umbra and gathered the artifacts needed...
- Grave Robbing: The revelation that the Hammer of Ages is located on the grave of Fercon Ironbeard puts him squarely in this trope.
- Horrible Judge of Character: He thought that if he freed Umbra, he would reward him with his power via Fusion Dance. Oh how wrong he was.
- Improvised Training: He learned most of the magic that Vez'nan used by observing him and practising it himself.
- In the Hood: Wears a really sinister one. Seems to be a trend in the Dark Army, just like his master.
- I Shall Taunt You: He will occasionally take a break from breaking the seal on Umbra to taunt you and make quotes, just like Vez'nan before him.
- Not Quite Dead: The Hammerhold Campaign in Vengeance reveals that he survived the fall from Umbra blasting him. He's hidden in each of the five levels, and finding him in all five of them will give the achievement "Malagar Is Back!". Fittingly, the heroes Never Found the Body after Umbra's defeat.
- One-Hit Kill: Occasionally he zaps your troops with a deadly red beam.
- Red Eyes, Take Warning
- Revenge: His goal is to make Linirea and the world suffer after his master Vez'nan was slain by Linirea.
- Stealth Expert: He maneuvered his way through the shadows in Linirea in order to get to the artifacts that he wanted.
- The Unfought: He fires powerful attacks at you occasionally (see above) but he is never fought as he gets tosses aside by Umbra.
Nazeru

A red efreet who guards the Nazeru's Gate.
- Badass Finger Snap: He uses this to instantly disintegrate troops and summon Lesser Efreeti.
- Bald of Evil
- Beard of Evil
- Dishing Out Dirt: Can cover your towers in sand, taking them out of commission for a while.
- Flunky Boss: He'll summon Lesser Efreeti to go for the exit. After he Turns Red he summons even more.
- Fog Feet: Being a genie, he has a misty haze for a lower body.
- Genie in a Bottle: After being defeated, he is trapped inside a lamp. Playing the Heroic and Iron Challenge modes will show his lamp being sold by a merchant.
- Jackass Genie: "The red efreet are not the genies you dream of...," indeed.
- MacGuffin Guardian: He guards the only gate to the jungle where Malagar has fled to.
- One-Hit Kill: His attack can instantly kill a group of soldiers by turning them into ash. Even heroes are not immune.
- Pointy Ears
- Power Floats: Being a genie of course.
- Wake-Up Call Boss: He's the first boss you encounter and one that allows you to train for the other bosses.
Quincon

A giant grey gorilla ridden by the Warlord of the Ma'qwa tribe. Is the boss of the stage "Temple of Saqra".
- Beast of Battle: Quincon for the Ma'qwa Warlord.
- Big Guy, Little Guy: Quicon and the Warlord, respectively.
- Cool Crown: Both the Ma'Qwa Warlord and Quincon have one.
- Enemy Summoner: Will call forth Mandrilos from the jungle to rush at the exit.
- Killer Gorilla
- King Mook: The Warlord is this to the Savage Warriors while Quincon are this to his minions, the Mandrilos.
- Red Eyes, Take Warning
- Shout-Out: He's a gorilla that throws barrels as one of his attacks.
- Spikes of Villainy: Quincon has these on his armour.
- Squashed Flat: When Quincon is defeated, he falls on his back, crushing the Warlord.
- Throw a Barrel at It: When he's injured at a certain point, he'll retreat to a pole and throw barrels at any ground units.
Beresad
A feared dragon who guards his lair.
- Achilles' Heel: His flames will disable the tower it effects except for the Battle-Mecha, since it operates separately from the main tower itself.
- Dragon Hoard: He is seen sleeping on a cave full of treasure. When he leaves to attack, you could click/tap it and steal 100 gold from him.
- Face–Heel Turn: While he wasn't necessarily an ally in Origins, you can pay him to fight enemies. In Frontiers, his loyalty has been bought by Malagar and he harasses Linirea's forces within his lair. And in Vengeance, he's allied with Vez'Nan and actively attacks Linirea.
- Greed: His defining trait. He'll fight for whoever promises him the most riches.
- Only in It for the Money: He fights for whoever pays him the most. In Origins, he'll fight for you. In Frontiers, he's been bribed by the Saurians and Malagar. And in Vengeance, Vez'nan bribes him by promising him the treasures of the Dwarven Kingdom.
- Technicolor Fire: He breathes green fire that temporarily disables towers.
- The Unfought: He acts more like an obstacle than a foe, occasionally disabling your towers with green fire. Played with in Vengeance, he is fought directly by Linirea... except that he's a Hero Unit controlled by you with Linirea as the enemy.
Umbra

A creature of shadow imprisoned in a large crystal. Is the boss of the stage "Emberspike Depths".
- Anti-Climax Boss: In-Universe, Sha'tra regarded him as this, seeing him as nothing more than a nuisance.
- Bad Boss: Kills Malagar upon being freed, even if he had just completed the ritual and was begging for help.
- Blob Monster: When he loses all his health, he's blown into multiple shadowy blobs that need to be attacked to harm him. They'll reform, but he'll have lowered health when they do so.
- Damage-Sponge Boss: Has average health for a boss, but his ability to reconstitute himself from his remains means you have to destroy him multiple times before he stays down.
- Dark Is Evil: A creature of pure shadow who announces its desire to consume the world upon being released.
- Eldritch Abomination: An ancient god of Shadow and Darkness sealed in a massive crystal, much harder to kill even than previously met bosses like Moloch, a Demon Lord.
- Enemy Summoner: Summons Shade Elementals to overwhelm the defences while he weakens them by destroying them.
- Eye Beams: Which he uses to destroy your towers or heroes.
- Final Boss: The final opponent fought in the main campaign.
- Flunky Boss: Umbra never directly approach towards the exit, he summons Shade Elemental to do his job.
- From a Single Cell: So long as even a few blobs of his essence are intact, he'll be able to reform himself with all his abilities intact, albeit with less health as more and more of his remains are destroyed.
- Glowing Eyes: The only visible feature on its face, though he does reveal a mouth upon defeat.
- Greater-Scope Villain: Lord Malagar, wished to free him from his prison.
- My Rules Are Not Your Rules: He is one of two enemies in the entire series who can outright destroy your towers.
- Power Floats: A ghost like shadow creature who levitates under his own power.
- Russian Reversal: His description in the directory, as seen above.
- Sealed Evil in a Can: He was trapped inside a crystal prison until Malagar freed him.
- Tailor-Made Prison: His Crystal Prison we see him sealed in in Frontiers was specifically created to imprison him by the mages of Linirea, and he was sealed within it by Fercon Ironbeard and the Hammer of Ages.
- Victory by Endurance: Unlike other bosses, who are effectively instant losses by taking away 20 hearts upon reaching the exit, Umbra never goes for the exit himself. Rather, he summons endless hordes of Shade Elementals while slowly whittling away at your defenses by destroying your towers. On top of that his Shades only give a paltry 5 gold upon being defeated meaning the battle is effectively a race to destroy him before you completely run out of resources to fight back with.
- Villain of Another Story: Centuries before the events of the games, he was destroying the lands of Linirea, and decimating the population.
Leviathan

The ancient deity of the Deep Devils. Is the boss of the stage "The Sunken Citadel", and the Arc Villain of the Rising Tides mini-campaign.
- Achilles' Heel: When he blocks your towers with his tentacles, it stops in his tracks, leaving him vulnerable to the Rain of Fire or towers he missed.
- Attack of the Monster Appendage: During the stage, he will occasionally use his tentacles to block your towers or show a bit of his dorsal fin. Only after completing all of the waves he will emerge.
- Combat Tentacles: He uses his tentacles to temporarily disable your towers.
- Damage-Sponge Boss: His only special ability is to wrap his tentacles around your towers, which doesn't even require you to pay attention to it.
- The Dreaded: To seagoers, as seen in his description above.
- God of Evil: The Deep Devils worship him as a God.
- Kraken and Leviathan: He combines both the traits of a Leviathan and has tentacles like the Kraken.
- Noodle Incident: It is mentioned in the mission brief that he was already defeated once by Linirea's Navy, decades before the events of the game, alongside the "Corsair Brotherhood" but details are scarce.
Vasile

The vampire lord of the Dusk Chateau.
- Arch Nemesis Dad: Is revealed via
 Word of God to be Lucrezia's father.
 - Badass Long Robe
- Back from the Dead: Unsurprisingly, being a vampire and all. His return forces you to battle him and his minions.
- Battle Aura: In his second phase, he emits an aura that damages your units.
- Bodyguard Babes: The first time he appears he's surrounded by four of his buxom Vampiresa servants.
- Dirty Coward: When Dante ambushed him at his own castle he left his daughter Lucrezia to possibly face his wrath, though this turned out to work against him after the two of them grew to like each other and Lucrezia eventually turned against him.
- "Instant Death" Radius: In his second phase, he emits a very powerful life-draining aura that will easily off nearby troops and heroes in mere seconds.
- I Shall Taunt You: He will occasionally appear on the two balconies of his castle to taunt you and quote vampire fiction.
- Know When to Fold 'Em: When he was ambushed by Dante at his castle, he had no army there to back him up, nor did he prepare himself for an attack like this. He only managed to escape from Dante by vanishing away and letting him deal with his argumentative daughter, Lucrezia.
- Life Drain: Like any good vampire, he can suck the blood out of your troops.
- Offing the Offspring: He indirectly did this to Lucrezia in the past, leaving her to possibly die at the hands of Dante. He can do this directly to her in his boss level Dusk Chateau, if you're not careful in managing her.
- The Pawns Go First: When he ambushed Dante long before the events of the game, he let him destroy many of his Vampiresa army before getting to him himself, though whether this was intentional or not is never revealed.
- Power Floats: Feeling Too Important to Walk like any good vampire lord, Vasile floats above the ground towards you.
- Red Baron: Also known as "The Everlasting Prince".
- Red Eyes, Take Warning
- Sequential Boss: He has 2 phases.
- Shout-Out: He quotes many vampire works, including Twilight, Interview with the Vampire, Bram Stokers Dracula and even Dracula: Dead and Loving It.
- Tom the Dark Lord: The Everlasting Prince, vampire lord of the Dusk Chateau, has a completely ordinary Romanian name.
- Walking Wasteland: His aura during phase two kills your troops quickly.
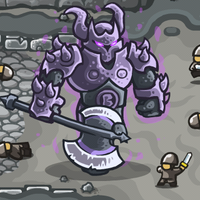
Xyzzy

The king of the Saurians. Is the boss of the stage "Darklight Depths".
- Dual Wielding: He dual wields a pair of hammers.
- Ground Pound: His special attack consist in pounding the ground repeatedly with his hammers, damaging your troops from far away.
- King Mook: Of the Saurian race.
- Large and in Charge: He greatly outsizes even the hulking Myrmidons and Brutes.
- Lightning Bruiser: He's surprisingly fast for a boss, though he often stops to perform his Ground Pound attack.
- Pet the Dog: He spared an injured Xoguieth and got the Saurians to tend to his wounds. Xoguieth in turn gave him and the Saurians his alien technology.
- Power Glows: His hammers, implied of being hi-tech weapons of alien origins just like his minions'.
- Purple Is Powerful
- Reasonable Authority Figure: He made sure to keep The Ancient Being Xoguieth alive, so that: 1. He wouldn't kill him and his Saurians, and 2. In order to try and create some of the technology that he had with him. The fact that The Ancient Being was also lived a long time afterwards also shows that he wasn't doing so just out of convenience.
- Royals Who Actually Do Something: He was very proactive in trying to reason with The Ancient Being that turned up on the Saurians' doorstep, and he attempted to rid the forces of Linirea from the caverns in Darklight Depths.
- Top-Heavy Guy: As seen in the picture.
God King
An ancient king of the deserts.
- Bling of War: He wears a lot of golden ornaments while on his throne
- I Shall Taunt You
- Orcus on His Throne: Being an endless mode boss, he doesn't move from where he stands.
- Quicksand Sucks: He can make a whirlpool of quicksand that can send enemies further down the road.
- Smoke Out: He can turn enemies invisible by cloaking them with sand.
- Summon Magic: He can summon an obelisk that can in turn summon enemies.
- The Unfought: Like any other endless mode antagonists, he only exists to aid the enemies.
- Walking Shirtless Scene
Reaper Queen

The queen of the Reaper aliens.
- Mook Maker: In addition to the parasytes, she can sometimes give birth to a fully grown reaper.
- Mother of a Thousand Young: She is the mother of the Parasyte and Reaper aliens.
- Purple Is Powerful: Well, purple and pink anyway.
- Religion of Evil: Some time after the defeat of Umbra, she infects the Ma'qwa cannibals with her Parasytes and becomes worshipped by them as their new Dark God.
- Silent Antagonist: She is incapable of speech and does not taunt you like most other antagonists.
- Status Buff: She can boost the attack and speed of any Parasytes and reapers in the battlefield.
- Super Spit: She can spit out poison at your troops.
- The Unfought: Like any other endless mode antagonists, she only exists to aid the enemies.
Gnoll Enemies
A group of enemies that only appear in the Woodland area of the game (including the Hulking Rage mini-campaign). These include the Gnoll Reaver, Gnoll Burner, Hyaena, Gnoll Gnawer, Perython, Gnoll Blighter, Gnoll Catapult, and Blood Gnoll.
- Airborne Mook: The Perythons are eagles with deer heads that fly past your troops. They can also come in carrying Gnoll Gnawers or rocks that they can drop on forces for heavy damage.
- Battle Aura: The Gnoll Gnawers have an aura around them whenever they are close to each other.
- Carry a Big Stick: The Gnoll Reavers carry large clubs with them to battle you and your troops.
- De-power: The Gnoll Blighters are able to stop the magic blossoms from being usable in the main campaign.
- Dem Bones: The Gnawers and Blighters have a lot of skulls on them when they arrive for battle.
- Even Evil Has Standards: Heinous as they are, they apparently find Hi-Hi Enha too much for them, as evidenced from locking him up in a cage and not inviting him to any parties.
- Fragile Speedster: The Hyenas are fast-moving enemies with some magic resistance and the ability to speed up to avoid combat with troops, but have lower HP than even the Gnoll Reavers.
- From Nobody to Nightmare: If corrupted by the Bloodsydian of the Blood Ogres, the Gnoll Reavers and Gnoll Burners became very fast and very deadly Blood Gnolls.
- Furry Confusion: The Gnolls are Funny Animal hyenas, but one of their unit types is an actual non-anthropomorphic hyena.
- The Goomba: Gnoll Reavers are the weakest enemies in the game.
- Heinous Hyena: They're all hyena people and none of them are nice at all. They also have actual hyenas as part of their forces.
- Hoist by His Own Petard: The Gnoll Burners death animation is them dropping their burning sticks on themselves and burning from it.
- Magic Staff: The Gnoll Blighters have staffs that they use to cast spells to wither Magic Blossoms and attack your troops from a distance.
- Metal Slime: Destroying a Gnoll Catapult nets you 100 gold, but you don't have much time to do so before it retreats.
- Mix-and-Match Critters: The Perythons are eagles with deer heads.
- Mook Commander: The Gnawers can buff each other when they are close to each other, increasing their damage output.
- Our Perytons Are Different: Perythons resemble large black birds with the heads of stags. Some of the airlift Gnoll warriors into battle.
- Playing with Fire: The Gnoll Burners, as the name suggests.
- Weak to Magic: Blood Gnolls are the only enemies in the series that have a magic weakness and take extra damage from magic.
- Zerg Rush: The main tactic of the Reavers.
Twilight Enemies
The Twilight Elves, the most recurring enemy of the game, and the ones with the largest range of levels as well, appearing in all stages and one mini campaign. These include the Twilight Harasser, Twilight Scourger (and its banshee), Twilight Avenger, Zealot, Twilight Evoker, Twilight Golem, Twilight Heretic, Arachnomancer, Drider, Blood Servant, and Mounted Avenger.
- Action Bomb: The Twilight Avengers can put a blasting spell on their comrades that affects your troops when they are killed.
- Arch-Enemy: To the regular elves that you are in charge of commanding.
- Asteroids Monster: The Arachnomancer splits into three Spiderbrood upon death.
- Ax-Crazy: The Driders are said to be this.
- Bad Boss: Twilight Scourgers whip their own troops, dealing damage to them, to speed them up, while Twilight Avengers turn their dying allies into bombs that harm all non-Twilight elf troops.
- Badass Long Robe: The Zealot, Evoker and Arachnomancer each have these.
- BFS: The Twilight Avengers carry ones that help to buff their comrades.
- Big Creepy-Crawlies: The Mounted Avengers ride big beetles into battle.
- Black Magic: Used by Twilight Heretics and Arachnomancers.
- Boss in Mook Clothing: The Twilight Golems have a whopping 4000 HP on Normal, deal insane area damage with their attack, and are have Contractual Boss Immunity to almost all One-Hit Kill attacks.
- Cerebus Syndrome: The arrival of the Twilight Elves (specifically the Harassers in Royal Gardens) signals the point in which the plot takes a more serious turn.
- Developer's Foresight: The Twilight Avenger's Blasting Curse explosion only affects non-Twilight Elves. This means that Twilight Elf Renegades, Reg'Son and Lynn are all immune to the effect.
- The Dreaded: The description for the Twilight Scourger says that their troops fear them more than any enemy.
- Dying Curse: Two examples:
- The Twilight Scourger releases a banshee on death that temporarily disables any tower that's close to it.
- The Twilight Avenger has "Blasting Curse" that it can give to its comrades and when said cursed die they explode any non-Twilight Elves nearby.
- Enemy Summoner: The Zealots will summon their comrades on runed circles on the floor of The Unseelie Court, a good deal closer to the exits than when the troops would originally come from.
- Evil Counterpart: To the regular elves under your command.
- Eyeless Face: The Blood Servants, have no eyes, none in the promo material, none in the game, none at all.
- Fair Folk: They are very much Drow in all but name.
- Fragile Speedster: The Blood Servants.
- Giant Mook / Golem: The Twilight Golems.
- Heavily Armored Mook: The Avengers and Golems both have a lot of physical armour.
- Hell Hound: The Blood Servants are pretty much this, being genetically-engineered monstrosities that attack troops with speed.
- Horse of a Different Color: The Mounted Avengers ride on huge beetles when they attack you.
- Injured Vulnerability: The Twilight Golems get slower as they take more damage.
- In the Hood: The Twilight Evokers wear hooded cloaks on them.
- Luckily, My Shield Will Protect Me: The Twilight Avengers all have shields, and when they are put down to fight, they have less physical armour on them (from 90% to 50%).
- Magic Staff: The Twilight Heretic has one that allows it to cast spells on your troops.
- Mighty Glacier: The Twilight Golems are juggernauts of health and defence and can clear troops very quickly with their attacks. However, they have terrible speed so they are easily weakened by your towers and they lose speed the more damage they are.
- Mook Commander: The Twilight Scourgers can buff their comrades into speeding up with their whips.
- Mook Medic: The Twilight Evoker can heal all nearby allies, as well as disabling towers.
- No-Sell: The Twilight Golems are totally immune to the instant death attacks of the Golden Longbow and Wild Magus. However, Reg'son's Vindicator will still kill them instantly.
- One Hit K Ill: The Twilight Heretic can instantly kill troops by sucking out their souls.
- Purple Is Powerful
- Red Eyes, Take Warning: Both the Evoker and Heretic have these.
- Rock Monster: The Twilight Golems are animated rock structures brought to life by the twilight elves.
- Spider People: The Driders are to quote "Half-Elf, Half-Spider Abominations".
- The Arachnomancers, by extension can be considered this, due to their ability to command them and explode into them upon death.
- Stripperific: Scourgers and Evokers wear very little clothing while battling you.
- Summon Magic:
- The Zealots in The Unseelie Court summon enemies through floor patterns from walls of the court.
- The Arachnomancers can summon Sword Spiders, Spiderbrood, and Sons of Mactans onto the battlefield.
- The Virus: Driders can infect your troops and turn them into Driders as well.
- We Have Reserves: Twilight Avengers turn their non-elf allies into bombs that harm all non-elf units, enemies and allies alike, simply to clear their path.
- Whip of Dominance: The Twilight Scourgers are cruel Mook Commander units that are dressed in skimpy armor and use their whips to give their allies a speed buff when battling you.
- Your Soul Is Mine!: The Twilight Heretics can insta-kill a soldier as one of their attacks. They can also use a spell to do so slowly to your troops.
Spider Enemies
A group of enemies that appear on the second and last stages of the main campaign, as well as the Forgotten Treasures mini campaign. They include the Sword Spider, Webspitter Spider, Spiderbrood, and Son of Mactans.
- All Webbed Up: The appropriately-named Webspitter Spiders have the ability to temporarily web up groups of your troops and even heroes, stunning them for a short while.
- Fragile Speedster: The Sword Spiders and Spiderbrood.
- Giant Spider: Most of them are pretty big, but the Webspitters are especially huge.
- Informed Ability: The Sword Spiders allegedly deal high damage as one of their notable traits in the Monster Compendium, but their attack is even lower than that of most other spiders in the series.
- Mutant: The Spiderbrood are spiders that are mutated by magic to become what they are now.
- Poison Is Evil: The Sons of Mactans are poisonous enemies.
- Purple Is Powerful: Played straight with the Webspitters, less so with the Spiderbrood.
- Red and Black and Evil All Over: The Sword Spiders and Sons of Mactans (the latter like their mother), both have a red and black colour scheme.
- Zerg Rush: The Sword Spiders in the Faery Forest stages, the Spiderbrood in the First City stages.
Enchanted Forest Enemies
A group of enemies only seen in the second stage of the main game. The enemies include: Satyr Cutthroats, Satyr Hoplites, Gloomy, Bandersnatch, Redcap, Boomshroom, Munchshroom, Fungus Breeder, and Screecher Bat.
- Airborne Mook:
- Gloomies are dull-looking fairies that fly over your troops. They have weak health, but can clone themselves which becomes problematic especially when your artillery doesn't target them.
- Screecher Bats that only appear in the "Bittering Rancor" mini campaign (specifically Duredhel Outskirts). They fly over your troops and use a screech to stun them.
- Asteroids Monster: The Fungus Breeder explodes into two Munchshrooms on death, while the Munchshroom explodes into two Boomshrooms on death.
- Ball of Light Transformation: The Satyr Cutthroats and Hoplites, Bandersnatch and Redcap will turn into a ball of light when travelling through the Dust Trails.
- Bat Out of Hell: The Screecher Bats, obviously.
- Be the Ball: The Bandersnatch is basically a giant hedgehog that curls into a ball to move very quickly.
- Defeat Equals Explosion: The Boomshroom, Munchshroom and Fungus Breeder will explode when killed.
- Dungeon Bypass: The Dust Trails will allow the Satyr Cutthroat and Hoplites, Bandersnatch and Redcap go passed a good deal of your towers towards the exit, and it's very hard to tell which enemy is which (unless your on a map that you can see them going into it in the first place).
- Enemy Summoner: The Satyr Hoplites will randomly summon three Satyr Cutthroats by beating their shields.
- The Fair Folk: Many of the enemies in the forest are malevolent fae.
- Fauns and Satyrs: The Satyr Cutthroats and Hoplites are satyrs.
- Glass Cannon: The Redcaps can deal a lot of damage, but have little armour to protect themselves.
- Good Smoking, Evil Smoking: The faeries of the Fungus Breeders smoke pipes.
- Heavily Armored Mook: The Satyr Hoplites have 50% physical armour on them, 80% on Impossible mode.
- Hoist by His Own Petard: The death animation for the Redcaps shows them impaling themselves with their own scythes.
- King Mook: The Satyr Hoplites are this to the Satyr Cutthroats.
- Lightning Bruiser: The Bandersnatches. Like most Giant Mooks in the series, they have a lot of health and hit hard while even sporting an area attack. Unlike most giant mooks, they also move very quickly by rolling into a ball and are immune to slowing effects when rolling.
- Luckily, My Shield Will Protect Me: The Satyr Hoplites have shields, which may or may not help them with their high armour rating. It also serves the purpose of summoning smaller Satyr Cutthroats.
- Magic Wand: The faeries that are responsible for "promoting" the Boomshrooms into Munchshrooms, use these do to just that.
- Mushroom Man: Subverted, the Boomshroom, Munchshroom and Fungus Breeder have no arms and only hop or trudge their way along the path.
- Names to Run Away from Really Fast: Satyr Cutthroats.
- One-Hit Kill: The Redcaps have chance of killing a soldier with one swipe from their scythes.
- Our Gnomes Are Different: The redcaps are evil gnomes that can be deadly.
- Red Eyes, Take Warning: The Satyr Hoplites, Munchshrooms, Fungus Breeder (the mushroom part) and Screecher Bats, all have bright red eyes.
- Self-Duplication: The Gloomies' special ability is to create a clone of themselves with the same amount of HP the original had, easily creating a swarm. And unfortunately, the Artillery which is normally the best counter to swarming enemies cannot target Gloomies, because they're also Airborne Mooks.
- Sinister Scythe: The Redcaps wield these.
- Super-Scream: The Screecher Bats scream at your troops, which stuns them for a little bit.
Cloud Enemies
A (small) group of enemies that are only encountered on the last stage of the main campaign. They include the Razorboar and Cloud Stalkers.
- Airborne Mook: Cloud Stalkers are flying enemies that use your troops to breed and multiply. Notably, they temporarily become a grounded unit vulnerable to Artillery when they latch onto a soldier.
- Critical Status Buff: Razorboars' damage increases as their HP drops.
- Face Full of Alien Wing-Wong: The Cloud Stalker's modus operandi is to latch onto a solider and quickly drain their health, and if this kills the soldier another Cloud Stalker hatches out.
- Flying Seafood Special: Cloud Stalkers resemble flying manta rays.
- Full-Boar Action: The Razorboars are large boars with a great amount of health. They also can charge into your troops to damage and bypass them.
- The Virus: Any troop that is killed by a Cloud Stalker will explode and produce another Cloud Stalker.
- Wreathed in Flames: Razorboars charge at your troops while on fire to deal heavy damage plus bypassing them.
Ogre Enemies
A group of enemies encountered in the Woodland area of the game, and the Hulking Rage mini campaign. They consist of the Ettin, Blood Ogre and Ogre Magi.
- Carry a Big Stick: The Ettins wield large trees as their weapon.
- The Corruption: The Blood Ogres are able to be this for the much weaker Gnoll forces (specifically the Reavers and Burners).
- Dumb Muscle: The Ettin are this.
- Evil Sorcerer: The Blood Ogres are warlocks that use the Bloodsydian to perform their dark magic-related abilities, while the Ogre Magi directly attack with magic and defend their allies with magic as well.
- Giant Mook: All of them have a great amount of health and do a great amount of damage.
- Ground Pound: The Blood Ogres do this when they corrupt the Gnoll Reavers and Gnoll Burners.
- Healing Factor: The Ettin is capable of regenerating health over time, as are the other ogres.
- Heavily Armored Mook: Ogre Magi have 75% magic resistance.
- In the Hood: One of the heads of the Ogre Magi appears to be wearing a hood over it.
- Multiple Head Case: All the ogres have two heads. Notably, the Ettin's two heads disagree with each other every now and then, causing it to hit itself with its own club and stunning it for a brief while.
- Our Ogres Are Hungrier: Two-headed beasts that can wield magic and generally more intelligent than the ogres of the first game.
- Power Crystal: The Blood Ogres use Bloodsydian as their source of magic, while the Ogre Magi use small green Crystals in their spells against your troops and heroes.
- Red Eyes, Take Warning: The Ettins have red eyes.
- Synchronisation: The Ogre Magi absorb the damage taken by its allies near it, and healing itself almost as quickly as it takes that damage.
Shadow Enemies
A group of enemies only encountered in the Forgotten Treasures mini campaign. The enemies include: Shadowspawn, Devourer, Dark Spitter, Shadow Champion and the reappearing Screecher Bat.- Action Bomb: The Shadow Champions explode on death, with dark blood in their death zone (see Taking You with Me below).
- Airborne Mooks: The Screecher Bats, as they were in the Faery Forest.
- Animalistic Abomination: The Devourers are unsettling dog-like things that eat your fallen troops. Even in death, they remain unsettling as they drop into a lifeless lump of flesh while their back splits open.
- Bloody Murder: The Dark Spitters spit out Dark Blood at your troops, which infects them and turns those who die while infected into Shadowspawn.
- Came Back Wrong: The Shadowspawn are the undead versions of your troops, now fighting you.
- Contractual Boss Immunity: The Shadow Champions are totally immune to the instant death attacks of the Golden Longbow and Wild Magus. However, Reg'son's Vindicator will still kill them instantly.
- Cool Sword: One is wielded by the Shadowspawn as their primary weapon.
- The Corruption: The dark blood that's spat by the Dark Spitters and exploded over an area thanks to the Shadow Champions, affects your troops in negative ways.
- Elemental Weapon: The Shadow Champions wield fire whips as their weapons and deal a lot of damage with them.
- Hell Hound: The Devourer is a dog-like creature that is a Fragile Speedster and eat the corpses of your troops.
- Horned Humanoid: The Shadow Champions are this.
- Informed Ability: While the description for the Dark Spitter says that it has a Healing Factor, there is no such proof of that in-game.
- Long-Range Fighter: Dark Spitters are very dangerous at range thanks to their Dark Blood spitting attack that deals heavy damage over time and turns infected troops that die into Shadowspawn. Their close-range ability is lacking and they cannot spit dark blood when in melee combat.
- Our Zombies Are Different: The Shadowspawn are undead creatures that exist because of the effects of the dark blood on elves and dwarves.
- Red Eyes, Take Warning: All of these enemies have red eyes.
- Taking You with Me: Shadow Champions will explode into a cloud of Dark Blood on death, this will infect any nearby troops with it and can transform them into Shadowspawn if it kills them.
- To Serve Man: Devourers will gain HP whenever they kill one of your troops.
- The Virus: Dark Spitters spit attack will temporarily infect troops with Dark Blood that deals heavy damage over time. Should a troop die while infected, they explode into a puddle of dark blood and a Shadowspawn rises from it.
- Was Once a Man: Shadowspawn used to be dwarves/elves until they were corrupted and killed by the dark blood.
Hi-Hi Enha

A berserker from the Gnoll tribes sent to assassinate Alleria Swiftwind. Is the boss of the stage "Gryphon Point".
- Battle Aura: He can boost nearby enemies' attack damage.
- Battle Cry: Howls to summon more enemies whenever he gets to certain points on the path.
- The Friend Nobody Likes: He's this to the Gnolls themselves, as his Flavor Text states that he never gets invited to the parties. That, and they actually keep him caged up.
- Godzilla Threshold: As it is seen caged and even in Heroic and Iron Challenge to be caged again, it implied that he was too dangerous even for the Gnoll and he was released when they were desperate of breaching your defences.
- Heinous Hyena: Gnolls are already pretty unfriendly to begin with, but this guy's temperament scares even the other Gnolls if their refusal to invite him to parties and his captivity is any indication.
- Non-Lethal K.O.: Unlike several other Kingdom Rush bosses, he doesn't die and is knocked out instead. He's shown to be caged back up in the Heroic and Iron Challenges.
- Spikes of Villainy: He wears some spiked armour on himself when battling you.
Malicia

Queen of the Twilight Elves who started the war. Is the boss of the stage "The Unseelie Court".
- All Webbed Up: She does this to some of your towers and abilities when she comes down from her throne to battle you.
- Badass Cape
- Big Bad Duumvirate: Of Origins alongside Mactans.
- Cool Crown
- God Save Us from the Queen!
- Interface Screw: Her web powers also affect the spells.
- Magic Staff: One that she uses to block some of your abilities and towers.
- Orcus on His Throne: She spends most of her time on the throne in the Unseelie Court, taunting you until she faces you in the final wave.
- Pintsized Powerhouse: Malicia is only slightly bigger than a Twilight Harasser (and actually smaller than Twilight Avengers). That doesn't mean that she is not a big threat.
- Purple Is Powerful
- Villainous Legacy: Even though she and Mactans are defeated for good, they successfully corrupt the Tear of Elynie, which becomes a catalyst in Vez'nan's fall to evil and Malagar's conquest later on. Not to mention corrupting Faustus into Bonehart as a direct result.
Mactans
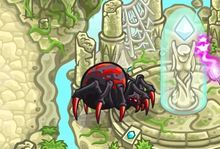
One of the Ancient Spider Queens.
- All Webbed Up: One of the ways she can harass you is by webbing up your towers. Thankfully you can tap her to avoid this.
- Big Bad Duumvirate: Of Origins alongside Malicia.
- Call-Forward: She mentions Sarelgaz in one of her quotes, suggesting that the two knew each other. Many years later, Sarelgaz indeed becomes a threat to Linirea.
- Giant Spider: She's a spider who's as big as a Son of Sarelgaz. That's still the size of an average tower.
- Hive Queen: Several of her brood are encountered in the level she debuts in and the final level.
- Meaningful Name: Latrodectus mactans is the species name for the Southern Black Widow spider.
- Proactive Boss: She constantly harasses you throughout her lair as well as the Shrine of Elynie, by either webbing your towers or spawning spiders and covering the floor in webbing. Ironically, she's never actually fought directly.
- Red and Black and Evil All Over
- Red Eyes, Take Warning
- The Unfought: She is never officially fought as she merges with Malicia to become the Spider Goddess.
- Villainous Legacy: Even though she and Malicia are defeated for good, they successfully corrupt the Tear of Elynie, which becomes a catalyst in Vez'nan's fall to evil and Malagar's conquest later on. Not to mention corrupting Faustus into Bonehart as a direct result.
Spider Goddess

The combination of Malicia and Mactans through the Tear of Elynie. Is the boss of the stage "Shrine of Elynie".
- Final Boss
- Fusion Dance: The combination of the two gives her both their strengths. See their sections above for details.
- My Rules Are Not Your Rules: She is one of two enemies in the entire series who can outright destroy your towers. Thankfully, she only does this three times, each time she loses 1/4 of her health.
- Red Eyes, Take Warning
- Spider People: The biggest and scariest of them all.
Bram the Beheader

A brutal ogre warlord who uses the Bloodsydian for further conquest. Is the boss of the stage "Beheader's Seat".
- Beard of Evil: He has a rather hard-to-see goatee.
- Cain and Abel: He removed his brother's head and put him on a pike.
- Cloud Cuckoo Lander: Bram's brother, who seems to be still alive after his head was cut off and mounted on a pike, is rather crazy and comical, talks illogically and frequently leaves comments that have no relation to what Bram (who survives his decapitation as well) says.
- Fate Worse than Death: After defeat, his head gets stuck on a pike near his brother's and is now forced to listen to his brother's insane ramblings... which he hates.
- Horns of Villainy
- Hot Blooded Sideburns
- I Shall Taunt You
- Laser-Guided Karma: After his defeat, his head is also stuck on a pike like his brother's (whom he beheaded), and his dialogue suggests that he can't stand his brother's insane ramblings.
- Losing Your Head: An interesting case where he chopped his other head off and placed it on a pike. Said "brother" is still surviving and talks with insane rambling. After his defeat, his head is stuck to a pike near his brother's, still alive and complaining about his brother's ramblings.
- Megaton Punch: He can literally smack soldiers one-by-one out of the map.
- Multiple Head Case: Defied, he chopped off his brother's head.
- Non-Lethal K.O.: While his death animation has him turn to Bloodsydian and crumble, it's revealed that his head survived and is now stuck on a pike near his brother's.
- Off with His Head!: His favourite method of getting things done, as evidenced with his "brother" stuck on a pike.
- One-Hit Kill: His attack sends troops and reinforcements flying away. However, he cannot kill heroes this way, and has to hit them multiple times instead.
- Our Ogres Are Hungrier: Like the other ogres, he's a two headed one. Well, he was a two-headed one.
- Purple Is Powerful: The only purple ogre that we see, and the one clearly in charge.
- Villain Respect: He respects the elves fighting him to the death.
Baj'Nimen the Hateful

Malicia's most trusted lieutenant who wishes to cast a spell which will destroy the continent. Is the boss of the stage "Duredhel Outskirts".
- Beast of Battle: His centipede.
- Creepy Centipedes: He rides a gigantic one into battle.
- The Dragon: Might have been this to Malicia.
- Death from Above: Casts a powerful meteor spell on your troops.
- Heal Thyself: Is able to heal a good chunk of his health every now and then.
- Magic Staff: One that he uses to cast purple meteors onto your troops.
- Staff of Authority
- Undying Loyalty: He seems to have this for Malicia, taking over a large portion of the Twilight Elves' army in her place, and trying to wreck even more havoc on the continent.
Godieth the Infernal

A powerful Pit Lord who escaped his prison by the dwarves and decimated them.
- BFS: Carries a massive Flaming Sword to hit your troops with. He drops it when he dies.
- Bloody Murder: His main gimmick is to spit out a huge glob of Dark Blood to produce a patch which infects heroes and troops standing within.
- The Corruption: He is the source of the Dark Blood that corrupted the Dwarves and turns your troops into undead Shadowspawn.
- Dug Too Deep: The dwarves dug too deep and accidentally released them, which resulted in the dwarves' deaths. Except for Wilbur.
- Horns of Villainy: He's a Balrog expy, a huge pair of horns are to be expected.
- Shout-Out: To Durin's Bane, the Balrog from The Lord of the Rings. Godieth also heavily hinted to be said Balrog's younger brother and is jealous of him for being 'more famous'.
- Wreathed in Flames
Hee-Haw the Wicked

The chief of the gnolls.
- Adipose Rex: The fat ruler of the Gnoll tribes.
- Catapult to Glory: He can summon enemies by launching them from catapults.
- Eyepatch of Power
- Funny Animal: Notable for being the only gnoll who can talk and displays a higher level of intelligence compared to the other gnolls.
- Inescapable Net: He can launch nets to trap your hero.
- I Shall Taunt You
- King Mook: Of the gnoll tribes.
- The Unfought: Like any other endless mode antagonists, he only exists to aid the enemies.
Ainyl

Malicia's sister who spearheaded the invasion of the elven capital Aredhel.
- Badass Long Robe: She wears one.
- Barrier Warrior: She can create an energy shield to protect an enemy with low health.
- Foregone Conclusion: Her invasion of Aredhel is bound to succeed, since the fifth level of Origins states that the capital had fallen in the level briefing. The reason the player plays it is in order learn from the mistakes and make sure that something of the like never happens again.
- I Shall Taunt You
- My Rules Are Not Your Rules: She can outright destroy your towers, something that only final bosses can do.
- Red and Black and Evil All Over: Her clothes have a red and black colour scheme, and she's Malicia's sister.
- Teleportation: She can teleport enemies forward down the path.
- The Unfought: Like any other endless mode antagonists, she only exists to aid the enemies.
Worker Enemies
The enemies faced at Vez'nan's Tower in the tutorial. These consist of Human Woodcutter and Human Worker.- Curb-Stomp Battle: They're all easily slaughtered by the dark army as they're Worker Units who are not combat trained at all.
- The Goomba: Human Woodcutters are the weakest enemies in the game and serve as tutorial enemies. Human Workers are only slightly stronger.
- Mighty Lumberjack: While the Human Woodcutters sport this look, they are anything but mighty.
- Shovel Strike: The Human Workers attack with a shovel, not that it does them much good at all.
Dwarven Enemies
A group of enemies encountered in the Dwarven Kingdom. These consist of Dwarf Bruiser, Warhammer Guard, Clockwork Spider, Chomp Bot, Cyclopter, Tinbeard Gunman, Smokebeard Engineer, Sulfur Alchemist, Quarry Worker, Stonebeard Geomancer, and MechaDwarf MK.9.- Airborne Mook: Cyclopters are the Dwarves' flying enemy unit and are quite fragile and slow.
- Alchemy Is Magic: Sulfur Alchemists have a very high magic resistance and they're capable of throwing blue Healing Potions at their allies and purple exploding potions at your troops.
- The Alleged Car: Cyclopters are slow and very flimsy, only slightly tougher than a Dwarf Bruiser. Even a Linirean hunting eagle can take more than twice the damage of these flying machines.
- Animal Mecha: Clockwork Spiders are clockwork creatures with the shape of spiders.
- Armored Coffins: The MechaDwarf MK.9 lacks an Ejection Seat. When it gets destroyed, it blows up and turns the pilot into ashes.
- Fast Tunnelling: The Quarry Workers can tunnel underground very quickly, bypassing troops with ease.
- Giant Mook:
- An odd case with Stonebeard Geomancers. They don't have too much health for a giant enemy normally, but when they enter combat they turn into animated stone, which multiplies their current and maximum health by 3.3x making them far more durable. Their health is divided by 3.3x when they exit combat.
- MechaDwarf MK.9s play this straight by having lots of health, high damage and an area attack. They also sport heavy armor.
- The Goomba: Dwarf Bruisers are just about as weak as Human Woodcutters, but they appear in numbers.
- The Guards Must Be Crazy: The outer gates were defended by the very weak Dwarf Bruisers and the slightly stronger Warhammer Guards, while the city corridors were defended by those as well as the weak Clockwork Spiders and a few Chomp Bots. This allowed Vez'nan's army to infiltrate and begin taking over their facilities one by one. Even the Dwarf King Bolgur will Lampshade it by saying "I should have invested more in my army."
- Healing Potion: Sulfur Alchemists throw healing potions at their non-mechanical allies in order to heal them. They throw a different potion at your forces instead.
- Heavily Armored Mook: MechaDwarves MK.9 sport 70% physical armour.
- Kung Fu-Proof Mook: Quarry Workers will tunnel underground making them immune to towers and troops, they can only be damaged or blocked after they resurface.
- Literally Shattered Lives: Stonebeard Geomancers turn into stone and shatter when killed.
- Long-Range Fighter: Tinbeard Gunmen attack your units from a range, but are less effective in close combat. Sulfur Alchemists are very weak in close combat but their thrown exploding potions can deal a good bit more damage.
- Magic Versus Science: Most of the Dwarves fall on the science side, using gadgets and all, but a few like the Sulfur Alchemist and Stonebeard Geomancer incorporate magical abilities. This also gets lampshaded in the Clockwork Factory's level description."On second thought... those automated machines seem useful... claim the factory in my name. Even if their steel might stop our swords, they won't stop our magic!"
- Mecha-Mooks: Clockwork Spiders, Chomp Bots and MechaDwarf MK.9s are machines used by the dwarves. While Clockwork Spiders explode on death, the other two stay disabled for a while before breaking down and giving you gold. During this period, they can be repaired by Smokebeard Engineers.
- Mini-Mecha: MechaDwarf MK.9s are mechanical walkers piloted by dwarves. They have high health and armor, deal high damage and can use an area of effect Shockwave Stomp, but they move slowly.
- Mook Debut Cutscene: It's not so much a cutscene as it is a glorified animation, but the MechaDwarf MK.9 gets a pretty awesome one in Clockwork Factory when the mecha assembly factory activates on wave 8. The factory lights up as a hatch opens up to reveal a platform which lifts a dwarf that walks into the factory. Two mechanical arms extend into the factory and do some tinkering, and then the first MechaDwarf MK.9 in the game slowly marches out of it.
- Mook Medic: Smokebeard Engineers can repair the disabled bodies of Chomp Bots and MechaDwarf MK.9s, reviving them. Sulfur Alchemists can throw healing potions at their allies.
- No Self-Buffs: Sulfur Alchemists can't use their own healing potions on themselves, although they can use their healing potions on each other if there's more than one.
- One-Man Army: The Flavor Text for the MechaDwarf MK.9 enemies states that they're "Capable of smashing whole armies with their strength". It's true to a certain extent as they deal heavy damage, have a powerful area attack, and sport huge amounts of armour, but Vez'nan's dark army can exploit their weakness to magical attacks.
- Oxymoronic Being: Stonebeard Geomancers are giant Dwarves bigger than any of your troops.
- Spam Attack: Chomp Bots have deceptively low damage as they actually hit three times in succession.
- Starter Villain: They're the first main antagonist faction in the game and the weakest one. Thanks to stationing all the powerful forces in the inner parts of the kingdom and leaving the weakest ones to defend the gates, the dark army manages to invade their kingdom and take over their facilities while drugging the dwarves to leave them crippled. Furthermore, their kingdom values money as power, as compared to the Northerners who value might as power.
- Taken for Granite: Stonebeard Geomancers inflict a non-lethal and a lethal version to themselves. When in combat, they turn themselves into animated stone which multiplies their current and maximum health by 3.3x until they exit battle. When they're killed, they turn to stone and crumble.
- Weaksauce Weakness: Repairing a machine tends to be a very delicate process, let along using long distance electromagnetic technology to do so. As such, if the Smokebeard Engineer is interrupted mid-repair, the process fails and causes the machine to be destroyed instead.
- Zerg Rush: Dwarf Bruisers and Clockwork Spiders appear in numbers to rush your defences.
Northern Enemies
A group of enemies encountered in the the Frozen North. These consist of Northern Wildling, Northern Huntress, Glacial Wolf, Blue Wyvern, Northern Berserker, Nanoq Warbear, Apex Stalker, Apex Shard, Ice Witch, Leap Dragon, Valkyrie, Draugr, Svell Druid and Frost Giant.- Airborne Mook: Blue Wyverns are the flying enemy of the area. Leap Dragons are an interesting case, they're grounded units that can take off into the air to bypass troops for a short period every now and then.
- Asteroids Monster: When an Apex Stalker is killed, they drop an Apex Shard.
- Badass Army: Compared to the Dwarves. The basic Wildling has over 1.5x the health and deals over twice the damage of the armored Warhammer Guards.
- Barbarian Tribe: Most of the Northerners are part of one. They value might as power.
- Bears Are Bad News: Nanoq Warbears are polar bear Giant Mooks with high health, damage and armour, and while they're initially slow they can charge into battle gaining a huge boost of speed until they reach your units.
- Beast of Battle: Nanoq Warbears are the Northerners' trained polar bears clad in armour and sent to attack your troops.
- The Berserker: The Northern Berserkers, of course. They have good HP and a damaging Spin Attack that is great at killing grouped units, but on the defensive side they lack any form of armour or magic resistance.
- Bilingual Bonus:
- Nanoq means 'polar bear' in Greenlandic, and Nanoq Warbears are combat-trained polar bears. This also makes the Nanoq Warbear a somewhat redundant name.
- Svell is Icelandic for Ice, and the Svell Druids use ice to freeze your towers and attack your troops.
- Call-Back: The Frost Giants' death animation is similar to that of J.T's, where they freeze up in ice and shatter leaving their hips, legs and spine behind.
- Decomposite Character: The Barbarians from the Barbarian Mead Hall have their abilities split between the Northern Huntress and the Northern Berserker. The former uses the Throwing Axes ability while the latter uses the Whirlwind Attack ability.
- Dragon Rider: Leap Dragons are mounted by Northerners who command them to attack or fly.
- Elemental Embodiment: Glacial Wolves are wolves animated by ice magic, while Apex Stalkers and their shards are beasts made of magic ice. This nature makes them magic resistant, especially the Stalkers and shards.
- Enemy Summoner:
- Ice Witches can attack your units to freeze them, and they also spawn Apex Shards one at a time to rush your troops.
- Valkyries can attack in melee combat and can also raise Draugr from the bodies of Northerners.
- Foil: The Northerners heavily contrast the Dwarves as a faction.
- The Dwarves value gold as power, the Northerners value physical strength as power.
- The Dwarves primarily use machines for combat, while the Northerners use physical might, trained creatures and magic for combat.
- While the Dwarves had ill-prepared guards and were caught unawares, the Northerners' first action upon seeing the Dark Army was to immediately alarm the entire tribe.
- Vez'nan's tone of pre-level dialogue against both factions is contrasting too. He takes pleasure in capturing the Dwarven facilities and rendering them useless, but when it comes to the prepared Northerners, he's angry with the player for several screwups against them.
- Giant Mook: Nanoq Warbears and Frost Giants have a lot of health and armour, and do quite a lot of damage.
- Good Counterpart:
- Glacial Wolves are almost similar to Worgs from the first game and War Hounds from Frontiers. They're wolf-like enemies that move quickly, appear in numbers, sport 50% magic resistance and even have very similar amounts of HPnote . The main difference however is that Glacial Wolves trade in their damage and melee dodging capability with an icy explosion upon death which can freeze units.
- The Valkyrie is the game's equivalent to Frontiers' Blood Trickster, being able to raise zombies from the corpses of allies.
- Guys Smash, Girls Shoot: The first three barbarian types you encounter are Northern Wildlings, Northern Huntresses, and Northern Berserkers. The Wildlings and Berserkers attack with melee while the Huntresses throw axes from afar. In addition, only one of three female enemies is a melee combatant (Valkyrie), and only one of the male enemies is a ranged fighter (Svell Druid).
- Heavily Armored Mook: Valkyries sport 70% physical armour.
- Horny Vikings: The Northerners are pretty much Vikings in everything but name. They live in the icy north, wear horned helmets, have several Norse-related stuff, use Viking ships, etc.
- An Ice Person: Ice Witches and Svell Druids have ice magic. The former uses them to freeze troops and create Apex Shards, the latter uses them to freeze your buildings.
- Lightning Bruiser: The Nanoq Warbear is powerful with strong damage, high HP and medium armour. While they're slow, they have the ability to charge when not in combat, which greatly increases their speed until they reach your units.
- Literally Shattered Lives: How Glacial Wolves, Apex Stalkers, Apex Shards, Svell Druids and Frost Giants die. They either explode into ice, or freeze up into ice before shattering.
- Might Makes Right: They believe that might and power comes from physical strength.
- Mighty Glacier: Frost Giants are these in both the literal and trope sense, being icy armoured giants that move slowly but hit extremely hard.
- Mook Debut Cutscene: It's not so much a cutscene as it is a glorified animation, but the Northern Berserker gets a pretty awesome one in Frozen Rapids' second wave. A huge Viking Ship appears, docks on the ice, opens up and a hulking Berserker walks out hellbent on mincing your dark army.
- Noble Wolf: Glacial Wolves are ice elemental beings that actively fight against Vez'nan's dark army.
- Not Quite Flight: Leap Dragons have rather small wings and they don't properly fly but rather take an extended leap while flapping their wings to struggle to keep airborne, hence their name.
- Our Dragons Are Different: They come in different types here. Blue Wyverns are standard flight capable dragons, while Leap Dragons are awkward at it thanks to their size and small wings, and can only fly for short intervals.
- Our Giants Are Bigger: Frost Giants are Giant Mooks with high health, armour and attack damage, but are very slow.
- Perspective Flip: The Barbarians from the first game's Barbarian Mead Hall are now your opponents, and their abilities are now split between the Northern Huntress (Throwing Axes) and Northern Berserker (Whirlwind).
- Spam Attack: Northern Huntresses and Apex Stalkers both have a very fast attack rate.
- Spin Attack: Used by the Northern Berserkers to hit groups of your units.
- Status Effects: The primary status effect that these guys use is freeze, which temporarily disables troops and towers. Glaier Wolves explode into an icy explosion that can freeze your units. Ice Witches use ice magic that freeze your units. Svell Druids freeze your towers, and frozen towers can be tapped a few times to be freed.
- Underestimating Badassery: Vez'nan initially declares them as dumb, bulky Northerners who value might as right in the first Northern level's intro. Things then go pretty south for Vez'nan against them, from the Northerners at the outpost sounding their horn to call reinforcements, fighting Vez'nan's army on a frozen rapid river that breaks apart and drowns a huge part of his army, and their leader Arkuz was prepared to flee the village once it was captured. All this causes Vez'nan to angrily berate the player in the following level introductions.
- Valkyries: One of the enemy types, they will resurrect fallen Northerners nearby as Draugr.
Linirea Enemies
A group of enemies encountered in Linirea. These consist of Recruit, Footman, Watchdog, Troop Captain, Farmer, Hunting Eagle, Elven Ranger, Devoted Priest, Gryphon Bombardier, Arcane Magus, High Sorcerer, Golem House, Paladin, Shieldbearer, Cavalier, Musketeer and War Wagon.- Airborne Mook: Hunting Eagles are fast flying enemies with low HP while Gryphon Bombardiers are slower but attack your troops with Splash Damage explosives.
- Area of Effect:
- Gryphon Bombardiers lob bombs that hit troops in an area.
- Arcane Magi cast a magic meteor spell that hits troops in an area for armour-piercing damage.
- High Sorcerers ride an Earth Elemental whose attack hits troops in an area for heavy damage.
- Paladins attack your troops with Holy Strike which hits an area of troops for heavy damage.
- Armor Is Useless: Paladins, despite wearing full plate armor like their counterparts from the first game, have no physical resistance.
- Attack Animal: Watchdogs are attack dogs trained to aid Linirea's army on the battlefield. They're fast but have low HP.
- Badass Army: The basic Linirea Recruit alone has more HP and attack damage than the basic members of the Dwarven and Northern armies. The rest of their army (with the exception of the dogs and eagles) are even stronger.
- Clown Car: The War Wagon contains a nearly-endless amount of Footmen within. Their Flavor Text even lampshades it by describing them as "Like a clown car but a lot less funny".
- Cool Horse: Cavaliers are Paladins on horses that allow them to charge past troops.
- Curb-Stomp Battle: The farmers (who aren't Joe Jenkins) that try to take on the dark army are very weak in both HP and attack power and are easily slaughtered.
- Developer's Foresight: If a High Sorcerer get possessed by the Spectres' Mausoleum, he'll transform enemies into friendly sheep for you (said sheep will just stand there without doing anything until they are killed).
- Discard and Draw: Paladins in the first game had high armour, while in this game they have no armour but a good amount of Magic Resistance. Furthermore, they trade their Holy Light for the capability to buff their allies' damage.
- Dungeon Bypass:
- Cavaliers can charge through your troops to avoid melee combat with them.
- Arcane Magi can teleport troops further down the path.
- Field Promotion: This is the Troop Captain's ability. Their Flavor Text shows that they're the ones in charge of training Linirea's Recruits, and when on the field they will promote Recruits into Footmen by shouting.
- Forced Transformation: The High Sorcerer can transform your troops into enemy sheep, much like how the Sorcerer Mage tower could do to enemies.
- Fragile Speedster:
- Watchdogs are some of the fastest enemies in the game but are very fragile for a late-game enemy.
- Hunting Eagles are fast flying enemies but have nominally more HP than a Watchdog.
- Cavaliers move quickly and can even charge past troops to avoid being blocked, but have relatively low HP and lack armor for an endgame enemy. Don't get cocky however, since the far more durable Paladin will dismount upon the horse's death.
- Giant Mook: The High Sorcerer has a lot of HP and armour and can deal a lot of damage thanks to his Earth Elemental. The Golem Houses can take a good bit of damage while dishing it out.
- Glass Cannon: Musketeers deal very heavy damage from a long range but they have low HP.
- Good Counterpart:
- Watchdogs are fast but weak enemies with magic resistance, similar to the Wulves and Worgs.
- Elven Rangers appear similar to Twilight Harassers except that they lack the Harasser's teleportation and have magic resistance instead of armour.
- Devoted Priests appear to be similar to the Twilight Evokers, being cloaked priestesses who heal their allies.
- Shieldbearers have a similar weakness as Twilight Avengers by losing their physical armour while in combat.
- Musketeers shoot your troops for heavy damage from afar in a manner similar to Saurian Deathcoils.
- Golem: The Earth Elementals that the High Sorcerers ride into battle are their constructs. This also makes them Giant Mooks.
- Guns Are Worthless: Averted with Musketeers. Their rifle attacks deal very high damage to your troops and heroes from a long distance.
- Heavily Armored Mook: High Sorcerers ride Earth Elementals and as such have a huge amount of HP and armor. The Shieldbearer has very high armour when he's not in combat. Surprisingly, Paladins have medium magic resistance, despite having heavy armor in the first game.
- Hero Antagonist: Several of them are the forces of Linirea from the first game.
- Heroic Dog: Watchdogs are attack dogs trained to attack the dark army. Pity for them that they're quite easy to kill.
- Horse of a Different Color: Gryphon Bombardiers ride gryphons into battle.
- Invulnerable Horses: Averted with Cavaliers. Your towers actually attack and damage the horse the Paladin is riding on, and when they're killed the Paladin dismounts.
- Light Is Good: Devoted Priests use light-based powers to heal allies and grant magic resistance, while Paladins use Holy Strike to deal huge damage to groups of troops. Of course, since you're the Villain Protagonist, this makes them your enemies.
- Long-Range Fighter: Musketeers. They deal incredible damage to troops and heroes from afar, especially with their special ability where they fire an extremely powerful shot at a very long range, but their HP and close combat ability is lackluster.
- Mighty Glacier: High Sorcerers. They have a One-Hit Kill Forced Transformation ability that thankfully has a long cooldown time, and a giant amount of health plus a damaging area attack thanks to the Earth Elemental they ride. Fortunately, said elemental also moves very slowly due to being made of rock.
- Mook Lieutenant: Troop Captains can promote Recruits into armoured Footmen.
- Mook Maker: War Wagons do not attack, cannot be blocked, and their only purpose is to summon a group of footmen every now and then.
- Mook Medic: Devoted Priests will heal nearby troops and also grant magic resistance to those nearby.
- The Musketeer: The Musketeers, of course. They have both melee combat capability as well as long range gun attacks, although they're weak in the former.
- Noble Bird of Prey: Hunting Eagles are Linirea's trained eagles sent to fly over the battlefield to the exit quickly.
- No Self-Buffs: Devoted Priests can't use their healing spells on themselves, although they can use their healing spells on each other if there's more than one.
- One-Hit Kill: Any troop that the High Sorcerer polymorphs into a sheep is as good as dead.
- The Paladin: Paladins are magic-resistant enemies that use Holy Strike to deal area damage and can also buff the damage of allies.
- Perspective Flip: The towers that you used in the first game are now enemies, and their abilities are appropriately used against you:
- Recruits and Footmen come in numbers to swarm your barracks units.
- Elven Rangers fire arrows rapidly at your troops.
- Musketeers attack your troops for heavy damage from a long distance.
- Paladins have an Area of Effect in the form of Holy Strike.
- Arcane Magus can cast Teleport to teleport their allies further down the path.
- High Sorcerers ride their summoned Earth Elemental that deals area damage and can Polymorph your troops into sheep.
- Gryphon Bombardiers lob bombs that deal area Splash Damage to your troops.
- Rain of Arrows: Elven Rangers have a very fast-firing arrow attack and appear in decent numbers, leading to this trope on any unlucky troops or heroes in range.
- Sapient House: Golem Houses are Lozagon houses brought to life by Magnus Spellbane.
- Scary Black Man: One of the various types of farmer is a big, muscular dark-skinned man who has more HP and deals much more damage than the other farmers. He's still weak compared to the actual militia, however.
- Shield-Bearing Mook: The appropriately-named Shieldbearer carries a shield that gives him incredible armour rating. He only puts it down when he engages combat.
- Sniper Rifle: Musketeers convert their gun into one of these whenever they use their long-distance attack. It deals a huge amount of damage to troops and heroes it hits.
- Spam Attack: Both Elven Archers and Gryphon Bombardiers have a very fast rate of attack, both of which spell bad news for your barracks troops.
- Squishy Wizard: Subverted by both the Arcane Magus and High Sorcerer. The former has a devastating area attack spell and a teleportation spell that aids allies but he comes with a good bit of HP, while the latter can turn your troops into sheep and is a Giant Mook thanks to the Earth Elemental he rides. It's played straight with the latter when he's killed, since the Earth Elemental breaks into rock chunks that crush him instantly.
- Training the Peaceful Villagers: The Farmers in Otil Farmlands will attack and rush your troops... only to deal pathetic damage and be slaughtered quite easily.
- White Magician Girl: Devoted Priestesses resemble Diedre the priestess from Frontiers and they aid their allies by healing and giving them magic resistance.
Anurian Enemies
A group of enemies fought on Anuria in the Subaquatic Menace expansion. These consist of Anurian Chaser, Anurian Warden, Crystal Amphiptere, Anurian Infuser, Anurian Channeler, Anurian Erudite, and Crystal Demolisher.- Airborne Mook: The Crystal Amphipteres are small flying dragons infused with crystals. They're rather weak and relatively slow, but gain a huge speed boost if they get a magic infusion from an Anurian Infuser.
- Alien Blood: Anurian Chasers and Wardens leave green blood when killed, while Infusers, Channelers and Erudites leave purple blood upon dying.
- Badass Army: In the news previews, they're shown to be giving the the very same Dark Army that conquered Linirea lots of trouble. Indeed, they can give a lot of trouble in-game, having units that benefit each other as well as powerful Cannon Fodder units.
- Black Mage: Anurian Erudites fire off powerful spells to decimate your troops, can charge up to three shots, and can deal even more damage if they get a damage boost from a Channeler's aura.
- Charged Attack: Anurian Erudites can charge up to three magic bolts in a similar manner to the Archmage Tower/Specters Mausoleum, unleashing all three on the first troop or hero they come across.
- Color-Coded for Your Convenience: Apart from the Chasers, all the enemies appear with one of two colours of crystal. This identifies which type can benefit from mages using the same colour.
- Deflector Shields: When infused with magic by an Anurian Infuser, the Anurian Warden gains a damage shield.
- Evil Versus Evil: The Anurians do not have good intentions for the kingdom and Vez'nan's forces actively fight against them, though out of Vez'nan's selfish interests.
- Frog Men: Many of the Anurians appear to be amphibian-people. Most of them are frog-people, but the Anurian Channelers and the Anurian Infusers appear to be axolotl-people.
- Foil: Anurian Infusers and Anurian Channelers. Both of them are apprentice mages of the Anurians and act as support, but their methods of helping their allies differ. Infusers support allies with blue crystals from afar by actively firing a long distance beam at them, while Channelers assist allies with pink crystals via a passive aura ability by being near them. Finally, Channelers are actually more powerful in melee combat while the opposite is true for Infusers which are Long Range Fighters.
- Giant Mook: Crystal Demolishers are golems with slow speed but high HP and hit insanely hard while also dealing massive amounts of area damage when killed. While they lack armour, they can gain armour from nearby Anurian Channelers, and they also appear in greater numbers than MechaDwarves MK.9, Frost Giants, and High Sorcerers.
- Golem: Crystal Demolishers are golems infused with crystals all over their bodies. While they lack any armor or magic resistance, they have a good amount of health and can gain armour if near an Anurian Channeler.
- Heavily Armored Mook: Anurian Wardens have armour to protect against melee damage. The Crystal Demolisher lacks armor, but any nearby Anurian Channelers will grant them some.
- In a Single Bound: The Anurian Chasers have the ability to do a huge leap at your troops and land with a Shockwave Stomp as a Dynamic Entry attack.
- Mighty Glacier: Crystal Demolishers have lots of HP and hit for insanely high damage (more so than other Giant Mooks in the series), but move and attack at a slow speed.
- Mook Commander: Anurian Channelers buff the pink units around them. Erudites nearby will get a damage buff, and Crystal Demolishers get an Armor boost.
- Our Dragons Are Different: Crystal Amphipteres are the Airborne Mook of the area and resemble small blue dragons with blue crystals embedded in their heads. If said crystals are infused with magic, they get a temporary speed boost.
- Outside-Genre Foe: In the news updates prior to the expansion, the Dark Army initially thinks they could easily take on the Anurians. Things quickly change thanks to the Anurians' odd fighting style."They are hundreds, my General, they sing... and croak... and jump! They jump a lot, and too far! Their strange spears are deadly and the shields on their backs are as hard as they can be! We are not prepared to fight against such weird warriors! The defeat is imminent, boss, my apologies, but we need you here!"
- Power Crystal: They come in two different colours and allow amplification of magic.
- Blue crystals are infused into Anurian Wardens and Crystal Amphipteres, while the Anurian Infuser's staff holds one. This allows the Anurian Infusers to infuse the Wardens and Amphipteres, giving them Deflector Shields and a speed boost respectively.
- Pink crystals are infused into Anurian Erudites and Crystal Demolishers, while the Anurian Channeler's staff holds one. This allows the Anurian Channelers to buff nearby Erudites and Demolishers, giving them an attack buff and an armor buff respectively.
- Power Floats: Anurian Erudites sit on a floating lilypad that levitates due to their powers.
- Reduced to Dust: Anurian Channelers die by having their magic fry them before crumbling to dust.
- Squishy Wizard: Both the Anurian Infusers and Anurian Channelers have powerful abilities to help allies, but they have rather low HP. The Anurian Erudites are less squishy with twice the health of an Anurian Infuser, and deal powerful magic damage.
- Status Buff: Anurian Infusers can give a Haste buff to Crystal Amphipteres while the Anurian Channelers' aura gives an Damage buff to Anurian Erudites while giving Crystal Demolishers a stacking Armor buff.
- Stealth Pun: Anurian Erudites swell up and explode when killed. In other words, they literally croak when they lose all their HP.
- Taking You with Me: Upon death, Crystal Demolishers explode into rubble that deals massive damage to any troops or heroes near it.
- White Mage: Anurian Infusers have the ability to infuse Anurian Wardens and Crystal Amphipteres to give them Deflector Shields and a speed boost respectively, while Anurian Channelers will buff the damage of nearby Anurian Erudites and grant armor to nearby Crystal Demolishers.
- Zerg Rush: Anurian Chasers appear in great numbers, and their Dynamic Entry attack can quickly whittle away most troops' health in no time.
Frozen Nightmare Enemies
A group of enemies fought in the Northern Mountains in the Frozen Nightmare expansion. These consist of Snow Golem, Frozen Heart, Frozen Soul, Ice Reaper, and Winter Lord.- Ancient Evil: They, under the command of The Winter Queen, wrecked havoc across the North centuries before the events of the game.
- And Then John Was a Zombie: If an Ice Reaper kills a unit, that unit is transformed into an Apex Shard.
- Anti-Frustration Feature: Frozen Hearts cannot reform from their souls if they are near the exit, most likely because they would very easily leak if they were able to. Ice Reapers are also unable to resurrect fallen units if they are reasonably close to the exit.
- Barrier Change Boss: Winter Lords have the ability to alternate their physical and magic resistance. When they have rocks floating around them, they're extremely resistant to physical damage, when they have ice they're extremely resistant to magic.
- BFS: Winter Lords attack your troops with a huge icy sword that inflicts a permanent-lasting health-draining chill.
- Elemental Embodiment: Snow Golems, Frozen Hearts, and Winter Lords are all icy elementals animated by ancient spirits.
- Elemental Weapon: The Winter Lords have icy swords which inflict a deadly never-ending frostbite on targets they hit.
- Evil Is Deathly Cold: Ice Reapers turn units killed by their icy claws into Apex Shards, while Winter Lords inflict a deadly chill that lasts until the affected dies.
- Evil Versus Evil: They do not have good intentions for the Kingdom, and Vez'nan opposes them.
- Giant Mook: Snow Golems have massive amounts of HP and hit hard, but move very slowly.
- Heavily Armored Mook: Frozen Souls have extreme amounts of resistance to physical damage thanks to being a ghost. Winter Lords have extreme resistance to physical damage half the time, the other half of the time they have extreme magic resistance.
- Lightning Bruiser: The Ice Reapers are the fastest of these enemies.
- Literally Shattered Lives: Since most of them are made of ice, this is their death animation.
- Mighty Glacier: Almost literally given their theme. Snow Golems and Frozen Hearts are slow-moving but deal high damage.
- Our Ghosts Are Different: The Frozen Souls are the spirits of the Frozen Hearts, who will resurrect the Hearts after a certain period of time, unless killed beforehand.
- Power Limiter: The Winter Lords' attack neutralizes what your units and heroes are able to do, slowing them down and slowly killing them.
- Reviving Enemy: When a Frozen Heart is killed, their Frozen Soul escapes. These are immune to slowing effects, cannot be blocked, and if not defeated within a few seconds will reconstruct its Frozen Heart body good as new.
- Snowlems: The Snow Golems are turtle-like golems made of rock and snow.
- Suddenly-Harmful Harmless Object: Snow Golems initially don't attack and can be destroyed prematurely. However, they will awaken on certain waves and attack if not bombed beforehand.
- Status Effects: Winter Lords inflict a poison-like status on troops they attack. Unlike most health-draining effects in the game, this one lasts until the affected unit dies.
- Strong Enemies, Low Rewards: Snow Golems have a ton of hit points and light armor, ensuring that they'll survive for a good while without instant kills. When killed, they drop a measly 25 gold, far less than what other Giant Mooks in the series would give.
- Suddenly-Harmful Harmless Object: The Snow Golems are initially part of the scenery, before bursting out of their hiding spots and walking along the path.
- Supernatural Gold Eyes: They all have these, like The Winter Queen.
- You Are Already Dead: Any unit attacked by the Winter Lord receives a frostbite status that constantly drains health until they die, and does not wear off. Only a max-level Jigou can survive it thanks to his constant fast regeneration.
Cursed Bargain Enemies
A group of enemies fought in the Rotten Forest in the Cursed Bargain expansion. These consist of Ghost, Haunted Skeleton, Werewolf, Bone Carrier, Screecher Bat, Corrosive Soul, and Lich.- Airborne Mook: Screecher Bats will fly over your troops, though they will stop to stun them.
- Armor-Piercing Attack: Corrosive Souls' attacks deal True Damage, making armour useless against them.
- Bat Out of Hell: The Screecher Bats return from the previous game and they have the same stunning ability against your troops.
- The Bus Came Back: The Ghosts, Werewolves and Screecher Bats return from the previous three games.
- Death-Activated Superpower: When killed, Haunted Skeletons and Bone Carriers will buff the damage of Haunted Skeletons while healing Haunted Skeletons and Bone Carriers.
- Dem Bones: Haunted Skeletons and Bone Carriers are skeletons under the control of the Ancient Ghosts.
- Enemy Summoner: Liches are capable of using powerful magic attacks as well as summoning hordes of Haunted Skeletons.
- Giant Mook: Bone Carriers are slow-moving but have heavy armour, high HP, and hit hard.
- Healing Factor: Werewolves have a HP regeneration like in the previous games.
- Kill One, Others Get Stronger: Killing a Haunted Skeleton (or any other mook) will not only heal other Haunted Skeletons nearby, but will also give them a permanent attack boost.
- Lightning Bruiser: Corrosive Souls have a good amount of HP, move very quickly, and deal strong armor-piercing damage.
- Make Me Wanna Shout: Screecher Bats will use a sonic attack to stun your troops, just like in the previous game.
- Mook Commander: Bone Carriers will buff the attack of Haunted Skeletons near them.
- No-Sell: Forget using physical towers against Ghosts, as they are completely immune to anything that isn't magic or true damage. This includes status effects like poisoning or stun.
- Our Ghosts Are Different: Ghosts are shackled spirits that can only be harmed by magic. Corrosive Souls are wolf-like ghosts made of a union of hungry beast souls, and their attack pierces armour.
- Our Liches Are Different: Magic-using, magic-resistant undead that can also summon Haunted Skeletons to their side.
- Our Werewolves Are Different: Werewolves return from the Shadowmoon and Curse of Castle Blackburn expansions, and they have the same high damage and Healing Factor abilities as before.
- Savage Wolves: The Corrosive Souls are ghostly wolves with armour-piercing attacks.
- Weak to Magic: Like in Frontiers, Ghosts are only vulnerable to magic attacks and are completely immune to physical damage.
- Zerg Rush: Haunted Skeletons attack in numbers. This goes hand in hand with their ability to buff and heal their kind upon death.
Rise of the Dragon Enemies
A group of enemies fought in the Rise of the Dragon expansion. These consist of Mogwai, Nian, and Carnival Dragon.- Crazy Enough to Work: The Carnival Dragon's Flavor Text outright calls wearing a dragon dance suit a strange choice for a weapon, confusing Vez'nan's forces. This makes them unable to be blocked in any way.
- Griping About Gremlins: Mogwai are fast but weak gremlin creatures that appear in hordes and multiply on contact with water.
- Healing Factor: Nian get a huge regeneration if they're on water.
- Homefield Advantage: Nian are ancient water beasts that gain a huge Healing Factor on the water areas.
- The Juggernaut: All parts of a Carnival Dragon cannot be blocked, slowed, or stunned.
- Segmented Serpent: Carnival Dragons consist of a chain of separate enemies that make up the dragon. All parts have to be killed individually, with the head having over twice the health of a body segment.
- Shout-Out:
- Mogwai are basically the namesake creatures from Gremlins, being small gremlins that multiply on contact with water.
- Nian are based off the monsters from Chinese Mythology. They have a Healing Factor when on water, referencing the Nian's ocean-dwelling lifestyle.
- Stone Wall: Carnival Dragons have no attacks and move slowly. However, all parts cannot be slowed, stopped, poisoned or blocked in any way and each segment has a lot of health, especially the head — an entire dragon put together can have over 4000 health.
- Zerg Rush:
- Mogwai appear in enormous numbers, which only grow larger if they make contact with water.
- The Carnival Dragons' segments can number from as low as five to as many as ten, with each segment being an individual enemy.
Primal Ravage Enemies
A group of prehistoric enemies fought in the Primal Ravage expansion. These consist of Velociraptor, Prehistoric Dwarf, Cave Dwarf, and Pterodactyl.- Airborne Mook: Pterodactyls are the flying enemies encountered in the campaign. Some can even carry Prehistoric Dwarves as transport.
- Born as an Adult: Velociraptors can lay eggs that hatch into a fully-grown velociraptor after a few seconds. Their nests will also spawn fully-grown Velociraptors.
- Domesticated Dinosaurs: Implied. The Prehistoric Dwarves can use Pterodactyls as carriers, and can also use a war cry to buff the speed and attack of Velociraptors.
- Enemy Summoner: Velociraptors will eat your troops and lay an egg should they execute one of your troops. The egg then hatches into a full-grown velociraptor after a few seconds.
- Explosive Breeder: The Velociraptors reproduce extremely quickly. By executing and eating your troops, they lay an egg that hatches an adult velociraptor, which can go on to do the same if it kills another of your troops. They also emerge fully grown from the egg nests on the map. This, along with their insatiable appetite, is one reason why Vez'nan doesn't want to have any in his ranks, despite harboring several vicious, scary troops of his own. Hilariously, the Ignis Altar makes use of this by having an endless supply of Velociraptor eggs to throw into their volcano.
- Finishing Move: Velociraptors can execute any troops at 20% or below HP, eating them and allowing them to spawn an egg.
- Fragile Speedster: At 170 HP, Velociraptors are even less durable than Linirea's 200 HP Recruits. They are however one of the fastest enemies in the game, moving very quickly while also dealing high damage.
- Hollywood Prehistory: Cave Dwarves are living alongside dinosaurs and pterosaurs in an previously-undiscovered area of the Dwarven caves.
- Horse of a Different Color: The Pterodactyls can carry Prehistoric Dwarves with their feet, despite the paleontological inaccuracies.
- Mook Commander: Prehistoric Dwarves can shout to boost the speed and attack damage of nearby velociraptors.
- Prehistoric Monster: The mission briefings for two of the levels has Vez'nan declare his abhorrence towards the dinosaurs, calling them "disgusting lizard-like creatures that have very pointy claws and teeth", and also mentioning that they devour everything in sight. It says something when Vez'nan outright refuses to put dinosaurs into his Dark Army despite having monstrous troops of his own.
- Raptor Attack: The Velociraptor enemies are very inaccurate to paleontology. They not only lack feathers, are larger than most humans, and finally have such a fast metabolism that they can immediately pop out an egg after eating your troops, which hatches an adult velociraptor!
- Rock Beats Laser: These primitive Dwarves are much more dangerous and durable than their more technologically-advanced cousins. Prehistoric Dwarves have more health than MechaDwarves Mk. 9 and hit harder, despite wearing caveman clothing and wielding a stone hammer for a weapon.
- Shout-Out:
- Terror-dactyl: The pterodactyl enemies have grasping feet that allow them to carry around prehistoric dwarves.
- Zerg Rush: Cave Dwarves are almost always spawned in large, tightly-clustered groups.
Hammerhold Enemies
Warriors and nomads, mystics and magic wielders, this is a group of defenders of Hammerhold, fought in the Hammerhold DLC expansion. These consist of Legionnaire, Legion Archer, Camel Rider, Falconer, Desert Eagle, Nomad, Djinni, Magic Carpet, Master Assassin, Sand Mystic, Merchant, War Elephant and Drum Elephant.- Airborne Mook: Desert Eagles and Magic Carpets are the flying foes of the campaign. The former is a Good Counterpart to Shadow Archers' Crow, flying down the path and rapidly striking ground units, while the latter is a stronger version of Gryphon Bombardier.
- Area of Effect: Courtesy of Magic Carpets and Sand Mystics, whose attacks do area damage.
- Armor-Piercing Attack: Sand Mystics and Magic Carpets do magic damage, this ignoring the armor of your units.
- Badass Army: The Linireans are no doubt a strong army, but Hammerhold has been through a lot and, in addition to harsh desert conditions, pretty much required its denizens to improve. This is further bolstered by Hammerhold having prepared their troops to assist Linirea, but was stalled by a diversion orchestrated by Vez'nan. It's a telling when the weakest enemy, Legionnaire, has more hp than every basic unit from the main game, there are many quick units, area attackers and in general foes that can counter your barracks.
- The Beastmaster: Falconers have a Desert Eagle that they can send out to harass your troops.
- Bombardier Mook: Magic Carpets not only fly, but they also toss Splash Damage magic bombs on your troops.
- Boss in Mook Clothing: Unlike Cerberus from the first game, which is only fought at the end of Pit of Fire and twice midway through Pandaemonium, War Elephants and Drum Elephants are Mini-Boss enemies that appear much more often in the levels to the point where they can be considered these.
- Call-Back: Djinni's polymorphing and tower-stunning abilities, as well as his death animation, are pretty much the same as Nazeru's, an efreeti boss from Frontiers.
- Forced Transformation: Djinni can transform towers into sandcastles to temporarily disable them, and can turn multiple troops into goats, ostriches, or fennec foxes to temporarily put them out of commission.
- Horse of a Different Color: Camel Riders are mounted on camels which allow them to move quickly and perform a strong spear attack against your troops.
- The Juggernaut: Both the War Elephant and Drum Elephant cannot be stopped by troops, slowed, or stunned, and any troop in contact with them takes constant damage.
- Locked Out of the Fight: Unlike troops turned into sheep by the High Sorcerer which are considered dead, troops (and heroes) turned into ostriches/fennecs/goats by the Djinni aren't, but still cannot block enemies, be attacked by ranged enemies, or use abilities (though transformed Barracks troops can still be moved), and will transform back to their original selves after a period of time. Likewise, any tower transformed into a sandcastle by the Djinni will be unable to be do anything or interacted with until they turn back.
- Magic Carpet: The Magic Carpet enemy flies on one, allowing them to be an Airborne Mook.
- Mini-Boss: War Elephants and Drum Elephants like Cerberus from the first game. Both elephants are slow, but insanely tough, have huge armor, can't be blocked since they trample anything in their way with constant damage dealt, and count as bosses which means they have full Contractual Boss Immunity against slows, stuns, and instant kills. If that's not enough, each elephant comes with an added ability: War Elephants house Legion Archers that shoot your troops that is out of elephant's range, while Drum Elephants play an inspiring beat that improves the stats of nearby foes. Thankfully, they only appear in later stages and are introduced in later waves of stage 4, having the tendency to come out in quantity of one person lane, but that is a small relief if you have to deal with this thing and other enemies at the same time. Come stage five, one even spawns as soon as wave 6!
- Mook Commander: Drum Elephant has a drummer play war beats that inspire other enemies, making them faster and stronger for a short amount of time.
- Noble Bird of Prey: Desert Eagles fly quickly like the Hunting Eagles of Linirea, but unlike Hunting Eagles, they will fly on top of your troops and harass them for constant Damage Over Time. Of course, since you're fighting against Hammerhold, they're also Feathered Fiend.
- One-Hit Kill: The Master Assassins have a chance to use an attack that one-shots a troop, but fortunately can't use this on heroes.
- Perspective Flip: As is with Linireans from main game, some of these enemies use their abilities they had as Frontiers towers against you:
- Legionnaires are tough melee units who rush at you in high numbers. At Wizard's Landing, they even have their own Barracks tower which occupies a strategic point and spawns them during some waves.
- Legion Archers act as Good Counterpart to Shadow Archers from first game, shooting arrows from afar. At Wizard's Landing, like Legionnaires, they have two towers of their own from which they shoot your troops without the risk of being killed.
- Desert Eagle, surprisingly, shows how it would be if you Shadow Archers' Crow was an enemy instead of tower ability, flying down the path and rapidly damaging your troops.
- Master Assassins run down the path and engage in melee combat, but, like their tower counterparts, can also dodge your attacks and perform a One-Hit Kill uppercut.
- Djinni will turn your troops into useless animals. It's not a One-Hit Kill like in Frontiers, but instead disables them for a long time.
- Sand Mystics may or may not be related to Wizard Tower with their magic area attack.
- The Red Mage: Sand Mystics not only have a powerful area magic attack, but can also heal themselves and their allies.
- Squishy Wizard: Sand Mystics have low health compared to several other enemies in the campaign, but their magic attack deals an ungodly painful amount of damage to an area and can't be blocked by armor. They can also heal themselves and their allies.
- Thou Shalt Not Kill: The Djinni's flavor text mentions that they are bound to pacts and must protect the desert without harming people. Indeed, they lack any damaging attacks whatsoever. Yet, they don't need to be deadly to be terrific protectors, as your troops/heroes turned into goats/ostriches/foxes can attest.
- War Elephants: War Elephants and Drum Elephants serve as Mini Bosses with Contractual Boss Immunity. They have a giant amount of health, cannot be blocked by troops or stunned, instead causing troops touching them to be Trampled Underfoot. War Elephants have archers on top that rain arrows on your troops, while Drum Elephants have a drummer that buffs Hammerhold troops around them.
- You Are Too Late: The forces of Hammerhold were going to aid Linirea against Vez'nan's forces, but the evil wizard bribed the pirates and scavengers around Hammerhold to push a constant assault as a distraction, diverting Hammerhold's forces to fight them. By the time Hammerhold's forces had mopped up the pirates and scavengers, Linirea had fallen to the Dark Army.
Bolgur, the Golden King

The King of the Dwarves. He fights using a mecha disguised as an enormous throne.
- Armored Coffins: His throne mech lacks an ejection seat. When it's destroyed, Bolgur gets exploded and crushed by the wreckage that falls on him.
- Bandit Mook: If you amass too much gold during the level (i.e. via Goblin Thieves), he'll actually jump onto your money counter and steal from it◊.
- Blade Below the Shoulder: His hammer and axe are integrated into the arms of his throne mech.
- Bling of War: He wears gold armour on himself when he's taunting you, swimming in his treasure, and piloting his mecha.
- Cool Chair: His throne transforms into a Humongous Mecha for his battle.
- Defeat Equals Explosion: When Bolgur's mech is beaten, it undergoes a chain-reaction destruction that buries him (or what's left of him) in the rubble.
- Hero Antagonist: King of the Dwarves, who are allies of Linirea. He fights against Vez'nan but is defeated.
- Macross Missile Massacre: His mech is capable of firing a slew of missiles from its shoulder-mounted missile launchers, said missiles can kill your hero and troops quickly from anywhere on the map.
- Money Fetish: During the level itself, Bolgur will actually dive into the piles of money in a manner similar to Scrooge McDuck. He'll even steal directly from your money counter if you have too much gold. After defeating him, Vez'nan notes that Bolgur and the dwarves valued money and gold as power.
- Red Eyes, Take Warning: His battle-mecha has eyes that glow red when activated.
- Treasure Room: Bolgur sits right in front of a massive pit of gold.
- Wake-Up Call Boss: He's the first boss of the game and will show that the game's not pulling any punches thanks to his extremely high damage and powerful minions.
Arkuz, Lord of the North

King of the Northerners. He first appears in the Northerners Village, before retreating on his personal blue wyvern to Jokull's Nest, where you defeat him.
- Badass Boast: "I'm the ONLY King in the North, you hear me!?"
- Badass Cape
- Barbarian Hero: He's the king of the Northerners and leads them. Since he opposes Vez'nan, this makes him a Hero Antagonist.
- Deadly Euphemism: Has one in Northerners Village:"We will show you some Northerner hospitality."
- Death from Above: The Northerners Village level has him command his men to unleash a Storm of Blades onto your troops to deal massive damage.
- Didn't Think This Through: He swaps his ride from a flying dragon to Jokull. Since she's too big to leave the cave she's in, this has bad consequences for Arkuz when she's beaten and he can't find a way to escape.
- Dragon Rider: He rides a huge blue wyvern with icy breath. Later on, he rides on top of the massive Jokull's head.
- Hero Antagonist: The second king that Vez'nan fights against. His barbarians were Linirea's allies in the first game. He fights against Vez'nan but is defeated.
- Horny Vikings
- Horse of a Different Color: He rides a huge blue Wyvern. During the boss battle, he swaps to an even bigger blue wyvern in Jokull.
- Human Popsicle: In the Heroic and Iron Challenges, he's seen on the same block of ice that Jokull emerged from, except that he's in a block of ice from the neck down.
- Large and in Charge: He's quite a large fellow.
- Pre-Asskicking One-Liner: "Are you ready to chill your bones?"
- Proactive Boss: During Jokull's Nest, he will periodically take off on his dragon to freeze your troops.
- Storm of Blades: During the Northerners' Village level, he'll command the Northerners to drop a hail of weapons onto your troops to deal massive damage.
- The Unfought: He's never fought directly during the two encounters you have with him.
- Villain: Exit, Stage Left: Or more Hero Exit Stage Left. When Vez'nan is successful at beating the inhabitants of his village, Arkuz escapes on a huge blue dragon.
- You Will Be Spared: After Jokull is beaten, it's revealed that Vez'nan spared Arkuz if one plays the Heroic and Iron challenges, though Arkuz is in no shape to fight back anytime soon.
Jokull, Mother of Wyverns

A humongous wyvern summoned by Arkuz and is the mother of all the Blue Wyverns and Leap Dragons.
- Alien Blood: Her blood is purple, which is seen as she Shows Damage from the cannon shots.
- An Ice Person: She uses ice breath to freeze your towers and damage troops in the way.
- Breath Weapon: One that can freeze your towers and troops.
- Death from Above: Fires spikes into the air that rain down on your troops and heroes for incredible damage.
- Flunky Boss: There's a chamber in which her Blue Wyverns will come out of and try to fly towards the exit. These spawn continuously until she dies.
- He Was Right There All Along: That huge spiky formation of ice that Arkuz and his dragon are standing on during the level? That's her head encased in ice, and Arkuz breaks her out once all 15 waves are cleared.
- Meaningful Name: Jokull means Glacier in Icelandic, and she's a massive ice dragon.
- Mother of a Thousand Young: The Blue Wyverns and Leap Dragons you've been facing so far are her children, and you face several of them in the Northern stages.
- Muggles Do It Better: While Vez'nan does have magic and magic-using troops, none of them are able to attack or hurt the massive ice Wyvern Jokull. Instead, he simply deploys two huge gunpowder cannons to blast her face in with cannonballs.
- Our Dragons Are Different: She's a gigantic ice wyvern whose head is over five times the size of a tower.
- Puzzle Boss: She cannot be hurt by your towers. In order to hurt her, you need to tap the cannons at the bottom of the screen to fire at her face.
- Rent-a-Zilla: She is a massive dragon and the biggest enemy in the series bar none. Her head itself is over five times the size of a tower.
- Shows Damage: As she take more and more damage from your cannons, her face starts to bleed purple and her horns start getting broken.
- Spike Shooter: She can fire her spikes into the air which then rain down on your troops to deal very heavy damage.
- Turns Red: When low on health, her ice breath will affect all the towers and units in front of her, instead of just those on one side.
- You Are Grounded!: Essentially did this to her own son Eiskalt by trapping him under several layers of ice for his attacks on humans.
Joe Jenkins (and Baa San)

A sheep farmer living on Otil Farmlands as well as his summoned ninja sheep.
- Badass Bystander: He stands by not doing anything until the player kills all his sheep by clicking them. He'll then enter the fray, and he has the stats and damage of a Giant Mook.
- The Beastmaster: He can summon sheep named Baa San to attack you.
- Berserk Button: He'll make an angry gesture each time the player kills one of his sheep by clicking them. Kill all of said sheep, and he'll have enough and attack you and your forces.
- Big Ol' Unibrow
- Enemy Summoner: Once he loses some health he gains the ability to summon sheep minions.
- Gardening-Variety Weapon: His weapon of choice is a farmer's pitchfork.
- Gratuitous Ninja: The Baa San sheep he summons are ninja sheep.
- Killer Rabbit: Not Joe himself, but the Baa San sheep he summons. Unlike other sheep in the series they can attack units for decent damage. They're also immune to being killed by clicking unlike other sheep.
- Leeroy Jenkins: Immediately charges into battle once his sheep are killed, with no respect for planning or safety. According to the achievements, he's Leeroy's brother.
- Martial Arts Headband: The Baa San sheep he summons wear these to differentiate themselves from the other sheep.
- Video Game Cruelty Punishment: Pop all the sheep and this will cause him to attack. If you're at an early wave and your defences aren't set up, this can be a rude awakening.
Alleria Swiftwind
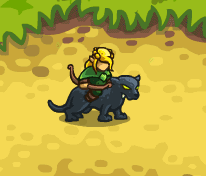
Previously a hero in the first Kingdom Rush, the Queen of Aredhel returns to defend her home in Silveroak Outpost from Veznan's forces.
- Badass Boast: "Do you bleed?" "Because you certainly will!"
- Flunky Boss: She appears every now and then to summon Elven Rangers and to shoot arrows at your forces. However, you don't have to beat her to win, since defeating her only causes her to back away prematurely.
- Hero Antagonist: One of Linirea's heroes who actively opposes Vez'nan's forces.
- Heroic BSoD: She is distraught after the level ends and she is defeated, and for good reason:"A sad day… My bow… is broken…"
- Horse of a Different Color: She rides a panther into combat.
- Long-Range Fighter: Her arrows have an effective range of around half the map and can hurt a lot, but her melee combat ability is less dangerous.
- Panthera Awesome: The panther that was by her side in the first game, and was just a cub in Origins, is now her War mount, similar to the Moon riders reinforcements in Origins.
- Proactive Boss: Constantly harasses your forces in the Silveroak Outpost level by either shooting them with her bow or by summoning Elven Rangers to attack you. Although she's attackable, there's no reason to since she usually leaves too fast and doesn't give any actual rewards.
- Royals Who Actually Do Something: She is the last of Aredhel's royal family and she proactively attacks your forces during Silveroak Outpost.
- Tactical Withdrawal: When she's "killed" by attacks, she simply teleports away only to reappear again shortly.
- Teleportation: She teleports to different parts of the map when she appears and disappears. This is also how she summons her Elven Rangers.
Magnus Spellbane

Previously a hero in the first game, and one of the most powerful wizards in Linirea, Magnus aids the defenders of the City of Lozagon against the forces of Vez'nan, his former mentor.
- Animate Inanimate Object: One of his spells can turn houses into Golem Houses which uproot themselves and attack your forces.
- The Apprentice: The briefing for the City of Lozagon says that he used to be this to Vez'nan.
- Deflector Shields: One of his spells gives shielding to his allies.
- Hero Antagonist: One of Linirea's heroes who actively opposes Vez'nan's forces.
- Leaning on the Fourth Wall: When he says "It's sad. An old wizard turned support.", is he referring to his experience as a former hero in the first game and being The Unfought here, or Vez'nan's position of not being playable until the final level of this game?
- Magnus Means Mage: Just like in the first game. We even get to see him use an expanded repertoire of spells here.
- Mind over Matter: One of his spells telekinetically controls a ladle that collects acid from a cauldron and dumps it onto your troops.
- Proactive Boss: Will continuously harass you during his level by casting spells that either hamper you or help his allies.
- Purple Is Powerful: Like in the first game.
- Sapient House: He created one near the top exit that will eat your troops, and creates three more during certain waves that will uproot themselves and walk towards the exit.
- Status Effects: Can cast a spell that disables your towers, much like Vez'nan's spell in the first game.
- Ultimate Authority Mayor: From what we can tell, he's the one in charge of Lozagon.
- The Unfought: Unlike Alleria and Gerald, he's never directly fought. He does however hamper your troops and aid his forces during the level itself.
Sir Gerald Lightseeker


Another hero from the first Kingdom Rush game, now a commander in charge of his own military barracks situated near the capital city of Linirea. He is the only one of the heroes from the first game that you battle as a boss unit.
- Ain't Too Proud to Beg: When beaten, he begs Vez'nan to allow him to at least keep his honour.
- Boss Battle: After beating all the waves, he decides to do things by himself and attack your forces directly.
- Continuity Nod: The poses and moves he does before he actually battles you are identical to the ones Prince Denas made back in Origins.
- Cool Shades: He wears these when lounging on his barracks tower.
- Heal Thyself: He has the capability to heal his HP while striking a pose.
- Heavily Armored Mook: He has a very high armour rating thanks to his armour.
- Hero Antagonist: One of Linirea's heroes who actively opposes Vez'nan's forces.
- Idiot Ball: If he had simply attacked you from the get-go while your defences were weak instead of relaxing back and having his troops attack you, he would've easily won.
- King Mook: Of the Paladins.
- Mook Commander: If enough troops get near him during his Boss Battle, he will activate his Courage ability from the first game which will boost their armour and damage output, making them a hassle to deal with.
- One-Man Army: Declares himself as this at the beginning of the level, but then decides that his men can handle you. When he decides to do things himself, he's easily capable of shredding most of your units.
- Orcus on His Throne: For most of the level, he just lounges on his deck chair letting his valet serve him drinks while he watches you pummel his troops.
- The Pawns Go First: He sics his men on you at the start of the fight, thinking that they can easily take you on. When they fail, he enters the fray. This ends up being his undoing since the defeat of his army allows you to strengthen your forces enough to be able to beat him.
- Pre Ass Kicking One Liner: "Fine. I'll do it myself."
- Pre-Final Boss: Gerald is a comparatively simple boss fought at the end of the penultimate level in the main story.
- Pride: His Fatal Flaw. He thinks that you're not worth fighting and that his troops could handle it. He only decides to do things himself when most of his forces are down, and by then your defences are enough to defeat him.
- Pride Before a Fall: During the span of his level he boasts about his power, presents himself as a haughty and stuck-up hero, and then gets beaten and humiliated by the Dark Army. His final action before being captured is to plead "Could I keep my honour?" while kneeling down.
- Underestimating Badassery: Despite the Dark Army conquering Silveroak Outpost and the City of Lozagon while capturing Alleria and Magnus, he still underestimates them and decides to let The Pawns Go First. This proves to be a costly mistake as the Dark Army defeats his men while becoming strong enough to take him down.
- Walking Shirtless Scene: From the beginning of Lightseeker Camp until the moment he steps out of his barracks in full gear, he is completely shirtless.
King Denas
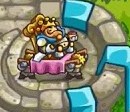
Ruler of Linirea and the final opponent in Vez'nan's path along with his Paragons.
- Adipose Rex: Still very much this, even possessing his Balloon Belly from the first game.
- Big Good: The ruler of Linirea and the forces of good. This also means he's the final opponent standing in your way.
- Cool Crown
- Face Death with Dignity: When we see him after the end of the final level, we see him on his throne, waiting for Vez'nan to break in, he points his sword at him, telling Vez'nan that the people of Linirea will never bow to him, before disappearing from one of Vez'nan's spells. Whether this actually killed him remains to be seen.
- Hero Antagonist: He is Linirea's king who actively opposes Vez'nan's forces.
- Oh, Crap!: When he realizes that Vez'nan is about to destroy the castle walls, his reaction is "Oh come on!" before his knights carry him away to safety.
- Tar and Feathers: His preferred method of dealing with your towers is to have his mortar troops launch barrels of tar and feathers to cover them in the stuff, disabling the tower until it's removed.
- Too Important to Walk: He's carried around on his throne by his knights.
- The Unfought: He is never directly fought at all, and the Final Boss battle is against his Paragons.
- What Happened to the Mouse?: The knights that were carrying him into his castle don't appear when Vez'nan breaks into his throne room in the cutscene following his defeat. He might have dismissed them following Vez'nan's victory.
Paragons

King Denas' Praetorian Guard and his last line of defence against the Dark Army.
- Armored But Frail: Paragons have the second-least amount of health of any boss in the series, but they make up for it with both armour and magic resistance.
- Charged Attack: When they're in combat with Vez'nan's Archdemon, they can charge up an attack that will deal hefty damage and Knock Back the demon. If you tap on Vez'nan to command the demon to use its own Charged Attack while the Paragons are charging theirs, the Paragons will get interrupted and stunned instead.
- Final Boss: The final boss enemy encountered in the main campaign. You have to face three of them, one after another.
- Heavily Armored Mook: The Paragons are one of two enemies in the entire series to boast both armor and magic resistance, the other being the Sons of Sarelgaz.
- Hero Antagonist: They're Linirea's most powerful forces and the final objective in the player and Vez'nan's way.
- Hold the Line: All three are trying to prevent Vez'nan's Archdemon from entering the castle.
- Knock Back: They're capable of knocking back Vez'nan's demon with a charged attack.
- Light Is Good: They're dressed in light colours, charge their spiked hammers with holy energy when they use their special attack and are the strongest knights of The Good Kingdom. This also makes them an enemy of the player.
- Make My Monster Grow: When a Paragon enters battle, he imbibes a growth potion, turning from child-sized to gigantic in order to face off Vez'nan's giant Archdemon. They shrink back down to normal when killed.
- Praetorian Guard: King Denas' most elite guardsmen and his last line of defence.
- Rule of Three: You have to fight three of them, one after another.
- Sequential Boss: Unlike other bosses, three Paragons must be fought in total, one after another.
- Top-Heavy Guy: The potion they drank makes them much more bulky in the arms and torso.
King Polyx the Wise

Leader of the Anurians, who got corrupted by darkness while studying dark magic.
- Adipose Rex: The fattest Anurian out there and the king of them all. In fact, one of his quotes outright states that this is how Anurian culture works:"In our culture, the fattest is seen as the smartest."
- Authority Equals Asskicking: He's the king of the Anurians, and instead of using a mech, dragons, or Paragons to fight you, he jumps into the fray himself. He's also no slouch in combat.
- Eating the Enemy: How he deals with troops — he swallows them whole with his tongue for a One-Hit Kill.
- Evil Versus Evil: Polyx plans to take over the kingdom by force, and Vez'nan isn't keen on that since HE wants to be the ruler. That, and Anuria has some powerful magic crystals that Vez'nan could use.
- Fallen Hero: He used to be a good sage until studying dark magic corrupted him.
- Fat Bastard: He's a huge fat toad and is planning to taking over the kingdom.
- Frog Men: Like the other Anurians, he's a frog man. A huge, fat, warty one at that.
- Large and in Charge: Polyx is the king of the Anurians and he's far bigger than any of them. In fact, the Anurians invoke this by seeing the fattest as the smartest.
- One-Hit Kill: His attack eats your troops in front of him to take them out of the battle instantly.
- Power Crystal: Has both blue and pink magic crystals all over his body, and he floats on one. Thankfully, the only magic he uses with this is a teleportation spell that makes him change lanes.
- Power Floats: When he finally decides to fight, he rises up on a huge floating magical crystal.
- Precision F-Strike: His Pre-Asskicking One-Liner "That's it! I'm froggin' angry!" uses a family-friendly version of this, since it's obvious what "froggin'" is a replacement for.
- Teleportation: Initially, he moves down the top lane, but once he gets 1/3 of the way through he teleports and switches to the bottom lane. Once he's 2/3 of the way through, he teleports back up to the top lane.
The Winter Queen

An ancient icy threat who was sealed away by heroes long ago, she has awakened once more and seeks to take over Linirea with her army of ice monsters.
- Ancient Evil: A primordial being who wrought havoc several years ago in the past.
- And Then John Was a Zombie: Like the Ice Reaper, she turns any units she kills into Apex Shards.
- Anthropomorphic Personification: It is stated on the post on the IronHide website that she is the "incarnation of Winter", hence why she couldn't be killed, and locked away instead.
- Cool Crown
- The Dreaded: You know that she's a serious threat when even Vez'nan himself drops almost all signs of evil hamminess in the level intros for the Frozen Nightmare.
- Elemental Hair Composition: Just like with Elora Wintersong, her hair seems to be frozen.
- Endless Winter: Several years ago, this was her plan until she was sealed away. After awakening, she plans to continue what she started.
- Evil Counterpart: To Elora Wintersong. They are ladies with ice powers who share a similar looking appearance, but while Elora is fighting on Linirea's side, the Winter Queen fights against almost everyone.
- Evil Is Deathly Cold: She's an ice- and winter- based villain who wants to plunge the world into an Endless Winter. Even Vez'nan himself thinks she's too much.
- Evil Versus Evil: Vez'nan's forces oppose her and plan to seal her away so that she will not be a threat to the Dark Army, and will also let the Dark Army be the ones remembered for saving the kingdom from her.
- Godzilla Threshold: If the post on the IronHide website is to be believed, then it took the power of the wizards of the Stormcloud Temple, and their Solar Heat Quartz, to lock her away all those centuries ago.
- Harmless Freezing: She can freeze your towers in a similar manner to Svell Druids.
- An Ice Person: She can freeze your towers and impale your troops with ice powers.
- Orcus on His Throne: A literal example, where she sits on her throne until the final wave.
- Power Floats: She comes into combat floating on a huge floating chunk of ice where her throne is situated.
- Sealed Evil in a Can: She was imprisoned by the Stormcloud Sorcerers in the past. After Vez'nan's Dark Army defeats her, this happens to her again.
- Squishy Wizard: The Winter Queen has the lowest HP of every boss in the series (4000 HP) and lacks armour or magic resistance, but has several spells to hamper you with.
- Supernatural Gold Eyes: She has these in the cutscene explaining her backstory.
- Winter Royal Lady: She's called the Winter Queen, and she has ice powers as well as several servants under her rule.
The Ancient Ghosts (a.k.a. The Ghost Kings)

Many years ago, Vez'nan made pacts with ancestral entities who agreed to give him command of their troops in exchange for the souls of the defeated enemies. After Vez'nan' victory, they demand their share plus the souls of half of the living population of the kingdoms, a price Vez'nan is not willing to pay. They were formerly known as Tristen and Umber, the Diarchs of Valardul, and the ones that oversaw its (unintentional) corruption from a wealthy and fertile kingdom, into the haunted wasteland we presently see it as.
- Advancing Boss of Doom: The ghosts do not engage in any combat as they slowly advance towards the exits.
- All for Nothing: Their attempted conquest of the territories west of them ended up destroying their once might nation, turning it into a wasteland, and forcing them into their now-ghostly states.
- Ancient Evil: Like their name suggests, they're ancient evil spirits who were around since long ago.
- Anti-Magic: The blue ancient ghost is completely immune to magic damage.
- Bad Boss: In life, they were twin princes who tried to take over Linirea with their army. They had no qualms firing upon their own troops with cannonballs, which was how Jack met his demise.
- Character Select Forcing: You're pretty much forced to bring both physical and magic towers in your loadout against them, due to each having complete immunity against one type.
- The Conqueror: During their times as living beings, and as Diarchs of Valardul, they attempted to take the territories west of them for themselves. It ended horribly.
- Create Your Own Hero: In life, the two fired upon their own men including their strongest Knight Jack. This ended up killing him, and his Headless Horseman spirit swore vengeance on them ever since.
- Deal with the Devil: Vez'nan made a deal with them, in order to get his dark army, he would have to exchange the souls of his defeated enemies once he was successful. Unfortunately, the ancient ghosts want more. They're also heavily implied to have done a similar deal with Lord Blackburn. They themselves did this in order to slay the enemies that were within walking distance of taking over their kingdom, which resulted in their kingdom turning into the wasteland known as Valardul and the Rotten Forest that we presently see in the game. It even allowed them to become the ghosts they are presently.
- Didn't Think This Through: Their cannon barrage on the Lush Forest not only cut down many of their own troops (including the future Jack O'Lantern), but got rid of their one shot at possibly winning the war that they seriously losing. This started the Disaster Dominoes that caused them to turn to Dark Warlocks and accept their offer of destroying their enemies without hesitation, resulting in Valardul's current state of eternal damnation.
- Dual Boss: The very first example in the entire series. Both ghosts will slowly move down each lane, with the purple ghost being immune to physical damage, and the blue one immune to magic.
- Evil Versus Evil: Vez'nan fights against them as he doesn't want the living population to be taken by the ghosts.
- Evil Versus Oblivion: Vez'nan is at odds with the Ancient Ghosts as they want to take the souls of the living too, which was not in his bargain. While Vez'nan is evil, it's still in his interests to keep the innocent townsfolk alive.
- Face–Heel Turn: They used to be the good kings of Valardul, until their lust for more drove them to attack the territories west of them, which eventually ended in failure.
- Fisher King: In life, they were (initially) nice people of a prosperous kingdom surrounded by the Lush Forest. After their lust for power and subsequent Deal with the Devil, they're now two evil, greedy Ghost Kings who haunt the Rotten Forest, the people of their country now turned into undead minions.
- Forever War: They began a 20-year-long war that engulfed the entire continent, saw the rise of Linirea as a benevolent and powerful kingdom, and led to the current state of them and Valardul.
- Gaia's Lament: Their actions caused the kingdom of Valardul and the once Lush Forest (later the Rotten Forest) to become the wasteland it is today, and it has a long way to go before it's fully healed, if ever.
- Greed: The main motivation behind their actions.
- Intangibility: The purple Ancient Ghost is immune to physical damage, presumably due to this.
- The Juggernaut: Neither of them can be blocked by troops nor be affected by negative statuses.
- Moving the Goalposts: Their original pact with Vez'nan had a price: they required the souls of every enemy soldier fallen in battle. After Vez'nan's victory, they come to claim that price... except they also demand the souls of half the living population in the kingdoms. Vez'nan is not happy with that.
- No-Sell: The blue ghost is immune to magic damage while the purple one is immune to physical damage. Neither of them can be blocked by troops or be affected by negative statuses.
- Our Ghosts Are Different: Two ancient spirits, one of which is immune to magic, and the other is immune to physical damage.
- Predecessor Villain: To Vez'nan, Greenmuck and Myconid. They made themselves into Linirea's enemy long before Vez'nan turned evil. Furthermore, their Deal with the Devil was the reason why the Rotten Forest became corrupted in the first place, spawning both Greenmuck and Myconid.
- Royal Brat: Their father would grant them with whatever they desired, and this eventually bled into their status' as power-hungry tyrants.
- Stone Wall: An odd case in terms of bosses. While they are both very slow, have no attacks, and each have less health than any other boss in the series (3000 HP), each of them have complete immunity to one damage type and cannot be blocked by any troops.
- Used to Be a Sweet Kid: They were once the pride and joy of their father and the kingdom of Valardul, and under their early rule, was a very good place to live in. However, their lust for more turned them into tyrants, and eventually, Ghost Kings.
- Weak to Magic: The purple Ancient Ghost can only be damaged by magic as he is immune to physical damage.
The Dragon King
A powerful water dragon who seeks to obtain the power over all land, sea and air. Long ago, he was sealed into a statue and locked in an abandoned temple to stop him. Years later, after Vez'nan's victory, he was freed by escaped Linireans as means of retaking their kingdom. However, he came with an army and plans of his own...- A God Am I: At the beginning of his stage he proclaims himself the god of the sea.
- Making a Splash: His main contribution to the fights is spitting out globs of water to create puddles that buff his Mogwai and Nian.
- Non-Action Guy: He doesn't have any damaging attacks, instead spitting water balls that create wet patches on the ground to support his troops. His battle consists of him moving forward every few seconds while using the aforementioned water balls.
- Proactive Boss: Instead of simply spouting Boss Banter, Dragon King spits water globs during the level, even before his actual fight begins.
- Sealed Evil in a Can: He was sealed away in the form of a golden dragon statue before the Linerians freed him to fight Vez'nan.
Great-T
The most powerful apex predator of them all, Great-T is a ferocious dinosaur tamed by the chief of prehistoric dwarves. The only thing that rivals his hunger is his desire for a good nap.
- Vegetarian Carnivore: Despite being a T. Rexpy, It will eat the carnivorous plants on the map to regain health.
Mirage

- Action Girl: A female assassin capable of stealth tricks and both close and long-range combat.
- Blow That Horn: She carries a horn she uses to signal Nomads and Djinni to attack with.
- Combat Pragmatist: The briefing for Sape Oasis has Vez'nan even warn the player that "she likes to play dirty, so watch out for ambushes and deceiving illusions". True enough, she doesn't play fair during the level, summoning Nomads from the trees (and later on, from a spot very close to one of your exits), as well as calling in Djinni from an area relatively close to the exit.
- Devious Daggers: She fights with these, either throwing them from afar or stabbing your troops in close combat.
- The Leader: She leads her own legion of Nomads, trained in her ways of combat and ready to strike at the blow of her horn.
- Proactive Boss: She pops up multiple times throughout the level even before she herself begins to fight. She uses her horn to summon Nomads and Djinni into the fray and stays for some time to throw daggers at your units before disappearing.
- Took a Level in Badass: On a more meta level. She is much more powerful than she was in Frontiers, now capable of actively fighting in close range and quickly killing her opponents. Then there's also the fact she has her own battalion now.
Sha'tra

- Alien Abduction: Like in Frontiers, he can use his UFO to abduct your troops as an instant kill.
- Anti-Structure: Another attack of his UFO emits a powerful laser beam that can blow up towers.
- Ash Face: After his control panel blows up after his defeat, he gains this.
- Hoist by His Own Petard: Unlike other bosses of DLC, you can't directly target him.. Instead, after you defeat his troops, his control panel malfunctions and blows up, forcing him to retreat.
- Non-Action Guy: Unlike Mirage and Alric, who step down the path to fight your army, he prefers controlling his UFO to provide support for his troops by abducting your barrack troops and blasting towers to bits.
- One-Hit Kill: His abduction attack instantly kills units in an area, like it did in Frontiers, while his laser cannon instantly destroys towers.
- Villain: Exit, Stage Left: In this case, Hero: Exit Stage Left. After you beat the final wave, his control panel malfunctions and blows up, so he calls upon his ufo and flies off.
Alric

- Blade Spam: He will use Flurry to deal a rapid set of powerful slashes to your troops around him. This hits an area, meaning that several troops can get downed if they're attacking him.
- Flunky Boss: Alric still has the ability to summon Sand Warriors to aid him. Not only are those tougher than in Frontiers, but they also persist indefinitely unless killed.
Malik Hammerfury

- Anti-Structure: He can use the Hammer of Ages to destroy a tower along with its placement spot, permanently rendering it unusable.
- Big Good: Of the Hammerhold campaign, being the ruler of the eponymous kingdom and leader of its army. Naturally, he is the last thing standing between you and the throne.
- Boss Arena Urgency: He will destroy towers near him along with their placement spots, making it not only harder to damage him but also making it increasingly harder to kill the mooks that spawn in.
- Legendary Weapon: Wields the Hammer of Ages crafted by Farcon Ironbeard, a weapon and tool that can create structures Made of Indestructium. It's also capable of permanently ruining structures beyond repair, as demonstrated in the fight against Malik.
- Mighty Glacier: He has the most hp out of all Vengeance bosses and is perhaps the slowest one, but he has a powerful long-range lightning strike, impressive close range strike and an ability to permanently destroy towers.
- My Rules Are Not Your Rules: He can destroy towers like Umbra and the Spider Goddess before him, but unlike those two, any tower he destroys also gets its placement spot permanently disabled.
- Permadeath: Unlike most other tower-destroying moves in the series, any tower destroyed by him will also get its placement spot rendered permanently unusable.
- Rags to Royalty: From being enslaved by the Gnolls during Origins, to the current leader of Hammerhold during Vengeance.
- Trial by Combat: Challenges Vez'nan's forces via one. Whoever wins gets the throne of Hammerhold.
Wildbeasts
Savage anthropomorphic animals living in the Everadiant Forest.The Unblinded Cult
An Apocalypse Cult devoted to helping the Overseer conquer Linirea. They seem to have overtaken a mine and created many temples there.Abominations
The spawn of Overseer himself, a multitude of Eldritch Abominations infesting corrupted portion of Linirea.The Overseer
A powerful interdimensional being seeking to turn Linirea into its playground.- Big Bad: It is the main antagonist of spin-off Legends and now Alliance, seeking to enter the world of Kingdom Rush to use it however he wants.
- Eldritch Abomination: A gigantic multi-eyed tentacled monstrosity that can turn humans into abominations of nature and manipulate reality.
- Faceless Eye: How he is seen at first. It's eventually revealed the eye seen is just one of many sitting on his true body.
- Greater-Scope Villain: He has been one of these for the entire franchise, chained by Linireans in the basement of Denas castle when it tired to enter the universe. Veznan's conquest was a well-intentioned attempt to finally deal with him, since his arrival would spell doom to their universe.
- Reality Warper: The trailer for the Alliance shows some parts of Linirea, such as Stormcloud Temple and plains, affected by his power, with floating pieces of land, seemingly bottomless crevasses, tentacles protruding from everywhere and gigantic eyes in the ground.
- Sealed Evil in a Can: It was trapped in the basement of Denas's castle for a long time, but there is another layer on top: it is trapped in a void between many realities, giving him the ability to appear on many different universes seemingly at once, explaining his presence in Kingdom Rush, Iron Marines and even Junkworld.
- Two Aliases, One Character: In Iron Marines Invasion, he appears as a Void Sovereign, but mentions heroes and legends, referring to Kingdom Rush Legends.
- World Eater: As per Word of God, his main motivation. He drains each world it visits of it's energy and feeds off of it.