For none could tame our savage souls yet you the challenge met
Under palest watch, you taught, we changed, base instincts were redeemed,
A world you gave to bug and beast as they had never dreamed
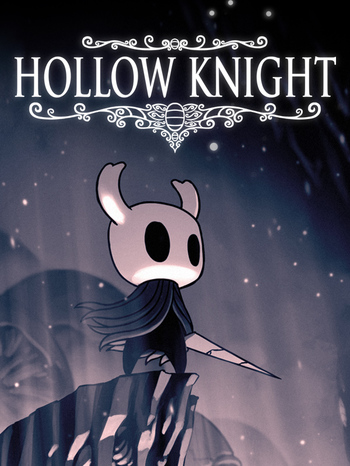
Long ago, a great and powerful being known only as the Pale King once ruled over Hallownest, a vast and ancient land of bugkind buried deep underground. Though long fallen to ruin after a dimly remembered catastrophe, explorers and thieves still brave its dark roads, its caverns, and towers, searching for riches and wonders. Lately, though, something has changed. Villagers and explorers venturing into the caverns have stopped returning. The caverns throb and tremble with a savage energy that sends creatures mad with rage and robs explorers of their memories.
As the enigmatic knight, players journey through the fallen kingdom of Hallownest in search of their origins, finding new areas, challenging several enemies and bosses, and gaining new abilities along their travels. The game is a platformer focused on exploration, featuring simple but fairly hectic melee combat, as well as finding and equipping several ability-enhancing charms to augment the protagonist. The world is very open-ended, and acquiring a new power often opens up several new areas to explore in classic Metroidvania fashion. There's also a heavy focus on boss battles, with unique and challenging mandatory bosses plus over a dozen extra bosses in obscure places, with more extra challenges for the dedicated player.
In short: what would you get if you took the adorable insects from A Bug's Life and put them in the ruined, oppressive Dark Fantasy world of Dark Souls?
You'd get something like Hollow Knight, a hand-drawn 2D action Metroidvania created by Australian developer Team Cherry, after a successful Kickstarter campaign![]() . It was released in February 2017 for PC via Steam. A Nintendo Switch port was released on June 12, 2018. A version with the subsequent free updates called Hollow Knight: Voidheart Edition was released for PlayStation 4 and Xbox One on September 25, 2018.
. It was released in February 2017 for PC via Steam. A Nintendo Switch port was released on June 12, 2018. A version with the subsequent free updates called Hollow Knight: Voidheart Edition was released for PlayStation 4 and Xbox One on September 25, 2018.
Over the course of its update history, the game has released four free expansion packs:
- The first, Hidden Dreams
 , was released on August 3rd, 2017, being mostly a slight tweak to the base game that added in some new bosses and features.
 - The second, The Grimm Troupe, was released on October 26th, 2017. It added a side quest that can be explored in the middle of the game as well as several new items and characters.
- The third, Lifeblood, was released on April 20, 2018. It focused entirely on optimizations to the game and some quality-of-life updates to features, such as allowing players to place their own map markers.note
- The fourth and last free update, Godmaster, was released on August 23, 2018. It adds a new area explicitly devoted to a series of Boss Rushes, culminating in a gauntlet that has the player face off against every single boss in the game, with two new endings from besting the ultimate challenge.
Aside from the game, there are also some secondary products:
- Two Downloadable Contents containing the game's official soundtrack. OSTs from the base game are available under the Official Soundtrack DLC, while additional post-launch/expansion pack OSTs are available under the Gods & Nightmares DLC.
- Team Cherry has released a prequel comic told from the perspective of Quirrel.
- A Hollow Knight Wanderer's Journal, which introduces a new character named Ellina.
- There is also various official Hollow Knight merchandise being sold, such as shirts, pins, and plushies.
The plot of the game, focusing on the fall of the kingdom of Hallownest, is explained via Story Breadcrumbs, with much of the character motivation, backstory, and purpose left to the player's imagination, if not intentionally cryptic in tone and open to a lot of interpretations. With that in mind, take entries detailing the lore of the setting with a grain of salt.
The game is Troperiffic as it is. But since the usage of the term "Hallownest" is interchangeable to refer to both of the game's location/landscape/setting and as a collective term for the In-Universe Kingdom of Hallownest and its denizens, there is now a separate subpage for the setting tropes and general character tropes as listed here. Likewise, most of the character-exclusive tropes are listed in their appropriate subpages here, while gameplay tropes limited to the Player Character's mechanics are listed here.
On February 14, 2019, it was announced that the game will have an upcoming sequel starring Hornet, called Hollow Knight: Silksong.
Higher Beings, these tropes are for you alone:
- Unique enemies have their own page.
- 100% Completion: If one includes all the unlockable achievements in the game, the player is required to do at least two playthroughs since some achievements are tied to making decisions that the game auto-saves after making.
- There are even two achievements related to your 100% completion progress when you beat the game.
- For the PS4 version, there's also a Platinum Trophy named "Heart of Hallownest" which is tied to the feat of getting all other trophies.
- Ability Required to Proceed: A very common Metroidvania gameplay/level design convention, where you can collect movement abilities, spells, or passive items along the way to discover new areas. Backtracking also ensues to the previously-visited areas:
- You must obtain the Vengeful Spirit spell from the Snail Shaman in order to blast the Elder Baldur blocking the entrance to Greenpath.
- The Mothwing Cloak allows you to dash and cross tight spaces that cannot be jumped over. It can be used in conjunction with the jump mechanics to cross greater distances.
- The Mantis Claw allows you to directly scale up walls and reach areas that require a series of wall jumping.
- The Monarch Wings give you the double jump ability, for reaching ledges that you cannot just simply wall-jump with.
- The Crystal Heart gives you a super dash ability to cross even greater distances that simple wall jumps and dashes cannot. However, it needs to be charged and requires the Knight to be stationary while preparing this.
- The Shade Cloak upgrades your basic dash to be able to cross Shade Gates that block your path.
- Isma's Tear allows the Knight to swim in acidic pools.
- Desolate Dive/Descending Dark can break fragile floors, uncovering more paths and secret areas.
- Action Bomb: There are a lot of exploding enemies in the game. Common indicators such as a large glowing pus of infection can be seen to more readily tell that they are living bombs:
- Belflys are exploding, tracking creatures that detonate on contact and deal two masks of damage to the Knight.
- Some bugs only detonate a few seconds after you have killed them, making these a case of Taking You with Me.
- Oomas track you down after you've popped their outer layer. Fortunately, they will explode even if they've hit an environmental object. Alternatively, an Ooma can hit another Ooma, causing a chain reaction of explosions.
- The Violent Husks are classic examples of this trope. Their only method of attack is to rush forward and detonate once they make contact with anything: the Knight, other enemies, or even walls.
- Action Girl: Hallownest is no stranger to female warriors. We have the likes of Hornet, Cloth, Dryya, Ze'mer, Isma, and the Mantis Lords. Iselda the shopkeeper is also implied to be one, as when struck with the Dream Nail, she reveals that she has only set down her weapon to start a quiet life with Cornifer.
- Adam Smith Hates Your Guts:
- Salubra the charm vendor will sell you several charm notches, which allow you to equip more charms at once, but each one is more expensive than the last, despite being identical. She will also refuse to sell them until you've collected enough charms.
- Sly will sell you several mask shards that start out cheap but ramp up in price quickly—the fourth costs 10× as much as the first. He initially thought they were worthless, but since the protagonist keeps buying them, he figures they must be valuable.Sly: I feel bad charging you so much for the previous shards, especially because it means I have to charge even more for this one.
- The most expensive thing Sly sells is a humble lantern, made of a glass globe with one of the common glowing flies inside. The thing has the price of several magical trinkets or reforging your weapon a couple of times—but because it's an item that grants access to new, dark areas and potential shortcuts, you have to pay up.
- The Nailsmith's services, since the pricing is not a linear increase (even when not counting the Pale Ores). The first nail upgrade costs 250 Geo, the second costs 800, the third costs 2000, while the fourth and final upgrade costs 4000 geo!
- Divine from the Grimm Troupe will make you pay out the nose if you want to make your Fragile charms unbreakable—but since this isn't needed to use them on dream bosses or in Godhome, it's not as bad as it could be.
- Advancing Wall of Doom: Bosses like the Traitor Lord and the Radiance have attacks like this—a wall that slowly moves towards the other side of the screen and can only be bypassed using the Shade Cloak's dash.
- Aggressive Play Incentive: The game encourages the player to get up close and personal, because not only do ranged spells typically inflict less damage than melee, but they also cost Soul—which can be recovered by making melee attacks. Soul can also be used for healing, further rewarding the player for focusing on nail attacks (since the Soul gain will pay for the inevitable lost health).
- Airborne Mook: There are plenty of hostile flying insects in almost every area. While many of the bugkind examples are justified because they have wings, some flying enemies float due to unnatural reasons such as the jellyfish in the Fog Canyon. To make matters worse, airborne mooks in this game have a degree of Artificial Brilliance in their flying movements.
- Air-Dashing: The Mothwing Cloak lets the Knight air-dash in the direction they're facing. It can be upgraded into the "Shade Cloak" which lets the player dash through enemies and their attacks without taking damage, and with the Dashmaster Charm which enables a downwards air-dash. The Sharp Shadow charm further upgrades the Shade Cloak so that the shadow dash is longer and does damage to enemies.
- Alien Blood: Enemies flash and emit liquid of a certain color when hit to indicate their state or what they are made of:
- The ordinary color for uninfected bugs, beings, and ghosts is white.
- Infected bugs flash and bleed orange blood.
- Beings made out of void will spurt a black substance known as void.
- Masks stained with Lifeblood will cause the Knight to bleed blue blood.
- All There in the Manual:
- According to the game manual, under "The Missing King" entry for the characters, the Pale King is explicitly stated to have gone into hiding.
- The Hollow Knight artbook states that the Black Egg Temple was built from the carapace of an ancient bug, hinted to originate from the ancient civilization.
- The official manual and a pre-release Kickstarter update revealed that Cloth is a cicada.
- The Indiebox for Hollow Knight comes with a PDF called "Grub Care Instructions". In it, it explains all their habits and how to raise one.
- According to the official manual, Vespa had once grown to an enormous size, hence her inability to leave the Hive.
- The Godmaster update reveal post confirms that the Godseeker is female.
- The side material, Wanderer's Journal, also accounts Ellina's additional observations to some of the creatures of Hallownest that are not in the Hunter's Journal, like the tidbit of how the infected blisters on a Furious Vengefly's wings improve their flight.
- Ambidextrous Sprite:
- Downplayed for most of the NPCs that you can interact with, since their sprites either have fixed or mirrored orientations depending on the scene. When the Knight moves around, the NPCs look at it, turning their heads without having to adjust their entire bodies.
- Played straight with the bosses and regular mooks, especially those with asymmetry in their sprites, which will be flipped when they face the other direction. Examples include the Hollow Knight's scar and arm, Grimm's cloak, and Zote's horns.
- Ambiguous Gender: Some of the characters have difficult-to-place genders. The use of "it" is fairly common, and certain characters call Hornet the "Gendered Child", since her having a gender is remarkable as opposed to her genderless siblings, the Vessels.
- Animated Armor:
- The Watcher Knights consist of nothing but hollowed-out remains controlled by swarms of infected lumaflies circling above the arena.
- Kingsmoulds and Wingsmoulds are suits of armor brought to life by the harvested void in order to serve as the guards to the Pale King's White Palace.
- Antagonist Title: From the start, "Hollow Knight" refers to an antagonist. That antagonist is the final boss. One ending zigzags this, as the playable Knight could become the next Hollow Knight to contain the infection.
- Antepiece:
- As explained in this video, the very first tutorial level in King's Pass can subtly teach tricks that players can use later on. To be specific on one example, the first few platforms that you can jump on are safe, while a certain platform is located right below a falling stalactite, and the nearby Vengefly can be killed by this stalactite if you don't kill it first. This teaches you two things; to watch out for falling objects, and that enemies can be damaged by environmental hazards.
- If the player isn't aware of the existence of seamless breakable walls yet, one Husk Guard in the Forgotten Crossroads has a tendency to strike its weapon in the lowered ceiling, opening a secret passage. It's also almost guaranteed to break the aforementioned structure if the player attempts to jump through the Husk Guard and escape to the leftmost platform.
- The place where you unlock the movement abilities would typically require you to use the recently unlocked ability just to reach the exit. For example, there is a tight space with acid that forces you to dash, and the nearest ledge has to be air-dashed.
- The area where the Sharp Shadow is located can only be accessed after obtaining the shade cloak. The shade gate at the entrance serves as a subtle reminder that the shade cloak allows you to bypass enemies by dashing past them. A part of the platforming section has two goams alternating vertically, which is guaranteed to damage the knight if you force yourself in, but using the Shade Cloak at the right time will allow you to get past said goams unscathed.
- The first whispering root that you can activate after obtaining the Dream Nail is found just outside the Seer's room in the Resting Grounds, and this place is small with easy platforming to simply teach you how to collect essence. The whispering roots in other locations have added challenges, such as covering a larger room, being hidden in breakable walls, or the Essence appearing near enemies or environmental hazards.
- As explained in this video
- Anti-Frustration Features:
- The Wayward Compass charm still shows the location of the Knight even if no map of the current area has been bought. This is useful if you accidentally visit a new, unfamiliar location and want to backtrack.
- Two were added in the game's first major update to make navigation easier. First, Cornifer's trademark humming and scattered papers were added to make him much easier to find as long as you can get within a few screens of him. Second, Iselda's shop was stocked with map markers that could be manually placed to help remind yourself which areas to return to later.
- If you beat the boss of an area after failing to find Cornifer's location, or if you've destroyed all three Dreamers, he'll move away and leave the map he would've sold you in his store at Dirtmouth Town.
- You'll find signs pointing in the direction of nearby benches and stag stations.
- You'll lose all your geo if you die and fail to kill your shade, so there's a bank headed by a lady named Millibelle where you can deposit your cash. As an added bonus, her bank is located just two rooms away from the Stag Station and bench in the Queen's Gardens. However, it is a scam. If you deposit more than 2550 geo and leave, she'll have fled to the City of Tears when you next come back. Finding her there will allow you to reclaim your money (with interest), though.
- Use a Simple Key to open the door at the edge of Dirtmouth and you'll find a service that moves your shade to you in exchange for a rancid egg, which saves you the trouble of going through potentially dangerous or distant territory to recover your geo. These have no other use, and an NPC in the City of Tears' sewers will even sell them to you for 80-100 geo a piece if you use up all of the pre-placed ones. This feature is especially nice if your Shade ends up in an unreachable location or otherwise glitches out so that you can't retrieve it.
- When dying against certain bosses, the shade will appear outside of the arena, so you can recollect your Geo and then head in a different direction if you feel that you're not ready for the boss yet.
- If you exhaust all of his other situational dialogue, Elderbug will always describe in passing the area of Hallownest you currently need to search in order to move the plot forward.
- In the Abyss, only a maximum of five siblings can actively chase the Knight. If a sixth is aggro'd, one of the previous five will break away from the group and return to being idle.
- The Grey Mourner's quest gives the impression that you need to take her "one-of-a-kind" flower all the way across Hallownest in one attempt without taking any damage or her reward will be impossible to get. If you fail, she is incredibly distraught but gives you another flower, and will do so endlessly, while insisting each one is just as unique and special as the last. This is done at least in part because she gives you a mask shard, which is required for 100% completion. Furthermore, even after finishing the quest, you can get flowers from the grave where you put it, allowing you to do stuff like give one to Elderbug or get the second Godmaster ending even after finishing it, though respawning it may require a reload.
- As an unusual display of mercy, if you've finished everything you need to get to that final fight, even if battling the Hollow Knight left you in awful shape, you'll be restored to full health before you clash with The Radiance. You're going to need it.
- The Hidden Dreams update adds an upgrade to the Dream Nail once you've collected 900 Essence: The ability to set Dreamgates. You can set down a Dreamgate for free almost anywhere by charging the Dream Nail, and warping to the Dreamgate costs just 1 Essence. This helps to eliminate the "runback" to any hard-to-reach boss or facilitate travel to distant key areas.
- Although every Boss Rush battle at Godhome culminates in a fight against a brand new boss, merely encountering them is enough to make them appear at the Hall of Gods, allowing you to practice against them at your leisure.
- Dying while in the dream world has far fewer consequences than dying in the normal world. You don't have to collect your shade (and thus don't lose your money), you respawn next to the dream world entrance rather than at a distant bench, and the three Fragile charms don't break, allowing you to use them without fear (which especially comes in handy in Godhome). The only exception is the True Final Boss battle against The Radiance, presumably because, as a Physical God and leader of a tribe who excelled in mucking about with dreams, she knows exactly how to truly kill you in one.
- The God Tamer doesn't need to be beat to enter the Pantheon it is fought in, ensuring the player does not need to complete the Trial of the Fool in order to complete Godmaster.
- If Divine has taken one of your fragile charms and you haven't paid her before banishing the troupe, the charms will be left on her tent when you return to Dirtmouth. You may have lost the chance to unlock the Unbreakable version, but at least, the Fragile charm will be returned.
- Since many places that require the Crystal Heart to traverse appear at first glance like platforming challenges, crystals from Crystal Peak appear in select early-game areas to make it clear to the player where they need to go next instead of letting them throw themselves at an impossible gap over and over. These crystals also resemble those formed from the Crystal Dash ability, hinting to the player to use that ability there.
- Anti-Magic: Seals of Binding are personal deflector shields present on selected individuals or objects, making them invulnerable to spells.
- Anti-Wastage Features: Focus is the Concentration-Bound Magic of Heal Thyself, which also spends Soul just in the "concentration" phase before any healing gets done. It can still be used at full health, but the concentration requirement makes it useless for healing right before being attacked.
- Anyone Can Die: Boy, this game won't pull any punches when it comes to the death count.
- On-screen deaths can include the Knight, the Hollow Knight, Zote, Tiso, Cloth, the Nailsmith, the three Dreamers, and a majority of the bosses that you can kill. There's also the implication that succumbing totally to the infection can lead to the loss of one's will, leading to the Knight killing the individual in self-defense, like in Myla's case.
- There are those who died prior to the start of the story, like Isma, Dryya, all of the Warrior Dreams, and the numerous named ghosts.
- While there are some characters whose situations are vague as is, the fact that they can disappear out of nowhere (some fading into light) might equate to death as well. These include Quirrel, the Seer, Ze'mer, and the Godseeker in two of the endings.
- Arbitrary Mission Restriction: You need to have the Grimmchild equipped in most of The Grimm Troupe quest, regardless if you're out hunting the Grimmkins (or else they won't appear on the map), challenging Grimm, or his Nightmare King version. The only time where this restriction does not take place happens if you proceed with the "Banishment" ending instead.
- Arc Symbol:
- That bug icon shown in the official title screens, main menu, confirmation prompt and auto-save icons? It is the Hallownest Seal, the sigil of the kingdom of Hallownest. In addition to the seals scattered throughout the game (that you can trade to Lemm), the symbol appears throughout Hallownest's architecture, on top of lampposts, on signs, and elsewhere in the background. The top of the seal is obviously the Pale King's horns, and the wings are likely the Monarch Wings.
- The Pale King's and the Hollow Knight's distinct horns are imprinted on various key objects and statues. As you are nearing the endgame, the four-pronged horns of the king also appear when you obtain the King's Brand, and it also resembles the maw of the dead Wyrm from which he was born.
- That bug icon shown in the official title screens, main menu, confirmation prompt and auto-save icons? It is the Hallownest Seal
- Arc Words: Many, but especially:
- "Void", "dreams", "light", and "will". These summarize the conflict between the Pale King and the Radiance – Both of them are higher beings commonly compared to the "light". The Radiance rules the "dream" world, while the Pale King granted free "will" to the bugs of Hallownest. The "Void" is what the King used to create Vessels in order to counter the Radiance.
- In the Grimm Troupe expansion, "flames", "dance", and "Ritual" are heavily tied into the motives of the Troupe and its leader, Grimm.
- In the Godmaster expansion, "Attune" is heavily associated with the Godseeker's quest.
- An Arm and a Leg:
- Mawlurks are Mawleks that lost their legs, only remaining stationary when encountered.
- While it could be obscured by the cloak they wear, the Hollow Knight's second arm is never visible. The Pure Vessel fought in the Godhome very clearly has two arms, confirming that the Hollow Knight lost one arm at some unknown point after this, presumably due to containing the infection.
- Armor-Piercing Attack: Some enemy attacks are classified as "Piercing", because they bypass even the Dreamshield on hit.
- Artificial Brilliance:
- Some enemies are programmed to perform specific actions when you are above them, such as having anti-aerial attacks like slashing upwards. Similarly, the Great Husk Sentries and Shielded Fools can quickly point their shields up when you try to jump or super dash over them from a higher position.
- Several flying enemies are also coded to keep hovering just far enough from your slashes. They can also synchronize their moves just to stay far away when you are in mid-air (i.e. if you jump towards them, it will also be the same time that they will move away).
- Sure, the Grimmchild may have some questionable programming on what it targets on specific conditions, but he can be helpful in Deepnest. If he starts spewing fire at the corpses, then that corpse is actually controlled by a Corpse Creeper, and is going to revive the host sometime soon.
- Artificial Stupidity:
- Once you defeat the mantis lords in their village, all mantis enemies will no longer attack you on sight or deal contact damage... unless, of course, you decide to attack them first, in which case they will retaliate like a typical enemy. Since they are still technically considered enemies, your summoned allies like the Grimmchild are still programmed to attack them, provoking them even if you do not intend to.
- Similarly, the Grimmchild will still automatically shoot the exploding jellyfish in Fog Canyon, which can damage the nearby knight. There is an area with a charm notch that encourages you to minimize damage to yourself by slowly traversing and avoiding the explosive enemies, and having the Grimmchild will just set off chain reactions of explosives and homing projectiles that may kill the knight if it is in proximity.
- Enemies can be lured to die via environmental hazards or Bottomless Pits. While most of the trick involves some manipulation by the players, some enemy types can easily fall to their death on their own, like the Leaping Husks who like to jump around, and the Violent Husks who explode on the instant they bump into other creatures or surfaces. The Death Loodles in the Colosseum of Fools don't even bother aiming and just bounce around at random, which makes them more likely to dive into spikes in some sections than actually hit you.
- Artistic License – Physics: Some real-life bugs don't get stuck on water; no, they can swim in it (some can even walk on the surface). Although, only the player character, who is made of void and therefore not a real bug, is seen to swim. Enemy bugs die upon contact in water.
- Art Shift:
- In-game, the characters' designs look very small and simplistic enough, but the animated cutscenes add additional details with more noticeable lighting and shading effects.
- This also applies to the pre-release Hollow Knight Press Kit, which contains high-quality artwork of certain characters that are drawn with better graphical fidelity compared to their actual in-game sprites.
- Side material such as the Quirrel comic have the liberty of drawing the characters and settings from the artist's desired angle, which naturally can make them more detailed than their in-game sprites.
- Art-Style Dissonance: The character designs are drawn in an exaggerated, thick-lined style that's fairly cute and simplistic. This heavily contrasts with the darker, highly detailed backgrounds strewn with corpses, broken shells, and ruined scenery of Hallownest. This also applies to the audio design, which uses the realistic sounds of vacant, howling wind, water droplets, and the echoing, muted blows of combat as these cute bugs fight with nails and thread.
- Attack Speed Buff: The Quick Slash charm decreases cooldown between standard attacks, letting the Knight launch more swings per second. Because more individual attacks allow the player to build up their Soul gauge, even spell-focused builds can find room for this one.
- Awesome, but Impractical:
- In general, many charms fall into this category. Their effects are awesome in theory, ranging from higher defense, retaliation attacks, and stronger magic attacks to quality-of-life improvements, like an auto-collection of geo. However, the points available to use charms are sparse, and most of the time you're way better off using the same Boring, but Practical charms all the time.
- The Sharp Shadow charm allows you to damage enemies while dashing through them with the Shade Cloak, which sounds helpful until you start trying to navigate through enemies you don't want to attack, such as Oomas. In addition, the length of the shade-enhanced dash is increased by 39%, which can raise the difficulty of platforming sections as most are designed with the standard dash distance in mind.
- Heavy Blow greatly increases the knockback distance of the Knight's attacks, pushing enemies farther away on a hit. In practice, this just means you'll spend more time chasing down the bad guys or waiting for them to come back into your range, especially with nail-focused builds. Enemies with ranged attacks are the worst about this, as they get more breathing room to shoot you. Spell-focused builds don't suffer as much, but they are difficult to use on non-boss enemies at the best of times. And against bosses, Heavy Blow is near-useless since almost all bosses are immune to knockback. However, because of this, it does have a small secret effect of reducing the number of hits required to stagger a boss by 1, allowing you to do things like this.
- Cloth has a huge damage potential in the fight against the Traitor Lord but she's so slow against a fast-moving target that she's more likely to miss while the boss has its aggro on the Knight instead.
- An In-Universe example that is lampshaded. In the Colosseum, the Battle Obbles each wear a tiny mask. The Hunter questions if the mask even has a practical use or if it's just an extravagance. Given that Battle Obbles have far more HP than normal Obblesnote , it seems that it does indeed have a use.
- Backtracking:
- Part of the Metroidvania genre. Once you've unlocked a new movement ability, it will open a lot of opportunities to go back to areas that you can now access in order to proceed to the next stage or uncover secrets.
- After you've spoken to Brumm in Deepnest, he asks you to meet him in the Howling Cliffs should you decide to go for the "Banishment" ending. That place is also where you called the Troupe in the first place.
- Balance Buff: The Lifeblood update introduced a lot of tweaks to selected charms and enemies alike. These also go along with some Nerfs.
- Battle Cry:
- The phrase "FAAAAAAARRRFFUUUUNNNDADDAAA!" appears to be some sort of battle cry in the Hollow Knight world, given that the Dung Defender cries it out before battle.
- Zote, who came from lands outside the kingdom, shouts something along the lines of "RAAA MAREVA!" in his boss fights.
- Battle in the Center of the Mind: What the boss fights in the Dream World essentially turn into, since you have to access someone else's dreams and beat the stronger boss inside.
- Behemoth Battle: In the two Godmaster endings, the Knight defeats the giant moth Radiance by turning into an even larger Void Entity capable of ripping the Radiance's face using its hands.
- Bittersweet Ending: The true ending. The knight defeats the Radiance, eradicating the plague once and for all, but to do so has to sacrifice its physical form and become one with the void, leaving Hornet to possibly mourn it in front of its shattered shell. Their purpose fulfilled, the shades of the failed vessels fade back into the void. With the Radiance gone, bugkind can now finally rebuild and recover from the horrors of Hallownest.
- Black Bead Eyes:
- A majority of the uninfected bugs have black eyes.
- As for the vessels, their eye holes are literally empty.
- Blob Monster:
- Downplayed in the cases of the Lifeseeds from the Lifeblood Cocoons and the infected moving "pus" enemies in the Ancient Basin. They look like tiny variants of this trope at first, but closer inspection tells that they are small insects carrying blobs on top of their body.
- The Ancient Basin itself is home to floating, moving blobs of infection that can damage the Knight. They are also spawned by the boss of that area, the Broken Vessel/Lost Kin.
- Mistakes and Follies in the Soul Sanctum are failed experiments on bugs and soul, leaving them in a slimy state.
- Blood Knight:
- The Hunter has a self-explanatory name. He gives you a journal and tasks you with killing or defeating every living thing you come across.
- Tiso only came to the kingdom in search of the Colosseum of Fools, and once there, he's excited for a good fight, promising to beat the tar out of everyone, including you. The poor guy then dies offscreen like a chump.
- Bombardier Mook:
- Volatile Gruzzers are so swollen with the Infection that blobs of infected fluids constantly fall out of their bodies, harming whatever happens to be below them as they fly aimlessly around.
- Fluke Zotelings float slowly up and out of sight after emerging from the ground, dropping loads of acid as they go.
- Bonus Feature Failure: Due to being Mutually Exclusive Power Ups, the Godseeker Mode doesn't have the Carefree Melody and Kingsoul charms. These are replaced by their respective alternatives (Fully-upgraded Grimmchild and Void Heart).
- Book Ends: In the first two endings, the playable Knight's eyes get filled with orange infection just like how the Hollow Knight "woke up" in the prologue with orange eyes.
- Boring, but Practical:
- The Grubsong is a charm accessible relatively early in the game that gives you soul each time you take damage. It's ludicrously cheap for its effect, only costing a single charm notch, and although it shines in spell-heavy builds and damage-sponge builds, it's hard to find an area where it isn't useful. It is also very beneficial for first-timers who constantly find themselves getting hit by enemies or environmental hazards, and is nearly indispensable in places with difficult platforming challenges but not a lot of enemies nearby to farm for soul.
- Wayward Compass is by far the most useful travel pin; for one charm notch, it actively marks where the knight currently is on the map. For those who aren't the best at keeping track of where they are, this is really useful.
- Weaversong is a two-notch charm that summons three small spiders that will fight alongside the player. Although they aren't the strongest, they are also invincible and can pierce shields. This makes them incredibly useful for dealing with shielded enemies, as well as good for crowd-controlling weaker enemies. They can even gather soul for the player when Grubsong is also equipped!
- Most of the charms that focus on the knight's nail, such as Long Nail, Mark of Pride, and Quick Slash, aren't very flashy but are highly effective. The Long Nail and Mark of Pride charms extend the reach of the knight's nail (and stack, to give the player as much as 40% extra reach), and Quick Slash makes its strikes faster, substantially increasing its damage per second.
- The Hiveblood charm is highly recommended in the Platform Hell areas of the White Palace. With endless (but slow) health regeneration, you are given infinite attempts at any section. Alternatively, you can combine Grubsong and Grubberfly's Elegy with Deep Focus to receive enough soul on every failed attempt that you never run out of health.
- Likewise, Bluggsacs are a source of infinite soul when hit with the Dream Nail however many times as you'd like.
- While it deals no damage, the Dream Nail is by far the most useful tool when farming for soul, thanks to its increased soul absorption and faster attack speed. It also knocks back most enemies on hit. The Dream Wielder charm further improves it by decreasing the charge time and greatly increasing the amount of soul gained per hit.
- Defender's Crest deals only 1 damage per tick, but it is already enough to kill the Infected Balloons summoned by the Broken Vessel and its Lost Kin variant. This allows you to focus on the main boss without worrying much about its backup.
- Boss-Altering Consequence:
- At one point, you battle the Watcher Knights, a Wolfpack Boss of six large beetles. Before the fight, there's a small side path you can take that leads to a chandelier just above their arena. Cut it down, and it will crush one of them, reducing the number of opponents you have to fight by one.
- Cloth is a recurring character who desires a challenge to test her strength. If you find her in the Ancient Basin, she'll confess her weakness, but continue forward through the inspiration she finds in your courage. From here on, she'll join you in the fight against the Traitor Lord. She'll die at the end, but not before taking the twisted mantis with her. Don't worry though, this is a happy ending, as she's been reunited with her friend Nola in death.
- Grimm starts his boss fight by bowing to the Knight. If you hit him then, he will screech at the Knight and use his most powerful attack at the start of the fight.
- Boss Bonanza: There are brand new bosses waiting at the end of each of the first four Pantheons in the Godhome. But what takes the cake is the Pantheon of Hallownest, which requires you to beat 40+ bosses (both new and Godmaster-exclusive) in an uninterrupted string before you can even challenge The Absolute Radiance, the stronger form of the True Final Boss.
- Boss Game: As ridiculous as it sounds, your reward for beating the first four Pantheons in the Boss Rush Godmaster content is this, a game mode that places you on the Godhome and only that place! This means that you can have an option to do boss fights on one save file right from the get-go, which also means that all necessary upgrades and abilities are already unlocked.
- Boss in Mook Clothing: Great Husk Sentries, encountered in the eastern City of Tears and the Resting Grounds, have one of the highest HPs for a non-boss enemy type, are equipped with a shield that makes them hard to hit without taking damage yourself, and their BFS strikes have long range as well as dealing double damage.
- Boss-Only Level:
- Any boss that you can encounter in the Dream World will have floating platforms for the levels, ending with the boss fight on a larger platform.
- The Godhome is a level dedicated solely to the Boss Rush segment as well as the Hall of Gods that allows you to re-fight any boss of your choice.
- Boss Remix:
- The battle themes for the False Knight, Broken Vessel, Grey Prince Zote ("Truth, Beauty and Hatred"), and Hollow Knight ("Sealed Vessel"), are all arrangements of the game's main theme, AKA the Knight's leitmotif. In turn, the Pure Vessel's theme from Godmaster is a choral arrangement of "Sealed Vessel".
- Hornet's and White Defender's battle themes are based on the Pale King's leitmotif.
- The Collector uses a distorted version of the main boss theme, "Decisive Battle", itself based on the Dirtmouth motif. When fought in the Godhome, it uses a distorted version of "Gods & Glory" instead.
- Nosk's theme is a remix of the Deepnest ambient track, of all things.
- Soul Master's theme is a remix of the Soul Sanctum theme, which itself is an Ominous Pipe Organ remix of the City of Tears theme.
- Grimm's theme gets a symphonic metal remix for his Nightmare King form.
- The Radiance's theme is appropriately a remix of the Dream Realm theme.
- Boss Rush: The Godmaster update adds a series of boss rushes, each made up of some combination of bosses you fought previously. In-story, the place you fight them at contains inhabitants looking to attune to the "gods", which happen to be the bosses of Hallownest.
- Boss Subtitles: Areas, Non-Player Characters, and bosses all get a subtitle on the screen. There are two bosses that instead get a full title card just before they appear.
- Bottomless Pits: Falling in the clouds below while in the Dream world will boot you out of a dream and send you back to the physical world. If this happens while fighting a boss in the Godhome, you'll take 1 mask damage instead and respawn to the central platform.
- Bragging Rights Reward:
- The first two challenges in the Colosseum of Fools, the Trials of the Warrior and of the Conqueror, task the player with surviving lengthy gauntlets of unique endgame enemies and award geo along with a charm notch and a pale ore, respectively, which are required for character progression. The third and final gauntlet, named the Trial of the Fool, is longer than the first two put together, ends in a difficult Dual Boss, and awards nothing except a single Hunter's Journal entry and geo at a point in the game when the player is unlikely to have anything left to buy. And, of course, an achievement titled "Fool".
- The Seal of Binding entry in the Hunter's Journal. It is the only reward that you receive for completing the fiendishly, painstakingly-difficult Path of Pain, which is an even harder challenge than the usual route in the White Palace. Yep, only a Journal entry. No character upgrade, charm, or power-up for what was probably an hours-long, frustrating platforming challenge. Not even an Achievement or Trophy.
- Technically, there's a lore cutscene as well — which is only three seconds long and contains a single, ambiguous movement with no audio or dialogue. Bragging rights only, indeed.
- Defeating all bosses in the Hall of Gods under the Radiant difficulty will award the player a statue of the Void Given Focus.
- The Weathered Mask is yet another Hunter's Journal entry that proves one of being able to complete all Pantheons with all Bindings.
- Breakable Power-Up:
- The Leg Eater sells you three charms (more HP, more geo drops, and stronger attacks) that will break if you die with them equipped. If that happens, you can still pay him to repair them. They also won't break if you lose inside a dream. The Grimm Troupe update offers a way to make the Fragile charms permanent so that they are not lost on death, but it costs a hefty amount of geo and you can't use that charm until you scrounge up the cash for the unbreakable version.
- Baldur Shell creates a barrier when focusing. This barrier blocks up to four hits before it breaks, and the Knight must sit on a bench to have it restored.
- Brutal Bonus Level:
- The third Trial in the Colosseum of Fools is much harder than the first two. Twenty waves of increasingly tough enemies, the later of which include Mantis Traitors, Soul Twisters, the exclusive Volt Twisters, and a long stretch of fighting Armored Squits and Battle Obbles while walljumping above Spikes of Doom that gives you no chance to heal, culminating with the God Tamer boss.
- The already difficult White Palace has the hidden Path of Pain, which takes you through the ninth circle of Platform Hell.
- The Godmaster expansion pack takes this trope up to eleven with the Pantheon of Hallownest, a Marathon Boss Rush against souped-up versions of all of the base game's bosses, plus their Dream counterparts, Nightmare King Grimm from the Grimm Troupe, and a few new bosses not seen in the vanilla game. It culminates with the Pure Vessel and Absolute Radiance, the prime versions of the main game's Final Boss and True Final Boss respectively. There are no checkpoints, so if the Knight dies, it's all the way back to square one.
- Bury Your Gays: The Grey Mourner and the Traitor Lord's daughter were a lesbian couple, but the latter is dead and the former's gender is only explicitly stated if you open the inventory and look at the item she gives you. The Grey Mourner also dies after you successfully deliver the flower to her lover's grave.
- Call a Hit Point a "Smeerp":
- A Heart Container in this game is called a "Mask", while the health upgrades are split into pieces called "Mask Shards". When you have collected all mask shards, the inventory item that represents all of your heart containers will be labeled as "Ancient Masks".
- The blue temporary masks are called "Lifeblood Masks".
- Call a Rabbit a "Smeerp":
- Swords in this setting are all referred to as Nails. Larger variants or Greatswords are called Greatnails. It's implied that this is due to the bugs' size.
- Hornet's weapon is called a "needle", as the silk attached to the handle also makes obvious. However, it looks and functions like a throwing Kunai. Given the weapon's size in relation to her body, Hornet uses this kunai-looking weapon like a lance at close range.
- There are bees in Hallownest, but they are never once called "Bees", instead referred to as denizens of the Hive, where they are found (similarly, the area is never called a "beehive": only "Hive").
- Zig-zagged with spiders, who are actually called "spiders" a couple of times, but most dialogues refer to them as dwellers of the Deepnest (note how their chief, Herrah, is only ever called "The Beast") or collectively known as "The Weavers".
- Candlelit Ritual: Jiji the Confessor, who can perform a ritual to summon your Shade, dwells in the presence of a large number of candles.
- Cap:
- Millibelle's bank caps at 4500 geo. The real cap is 2550. She'll steal it all if you deposit more than that.
- If you have at least 80 rancid eggs in your inventory, Tuk won't sell you any more. However, you can have up to 101 rancid eggs by buying all of Tuk's first, and then collecting all the ones that exist elsewhere.
- You can have a maximum of 2,147,483,647note Essence. Yep, that is over two billion.
- You can have a maximum of 9,999,999 Geo.
- Cap Raiser: You can collect vessel fragments that assemble into intact vessels which act as an extension of the player's soul meter; any soul they collect while that meter is full will instead go into those vessels, which will quickly refill the primary meter should it ever get used.
- Cash Gate: You'll need to pay small sums of geo to unlock certain Stag Stations, bench checkpoints, transports, and even the maps for each area. The lumafly lantern appears to be a more substantial example at first, costing a whopping 1800 geo, but that amount proves trivial as early as midway through the game. One of the Nailmasters even wants you to pay him first before he teaches you his Nail Art.
- Cataclysm Backstory: The game has multiple of them:
- The setting starts After the End, or when Hallownest was already doomed. The kingdom's fall was brought upon by the Radiance being able to spread the infection once more, ruining the Pale King's plans, yet his works, architecture, and technology still function even after the ruin.
- But even before the Kingdom of Hallownest existed, there is an unnamed Ancient Civilization that acts as the Precursors who worshipped the Void itself and were able to build the Soul Totems. These totems are still present and functional, while the Void was beneficial in the King's plans later on. However, it wasn't thoroughly explained how this ancient civilization died.
- The Godseekers used to live in lands far away from the Kingdom, but the gods they worshipped left them, forcing the Godseekers to find a new land and attune to other deities. This event was called the "woeful silence" according to the "Lament of the Godseekers" writing.
- Central Theme:
- Death. The concept of dying is an impactful yet mysterious thing—Anyone Can Die, Death Is Dramatic, death is inevitable, and the remaining living can only wonder about what happens in the afterlife. While there are a lot of characters here who can die within the story, some of them think of its consequences (The Hunter), some of them actively seek it (Cloth, the Nailsmith), some of them die or disappear in strange or mysterious ways (The Grey Mourner, Quirrel, Pale King) which make it hard to know where they currently are after their disappearance, some are mourned (The Traitor's Child, Herrah), some are remembered (the ghosts in the Spirits' Glade, the seven Warrior Dreams), some are forgotten (Vespa), some respect the dead as a part of their duty (the Gravedigger, Revek, Dr. Chagax) and some don't mourn the dead because they think it's a waste of time (Zote). Also, the ghosts depicted here have an ambiguous presence, where some are aware of their deaths, some appear to be at rest or dreaming, and others seem unaware that they've died at all.The Hunter: I wonder, what will come flying out of me when I die? Will my hopes and fears drift away into the darkness?Mister Mushroom: ..The dead can't make use of wealth in any case. What would they spend it on?Godseeker: A God so strong... Yet erased so completely. How could it happen?Quirrel: Be on your journey then, and allow me rest a time. With the deed complete, I begin to feel my age.Zote: Precept Seven: 'Mourn Not the Dead'. When we die, do things get better for us or worse? There's no way to tell, so we shouldn't bother mourning. Or celebrating for that matter.Zote: Precept Forty-Two: 'Spend Geo When You Have It'. Some will cling onto their Geo, even taking it into the dirt with them when they die. It is better to spend it when you can, so you can enjoy various things in life.Gravedigger: If you won't spare thought for the dead at least consider all the extra work you force upon those in my profession.Dr. Chagax: I used to help others. They were brought to me sick and dying... What difference did it make? ... Any victory against death will always be temporary... What a gloomy thought.
- Family is another overarching theme. Throughout the game, there are a number of characters who have family-related dilemmas.
- The relationship between the Knight, the Hollow Knight, and the Pale King is one. It's revealed later on that the first two are siblings and children of the Pale King and the White Lady, who were sacrificed to become the beings they are now.
- Hornet being the daughter of the Pale King and Herrah the Beast. She was conceived as part of an agreement between her parents, and after she was born, her mother went on to become a Dreamer, thus barely knowing her daughter.
- Then there's the Grey Mourner's backstory. Her lover was the daughter of a Mantis Lord, but due to the Mantis Tribe's xenophobic beliefs, they were Star-Crossed Lovers.
- A lesser example of a dilemma is the Grimm Troupe side-quest. The entire questline is about empowering Grimm's child (aptly called the Grimmchild) for their ritual.
- The Grubfather's children were all kidnapped. But if the Knight helps, he can be reunited with all of his children.
- The Nailmasters Mato and Oro (and, though only implied, Sheo) are brothers, but are feuding for undisclosed reasons.
- Death. The concept of dying is an impactful yet mysterious thing—Anyone Can Die, Death Is Dramatic, death is inevitable, and the remaining living can only wonder about what happens in the afterlife. While there are a lot of characters here who can die within the story, some of them think of its consequences (The Hunter), some of them actively seek it (Cloth, the Nailsmith), some of them die or disappear in strange or mysterious ways (The Grey Mourner, Quirrel, Pale King) which make it hard to know where they currently are after their disappearance, some are mourned (The Traitor's Child, Herrah), some are remembered (the ghosts in the Spirits' Glade, the seven Warrior Dreams), some are forgotten (Vespa), some respect the dead as a part of their duty (the Gravedigger, Revek, Dr. Chagax) and some don't mourn the dead because they think it's a waste of time (Zote). Also, the ghosts depicted here have an ambiguous presence, where some are aware of their deaths, some appear to be at rest or dreaming, and others seem unaware that they've died at all.
- Changing Gameplay Priorities: This comes as the result of the three major expansions added post-launch, since the base game focuses more on the Metroidvania exploration tropes:
- With the Hidden Dreams update, your late game can focus on fighting two Optional Bosses with increasing difficulty.
- With The Grimm Troupe update, your late game can focus on an overarching Fetch Quest followed by fights against two Optional Bosses.
- With the Godmaster update, your late game can focus on a huge Boss Rush mode of content, fighting all other bosses again while adding new ones for an expanded challenge.
- Checkpoint: Benches will heal you to full health and serve as your respawn points. You can only update your maps and swap charms while sitting on one. One of the last unlockables makes them refill the soul gauge as well.
- Checkpoint Starvation:
- The game is well known for having some bosses that are far from checkpoints. There is an invoked case in Crystal Peak, where a boss guards a very useful checkpoint, requiring that there be no other checkpoint near that boss or otherwise the checkpoint it guards wouldn’t be so useful.
- The Pantheons in the Godhome. Fail in a boss fight? You have to fight the other bosses again to take another shot.
- The Path of Pain is filled with continuous traps that you do not even have the time to land or rest. If you take damage, chances are, you'll be sent back to where you started. And if you die outright, even to the two Kingsmold at the very end, it's all the way back to the beginning of the whole Path of Pain for you.
- Chekhov's Armory: You can find thousands of Shade-like creatures in the Abyss, who are labeled as your "Siblings". In the "Dream No More" ending, they come to your help against the Radiance, also climbing up the clouds as you ascend, as well as forming a cloud of rising void to prevent you from falling too low.
- Chekhov's Gun: The Grey Mourner's Delicate Flower is part of an out-of-the-way, incredibly infuriating sidequest. Once you finish, you're given the option to collect more flowers to give to other NPCs, but there isn't really anything in the way of rewards. As of the Godmaster update, giving the Godseeker a flower before completing the Pantheon of Hallownest unlocks a variation of the unique Godmaster ending.
- Chekhov's Gunman:
- Some friendly NPCs who you can encounter in the first three levels actually have a large contribution at later points in the story. Quirrel and Cloth show up as Guest Star Party Members in two separate boss fights, while Hornet would turn out to be the protagonist's half-sibling and plays an important part in the Final Boss fight.
- The three Dreamers are first introduced via floating projections after the Knight obtains the Mothwing Cloak in Greenpath. They play greater roles end-game for being Living MacGuffins that the Knight has to kill.
- If you obtained the Monarch Wings without the Dream Nail yet, the Elderbug mentions that Dirtmouth used to have a gravedigger. After you do obtain the Dream Nail (and the ability to see ghosts) later on, you can interact with the ghost of the gravedigger, who is still in town. You can then choose to absorb him into the Dream Nail for a single essence.
- Collision Damage:
- Enemies deal damage on contact.
- The knight can do the same with the Thorns of Agony charm, which creates a burst of damaging thorns when the Knight is struck; the Sharp Shadow charm, which harms enemies that the Knight shadow-dashes through; and the super dash given by the Crystal Heart, which causes damage to whatever the Knight runs into and will kill weaker enemies without pausing.
- Combat Tentacles: Void-based beings such as the Void Tendrils in the Abyss and the Void Given Form can produce tendrils that lash out at targets.
- Companion Cube: Strangely enough, the Simple Keys seem to have this effect on bugs. Two separate individuals (the Pale Lurker and a corpse found in the Ancient Basin) apparently went mad and obsessed over the keys as their treasure.
- Completion Meter: The "World Sense" ability obtained just before the Final Boss room shows the current percentage completion in the pause menu and in the save file interface.
- Continuing is Painful: Dying spawns a shade of your character, takes all the geo you had, and reduces your soul gauge by 1/3. You have to return to where you died and defeat it in order to restore your cash and your gauge. There's an Anti-Frustration Feature however, since you can give rancid eggs to Jiji to relocate the shade in Dirtmouth instead.
- Exaggerated if you play in Steel Soul Mode. If you die, your save file is destroyed. Want to continue from where you left off? Too bad, you have to delete the save file and start from the very beginning again.
- Continuity Nod:
- In the comic, we see Quirrel arriving in Hallownest via the Howling Cliffs, confirming that he is a wanderer from outside the kingdoms.
- In the Wanderer's Journal, Ellina's story takes place during the events of the game. Although she doesn't meet it directly, various events are referenced, such as:
- Bretta being initially trapped in the Fungal Wastes, yet gets rescued and now resides in Dirtmouth.
- Sheo's painting of the Knight when Sheo taught them his Nail Art.
- At first, Ellina found the gate of the Abyss sealed, but she came back later to find that it has been opened.
- Controllable Helplessness: Happens in Deepnest. First, when you get stuck on the sticky bench, you can press the jump button, only to see a shaking animation. Later, you'll awake in a spiderweb, where again you can press buttons to shake, but to no avail—until you use the nail.
- Cosmetic Award: Four additional Evolving Title Screens can be unlocked by completing specific tasks:
- "Infection" is obtained by viewing Endings 1 or 2.
- "Void" is obtained by viewing Ending 3.
- "Steel Soul" is obtained by finishing the game on Steel Soul Mode.
- "The Eternal Ordeal" is obtained by completing the aptly-named hidden Mini-Game in the Godhome's Hall of the Gods. That is, you need to Kill more than 57 Zote enemies in a given run.
- Cranium Ride: Some non-hostile bugs only act as moving platforms and don't take damage from above, allowing you to down-strike from mid-air to bounce on their thick shells. However, Collision Damage still applies if you mistime your strikes and collide with the bugs.
- Crashing Dreams: At the end of a certain dream sequence, you arrive at a platform with a giant moth head looming in the background. The protagonist then wakes, being tended to by an actual moth who introduces herself as the Seer.
- Creator Thumbprint: Buzzsaws/Circular Saws/Sawblades. Even before this game has them in abundance within the White Palace, William Pellen has developed two games that incorporate circular saws as traps. The first is a 2012 Newgrounds game titled Return to Booty Grotto, and the second is a 2013 Stencil.com game titled Lulanda.
- Creepy Centipedes: Or "Garpedes" as the game calls them. These are gray-shelled centipede-like insects that move on a pre-defined path and are common in Deepnest.
- Critical Annoyance:
- When you only have 1 mask of health remaining, the Knight's idle animation changes to them hunching over slightly while breathing heavily and leaking void. In addition, dark lines appear on the edges of the screen and the remaining mask shakes violently while leaking void.
- If the Fury of the Fallen charm is equipped and the player reaches 1 mask, a rapid Heartbeat Soundtrack will play for the first few seconds and pulsing red tendrils will partially cover the screen instead of black lines. The Knight will also rapidly flash red.
- Cross-Referenced Titles: Defeating Hornet in your first encounter gives the "Test of Resolve" achievement. Defeating her again in the second encounter gives the "Proof of Resolve" achievement.
- Crown-Shaped Head: The Pale King has one, as does the Final Boss the Radiance. The crowns' appearances are played with a bit as well; the final boss has three spikes, while the Pale King has four. Though the lore of the game is often up for interpretation, in this case, the symbolism is quite clear: the Pale King was attempting to both usurp the final boss' place and set himself up as greater than it. As the game shows, the results were... not everything he had hoped for.
- Cruelty Is the Only Option:
- The Gruz Mother is merely a parent carrying all of its young inside its belly. This act seems to exhaust her, which is why the Gruz Mother is first seen sleeping on the floor. Unfortunately, she's also sleeping near a gate. And then, the player Knight has to kill the mother and her children in order to advance through the area.
- After you get the maggot to fall out of the False Knight's armor, he just lies defeated on the floor, but you can't continue until you kill him. And once you find two other maggots holding a funeral for him, you have kill the poor guys if you want to fill out the Journal.
- Cryptic Background Reference: There's a character identified as the "Black Wyrm". However, the only information presented regarding it was that the Five Great Knights fought it in a Great Offscreen War.
- Crystalline Creature: The enemies in Crystal Peak, besides an assortment of bugs with gems sticking out of their bodies, include the crystal crawlers, small creatures completely encased in crystals that periodically fire off laser beams.
- Damn You, Muscle Memory!:
- If you have learned only the Cyclone Slash Nail Art so far, you just have to hold and release the attack button regardless of any directional input. However, once you've learned the Great Slash, the control scheme for the Cyclone Slash now requires you to hold up or down as well.
- The Dashmaster charm allows you to dash downwards (and only if the charm is equipped). So holding the down button while dashing may yield to accidental dashes instead of panning the camera, thus potentially ruining the player's moves in tight platforming segments unless they get used to it.
- Dangerous Forbidden Technique: Overcharming, equipping more charms than you have notches for by equipping until you only have 1 notch left then forcing in a much larger charm. Normally the game simply won't allow you to, but if you attempt to equip a charm you can't fit 5 times your charm bar will eventually shatter and allow you to equip it. This gives your health bar a purple glow and causes you to take double damage, but can still be a very good strategy in situations where you can't afford to take any damage anyway (such as when transporting the Fragile Flower, which breaks if you take damage, or fighting in the Hall of Gods on Radiant difficulty, where you become a One-Hit-Point Wonder).
- Dark Fantasy: A Doomed Hometown setting, a zombie-like Hive Mind, ruined backgrounds and places everywhere, several Cults worshipping Physical Gods, a lot of depressed citizens, a ruined kingdom, a missing king? Cute bugs aside, Hallownest fits the bill.
- Dark Is Not Evil:
- The playable knight is associated with shadows and ghosts, and is a being spawned from the void in a place called the Abyss.
- The void, itself, is at worst a neutral force that the Pale King misused, and via the knight it helps to save Hallownest in the Golden Ending.
- Dark Reprise:
- The Soul Sanctum shares the City of Tears' melody, turned into a haunting song. The music for the Soul Master boss fight also shares this melody, making it a Dark Reprise of a Dark Reprise.
- The music for the White Defender is an interesting mix of this trope and Triumphant Reprise, because it combines the upbeat and silly Dung Defender theme with the melancholic White Palace one. It is ultimately a Dark Reprise, however, as it represents the Dung Defender's longing for his fellow knights and a past long gone.
- The White Lady's leitmotif, heard both when you meet her and at the start of the game scoring the "Elegy for Hallownest (also when fighting Hornet and Dung Defender), gets this treatment multiple times. The "Resting Grounds" motif and the White Palace theme are much more melancholy versions of it, and it appears again in the second and third endings, symbolizing the closure of Hallownest's epoch. This is because it's actually the Pale King's theme.
- The already solemn Knight/Vessel leitmotif (first heard on the title screen) has three darker reprises during the endgame.
- The first is during the Hollow Knight fight, especially the second half when it begins Fighting from the Inside; this version is also used during the Path of Pain and Birthplace sequences.
- The second is in the first two endings when the Player Knight absorbs the Infection and becomes the new Vessel.
- The third is in the True Final Boss ending when the Vessel Shades return to the Void from which they were created, having vanquished the Radiance once and for all.
- Dead Weight: Later in the game you run into Gluttonous Husks, large undead bugs that used to be members of Hallownest's high society, made obese by a luxurious lifestyle. They weaponize their bulk by throwing themselves at you. Likewise, the Hunter's Journal describes many of the larger infected creatures as being swollen with infection.
- Deadly Disc:
- The White Palace is a Platform Hell filled with spinning buzzsaws of varying sizes.
- Some bosses can incorporate these in their attacks, such as the Mantis Lords, the Traitor Lord, and Galien.
- Deal with the Devil: The Hunter compares the infection to a bargain, as it describes a Furious Vengefly:"The infection that passes from creature to creature grants strength and courage, but it also seems to enslave the will. Would you make such a bargain?"
- Deconstruction: Of the Heroic Mime and Blank Slate tropes typically used in many video games. Your character is a voiceless, personality-less being because they were literally bred and crafted out of the void to be that way since that kind of being was the only one who could fight a Mind Virus. In fact, the titular Hollow Knight, and Final Boss depending on the ending, failed in their mission because they weren't sufficiently empty.
- Defanged Horrors: A game with a story about a Hate Plague that's consuming a kingdom, with all sorts of terrifying monsters lurking in ancient caves, and horrifyingly amoral villains. The game also stars a cute bug as The Hero, and there are a lot of friendly characters that not only are concerned about their well-being but actually go to great lengths to help you and can have their kindness returned to them. Oh, and the Power of Friendship wins in the end.
- Defeat Means Friendship
- If you defeat the mantis lords, they acknowledge your strength and let you proceed to the Deepnest. The other mantis villagers won't attack you or deal contact damage anymore either, unless attacked.
- The Dung Defender can be met after his boss fight. He apologizes for thinking you were yet another mindless husk and praises your skill.
- Determinator:
- The Hollow Knight on account of supposedly having no will to be broken.
- The player knight is exceptional even among its kin. It of course won't give up if the player doesn't. But even in the cutscenes, it refuses to be left for dead in the piles of other failed vessels in the Abyss. It nearly climbs out of the Abyss only to see the Pale King seal the Abyss away with the knight still inside. Offscreen it still managed to find a way out and carve its way back to Dirtmouth.
- Developer's Foresight:
- If you have never spoken to him before, Cornifer will have a unique dialogue in Deepnest where he introduces himself in a paranoid tone.Hh-hello. I'm Cornifer. I'm a m-mapper by trade. I've tried to chart the dense nest beneath here b-b-but it's proving too dangerous for a bug like me... Vicious little creatures burst out all o-over the place and the passages are a dark, twisting maze. Even with my good head for direction, I-I-I've had enough... Unless you're well prepared, I'd urge you to leave, though if you're feeling strong enough to descend, would you like to buy m-my meagre map?
- Once you've obtained the Mantis Claw, you can access the Deepnest earlier than intended via two Sequence Breaking methods: finding a breakable wall and stepping on a breakable floor in the Fungal Wastes, or by brute-forcing your way against the Mantis Lords. Fortunately, the devs have added two Anti-Frustration Features in this case:
- As mentioned under Guide Dang It!, the upper routes of the Deepnest have well-lit areas to help the player traverse a bit just in case they haven't bought the lumafly lantern yet. The route back to the Fungal Wastes has glowing plants on the walls to guide the path.
- If you try to do some Save Scumming here and reload your file to respawn to the nearest bench, the next time you visit Iselda in Dirtmouth, you'll find out that she already sells the map of Deepnest. This comes in handy just in case you get lost here again.
- The Warrior Dream named No Eyes won't appear unless the player has bought the Lumafly Lantern. Why? Because her stage is so dark that it's impossible to know where you are going inside.
- If Cloth dies in the Traitor Lord boss fight before the player has acquired the Dream Nail, her ghost will be invisible but can still be interacted with through her corpse.
- If you have never spoken to him before, Cornifer will have a unique dialogue in Deepnest where he introduces himself in a paranoid tone.
- Die, Chair, Die!:
- You can break a lot of small fragile stuff in the environment such as spikes, poles, or even grass, but they won't drop anything.
- Geo deposits. Striking them will make Geo drop until they completely shatter. There's even a unique giant Geo deposit located in Kingdom's Edge that gives 420 Geo when destroyed.
- Diegetic Interface: Invoked with how the map works in-game. When you hold the button to display the map, the Knight will also bring up the map canvas that Cornifer gives it, and you can actually control the Knight while the map interface is still displayed, which will make it move while still looking at the canvas. This immersive feature also has its limitations, however, since you cannot even open the map interface when the Knight is off the ground. Updating the map itself, also requires sitting on a bench, and doing so will have the Knight interacting using its map canvas and quill.
- Diegetic Soundtrack Usage: In the tramway and the Queen's Gardens, there are rooms with speakers that play a low-fidelity version of the song that plays when you sit on a bench. You can destroy the speakers, which abruptly stops the music. It can reasonably be assumed that in the Eternal Ordeal, Zote's theme is actually being hummed by the Zotelings themselves.
- Difficult, but Awesome:
- Spells in general are difficult to use and beginner players likely need all their soul for healing while focusing on charms that make the nail more effective. But for advanced players (such as those tackling Steel Soul mode or attempting to speedrun the game), spells are incredibly useful for defeating bosses quickly, with the nail being used mostly to replenish soul.
- You can parry attacks of other blade-wielding enemies with a well-timed slash. However, the opportunity window is so small that it takes a while to practice and you can risk yourself colliding with the enemy. On the other hand, skillful players can use this to their advantage by minimizing damage during some boss fights.
- Enemies can't detect environmental hazards and can be lured into them for an instant kill. However, ground enemies have stricter movements (unless they come charging towards you). Flying enemies, on the other hand, are harder to trick due to their Artificial Brilliance movement rules.
- Dirty Coward: The Pale Lurker. It isn't exactly a boss fight, since all it does is run away every time you get close, thus a cat-and-mouse chase occurs, except the mouse also leaves spike traps behind.
- Disability Immunity:
- Invoked by the Pale King in the grander scheme of things via the Vessels. Being "hollow" means that the Radiance won't be able to corrupt anything if the individual has no sense of identity or will.
- Invoked with No Eyes and her followers as well. They gouged their eyes because they believed that the "light" would infect them in their dreams, so getting rid of one's eyesight equals immunity. No Eyes is proven to be Properly Paranoid at one point since the Radiance caused the infection via invading others' dreams.
- Disc-One Nuke:
- The Howling Wraiths spell, a vertical three-way burst that deals twice the damage of the Vengeful Spirit, can be obtained by a brief side trip to Fog Canyon immediately after acquiring the Mantis Claw. Furthermore (thanks to the game's non-linear design), after getting the first Nail upgrade, unlocking the Waterways, and defeating Dung Defender (you don't need the Desolate Dive to reach him, only to get to the nearby save bench), you can descend to the Ancient Basin to retrieve the Pale Ore piece necessary for the second upgrade. Both of these render the Soul Master battle significantly easier. The spell is also a boon against certain Warrior Dreams that don't get knocked back hard enough, such as Galien.
- Quick Slash. After defeating Soul Master and gaining access to the Desolate Dive spell, you can easily use the elevator in the Resting Grounds to the King's Station. From there, there's an immediate shortcut to Kingdom's Edge. Even with a single upgrade to the Knight's Nail, it's not too difficult to thread your way through the enemies below Oro's house and obtain the Charm with a little planning. With Quick Slash, it's very easy to shred several bosses that otherwise could provide a challenge, including the Dung Defender, Broken Vessel, Crystal Guardian, and Lost Kin, since these bosses rely on their superior HP at a point in the game where your damage isn't terribly high.
- Dismantled MacGuffin: The Kingsoul charm is split into two pieces, one acquired from the Pale King in the White Palace and the other given by the White Lady in the Queen's Gardens. The halves are useless on their own, but by interacting with their keepers, the Knight is able to acquire both pieces and join them as a functioning charm.
- Disturbed Doves: There are flocks of tiny creatures called Maskflies that fly off when you come close. They're harmless, but you can actually catch up and kill them with a few techniques, which is necessary to complete the Hunter's Journal.
- Door to Before: As a common trope/mechanic present in any Metroidvania title, you can occasionally unlock new shortcuts to platforming puzzles, adjacent rooms, or previous areas by unlocking a door/gate/elevator after hitting a switch.
- Downer Ending:
- The normal ending. The knight defeats its failed predecessor, but in turn has to become the new vessel to contain the plague.
- Additionally, the second ending is arguably worse, seeing that it is the same as the first ending, except Hornet is there, unconscious indefinitely.
- Draw Aggro: Joni's Blessing attracts the Lifeseed towards the Knight instead of their usual tactic of running away.
- Drone of Dread: The Forgotten Crossroads theme changes to a much creepier drone arrangement after the Infection takes it over. The Hive also fittingly has a drone-based BGM.
- Dual Boss:
- Several mini-bosses are a pair of Elite Mook enemies that wouldn't be too threatening on their own.
- The mantis lords' challenge starts as a single one-on-one battle, and winning causes the two other lords to attack at once.
- The God Tamer fight (found in the Colosseum of Fools) qualifies in that you have to contend with both the rider and her mount, but killing the mount makes God Tamer surrender.
- At the end of the second Colosseum challenge, two Oblobbles are fought at once. Killing one results in the other becoming enraged and shooting even faster projectiles.
- The watcher knights are notable for being six entities, the first of which you fight alone, and after which they are constantly resurrected so you're always fighting two at once. If you're having trouble you can crush one corpse permanently before entering the arena.
- Due to the Dead:
- Under the Pale King's rule, the Moth Tribe was tasked to be the caretakers of the Resting Grounds, the place to remember Hallownest's deceased citizens.
- All Warrior Dreams are located in graves used to remember where they died.
- The quest given to you by the Grey Mourner is to give a delicate flower to the grave of the Traitor's Child. The latter gladly accepts once you do so by bowing down, while the former will reward you with a mask shard if you complete this request.
- In the Beast's Den, Hornet requests to have some time alone so that she could mourn Herrah's death.
- Revek is an embodiment of this trope on both sides; he requests you to respect the ghosts in the Spirit's Glade. You can interact with them for sure, but if you "destroy" any of the ghosts using the Dream Nail, Revek will relentlessly pursue you as a punishment. And he cannot be stopped unless you leave the area, or use the Dream Nail on every ghost in the arena before finally Dream Nailing Revek.
- The Gravedigger (naturally by profession) tells you to at least spare some thought for the dead, berating you a bit since he notices that you are wielding a lethal weapon.
- In the Joni's Repose segment of Howling Cliffs, Joni's corpse has been placed peacefully "sleeping" on an altar.
- Dungeon Shop:
- Played straight for four cases; Cornifer sells you maps on the areas where you can find him (he appears in all mapped locations), Salubra sells you charms only in the Forgotten Crossroads, Tuk sells you Rancid eggs only in the Royal Waterways, and the Leg Eater sells you fragile charms only in the Fungal Wastes.
- Inverted for three cases as well wherein you find the shopkeeper by interacting with something when you wander somewhere in the kingdom, but they will later open up shop in Dirtmouth, the game's First Town. These are: Sly (whom you rescue in the Forgotten Crossroads), Iselda (when you encounter Cornifer for the first time and buy a map from him), and Divine (who is a part of the Grimm Troupe, a group that can only be called by lighting the nightmare lantern in the Howling Cliffs).
- Dying to Wake Up: If the Knight "dies" while fighting a boss in a dream, it wakes up near whatever it used the Dream Nail on to access said fight. Mechanically speaking, this doesn't count as a death—you don't lose Geo, for example.
- Dynamic Loading: Happens when you use the Stagways for transport. Instead of the usual "black-screen with a running icon" Loading Screen, the game will display a full-screen cutscene of the Knight riding the Last Stag across a winding dark cave. The scene can actually be pre-emptively skipped once the data is done loading, depending on your hardware.
- Early Game Hell: The start of the game can be particularly harsh for new players. Until you beat Hornet for the first time, you lack any movement beyond a basic jump and the bounce technique, soul is hard to come by, your nail has pathetic range, the first spell isn't obtained until you clear the first area, enemies starting with the mini-boss in Forgotten Crossroads can kill you in three hits tops, early bosses can be damage sponges since your nail isn't upgraded yet, and you'll have to do a lot of grinding for money if you want to buy even the basic supplies. Progress through the game consists in large part of accumulating enough health upgrades, Charms, and movement tools so as to actually feel in control of your situation.
- Easter Egg:
- If you die on the Lake of Unn before meeting Unn herself, your spawned Shade will not pay attention to you, as it would be looking at the direction◊ of the lake.
- Mister Mushroom's dialogue can only be understood if the Spore Shroom charm is equipped.
- Some NPCs have unique interactions with the knight aside from talking to them, or reading their minds via Dream Nail.
- Using Desolate Dive (or Descending Dark) removes the Mask Maker's mask.
- The Eternal Ordeal Mini-Game can be an easter egg in itself, given its comedic nature and the way you have to access it — You have to do a series of precise platforming moves in a corner of the Hall of Gods. Then once you've reached the ceiling, the Knight will be out of view, but you could still break a secret wall off-screen.
- If you die on the Lake of Unn before meeting Unn herself, your spawned Shade will not pay attention to you, as it would be looking at the direction
- Easy Levels, Hard Bosses: Zig-zagged for a majority of the contents. The platforming mechanics may be simplistic and easy to grasp, but the levels aren't a walk in the park and can quickly kill an unprepared player due to the number of traps and enemies. The bosses are more dangerous and complex, requiring the player to master precise movement and plan out their attacks.
- Easy Level Trick: Thanks to the game's non-linear Metroidvania design and some potential Sequence Breaking or Loophole Abuse:
- Regarding the Delicate Flower quest in the Resting Grounds, the game sets it up as if you have to get the flower first and then kill enemies along the way towards the Queen's Gardens. However, the player can actually do a loophole abuse by killing all enemies first in the reverse order, planning their course, and not sitting on a bench (so that enemies won't respawn). Then once you get the flower in the Resting Grounds, all you have to do is backtrack your previous path. You'll have fewer threats to deal with in this way.
- There's a charm notch in an area of the Fog Canyon that is littered with explosive traps and Ooma jellyfish. The usual method to get the item is to carefully navigate your way through, and hope you have enough health to last the entire gauntlet. However, if you have the Desolate Dive ability, you can shortcut straight down the middle of the room, with the added bonus of a shockwave that will clear out many of the traps.
- Having trouble with the huge Great Husk Sentries blocking your way in the City of Tears? If you have the mantis claw and the crystal heart, then you can just scale up the walls and super dash on the highest point to get past above them. Or you're quick, you can just jump next to them, use your Nail to bounce off their shield, and land safely on the other side to dash away.
- Easy-Mode Mockery: Inverted into a sort of "Hard Mode Respect". If you die during a Steel Soul run, wherein you are subject to Permadeath rules, you get a brief congratulation message for even trying."In attempting the feat, one proves their courage. May your Shade at last find rest."
- Elemental Powers:
- The Knight has Light and Void-based abilities.
- Among the bosses and their related characters: Grimm, Grimmchild and the Grimmkins have Fire, Uumuu has Electric, the Radiance has Light, Grey Prince Zote has explosions and Void, the Crystal Guardian and all other enemies in the Crystal Peak have crystal-based abilities and lasers.
- Among the other NPCs and historical characters: Unn has created the green vegetation of Greenpath, Isma grants immunity to acid, and the Void Entity is a being made out of void, who can also engulf the area in darkness.
- Elite Mook: Several enemies are tougher versions of minor mooks. For example, Aspids are easy to deal with early on, but in the later stages, you'll encounter their more dangerous version, the Primal Aspids.
- Empty Room Psych:
- Examples include a dead-end near the northwest entrance of Deepnest occupied by an NPC called the Mask Maker who only provides a bit of lore, another alcove in Deepnest housing a No-Face expy with a similar role, and a secret chamber in the Beast's Den sub-area with a trilobite sculpture that displays a Seal of Binding when hit with a Soul spell, but no valuable items or lore.
- Other locations seem disappointingly empty at first, with nothing but a corpse or grave, but later in the game acquiring the Dream Nail helps you find the secrets hidden there.
- Encounter Repellant:
- Equipping the Hiveblood charm removes aggro from all enemies inside the Hive.
- The Void Heart charm makes your shade, the void tendrils and the siblings in the Abyss docile.
- Endless Game: The Godmaster update added a very well-hidden bonus challenge appropriately called "The Eternal Ordeal", in which you fight an endless gauntlet of Zotelings of various shapes and sizes. Defeating 57 of them rewards you with a new title screen.
- Energy Weapon: The crystals in the Crystal Peak can shoot laser beams; so do the Crystallized Husks and the Crystal Guardian residing there.
- Epigraph: The game begins with a quote from an in-universe poem, Monomon the Teacher's Elegy for Hallownest as seen in the page quote above.
- Equipment-Based Progression: Apart from the movement upgrades, you also need to obtain Spells, find charms, and have your nail upgraded in order to improve your offensive capabilities. On the defensive/utility aspects, you can collect Mask and Soul fragments to increase your Heart Container and Mana Meter respectively, while charm notches allow you to equip more charms at once.
- Equipment Upgrade:
- Your nail can be reforged by the Nailsmith to increase its damage at the cost of Geo and some Pale Ores.
- Divine can upgrade the Fragile Charms into their Unbreakable Charm variants if you give her loads of Geo for each.
- Escape Rope: The "Dreamgate" can be used as one if you can escape the action long enough to use it. You can set the destination of the gate to anywhere you can stand on the ground, with the exception of boss rooms before the boss is dead. This costs one essence per use.
- Establishing Character Moment:
- Zote berates you and doesn't thank you even when you save his life. Yeah, he's that kind of a Jerkass.
- Cloth is hiding beneath the ground when you first meet her in the Fungal Wastes. She's a coward who pretends to be brave for most of the story.
- Quirrel is first seen greeting you while he examines the Black Egg temple, and then states his obsession with uncharted places. He can be found in various areas later on, relaxing on the spot or just admiring the view. He's a relaxed guy and friendly as well, to the point of helping you defeat a boss that you cannot initially hurt.
- You can hear the Dung Defender joyfully laughing even a large distance away from his room. He really is a happy fellow even when fighting you in a boss fight. He does apologize when the fight is over though, stating that he mistook you for something else.
- In the Leg Eater's first dialogue, he already asks you to give him Geo, a sign that he's a Geo-hungry Greedy shopkeeper.
- Eternal Engine: Crystal Peak's lower levels consist of a mine whose machinery kept running after its tenders succumbed to the infection, and exploring it requires the Knight to navigate floors made out of moving converyor belts and hallways lined with thudding pistons.
- Event Flag: There are many actions that trigger events elsewhere, and most of them require the game to be saved first (either via autosaves or benches) before they take place.
- If you haven't rescued Zote in Greenpath yet, then he dies the moment you pick up the Mantis Claw. On the other hand, rescuing him obviously unlocks more encounters with him in other areas, especially in the Colosseum of Fools. There's another flag added with the Hidden Dreams update involving Zote and Bretta if the latter is also rescued from the Fungal Wastes.
- Defeating the Broken Vessel and getting the Monarch Wings, or killing one of the three Dreamers, is the flag for turning the Forgotten Crossroads area into the Infected Crossroads.
- Some NPCs change locations in dungeons depending on how interacted with them previously. For example, Cornifer disappears from an area if you've beaten that area's boss, and Cloth moves to Dirtmouth if you rescued her in the Ancient Basin after killing the Traitor Lord.
- Getting the Void Heart charm immediately locks your save file out of Ending 1, as it will be replaced by Ending 2 as the default. Hornet will also be found at the entrance to the Black Egg temple when you exit the Abyss.
- Getting the Lifeblood Core will immediately boot you out of the secret Lifeblood Room in the Abyss, and you can permanently miss one Arcane Egg if you haven't picked that up yet.
- Everyone Calls Him "Barkeep": Applies to some bugs without unique names, sticking to their professions or titles instead, such as "The Hunter", "The Mask Maker" and "Midwife".
- Evil-Detecting Dog: Not dogs per se, but summoned companions will try to attack Millibelle if you bring them to her "bank", a sign that she's a scam and cannot be fully trusted. They'll also attack corpses infected by Corpse Creepers before they emerge.
- Evolving Title Screen: The game originally had the "Classic" title screen at first, but with the release of the Lifeblood, Hidden Dreams, The Grimm Troupe, and Godmaster content packs, players are able to select a theme of their choice. Voidheart, Void, Steel Soul, Infection, and "The Eternal Ordeal" were added afterward, with the latter four serving as Cosmetic Awards.
- Exact Words: A subtle example with regards to the Monarch Wings, the double-jump ability. Their name seems to refer to a monarch butterfly, but they do not resemble a monarch butterfly's wings at all. Monarch may instead be meant literally, referring to Hallownest's monarch, the Pale King. His silhouette in the background of the White Defender's fight has similar-looking wings, so he was likely their original owner.
- Expansion Pack: Four major content updates were released post-launch, each with a theme and a title to market them as expansion packs. These are occasionally referred to as "DLC", but this is misleading—they're included with the main game, not downloaded separately, and the current version of the game always has the new content enabled.
- Expository Gameplay Limitation: The Knight remains on the spot while it interacts with NPCs. Control only returns to the player after the dialogue ends. Even the Dreamshield (which passively orbits around the Knight) temporarily disappears when the player is busy talking to NPCs, so as not to have a distracting artifact moving around the screen.
- Facial Façade: Midwife is a mysterious resident of Deepnest and she has a happy-looking mask as her fake face. She will reveal her true aspect when she attempts to eat the Knight. There are no bad intentions though, it's a natural instinct.
- Fantastic Medicinal Bodily Product: Lifeblood Seeds are tiny creatures filled with a bright blue liquid called Lifeblood. Lifeblood invigorates the body and makes the drinker feel stronger, which mechanically translates to temporary bonus Masks when you kill one.
- Fantasy Counterpart Culture:
- Godhome from the Godmaster update has an Egyptian theme. The inhabitants wear golden masks and their cloaks have a mummy-bandage-like stripe pattern.
- Jiji's clothing and turban-shaped head, as well as Jinn's name are both Arabic concepts.
- Fantasy Metals: Pale Ore is a rare metal that can help in improving one's nail.
- Fetch Quest: The majority of the Grimm Troupe content's questline can be summed up into this. In order to evolve the Grimmchild, you are tasked with collecting flames from Grimmkins that spawn in specific locations.
- Final Boss: The Hollow Knight who contains the infection. The Radiance, the incarnation and source of the infection itself, can be fought as the True Final Boss.
- Final Death Mode: Steel Soul mode makes death permanent; die, and the game file becomes unusable. On the plus side, it makes the Fragile charms more useful, since their main drawback is negated, and you'll never have to worry about retrieving your Shade or losing all your geo.
- Final Dungeon Preview: If a player does the most natural action in a side-scroller video game—simply go right—the first thing they'll see after delving into the dungeons is the Black Egg Temple, which is indeed where the final boss is located.
- Finale Title Drop: "The Hollow Knight" appears for the last time as the Boss Subtitles for the Final Boss battle.
- Flash of Pain: There are enemies that flash white when struck with the nail, but this trope only applies to certain, pure bugs animated with soul.
- Flashback Effects: The Birthplace flashback scene is blurred on the edges and has darker, washed-out colors.
- Flavor Text:
- The Hunter's Journal contains additional comments and exposition from the Hunter after you kill more of a certain enemy.
- Although quite short, most of the charms and movement upgrades have additional info in their descriptions that detail how these items were made.
- Floating Head Syndrome: In part of the cover art of The Grimm Troupe update being a parody of the 90s circus and film posters, Grimm, Brumm, and Divine have their heads or upper body positioned above the title.
- Flunky Boss:
- Gruz Mother has a weird variation, where her children burst out of her body after she dies and have to be fought separately. This only happens during the first encounter, though.
- The Vengefly King can summon a couple of smaller Vengeflies to help him.
- With the exception of the first one, Soul Warriors can summon Follies to attack the Knight.
- The Collector drops glass bottles on the Knight that contain additional enemies during its boss fight.
- Flukemarm is the most extreme example in the game. Unable to attack or even move itself, it instead has to constantly shoot Flukefeys at you in order to damage and kill you.
- The Lost Kin spawns floating blobs of infection pus at a rapid rate, forcing the player to divide their attention between these Infected Balloons and the boss.
- During the Godhome version of the fight, several Ooma will rise from the water to serve as obstacles and distract you from Uumuu. However, this also serves as a Boss-Arena Idiocy as without Quirrel they are the only way to stun Uumuu.
- The Hive Knight summons smaller bees as the fight goes on.
- No Eyes never directly harms the knight, but rather summons the sanctuary's spirits to attack instead.
- Grey Prince Zote can summon various types of Zotelings that also bear a resemblance to his face.
- Foreshadowing:
- The last line of the game's very first conversation (with Elderbug when you first arrive in Dirtmouth) hints at one of its major themes, even though Elderbug doesn't really seem to realise it: "Perhaps dreams aren't such great things after all..."
- When the Hunter recalls that all efforts of the Soul Sanctum scholars were to no avail, he theorizes that the infection came from somewhere deep inside the bugs that they could not escape. He's right about the infection's methods – The Radiance can infect bugs from the inside, via dreams.
- While fighting the three mantis lords, notice the fourth throne broken in the background, hinting at the existence of the Traitor Lord.
- At the very top of the kingdom, there is a winged statue with a three-horned crown. The memory in it begs people to "remember the light". The statue depicts Radiance, the source of the infection and the real final boss of the game.
- Sly's dialogue when you first meet him foreshadows his identity as the Great Nailsage.
- There is also the fact that if you leave any of the infected bugs, outside his hut, alive and go in, they are gone when you come out. Suggesting that he was the one who killed them.
- A minor one, but in the cinematic where you encounter the Hollow Knight's statue in the City of Tears, the statue appears to shed a few tears. When it is encountered later in the game, we see that it is Fighting from the Inside, desperate to contain the infection, but it is unable to hold on for much longer.
- At one point in the Ancient Basin, you fight what appears to be an infected version of the knight, called Broken Vessel. Once it's defeated, you can dreamnail it to fight a more powerful version in the dream world that's called Lost Kin.
- You can pass by some dead husks in another area of the Distant Village. When hit with the Dream Nail, these hint about a group of fake bugs.
- Quirrel's mask on his head seems to look an awful lot like a certain Dreamer's mask. It's actually the key to Monomon the Teacher's shield, which allows the knight to dream nail and then kill her.
- In the City of Tears, Hornet reveals that the Knight has the "resilience born of two voids". The implication of the "two voids" here is revealed very late into the game, on the path to the Golden Ending. Being a Vessel, the Knight is made out of Void and therefore can have a lingering Shade. The other void refers to a more powerful "Lord of Shades" that results from the Knight obtaining the Void Heart.
- The ghost No Eyes believes that if she were to sleep and dream, she would become infected. She's technically correct on this one, since the Radiance does infect other bugs by invading their dreams.
- Myla's initial state, stuttering in her speech and mining all alone, foreshadows two things: there's a voice in her head commanding her to kill. That voice is the Radiance. Secondly, the fact that she shares the same basic model and look of the standard Husk Miner enemies in Crystal Peak (found just beyond her) hints at her final fate, that she will be infected soon and become an enemy.
- At one point, Salubra will mention that some charms are materialized from a dying bug's wish or essence. Sure, Joni and their "blessing" is one of the clear examples, but there is another instance of this case; the Kingsoul charm can be obtained from the "corpse" of the Pale King in the dream world.
- The Seer hints at several late-game revelations in many of your conversations with her, with her final dialogue telling you who the True Final Boss is, albeit vaguely.
- When you first talk to Vespa, she casually reveals the idea that the pale beings are to blame for the Player Character's nature, and that Vespa is not the "queen" who should be held accountable for it. She's referring to the Queen of Hallownest.
- Divine's first Dream Nail dialogue hints at the upcoming fight between the Knight and Grimm in order to continue the ritual. However, she also has doubts after saying this, hinting at the possibility that the ritual can be stopped and the troupe can be banished.
- Once you acquire the Shade Cloak, Hornet will compare herself to you, subtly hinting that she has a similarity with the Knight—that is, both share a common parent.
- When the Temple of the Black Egg is opened, the Elderbug will notice that the creature inside of it let out a cry, but it sounded divine. He's right about the divine part, since the Radiance is a higher being and is also inside that temple.
- When you give a Delicate Flower to the White Lady, she will sense a strange power from it and wonder how you are able to carry it without knowing such risks. She's hinting about how the flower plays a crucial role in the "Delicate Flower" ending as it can serve as a kryptonite against the Knight-turned-Void Given Focus, preventing the latter from spreading into Hallownest.There is rare power hidden in those frail petals.
To hold it so close, one must surely be unaware of its nature...
- For Want Of A Nail: The "Delicate Flower" ending starts out similarly to the "Embrace the Void" ending, but the difference is that the Delicate Flower in the Godseeker's hand prevents the Void from bursting out of the seeker's body, making both of them Disappear Into Light instead of the Void originally spreading into Hallownest. Yep, a single flower halted the End of the World as We Know It.
- Four-Legged Insect: Most insects in the game are portrayed with four limbs, with the exception of a few, such as the Last Stag, which has six due to his more realistic proportions. Similarly, the spiders are shown with six legs instead of eight.
- Freeze-Frame Bonus:
- In the middle of a fast and tense fight, the Knight's sprite can be hard to see when casting spells. The upgraded, void versions of the spells will have frames showing the knight in their shade form, (Best explained here), but even the small details such as void tendrils in that form can be hard to notice as well.
- When the Seer bursts into a cloud of white essence after saying her final dialogue, there is a small glowing moth that flies up out of the cloud.
- As the infection is being sucked out of the Hollow Knight, it creates an explosion that is shaped to resemble the silhouette of the Radiance. This silhouette can be clearly seen if the game is slowed down frame by frame, like what this Reddit post points out.
- When fought in the Godhome, notice that Grimm has a new bowing animation compared to when you fight him in his tent. He's actually acknowledging the Godseeker's presence and is bowing to her, not you.
- The face and blinking eyes of an unknown bug can be seen if you look down from the Lifeblood room (since the camera pans further when you hold the down button while standing). The bug in question is on the lower-right corner of the screen.
- It may only be visible for a few seconds before the screen cuts to black, but the "Embrace the Void" ending cutscene reveals that the Hollow Knight wields a Pure Nail, it's just that the weapon is now cracked.
- In the middle of a fast and tense fight, the Knight's sprite can be hard to see when casting spells. The upgraded, void versions of the spells will have frames showing the knight in their shade form, (Best explained here
- Full Health Bonus: The Grubberfly's Elegy charm lets your nail produce sword beams but only as long as you are at full masks.
- Fun with Palindromes: There's an enemy named "Pilflip". Try spelling it backwards.
- Funny Animal Anatomy: Due to the stylization, some of the anthropomorphic bugs have large anatomical differences from their real-life counterparts. For example, several beetle characters, including the Knight, have horn-like appendages on the top of their heads, inspired by the giant mandibles of male stag beetles. In real life, such mandibles are located in their jaws instead.
- Furry Confusion: Most of the cast are anthropomorphic bugs, but some enemies are more beastly insects. This is justified in that the anthropomorphic bugs were given light by the Pale King, and there are just different species of bugs, some apparently being unenlightened. What is not justified though is that there are also some bugs that appear as completely normal bugs relative in size to the anthropomorphic bugs as if they were human. It is not explained why tiny lightning bugs exist alongside the characters and giant pillbugs.
- Future Primitive: Primal Aspids are the ancestral forms of the Aspids. That's right, the stronger version came first, were thought to be extinct, but have reappeared in Kingdom's Edge. The Hunter himself finds it odd that the Primal Aspids' descendants are so weak in comparison.
- Game-Breaking Bug:
- At launch, the game was reported to run incredibly poorly for a lot of people, with regular frame drops, stutters, and failure to respond to input at critical moments. Even people with good hardware could find the game gasping from things as simple as taking damage or hitting enemies.
- Another launch issue was that GOG buyers were given an outdated version, 1.0.0.5, in which the Colosseum of Fools fails to grant the rewards for each challenge.
- It's possible for the Shade to glitch up and become completely invincible. There goes all your hard-earned cash.
- The arena for Soul Tyrant has spikes on the roof to the right. If you get knocked on them, the game respawns you outside the arena. Thankfully, you can still return to the fight by bouncing off the spikes from the right side of the building.
- If you take damage while one of the menus is up, some of its graphics can get stuck on the screen, even between areas. If this happens, do not open the menu again, because it will break completely and prevent you from exiting it. This will force you to close the game with Alt+F4.
- The Switch version generally holds up well, but some parts of the game with lots of moving parts (such as Crystal Peak or the White Palace) can still run very poorly without hardware resets, especially in handheld mode.
- The latest update, which brings the game up to the standards of the Void Heart Edition released for the PS4/Xbox One, improves this significantly.
- There's a glitch that can prevent the player from getting the Banish achievement permanently even if they seek that ending's final requirement of meeting Brumm in Howling Cliffs. That is, if the player chooses to leave the room of the Nightmare Lantern before breaking the brazier, Brumm disappears and Banishment will be unavailable forever, since he won't respawn.
- You can get permanently stuck if you use Desolate Dive/Descending Dark at the center of a Stalking Devout's hitbox, since the only way to end the spell's animation is to make contact with a floor.
- Gameplay Ally Immortality: You can't damage Cloth and Quirrel when they assist you as a Guest-Star Party Member, despite the fact that you can damage enemies, and enemies can damage their own allies.
- Gameplay and Story Integration: Several examples, most of them listed in the Character Pages of the playable characters.
- Giant Mook: Some mooks are significantly larger than most of their kind (i.e. Husk Guards, Stalking Devouts, Hive Guardians). These giants often deal two masks of damage per hit.
- Glowing Eyelights of Undeath: Dying creates a Shade of the Knight at the location they were slain. In contrast to the Knight's white head with empty-looking black eyes, the Shade has a black body with round, solid white eyes. The Siblings at the bottom of the Abyss have the same kind of look, but with a more pronounced glow.
- Many of the infected enemies have glowing orange eyes.
- Golem: There's a giant defunct mining golem in Crystal Peak. Examining it gives you the Crystal Heart upgrade. It is also possible to dreamnail this golem, which yields a Madness Mantra message consisting of the words "DIG, CRUSH, LIFT, DROP, OBEY, FOLLOW" in a scattered, repetitive manner.
- Good Colors, Evil Colors: The game uses specific colors for special meanings.
- Orange is evil. Some enemies have glowing orange eyes and all infected enemies have orange blood.
- Lifeblood is light-blue, and a Good Counterpart to the orange.
- The Grimm Troupe are themed around a dull red, and are sinister if not outright evil.
- Black is for creatures made out of Void, including the playable Knight. Later on, you'll encounter enemies made out of Void, and emit a black substance when struck. The Void itself is more of a neutral force, that also serves as an anti-thesis to the orange-colored infection.
- Goo It Up: Several infected bugs launch yellow/orange infection goo as their attacks. Some of the bees in the hive also shoot honey instead.
- Gotta Catch 'Em All:
- A bunch of caterpillar babies called grubs are trapped inside bottles and scattered all over Hallownest. Their father will give rewards for each one you rescue.
- Once you obtain the Dream Nail, you must look for a series of odd plants called "Whispering Roots" that you may or may not have seen previously. Hitting them with the Dream Nail scatters a bunch of essence around the room the where root is in. On top of that, getting the Dream Nail also unlocks fights with dream warriors and dream bosses, who when defeated can be collected by the Dream Nail for between 100 and 300+ Essence each. You need 1800 Essence to work towards the real ending, and 2400 to unlock some crucial context for the lore.
- Gotta Kill 'Em All:
- Filling out the Hunter's Journal requires you to kill every enemy and then do it over a dozen times again on those who aren't unique.
- You must kill all three Dreamers — Monomon, Lurien, and Herrah — before you can enter the Black Egg and face the Hollow Knight.
- Originally, defeating all dream bosses was mandatory to collect enough Essence for the Seer's last words, worth one point on the Completion Meter. However, the expansion packs added two new dream bosses and the possibility for normal enemies to drop Essence, so it's no longer required to kill them all.
- Guest-Star Party Member:
- Quirrel helps you fight a boss that is immune to your attacks by making it vulnerable.
- Cloth helps you out against the Traitor Lord if you first rescue her in a side area of the Ancient Basin.
- Guide Dang It!:
- A basic gameplay mechanic that seems to fly over the heads of several players for a good chunk of the game is that by attacking downwards while jumping, you can bounce off enemies and spikes. They end up learning it while messing with the bouncy mushrooms or observing sections that only look doable if one were to Cranium Ride on enemies. This also applies to spiked floor traps as well since there are situations where it is safer to bounce off the traps with your blade than find a way to jump and dash past them.
- Another basic gameplay mechanic that can easily be missed is Confessor Jiji being able to summon the player's Shade from elsewhere on the map, which is left after the character dies, so that the player can more easily recover their soul and geo. The problem is the way that Confessor Jiji explains this is so cryptic that it's incredibly easy to miss. Combine this with the fact that the first thing most players will do after death is recover their soul, rather than go back to town to talk to people, and players can easily go through the entire storyline with no idea what her actual gameplay purpose is.
- You can parry the attacks of other bladed enemies to save yourself from getting hit. However, the window of opportunity is small to the point that parrying becomes Difficult, but Awesome. The game never gives any in-depth tutorials regarding this mechanic.
- Did you know that you can mash the attack button to extend the duration of Cyclone Slash? The tutorial that pops up when you learn the Nail Art makes no mention of this.
- Similarly, the game never bothers to mention that there's a Quick Cast button unless you look at the control options yourself. Using that instead of the standard Focus/Spell Cast button significantly reduces the delay between hittng the button and unleashing the attack, making spell builds much more practical than before.
- Belfly and other explosive enemies immediately blow up with any of your attacks... Well, except for the Dream Nail (since it deals no damage), which pushes them back to a safer distance.
- Salubra hints that you can experiment with charm combinations to come up with unique abilities, buffs, or visual effects. You basically have to do some trial-and-error or straight up look for an online guide to know which charms have unique interactions when equipped together.
- For examples of combos with visual effects, the Grubberfly's Elegy gets colored red when under the effects of Fury of the Fallen, Shaman Stone increases the size of your spells, Joni's Blessing recolors the unique Hiveblood masks into blue, etc...
- There are also charm combos that do not have any visual indicators but still passively boost a certain gameplay parameter or more. Even if you do get to find out Set Bonuses for your charms and notice some improved passives, the actual numerical values and formulas aren't shown outright. For example, Strength increases your nail damage by 50%, Longnail and Mark of Pride increase nail range by 15% and 25% respectively, Sprintmaster boosts running speed by 20%, and is improved to 37% when equipped together with Dashmaster. Stalwart Shell increases the animation speed of the Thorns of Agony along with added invincibility frames, etc... Unfortunately, the game doesn't show the math for you.
- The Lumafly Lantern is used to light up some pitch-black areas of certain maps. However, not all of those areas are completely dark. There are rooms that are still well-lit, allowing you to easily travel without the lantern (albeit the sources of light can still be very small). It is actually useful once you've accidentally managed to do some Sequence Breaking and visit those dark areas earlier than intended and without having their maps yet. Take this visual guide for example, the hidden breakable floor that connects from Fungal Wastes will drop you to well-lit areas of the Deepnest.
- The existence of The Hive is indicated by a few bees surrounding it from the outside, but the entrance is blocked by a breakable wall. By this point, players will be well-acquainted with breakable walls, but this particular wall is offset behind a spike pit—the only one in the game placed so. This means the player must know to try sliding down the wall while simultaneously hacking at it with their nail (a difficult maneuver), or try blasting magic at a random section of wall (something players normally never do, as you can only cast two to three spells before needing to recharge).
- Iselda will sell a pin for the tram stations after you've obtained the Tram Pass. But the game never makes a hint out of this, and it is very possible to finish the game even without knowing that you can now buy a map icon for the trams. The same applies to the Warrior's Grave and Whispering Root Pins after you have acquired the Dream Nail.
- You can manually turn the rotating spiked platforms in Crystal Peak by slashing them with your nail, no need to wait for a couple of seconds when you mistime your jump!
- Figuring out how to get the true ending is basically a puzzle spanning the entire game, requiring you to awaken the Dream Nail by defeating close to every single dream boss in the game, go through an optional area and defeating the boss there to meet the White Lady and acquire one half of the Kingsoul, use the awoken Dream Nail on the corpse in the Palace Grounds to go to the White Palace, and survive its Platform Hell to get the second half of the Kingsoul. Finally, wearing the complete Kingsoul unlocks a secret area in The Abyss, with no prior indication that you should return to this seemingly random patch of ground beforehand, that allows the knight to confront its past as a being of the void, turning the Kingsoul into the Void Heart. With all that done, you'd think you're good to go, right? Wrong. You have to use the Dream Nail on the final boss as it is being pinned down by Hornet, allowing you to confront the true source of the infection, then beat that boss.
- Speaking of the aforementioned Platform Hell, did you know that the most fiendishly difficult part of the final sequence can be downright skipped? Underneath the corridor of rotating spike traps, there is a breakable wall directly between two oscillating buzzsaws. Lacking any kind of map, the game gives no indication such a skip might be possible.
- Even finding out that there are multiple endings in of themselves qualifies since you first need to get to Kingdom's Edge, which requires either finding a key to access the tram, going through a false wall in a side room in one of the larger regions of the game, or noticing there's a door at the very top of an elevator shaft that can only be reached with wall-jumping and the Crystal Heart. Even then, you'd need to either bounce off an enemy or acquire the Monarch Wings to let you Double Jump to the ledge required, and then fight Hornet again before getting the item that will open up the Abyss. Then you have to go to the opposite end of Hallownest and acquire the shadow cloak before Hornet will hint that there are multiple endings, but won't tell you precisely how to get them.
- There is no indication that there are two endings for The Grimm Troupe update. One path requires you to collect one extra flame in a faraway location on the map that's easy to miss, and then follow obscure directions to return to the start of the campaign. The other requires you to fight an extremely difficult boss. Taking one path permanently prevents you from getting the rewards and story development for the other.
- Likewise, getting the second ending for Godmaster has nothing to allude to it and is a real challenge. You have to deliver the Delicate Flower to the Godseeker, which means going through a gauntlet while having to take no damage. Though this may end up harder for some in that people don't realize that even after finishing the Grey Mourner's quest, one can take the flower from the grave without ill effect.
- Hard Levels, Easy Bosses:
- The Deepnest. It's dark, depressing, hard to navigate, filled with traps, houses a lot of respawning lesser mooks, and the elite ones can deal two masks of damage. However, the boss fights are ridiculously easy — One is a Zero-Effort Boss who won't fight back, and the other is an Optional Boss but can still provide a lot of room for healing due to some Boss-Arena Idiocy.
- There's a conditional case regarding the Trial of the Warrior. The trial itself can be very difficult since you're constantly juggling between waves of enemies, some even incorporating traps and changing platforms. If you chose to rescue Zote early in the game, he will be the boss fight in this trial, but he's so pathetic that he can't even damage you.
- Healing Checkpoint: Similar to Dark Souls, it is a mechanic that restores the player's masks when they sit down at a bench but respawns all slain enemies. Benches are also the only way to fill out the in-game maps if the player has the quill item and that area's map.
- Health/Damage Asymmetry: This is due to the difference in how the Player Character's health is measured compared to the enemies. Your health is indicated by masks usually representing the number of hits you can take. However, the enemies' health is measured by numerical values (but the game doesn't outright mention this, something that is only possible by looking at the source code), so the enemies, especially tougher bosses can take dozens or even hundreds of hits to die, while you only have up to a maximum of 9 hits to die without certain charms or Lifeblood masks. There is a reason for this, since the Knight has a basic spell that can recover health while no enemy in the game can heal themselves.
- Hearing Voices:
- This is a sign of the infection, as the Soul Master and Myla can attest to. They can hear the voice of The Radiance inside their heads.
- For some reason, even uninfected beings can experience this as well. As he comments on the Crystallized Husks, the Hunter recalls that the crystals in the Crystal Peak seem to "sing", albeit with a very soft voice.
- Heart Container: Your health and soul meters can be extended by a series of fragmented items. So can the amount of notches you have to equip charms.
- He Knows About Timed Hits: Some Lore tablets (like in King's Pass) somehow serve as visual tutorials, with an accompanied drawing of the actions, and the appropriate control scheme.
- Hell Is That Noise:
- Flukemons constantly emit disgusting slurping noises, which crescendo if they notice and start chasing you. When killed, they split into two parts—one which continues with the slurping, and another which starts screeching loudly.
- Entombed husks, who are essentially buried and half-decayed bodies that were reanimated by the infection anyway, make horrifying groans that sound like a person in pain gasping for air. Fortunately, they only appear in one small area. Unfortunately, it's dark, maze-like, and claustrophobic, and you will hear them before you find them.
- The fight against The Collector is constantly accompanied by its maniacal, high-pitched laughter, and as if this wasn't enough, the usual boss music theme is heavily distorted during this battle.
- Helpful Mook: The Lifeseeds contain lifeblood that serve as your additional, temporary health. Since they are still considered as Mooks, they also have an entry in the Hunter's Journal.
- Here We Go Again!: The first ending. The Knight just took the place of the Hollow Knight as the new vessel for sealing the infection, but since they don't have the proper means of destroying the actual source of it, only time will tell if the playable Knight wakes up and becomes fully infected as well. Even Hornet is aware of this trope, as she tries to defy it very early on by halting the Knight, fearing that they may end up like the Sealed Vessel.
- Hero of Another Story: The knight meets several other adventurers during their journey, like Quirrel, Hornet, Cloth, Tiso, Zote, and Mister Mushroom.
- He Was Right There All Along: Several bosses hide in the background at first:
- A room in the Forgotten Crossroads appears to just contain another horde of zombified bugs, but then the gates slam down and the False Knight drops in.
- The Mantis Lords initially sit idle on their thrones and only attack when you voluntarily challenge them, though they will close the gate to Deepnest if you approach it.
- The Soul Master is first seen as a distant shadow before teleporting into the foreground.
- A strange voice in the Royal Waterways beckons you to a room (literally) full of shit and nothing else, whereupon a Wormsign heralds the Dung Defender.
- In Deepnest, a doppelganger of the Knight leads them down a twisty corridor to a room littered with strung-up corpses, where the doppelganger reveals its true form as Nosk.
- In the Ancient Basin, you find the corpse of one of the player character's brethren, and as you approach the Infection pustules on the left side of the room, a swarm of Lightseeds reanimates the corpse, commencing the Broken Vessel boss fight.
- The Traitor Lord's boss fight in the Queen's Gardens at first appears to be yet another Multi-Mook Melee before he makes his appearance.
- The True Final Boss arena starts empty except for a couple of platforms leading to a Challenge prompt. Enter THE RADIANCE with full-screen Boss Subtitles.
- Hidden Depths: Reading people's minds with the dream nail will often reveal them, even the shady ones, to be concerned about something important.
- Zote at one point laments being trapped when he has a promise to fulfill: a promise to himself, a promise of success and glory! ...that's not a very good example. However, during his Colosseum fight, one of his dream nail quotes is "I'll kill a thousand more... Will that be enough, father?" Some of his fifty-seven precepts imply that his parents may have been abusive or at least neglectful in some way, but since they're never seen, there's no way of knowing whether that's the truth or just the way Zote sees them.
- Tuk, a big bug that's sorting through trash in the royal waterways, seems to be a greedy hoarder who will sell you rotten food for absurd prices. But, her thoughts reveal she's actually searching for a person and she's desperately hoping they will wash up in the dump eventually.
- Tiso thinks of the Knight as a worthy individual whom he wishes to fight in the Colosseum sometime, but his thoughts in Dirtmouth indicate that he doesn't respect the Knight, calling it a "squib" and even musing the chance to kill it right there. Fortunately, he doesn't, because to him, that would be a pitiful end.
- The Dung Defender/Ogrim longs for a friend and talks about them in his sleep. And despite his joyful attitude when fighting, a scene that plays when you defeat his White Defender variant has Ogrim bawling on his knees, as he looks at the silhouettes of the other four Great Knights vanishing. This implies that he deeply misses his comrades, and is lamenting that he's the only one left.
- Grimm's dream nail quote seems to state that he's fully aware of what the Vessels are and that the Wyrm made them. Also, in the Godmaster update, he is the only rematched boss that directly acknowledges Godseeker's presence, bowing to her instead of you during your rematch with him. And upon dream nailing him in the rematch, gives quotes further solidifying his awareness of the situation, talking about how it's an honor to attend "the seeker's call", and what a pleasure it is to be a part of this "charming ritual".
- It is repeatedly hinted that Sly is more than he seems, even before his identity as the Great Nailsage is revealed.
- Hitting Jiji with the dream nail seems to imply that she (ironically) regrets being asleep for so long, and fears that whatever darkness is present now will destroy her if she somehow falls asleep in such a way again. For added irony, while there is a ton of darkness and void that spawns Siblings and Tendrils in the Abyss that do pose a very real threat to her, the more immediate danger that could consume her is a Light Is Not Good plague.
- Iselda is the bored and disgruntled wife of Cornifer, the mapmaker, who thoroughly hates her job as a shopkeeper and is usually resentful towards her husband, who always ends up leaving her behind during his mapmaking escapades and consequently stays out for days. Her Dream Nail dialogue, however, reveals she knowingly gave up a grand life as a warrior to settle down with him, and that she feels much happier living with her "Corny", despite all his faults. If the player ends up buying every available map, making Cornifer finally come back home, she shows relief and openly admits she still loves him dearly.
- Hint System:
- Whichever location the Elderbug is bringing up when you talk to him is usually the one you should be exploring next in order to move the story forward or to find the next key item.
- Iselda's pins come in handy, as they automatically mark the key points in your map, such as the locations of benches, stag stations, hot springs, tram stations, and even the essence sources such as the whispering roots and warrior dream graves.
- In the Journal, the Hunter's expositions and notes also provide gameplay tips and techniques in defeating some of the enemies.
- Haven't found all the missing grubs yet? If you have defeated The Collector, its map will be obtainable in the top of the tower. It automatically marks the locations of those grubs on your map, similar to how Iselda's pins work.
- Hitbox Dissonance:
- Quite common in environmental traps, especially spikes on ledges such as this example◊. In such situations, the actual hitbox can be smaller than the visual object, where the Knight could have been "pierced" by the spikes but did not.
- Several bosses have a Shockwave Stomp attack that must be jumped over to avoid taking damage, at least until you get the Shade Cloak. However, like the first example, the actual hitbox of the shockwave is much smaller than its visual representation, making it easier to avoid than the visual would indicate.
- Don't get fooled by the Sword Lines of Sly's Great Slash attack when you fight him in the Godhome, because that hits farther than what the visual effect shows.
- Quite common in environmental traps, especially spikes on ledges such as this example
- Hit Stop:
- If you successfully parry an attack with your nail, there will be a distinct sound, a flashing visual effect, and a brief stop-motion for a while.
- In the boss fight against the Hollow Knight and the second battle with Hornet, this visual effect happens once you attack the boss while it is blocking. After a flash and a motion freeze, it will unleash a Counter-Attack on you.
- To simplify, every time you get damaged, there is a hit-stop effect that lingers for around 20 frames accompanied with a loud sound effect and void coming out of the knight. When you take two masks of damage instead, the sound effect is louder and the void covers more of the screen.
- The Carefree Melody charm also has a more distinct sound and a longer slowdown effect for a few seconds after it has successfully blocked an instance of damage.
- Homage: Draws a lot of inspiration from Dark Souls in terms of the story and some gameplay elements, with a lot of the gameplay coming from the Metroid and Castlevania franchises.
- Iconic Starter Equipment: In most artwork, the player character is depicted with the basic, weathered Nail instead of any of the upgraded Nails obtained from the Nailsmith.
- Idiosyncratic Difficulty Levels: The difficulty for the boss fights in the Hall of Gods are Attuned (boss has the same amount of health and deals the same amount of damage as in the base game), Ascended (boss has more health, deals more damage, and usually the arena is altered to make the fight more difficult), and Radiant (same changes as in Ascended, but also you now die in a single hit).
- Inescapable Ambush: The game loves to pull this on the player. One of the worst is in the top floor of the East City of Tears, where you are locked into fighting at least three waves of the tough Husk Sentries including the Winged, Lance, and Heavy types.
- Inexplicable Treasure Chests: Treasure Chests are located in areas that you need effort getting to, either by traversing environmental traps or by defeating nearby mooks or a boss first.
- The Infested: Downplayed. The Husk Hive is a zombified beetle with a beehive surrounding it's torso. It's implied the hive runs into it's hollowed out belly, but how deeply they're merged is left ambiguous. Notable this would be a case of a bugs inside bugs, and upon it's defeat the bees inside it emerge to continue fighting.
- Infinite Flashlight: The Lumafly Lantern doesn't run out at all since the light source is a group of fireflies in a lantern. And it doesn't break no matter what happens to the Knight.
- Informed Species: Some characters and enemies don't resemble the bugs they are said or implied to be in-game:
- The Last Stag's name calls stag beetles to mind, but he lacks the distinctive large mandibles stag beetles are known for; due to his horns, he seems to be based on a rhinoceros beetle instead.
- The Garpedes are called centipedes in the game's code. However, they have two pairs of legs per body segment instead of one like real-life centipedes, which might make them look more similar to millipedes.
- Dirtcarvers are enemies that resemble silverfish due to their flat body shapes and silvery scales. However, the game's codes classify them as baby centipedes, implying they are young garpedes. To make matters more confusing, the enemy Carver Hatcher is a flying bug that spawns dirtcarvers from its body, but neither centipedes nor silverfish are able to fly at any point in their lives. The game's bestiary even comments on this, wondering how Carver Hatchers could be the mothers of the dirtcarvers when they look so different from them.
- The God Tamer is a boss who was confirmed by her backer to be based on a cockroach, but she looks much more like an ant due to her more slender body shape and lack of membranous hindwings. She even tamed an animal to use as a Beast of Battle, much like some ants in real life can keep and protect aphids and caterpillars as livestock for sugar.
- An official post mentioned that Molten was based on a cicada, but he doesn't resemble one much due to the art style, having longer antennae and a smaller body, especially when compared to fellow cicada, Cloth. However, he is recognizable for keeping his old exoskeleton for protection, and cicadas are famous for the molts that they, like all arthropods, leave after their ecdysis.
- In-Game Banking Services: Millibelle the Banker can be found near Queen's Station offering her services. It's actually a scam, and she runs off with your money if you deposit more than 2550 geo.
- Interchangeable Antimatter Keys: Any simple lock can be opened by any simple key, but all simple keys are so shoddily made that they break after one use. So, they're more like simple lockpicks.
- Interface Screw: In several areas, your map is unavailable.
- Interface Spoiler:
- If you beat a new boss or a mini-boss but the Hunter's comment on them doesn't unlock in the Journal, then the fight's not over yet — you'll encounter that boss again sometime in the late-game.
- Stag Nest only unlocks if you find every Stag Station, and the blank space on the tunnel map will clue you in on where your missing stations are.
- If you visit a new room, and then rest on a bench, the room's entire layout gets added to the map even if you only saw a small part of it. A striking example is in Deepnest, where there's a broken wall leading to a grub. Once this is added to the map, you can see that it's part of a much larger room, giving you the clue to go back there and look for another broken wall. This is how you find the optional boss Nosk.
- Invincible Minor Minion: Played with in the case of the Wingmoulds. These are floating armored void entities that "split open" when hit, but reform a few seconds later. They cannot be killed, and only serve as additional platforming tools for the Knight's nail-jump mechanics.
- Jigsaw Puzzle Plot:
- This trope gets lampshaded and defied by Zote in his fiftieth precept:Precept Fifty: 'Don't Linger on Mysteries'. Some things in this world appear to us as puzzles. Or enigmas. If the meaning behind something is not immediately evident, though, don't waste any time thinking about it. Just move on.
- While the earliest parts of the game are left ambiguous for a first-time player, it is in Greenpath where the game starts establishing subtle objectives or directions on where you must go next. But even after that, it is only during the City of Tears cutscene that the greater backstory is explored and points you to two main objectives (break the seal on the Black Egg Temple and find the "Grave in Ash"). The latter is optional, but it will lead you to the path towards the Golden Ending. The three major expansion packs also attempt to add more lore or answer some plot holes left by the base game:
- Hidden Dreams gives more backstory on the White Defender's past, and on Bretta's delusions about Zote, but it requires Zote being rescued from the Vengefly King in order to see this new interaction.
- The Grimm Troupe introduces new characters who are Ambiguously Evil, with their Master knowing the history of the Kingdom and its two previous rulers. However, to start this quest, the player must have already obtained the Dream Nail from the Seer, since you'll be dealing with entities that came from the Dream World.
- Godmaster focuses on the backstory of most Higher Beings. Two endings were also added to demonstrate that the True Final Boss has an even stronger version in the Dream World.
- This trope gets lampshaded and defied by Zote in his fiftieth precept:
- Job-Stealing Robot: The Last Stag will scornfully dismiss the idea that a mere machine could do his job when you talk to him after acquiring the Tram Pass. The presence of a Tram Station marked with a Stagway Sign in the Resting Grounds suggests that the kingdom may have been in the process of switching over from the former to the latter when the plague hit if it's not a development oversight.
- Joke Ending: The "Mr Mushroom" ending is unlocked by deciphering a lore tablet in a well-hidden secret area inside another secret, and then following a series of obscure clues. The reward for all this is a scene in which a goofy-looking cartoon mushroom flies off into space, followed by the words "To be continued".
- Kaizo Trap:
- Downplayed. Any stray projectiles, or backup mooks that remain after you defeat a boss can still damage and kill you. Fortunately, the game auto-saves the state and acknowledges that you have killed that boss, so all you need to do when you die in this manner is to backtrack to the boss stage to receive your rewards and slay your shade.
- Fool Eaters are most likely hidden near Geo deposits or other points of interest.
- The Kaizo Trap also gets Inverted with the Nosk boss fight. If you revisit most bosses after dying to them, you generally get an abridged version of the boss' introduction cutscene. Nosk however will simply charge you the moment you re-enter his arena, not helping the fact that the shade you need to defeat to recover your geo and soul will also be in the room with him.
- Karmic Butt-Monkey: Zote the Mighty is a big-mouthed egotistical Jerkass who always belittles the Knight and treats it like a nobody, all while bragging about victories he never achieved. He's also extremely weak and always ends up in trouble. In fact, when the Knight meets him for the first time, he gets chewed on by the Vengefly King (and can potentially die if you neglect to save him, complete with the achievement if you do so), and later he gets webbed up by spiders in Deepnest and gets captured by the Fools to fight in their Colosseum against his own will, to be humiliated on public.
- Kill Enemies to Open: Even outside of boss fights, many scripted encounters lock you within the area until you can defeat all of the spawned enemies.
- King Mook: The Soul Master is this to the Soul Twisters and Soul Warriors. It has the teleportation power and the arcane bolts of both, the Twisters' orbiting magic shield and the Warriors' melee skills, including a teleport + downward attack combo. Other examples include the Gruz Mother (Gruzzer), Vengefly King, Massive Moss Charger, Shrumal Ogre (Shrumal Warrior), Mantis Lords, Traitor Lord (Mantis Traitor), Brooding Mawlek, Flukemarm (Flukemon), Crystal Guardian (Husk Miner and Crystallized Husk), Nosk (Corpse Creeper), Hive Knight (Hiveling), Uumuu (Uoma and Ooma), and Obblobble (Obble).
- False Knight is a subversion. He looks like a larger and stronger Husk Guard and has similar moves, but his club attack is limited to one mask of damage whereas the Husk Guard does two.
- Knockback: Aside from the basic effects wherein taking hits or dealing damage with nail attacks knock back the Knight and smaller enemies respectively, the game also has additional factors that affect this mechanic:
- Most larger bosses are completely immune to knockback.
- Three charms are specifically made to affect knockback; the first two outright state the effects in their description, while the third is subtle about it:
- Steady Body disables the recoil effect when the Knight strikes unarmored enemies with the nail, allowing them to remain in the same spot while attacking. However, this doesn't affect the recoil produced by the aerial downward slash, or by hitting environmental spikes or armored enemies with the nail. The charm also has a hidden benefit of preventing the Knight from being knocked sideways when it bumps into purple mushrooms in the Fungal Wastes.
- Heavy Blow increases the knockback distance when attacking smaller enemies, pushing them farther.
- Stalwart Shell reduces hit recoil (basically the amount of time where the Knight can't receive input after being hit), allowing you to strike back faster after being knocked by an enemy attack.
- The aerial downstrike attack recoils the Knight upwards when it strikes enemies, even against spiked floors!
- Pushing back enemies in your chosen direction can force them to fall into environmental hazards or sink in water.
- Kung Fu-Proof Mook:
- Crystal Crawlers are immune to your physical nail attacks, they can only be damaged by spells or offensive charms.
- Lightseeds cannot be harmed by summoned familiars.
- Laser-Guided Amnesia:
- It is said that the people of Hallownest should not head into the wasteland outside the Howling Cliffs and will pay with their memories if they do so. Quirrel, for example, comes from parts unknown but comes to remember who he once studied under: Monomon.
- It's implied that the knight and several other failed vessels managed to escape the Abyss even after it was sealed. The knight wandered into the wastes and lost its memory, which is why the game starts where it does—the knight arriving from the Howling Cliffs.
- Last Lousy Point:
- Most mask shards are found in secret areas or are sold by Sly. Some of them are given out as quest rewards instead. While the requests of the Grubfather and the Seer are easy, there is one questline that could gate the last mask shard due to its difficulty – The Grey Mourner's Delicate Flower Quest.
- Just like the mask shards, most charm notches are either bought from Salubra's shop or found in secret areas. There's a charm notch awarded for completing the Trial of the Warrior, but even that is manageable. The Grimm Troupe content, however, added another charm notch as a reward for defeating Grimm.
- As for the vessel fragments... better hope you are good at pogoing if you want that last one.
- Last-Second Ending Choice: While most endings are determined by things you do long before the final boss (getting the Void Heart, taking on the Godseeker's challenges), the choice that determines your ending between Dream No More and Sealed Siblings happens during the final boss fight—it's whether or not you take advantage of Hornet giving you an opportunity to use the Dream Nail. If you Dream Nail the Hollow Knight, you face the True Final Boss and then the Dream No More ending. If you don't and kill the Hollow Knight normally, you get Sealed Siblings, which is the same as the normal ending, except Hornet's now sealed with the Knight.
- Leaking Can of Evil: The Black Egg temple contains something that is causing the Infection, sealed away by the three Dreamers. Even from the start of the game, the amount of infected foes you fight makes it clear that the seal isn't quite working. After hitting a certain trigger (either gaining the double jump skill or killing a Dreamer), the seal will weaken considerably, turning the Forgotten Crossroads into the Infected Crossroads. The Black Egg Temple actually contains another leaking can of evil—the Hollow Knight, who served as a person-shaped can for the source of the Infection, but could not completely contain it and thus had to also be sealed away by the Dreamers.
- Leap of Faith: The Abyss is a very long drop filled with spiked traps in between platforms, making it hard to know where you are landing. Fortunately, the game doesn't have fall damage so the only thing you have to worry about is whether or not you land on the spikes (because they can respawn you to the nearest platform). In a specific part of it, the entrance to the Lifeblood Room is located on the far left, which also has spikes near it, even the wall (so you cannot easily super dash in its direction).
- Left the Background Music On:
- A certain piece of music ("Reflection") plays, usually in "safe" zones such as Stag stations. In a few areas (specifically, the trams and one save point in the Queen's Gardens), this music is revealed to be playing through a speaker or two on the wall. If you destroy the speakers, that music will never play again in that area.
- The City of Tears theme, particularly the "Outside" variation, has a One-Woman Wail for its main melody. In the Pleasure House, the same tune is sung by a ghost named Marissa. After you absorb her Essence with the Dream Nail, it stops.
- If you choose to banish the Grimm Troupe at the end of their quest line, the Dirtmouth BGM is replaced with an accordion arrangement played by Nymm, who is apparently an amnesiac version of Brumm.
- Leitmotif: There are multiple of them:
- Its two main leitmotifs are the main "Hollow Knight" theme from the menu screen, and the "White Lady" theme (the Pale King's theme), both of which are motifs of two plot-important characters they are named after. They both play throughout the game's soundtrack as a Recurring Riff. The menu screen theme appears in the boss themes for the False Knight, the Broken Vessel, and the Final Boss. The drone in the Abyss contains the same melody. The "White Lady" (Pale King) melody begins the game (underscoring the "Elegy for Hallownest" epigraph) and also appears in the "Resting Grounds" theme, the "White Palace" theme, and (more subtly) in Hornet's theme.
- Another prominent leitmotif is the melody of "Dirtmouth" and "Greenpath."
- The "City of Tears" leitmotif appears in "Dreamers" and "Dream," the latter of which is remixed into the theme of the True Final Boss.
- Major bosses have unique tracks when you fight them or their respective dream variants, but these are essentially just alternate versions of their original themes.
- "Haunted Foes" the most solemn of the Godmaster boss themes, is based on the main "Godhome" theme.
- When you are near your own left-over shade, a short, looping track plays, often dubbed as the "Shade Music Box". A slower version is played like an actual music box tunenote at the nursery room in the White Palace, which hints that the Vessels stayed there at a young age. The secret Path of Pain cutscene supports this, as the young Hollow Knight (AKA the Pure Vessel) was in the Palace's balcony with the Pale King.
- Its two main leitmotifs are the main "Hollow Knight" theme from the menu screen, and the "White Lady" theme (the Pale King's theme), both of which are motifs of two plot-important characters they are named after. They both play throughout the game's soundtrack as a Recurring Riff. The menu screen theme appears in the boss themes for the False Knight, the Broken Vessel, and the Final Boss. The drone in the Abyss contains the same melody
- Level Scaling: Certain enemies like Grimm and the Grimmkins scale in health depending on how upgraded your weapon is, providing a consistent challenge no matter how much damage you do per hit.
- Light/Darkness Juxtaposition: There is a heavy contrast and opposition between light and dark here, with hints that these forces equally counter-act each other:
- The Void is a force that opposes all other forms of light and wants to consume it. This is the reason why the Pale King infused the Vessels with the void, so that they may contain the Radiance. In certain endings, the Knight gets to channel the power of the Void Entity for itself, and finally kill the Big Bad, the Radiance.
- The Lighthouse in the Abyss was built in an attempt to keep the sea of black void at bay.
- The Kingsoul charm starts out purely white at first, then it completely changes into the pitch-black Void Heart charm on the way to the Golden Ending.
- However, in the "Delicate Flower" ending of the Godmaster expansion, the pitch-black Void Entity itself Disappears into Light just because the Godseeker was given the white delicate flower.
- It was told that the Five Great Knights once fought the "Black Wyrm" sometime in the past. Considering the fact that these knights serve the Pale King (who is a Wyrm associated with white light), it was literally a fight between black and white.
- Lighting Bug:
- The Lumaflies. They are hostile in their natural "Charged Lumafly" state, which electrocute stuff in a small radius... or they can be stuffed in a lantern and used as one's personal flashlight. Sly sells the latter type for 1800 Geo, which is essential if you want to traverse the Blackout Basement segments.
- Lampposts can be found throughout Hallownest that are topped with glass spheres holding small, glowing insects (this despite all characters in the game being much larger anthropomorphic insects). If the glass is broken, the insects flutter away.
- A giant bug also acts as one huge source of light—the Radiance, a huge glowing moth, with the light being depicted as sun rays coming out of its body.
- Light Is Good:
- The king and queen of Hallownest are both said to have dressed in white and the Pale King was associated with light. On the other hand, the White Lady is integral to guiding you towards the best ending.
- The White Defender, even though he's a boss for you to fight, is portrayed heroically and has white armor. This trope also applies to his fellow Great Knights serving under the Pale King, as they are usually depicted in shining white clothes back during their prime days.
- Also, the Pure Vessel in his prime, is depicted with white clothes like the Great Knights, and some of its abilities are also associated with light, or white glyphs.
- Inverted by the Radiance, whose light singlehandedly destroyed Hallownest.
- Living Gasbag: Funglings and Fungoons, enemies encountered in the Fungal Wastes, are round, gas-filled fungus creatures that float passively in the air. When killed, they quickly deflate and spiral out of sight.
- Living Shadow: There are creatures made out of the pure-black, liquid substance called Void. The Abyss contains Void Tendrils that block a given path. The Pale King has also conducted experiments with the Void and produced the Shades/Siblings (which are placed inside Vessels), the Kingsmoulds, and the Wingsmoulds (the latter two being found in the White Palace). The Collector is another void-based creature found in the Tower of Love (and is heavily implied to be an escaped Kingsmould).
- A Lizard Named "Liz":
- The enemies named "Squits" look like mosquitos.
- Two bugs are named "Caelif and Fera Orthop". The scientific name for the order of insects that includes grasshoppers and crickets is Orthoptera. The scientific name for the suborder of Orthoptera that specifically includes grasshoppers is Caelifera.
- Long Song, Short Scene:
- The City of Tears BGM has a 5-minute loop, with the more epic version of the Variable Mix only playing in the relatively short outdoor areas, so the player is unlikely to hear the piece in its full glory unless they stand idle. The OST only includes the first 3 minutes of the song.
- The Lifeblood Update added an "action" variation of the City of Tears theme, which only plays in an optional Inescapable Ambush room near the City's east elevator.
- The White Lady's theme runs for two minutes in-game, but can only be heard in full by pausing during her dialogue, and also got truncated on the OST.
- The relatively easy Mini-Boss fight with the two Shrumal Ogres near the beginning of Fungal Wastes uses the bass and percussion section of the Queen's Gardens' Battle Theme Music, which is the only time in the game that the bass and drums are heard without the main melodic stem, and the OST once again gave it the short end of the stick, only including the non-combat variation of the QG theme.
- The City of Tears
- Look on My Works, Ye Mighty, and Despair: The Pale King may be a Physical God, but boy does he fall prey to this trope. Not only is his supposedly "eternal" civilization lying in ruins, but he repeatedly failed to stop its devastating collapse at the hands of another god.Higher beings, these words are for you alone.Beyond this point you enter the land of King and Creator.Step across this threshold and obey our laws.Bear witness to the last and only civilisation, the eternal Kingdom.Hallownest
- Lotus-Eater Machine: Invoked by the three Dreamers, with their tactic of trying to trap the Knight into the dream world. This trope also crosses with Trapped in Another World since the dream world and physical world co-exist as distinct planes.
- Luke, I Am Your Father: On the route to some of the endings it's revealed, somewhat offhandedly, that both Hornet and the Final Boss are the protagonist's siblings, with Hornet being the daughter of Herrah and the Pale King, and both the knight and the Hollow Knight being the progeny of the Pale King. It's also heavily implied that the protagonist is an "offspring" of the king and queen of Hallownest, which is presumably why it can read ethereal messages intended for "higher beings" and also acquire the King's Brand. In one of the lines added in The Grimm Troupe update, the White Lady outright calls the protagonist her spawn.
- Mana Meter: The Soul Gauge is consumed to fire off spells or heal yourself. It can be filled by hitting enemies with the nail. Some charms affect the manner in which you fill the Soul meter.
- Man-Eating Plant: The Fool Eaters in Greenpath and in the Queen's Gardens are carnivorous plants that clap shut when you step on them.
- Many-Faced Divinity: Played with. The Dreamers are depicted as three masks fused together above the temple of the Black Egg. However, the Dreamers themselves are not divine (or even a unified creature). The symbolism actually represents that what they are sealing is divine.
- Mask of Power: It is suggested that wearing a mask can change the nature of a bug.
- Master of the Levitating Blades: Xero, one of the Warrior Dreams, fights with two nails hovering near him and launching them at the player character. At low health, he summons two more nails, making the fight more difficult.
- Mature Animal Story: Hollow Knight is an epic tale of a fallen kingdom ravaged by a Mystical Plague brought on by a scorned god's jealousy, and the endeavors of the void-touched ghost of the king's mute, genderless child to try to restore said kingdom to its former glory. As the game progresses, we learn of the dark and depraved things that went on in an endeavor to stop the aforesaid plague, including soul-based magic harvested from torture victims, and the throwing of hundreds, if not thousands of newborns into The Abyss to make them undead supersoldiers. The characters are mostly bugs, with a few other tiny critters, such as slugs, spiders, fluke worms, etc.
- Maximum HP Reduction: The Shell Binding in the Pantheons limits the maximum number of Masks to 4.
- Meaningful Name:
- The ghost Dr. Chagax is modeled after the kissing bug, blood-sucking true bugs from the Triatominae family known for transmitting Chagas disease. Furthermore, his status as a doctor is a homage to Carlos Chagas, the scientist who identified the kissing bug as the vector of the protozoosis and discovered the causes and characteristics of the parasitic disease (which is why it is named after him).
- The hardest Trial in the Colosseum of Fools is the Trial of the Fool, and its reward is a load of money and "the glory of being a Fool". Considering that the easier Trials gave out valuable items for completion, the likely reaction would be "only a fool would take on this trial."
- The ghost Dr. Chagax is modeled after the kissing bug
- Meat Moss: The Infection can not only infect bugs, but also the environment with huge cysts full of acidic pus. The Aspid Nest and Infected Crossroads have huge veins in the background as well.
- Mega-Microbes:
- Lightseeds are single-celled organisms that evolved from a strange air that became liquid, with that liquid becoming flesh. The Hunter's Journal states that they became swollen due to the infection.
- An Infected Balloon is a single cell of bloated infection that can float.
- Mercy Invincibility: Very short by default, but the Stalwart Shell charm is there to help extend that. Coupled with the one for more rapidly swinging the nail, it's possible to kill a couple of bosses more easily through careful damage races.
- Metroidvania: The game is made up of one large continuous world. True to form, you gain access to new areas by acquiring movement-based abilities as you travel, and by collecting keys to open locked doors.
- Mimic Species: Grub Mimics pretend to be harmless grubs that are trapped in glass jars in hopes of ambushing an unwary player who tries to rescue them. Before attacking they are completely identical to the regular grubs: the only way to tell that one is a mimic is to use the Dream Nail to read their thoughts before breaking the jar. A regular grub always thinks of its home, while a Grub Mimic thinks things like "Empty", "Kill" and "Other".
- Mind Screw: There are a lot of unanswered questions regarding the Godhome, and the related lore of that place can be hard to find and analyze. How exactly does the Godhome work? How is it able to summon memories of warriors from the past, even if they are already dead or currently weak? How is it possible that you can kill the Absolute Radiance via the Godhome when in fact, the Radiance is faced in the Hollow Knight's dream? What made it possible for the Knight to go up to eleven and transform into the God of Gods when it used to be just the Lord of Shades against the Radiance? And in the "Delicate Flower" ending, is it explained how a mere flower is able to prevent the void from bursting out? Aside from those questions, it is unclear if the summoned warriors in the Godhome are actually present there, or were dreaming. For example, Grimm acknowledges the Godseeker's presence by bowing to it, instead of you. Lastly, if you try to use the dream nail on Hornet in the Godhome, she gives us these interesting questions:...Do they watch us struggle?..
Do you haunt my dreams... Or I yours?
Little Ghost... What dreams we share... - Mini-Boss: In certain rooms, you get locked into a cage and must face a unique or suped-up enemy. Compared to the actual boss fights, the mini-bosses don't have unique soundtracks on their own, and mostly reuse the tracks of the major bosses or the ambiance of a stage.
- Mini-Game: The Hall of the Gods has a hidden room that contains the Eternal Ordeal, where you get to fight an endless army of Zotes (he can hurt you this time) and many variants of Zotelings. There's also a unique kill counter HUD with Zote's head in the bottom left corner of the screen. Kill over 57 enemies here to unlock a new Zote-themed title screen.
- Mirror Boss:
- Although it is not a boss, your shade will use all the moves you had when you last died and has HP in direct proportion to your max HP.
- Broken Vessel uses attacks similar to your own, except they're corrupted in nature due to its infection. This hints at the fact that the player character is also a vessel.
- Likewise, the Hollow Knight is one of the Knight's own kind and fights in a similar way to the knight.
- Hilariously subverted by Zote, who resembles the Knight but displays very underwhelming skills when finally seen in action.
- Missing Time:
- Coupled with Waking Up Elsewhere, when the Knight gets tricked in the Distant Village and wakes up to find itself webbed in the Beast's Den.
- In The Grimm Troupe storyline, destroying the Nightmare Lantern will produce a flash of light, with the Knight waking up alone in the Howling Cliffs and Brumm is nowhere to be found. When you return to Dirtmouth, the troupe's tent is no longer there, but an amnesiac stranger named Nymm is seen playing his accordion near the town's bench.
- Modular Difficulty: The game's designated boss-refighting area, Godhome, features the Pantheons, basically a series of Boss Rushes. For each pantheon, you can apply up to 4 different "bindings". One cuts your damage by 20%, one cuts your health in half, one prevents you from using charms, and one cuts your soul vessels down to 1 spell usage. The incentive for completing a Pantheon with bindings is adding lifeblood cocoons to future Pantheon attempts and accessing a secret area.
- Money Fetish: The Gorgeous Husk is obsessed with hoarding Geo. Kill him and you get hundreds of money for yourself, as he drops the most Geo out of all the enemies.
- Money for Nothing: You only need 2400 Essence to obtain all of the Seer's rewards and one related achievement, but you can have up to 3208 essence from all the possible bosses and sources that provide it, plus some more if you decide to farm it by killing enemies. So what can you possibly do with the remaining 808 excess Essence? Well, warping to a Dreamgate costs only 1 essence each. Surely, that gives you a lot of chances to warp to a location of your choice, and there are no other venues to dump Essence into.
- Money Grinding: Encouraged when you plan to upgrade the Fragile Charms into their Unbreakable variants, since Divine from the Grimm Troupe will charge you thousands of Geo each. Some areas are even designed to help in farming Geo:
- At 45 Geo each, Husk Guards in the Forgotten Crossroads are one of the earliest Geo farms, especially since both of their spawn points are near the Stag Station.
- After you beat the dual Shrumal Ogres at Fungal Wastes, a single one will remain on later visits to the room. It is worth 45-56 geo, is a sitting duck on its own (do bring a long sharpened nail to beat it quickly), and always respawns. Plus, the route between it and the closest save point and stag room is rather easy to navigate.
- The trials in the Colosseum of Fools can be replayed as many times as you like, and they reward Geo for each successful run.
- There are certain late-game areas that house multiple enemies at once (such as the Failed Tramway having Carver Hatchers, each giving 25 Geo upon death), which are also located near a bench, making them viable farming locations for manually respawning enemies quickly.
- The Greed and Gathering Swarm charms are built with this trope in mind, as both of them help you accumulate Geo faster than usual.
- Money Is Experience Points: In addition to the game's other services, you can use Geo to upgrade your weapon.
- Money Sink:
- Cumulatively amounting to 36 grand, Divine's prices for upgrading Leg Eater's charms are easily the highest in Hallownest, and are intended as a post-game sink for players who have accumulated a surplus after buying everything else. By the time you finish the process of strengthening the charms, Divine will be incredibly wealthy, which Leg Eater takes as a symbol of leadership and is implied to be part of the reason he's drawn to her.
- In quite a literal case, there's a fountain in the Ancient Basin where you can dump 3000 Geo for just a single mask shard!
- Monster Compendium: The Hunter's Journal. It provides alternate flavor text for each enemy once you kill a given number of them.
- Monstrous Scenery: The kingdom of Hallownest is mostly dominated by ruined structures and the remnants of the kingdom's lost glory, but there are several spots where massive creatures can be seen in the background that pay no attention to the Knight:
- In the Beast's Den in Deepnest, there is a massive trilobite-like creature that hangs suspended from the ceiling, far larger than the actual trilobite that can be fought in the Colosseum. While it can be touched and even attacked, it is immune to all forms of damage and does not respond to anything done to it.
- In the locked room of the Abyss that contains the Lifeblood charm, a massive head (a single eye is larger than the player character) can be seen opening almost a dozen eyes in the background and moving up and down slightly as though breathing. There's no possible way to interact with it, and with how large its head alone is that's probably for the best.
- The Land of Storms, the home of the Godseeker, is depicted in her memories as an apocalyptic wasteland where enormous insectoid figures loom in the background—these are presumably the Gods of Rain and the Gods of Thunder who abandoned the Godseeker's people.
- Moon Logic Puzzle: An odd instance where the game's intended Anti-Frustration Feature misleads players. When meeting Hornet at the memorial of the Hollow Knight, she says to "seek the Grave in Ash and the mark it would grant to one like you." Immediately after, players will typically inspect the memorial and find the Marker on their map is now pointing to the temple of the Black Egg they've already seen. This confuses players into thinking she means to go there, when in fact, these are two separate events. Hornet's dialogue is a hint to find the Kingdom's Edge ("Grave" means the corpse of the Wyrm, "Ash" means the snow brought by the body of the Wyrm and "the mark it would grant" means the King's Brand item found inside this corpse), and the memorial text automatically places the Marker of the Temple on the map as a reminder. These aren't directly connected, but since the game expects you to remember Hornet's advice and the Marker's the most obvious clue, players will inevitably forget the former and look for the latter long before it's of any use yet at that point in the game.
- Mosquito Miscreants: Squits are mosquito-like enemies that attack their enemies with razor-sharp proboscis. They have an upgraded variant encountered in the Colosseum of Fools, known as the Armoured Squits, which possess more health than their regular counterparts.
- Mr. Exposition: In line with the Story Breadcrumbs trope, most of the backstory and lore are explained by friendly NPCs, each covering certain topics:
- For the locations, we have the Elderbug, Quirrel, Marissa, the Midwife, and the Last Stag.
- For the greater backstory regarding the key figures involved in the past, we have Sheo, Lemm, Bardoon, Vespa, the Godseeker, and the Seer.
- For the creatures, we have the Hunter. Occasionally, some of the Hunter's expositions also include information on his own backstory and adventures.
- For the charms, we have Salubra.
- For some Leaning on the Fourth Wall sense, we have the Unnamed Moth in the Shrine of Believers.
- Multiple Endings: The game has five main endings, one of which is mutually exclusive to the rest. The latter four are unlocked by acquiring the Void Heart charm, and which one plays depends on the actions of the player.
- Hollow Knight: Acquired by defeating the final boss without the Void Heart. The protagonist defeats the Hollow Knight and absorbs the infection leaking out of it, before getting sealed inside the Black Egg as the new vessel for the plague.
- Sealed Siblings: Variation of the first ending. Acquired by not using the dream nail on the Hollow Knight when Hornet holds it down, resulting in her getting knocked off and the Hollow Knight starting another round of combat. Much like the regular ending, the protagonist becomes the new vessel for the plague, this time getting sealed into the Black Egg alongside Hornet, whose head shape appears on the Black Egg, indicating she's become a Dreamer. With Hornet gone and unreachable, there is no longer a way to eradicate the infection. This might mean that Hallownest is doomed.
- Dream No More: Acquired by using the dream nail on the Hollow Knight when Hornet holds it down, and then defeating Radiance in the Hollow Knight's dream. The knight rallies the void against Radiance and consumes it, destroying the infection once and for all at the cost of its own life.
- Embrace the Void: After conquering all of Godhome's trials the player takes the fight to Radiance at the end of the Pantheon of Hallownest. Once it strikes her down, instead of the souls of the generic siblings and Hollow Knight helping you drag her into the abyss, some monstrous-looking thing that may or may not be the player character transformed by the godly powers it's gained grabs her by the head and brutally murders her before consuming Godhome and the Godseekers into the abyss, which also begins to spread the void into the outside world. The final scene is a Sequel Hook for the Hornet campaign later on: Hornet stands outside of the Black Egg, watching as Radiance's corruption is snuffed out by the void. She turns and sees that the Hollow Knight has broken free, and puts up her guard.
- Delicate Flower: This is more of a variation on "Embrace the Void" than its own ending. If you give a delicate flower to the Godseeker, instead of the void erupting from the Godseeker's corpse and beginning to spread across Hallownest, its body instead Disappears into Light, leaving the flower behind and protecting the world from the void while also completely ending Radiance's threat. The rest of the ending plays out the same as "Embrace the Void".
- The Grimm Troupe update has two mutually exclusive endings:
- Ritual: Acquired by absorbing all flames around Hallownest, then defeating Nightmare King Grimm in his dream. The ritual is complete, Grimm is gone, but the Grimmchild charm is fully awoken and matured.
- Banish: Acquired by backtracking to the lantern, and destroying it with the help of a repentant troupe member. The troupe vanish, taking Grimmchild with them. You can get a new charm instead, and the embers of the kingdom remain.
- Mummy: Entombed Husks are mummified corpses buried under the Resting Grounds, but were reanimated by the infection.
- Mushroom Man: There are mushroom creatures of varying sizes in the Fungal Wastes area. Mister Mushroom is an Easter Egg character who claims to have existed long before Hallownest. Meeting him in several locations across the game world adds a post-credits stinger to the ending once you defeat the final boss.
- Musical Spoiler: While you encounter mid-bosses at different points in the game, as well as rooms that are locked and need to be cleared of spawning enemies before you can move on, the sign that you're about to fight a major boss is the subtle yet intense background music before entering the boss area. When about to face the Final Boss, there is no music in that area at all. This indicates that you're gonna be fighting the True Final Boss here if you meet certain criteria. Also, the Final Boss's Leitmotif will change into a sad orchestra halfway through the fight, indicating its formerly-friendly state but is now corrupted and forced to fight you.
- Mutual Kill: Cloth kills the Traitor Lord after being fatally injured herself. The only way to prevent it from happening is to fight this boss before rescuing her in an Ancient Basin-adjacent area.
- Mythology Gag: There are some concepts carried over from Team Cherry's first game Hungry Knight.
- The Knight's design is taken there. Mister Mushroom even makes a connection between the Knight and that game when you talk to him for the first time:Mister Mushroom: "...It's nice that you were able to help your friend. So you're not hungry any more?"
- Monomon's two-eyed mask design is based on the masked enemies that the player has to defeat in order to finish Hungry Knight.
- The main quest for both games can be summed up into "kill three larger masked enemies" in order to finish (or reach the end of) the story.
- The Knight's design is taken there. Mister Mushroom even makes a connection between the Knight and that game when you talk to him for the first time:
- Nerf: Weeks after the release of the Godmaster update and its Radiant mode fights, there was an outcry about how some bosses are still difficult to fight against, so they were nerfed to make the battles doable even in a no-damage run:
- Markoth's health was lowered (requiring the player to endure the Bullet Hell for a shorter period of time).
- The Collector's minions had their hit points reduced (making it possible to one-shot them with certain charms).
- Uumuu received many changes to its movement speed, vulnerability windows, and health to make it easier.
- Necessary Drawback: Forcing yourself to wear more charms than you have available notches gives you the Overcharmed status: all the charms function fine, allowing you to put together more elaborate combinations and have more buffs... but the strain it puts on your body causes you to take double damage each time you get hurt.
- New Weapon Target Range: Several abilities, such as Vengeful Spirit, the Mothwing Cloak, the Mantis Claw, the Crystal Heart, the Monarch Wings, Isma's Tear, and the Shade Cloak, are all followed by (or found in) rooms that give you a chance to see its ability in action and gain competence with them.
-
 Nintendo Hard: Dodging and reading enemy attacks and patterns are the needed skills here, especially when dealing with bosses. You have a very limited amount of health, healing makes you vulnerable, many enemies move and attack fast, there are environmental traps all over the place (most of them would also respawn you on the previous platform once you fall on these traps), save points are far away from each other, etc... Some areas and segments are even difficult by design, such as:
- The White Palace, a Platform Hell section. The optional Path of Pain within it also has very limited respawn points.
- The Trial of the Fool is a long gauntlet fight against mooks, while the stages shift platforms and spiked traps.
- The Pantheon of Hallownest is one long Boss Rush mode where you have to fight all 40+ bosses in one run. Die here and you'll have to replay the entire section if you want to have another chance.
- There are bosses that move fast or have rapid attack patterns, are durable, and deal two masks of damage per hit, which makes the fight more of an endurance test. These are Absolute Radiance, Pure Vessel and Nightmare King Grimm.
- No Biological Sex: Vessels (including the player character) have no biological sex or gender identity due to being artificial constructs created by the Pale King as an attempt to create a living thing with no mind or will, a being that is completely "empty" in order to contain the vengeful godlike entity known as The Radiance, who manifested in bugs minds and dreams and caused the infection that led to the eventual downfall of Hallownest.
- No Name Given: Not everyone you get to hear about has a name. One prominent example is the Traitor Lord's daughter whom the Grey Mourner requests you to bring the delicate flower to her grave.
- No Ontological Inertia:
- Getting the Monarch Wings for yourself stops a torrent of wind in a portion of the Ancient Basin (since the torrent comes from these wings).
- The entire Grimm Troupe (including Brumm and the Nightmare's Heart) vanish out of Hallownest once the Nightmare Lantern is destroyed. Quite subverted once you meet the new stranger in Dirtmouth named Nymm, who is hinted to be an amnesiac Brumm.
- Non-Lethal Bottomless Pits: Acid pools and spike fields act as this, dealing 1 HP of damage and setting the knight back to the last safe spot it stood on. The player can eventually find a power-up that lets the knight swim through acid.
- Noob Bridge: The Knight can attack in four directions with the nail, even if the game never gives you any detailed tutorial about nail combat. One particular attack that flies over the head of complete beginners is that you can attack with a downward slash in mid-air and use the recoil to gain height. In the Fungal Wastes, some mushrooms react to this by giving the Knight an especially high bounce, and this is in fact necessary to progress when you do not yet have later movement abilities.
- Nothing Is Scarier: Considering the location you're exploring, the whole game could be considered a "There All Along" version. However, the following examples are the cherry on the cake:
- The Stone Sanctuary is a pitch-black (unless you have the Lumafly Lantern) hall with no enemies or music, just a large stone statue with empty eye sockets, and a series of platforms that lead to a Mask Fragment. Return to the statue with the Dream Nail, however, and you will be treated to a fight with the Dream Warrior "No Eyes", possibly the game's creepiest boss.
- The Deepnest combines the aforementioned feeling with a "Wait for it...". While the game has a lot of dark places, this one requires a lamp to progress: otherwise, your screen will only show a pitch black. However, having this item is only the start of your problems: after that, you can see the shadows of spider-like creatures walking in the background who can jump out to attack your character.
- The worst offender combines the former sensation with "Nothing at all": the Abyss below the Ancient Basin, the deepest place in the game. While the original place is already this trope once you collect the Monarch Wings, the only sounds being the Knight's movement and the scuttling of the enemies, this specific location takes this up to eleven: only some normal enemies live here while the others are some kind of ghosts made in a dark substance and tentacles that are hopefully restrained to black lakes. Once you obtain the Void Heart, these enemies don't attack you anymore: while it can be a reassurance that you've been accepted as one of them, the feeling of loneliness can still be disturbing still disturbing.
- Notice This:
- Many collectibles emit a distinct ringing sound when you are near them, even if they are out of view or are hidden behind breakable walls. Similarly, the cries of the trapped Grubs can be heard as soon as you enter the room where they are located.
- The bonus geo dropped by the Greed charm have a white sheen and spin faster than the rest.
- There are out-of-place pink crystals found near the entrance to Isma's Grove in the Royal Waterways, serving as hints that you must use the Crystal Heart to super dash your way across.
- Not So Invincible After All: In a hidden area of the Deepnest, a Garpede corpse had been torn in half, implying that these creatures can be killed despite the Hunter's remarks on their strong shells that shrug off any attacks.
- Not Too Dead to Save the Day: In the "Dream No More" ending, the siblings who were left for dead in the Abyss, as well as the Hollow Knight's shade, all come to assist you in the final phase of the Radiance boss fight.
- NPC Roadblock:
- The Elder Baldur enemies serve as a massive roadblock unless you use the Vengeful Spirit spell to kill them. You can access the entrance to Greenpath very early on for sure, but you can't proceed unless you've gotten the spell to kill the Elder Baldur blocking the entrance.
- The Snail Shaman closes and guards the gates while you're still inside the Ancestral Mound, requiring you to kill the Elder Baldur inside as a practice for the Vengeful Spirit spell.
- There's a Bench and several Geo caches in a side area of Mantis Village, but a mantis guards the switch controlling its entrance and closes the door in your face. Once you've beaten the Mantis Lords, however, the area becomes accessible.
- Obvious Rule Patch:
- Husk Sentries gain slightly more health after the Knight obtains the Sharpened Nail, possibly to prevent the player from breezing through the City of Tears by easily killing them and have a large advantage early in the game.
- An update made the Grimmchild mandatory when challenging Nightmare King Grimm, to make the entry requirement similar to how you fought Grimm normally (he calls the Grimmchild to his cloak), even though this means sacrificing two charm notches. The Grimmchild is not required when facing either version of Grimm in the Godhome—but it won't appear in the boss fights, since it will not fight against its master.
- If you have a delicate flower, it will be destroyed when using Dreamgate. Nothing in the game indicates that this should be the case, but it prevents you from skipping the sidequest by teleporting to the end.
- Offscreen Start Bonus: You start the game jumping into King's Pass, and to the left (behind the Knight) is a secret area that would lead you back to the cliff where you've just jumped from! From here, you can do some short grinding of Geo even before you visit the town.
- One-Hit-Point Wonder: If you challenge the Hall of Gods on Radiant difficulty, any damage you take causes you to die regardless of how many masks you have.
- Optional Boss:
- Several spirits can be challenged as bosses once you get the Dream Nail. Take note of which bosses leave corpses behind, for example. Defeating them to collect their essence is mandatory for the good ending, but depending on how you play, you can skip at least one.
- Certain bosses like Nosk and the Collector are found in side areas and don't guard mandatory items.
- The two bosses added by the Hidden Dreams update (Grey Prince Zote and White Defender) are completely optional, and can be fought repeatedly with increasing difficulty.
- Likewise for the two Grimm Troupe bosses (Troupe Leader Grimm and Nightmare King Grimm). The latter is particularly notable for being a traditional superboss. Like all the Dream Nail rematches, the Nightmare King is substantially harder than the first fight. Grimm isn't exactly a pushover to start with, but Nightmare King Grimm is faster and deals TWO masks of damage per hit.
- Orbiting Particle Shield:
- The Dreamshield charm creates a flying shield that circles around the Knight, protecting it from projectiles while also dealing damage to enemies in conjunction with the Knight's nail attacks.
- The Dream Warrior Markoth also uses his own personal Dreamshield which acts the same way as its respective charm. At half-health, he summons a second one.
- Orwellian Retcon:
- The inscription for Xero's grave was initially "Here lies a Traitor". After Update 1.0.2.8, this was changed to "Cursed are those who turn against the King."
- In Update 1.4, the Shade Lord / Void Entity's statue in the Hall of Gods has the inscription "Void given mind". Update 1.4.2.8 changes it to "Void given focus".
- Prior to Update 1.0.3.7, the Traitor Lord was identified as a female in his initial Hunter's Journal entry:"Deposed Lord of the Mantis tribe. Embraced the infection and turned against her sisters."
- Initially, the Hiveblood charm can be obtained simply by walking through Queen Vespa's room. However, the Lifeblood update now requires you to fight the Hive Knight in a previous room. Vespa even received a new dialogue line to reflect the Hive Knight being defeated.
- Our Ghosts Are Different:
- If the Player Character dies, it will spawn a "Shade" on the spot, which is a Living Shadow made out of liquid void, that also shares the upgrades or abilities that the Knight had at the time they died. The player isn't the only one, as a Vessel, since there are thousands of other Vessels who died in the Abyss, but had their shades still lingering in that place. In the endings, they also demonstrate the ability to enter dreams and disappear along with the void.
- Normal bugs also leave ghosts that can only be seen if the player obtains the Dream Nail. Their existence is left ambiguous and so are the exact details of them in general, since some traits can vary depending on the bug (i.e. some are not aware that they already died, and some are not aware of the passage of time). However, all ghosts are stuck where their corpses are located. And since they give essence and disappear when hit with the dream nail, they can be assumed as the deceased bugs' imprints or memories.
- Over 100% Completion: 112% Completion with the four expansion packs. It counts most of the various upgrades, equipment, defeated bosses, as well as optional quests such as the Colosseum of Fools and Pantheons.
- This makes the "100% in 20 hours" and "100% in Steel Soul Mode" achievements much easier to get, as you can choose which 12% to omit; in particular, the Trial of the Fool and White Palace are no longer required.
- Needless to say, this necessitated adding an extra achievement for beating the game with 112%.
- Pain & Gain: "Fury of the Fallen" is the first charm available to you upon starting a new save file. It gives you a 75% increase to the damage of your nail while you only have one mask.
- Parody: The official cover art for The Grimm Troupe content pack is a reference to how the old posters for the 90s era circus shows are made — From the inclusion of the phrase "Team Cherry Presents", all of the text in general, including the features listed at the bottom, the Floating Head Syndrome with some Grimm Troupe members, and especially a film-grain effect on the entire artwork.
- Permanently Missable Content: Nothing critical or necessary for 100% (or 112%) completion can be missed, but there are some little things and interactions that can.
- Once you deposit more than 2550 geo at Millibelle's Bank and sit at a bench or use the Stagways, she will run off with the money to the Pleasure House in the City of Tears. You can slap her around to make her drop the money plus interest, but the banking feature will be lost for the rest of the game.
- In the Abyss, there is a room accessed by having at least 14 lifeblood masks (15 with the Joni's Blessing charm) in the knight's life meter, and said room yields the Lifeblood Core charm before throwing you out and never letting you back in. There is also an arcane egg in there, but if you fail to pick it up before grabbing the charm, you will be unable to go back in and retrieve it.
- There are speakers playing music in the tramways and in a save room in Queen's Gardens. If you break them, you'll find that they, of all things, are background objects that don't respawn.
- For the save room in Queen's Gardens, if you skip the bench unfolding animation by leaving the room, the speaker doesn't even spawn to begin with.
- Collecting the reward for clearing the White Palace sends you out of the dungeon. It couldn't be returned to until The Grimm Troupe update (when people needed to return so they could do the newly added Path of Pain) which would make people miss out on seeing the secret message to the right of the final room or sitting on the king's throne. If you went through the trouble of clearing all that Platform Hell, then you'd better sit on that like a boss.
- If you don't locate the Moss Prophet in the Fungal Wastes before triggering the Infected Crossroads by killing a Dreamer or getting the Moanarch Wings, he and his mossy vagabond audience will be long dead by the time you reach them in the adjacent Queen's Gardens. You'll still get the entry for mossy vagabonds though.
- After beating up the Dung Defender, you can call and interact with him by returning to his boss area. At a certain point, he'll go to sleep in the hidden room below and you won't be able to interact with him anymore. This was later patched in the Lifeblood update, wherein defeating the White Defender five times will cause Ogrim to wake up.
- There are mutually-exclusive charms that can be permanently replaced by another after completing certain criteria.
- The Kingsoul is a 5-notch charm that passively replenishes soul. But once it turns to the Void Heart, it will lose those gameplay benefits.
- The Banishment ending will replace the Grimmchild with the Carefree Melody.
- Ending 1 cannot be seen after you reach the requirements for the other ones. That is, once you obtain the Void Heart charm, Ending 1 will no longer be accessible for that save file since the charm cannot be removed and it overwrites the default ending with Ending 2.
- If you go for the Banishment ending during the Grimm Troupe storyline before you upgrade all your fragile charms to their unbreakable versions, you will permanently lose the opportunity to do so, since Divine will disappear with the rest. Fortunately, if Divine has eaten any fragile charms before you had the chance to upgrade them, she'll leave them behind, so you don't lose those, at least.
- If you don't rescue Zote from the Vengefly King and go on to acquire the Mantis Claw, he will be found dead if the area is revisited, and later interactions with him will be closed off, including the Grey Prince Zote fight. He cannot even be accessed in Godhome!
- After the Nailsmith upgrades the Nail four times, he loses his will to live and asks the player to kill him with the newly perfected Nail. Killing him gives the achievement Purity, but refusing and leaving the area leads to him moving in with Paintmaster Sheo and finding a new calling, giving the achievement Happy Couple
- Physical God: The gods that the various bug factions worship are actually real, and referred to as "Higher Beings." These include The Pale King, a Wyrm who created Hallownest; The White Lady, his queen; Unn, a sluglike Higher Being worshipped by the Mosskin; the Nightmare's Heart, the source of nightmares, worshipped and sustained by the Grimm Troupe; the Radiance, the god of light worshipped by the Moth Tribe (and the source of the Infection); and the Void Entity.
- All of the bosses of Hollow Knight become gods (or at least, are treated as gods) in the Godmaster update. The Knight itself is also a god, in fact, it is the avatar of the Void, the God of Gods.
- Physical, Mystical, Technological: The three ways or methods of quickly travelling across the kingdom: The Stagways (Physical since it employs an actual stag to ferry the passengers), the Dream Gate (Mystical since it creates a quick teleportation effect via the Dream Nail) and the Tramways (Technological since it's a mechanical vehicle)
- Piñata Enemy: The gorgeous husk is very easy to beat and drops 420 geo upon death. Alas, there's only one of him.
- The Pin Is Mightier Than the Sword: Called "charms" in the game, they provide a variety of useful buffs and abilities. They're acquired by various means throughout the game, only a certain amount can be equipped at a time, and getting more Charm Notches lets the player wear more charms at once.
- Planet of Steves: For two friendly NPCs, who share the same name with their two respective groups:
- The one who gave you the Vengeful Spirit spell is identified as the Snail Shaman, whose family is collectively identified as the Snail Shamans.
- You rescue a chained creature in the Royal Waterways who is identified as the Godseeker. Entering her mind with the dream nail reveals that her entire tribe is known as the Godseekers.
- Platform Battle: Many examples, including No Eyes, Flukemarm, Uumuu, and several Grimmkin fights, with the boss fight against the Radiance taking the cake as you have to ascend many platforms in the final phase while dodging attacks. In Godhome, many fights have environmental hazards and floating platforms that the base game fights didn't have, especially in the Ascended and Radiance fights.
- Platform Hell: The game features tough platforming sections every now and then, often in dead ends that contain grubs or some item as a prize. What tops them all is the White Palace, where the game goes full Super Meat Boy with several lengthy sequences of spikes and sawblades. Having the Hiveblood charm (or a combination of Grubsong and Deep Focus) is practically mandatory in there. The Grimm Troupe update turns this up to eleven with another segment in there called the "Path of Pain", which has even less breathing space and encourages you to be constantly on the move.
- Playable Epilogue: You can still resume your save file from your last bench even after you've watched the ending credits, with the only in-game change being that the Final Boss(es) are added to the Hunter's Journal. This trope is somewhat invoked as the ability to know your completion percentage will only be granted inside the corridor before the final boss fight. There's also a justification, since the major expansion packs were added post-launch, allowing players to try the newly-added content without starting over from scratch.
- Playing the Heart Strings: The game uses a strings-focused Dark Reprise of its main theme during the final phase of the battle with the eponymous Hollow Knight. This arrangement is also used for the aptly-named Path of Pain added with the Grimm Troupe expansion.
- Please Wake Up: Dream Nailing the Maggots holding a wake for the False Knight after you kill him will show that they're begging for him to wake up and defend them again.
- Maggot: "Wake up, brother! Help me!"
- Post-Defeat Explosion Chain: When defeated, Infected bosses spasm and release a lengthy screen-wide burst of orange Infection gas before dropping dead, while Warrior Dreams explode in a similar burst of Essence particles. Living, non-Infected bosses instead just flinch or stagger and then concede defeat; the exception here is Dung Defender, who has an explosion effect similar to Infected bosses' but composed of brown... gas... instead.
- Posthumous Character:
- The king of Hallowest was a reclusive bug and nobody knows what became of him, but his influence lingers on. You come to find that the infection is a sad consequence of him overthrowing Radiance and that he imposed countless sacrifices on others in his attempt to seal the goddess away for good. But it was all for nothing. The Hollow Knight couldn't contain Radiance's will and the kingdom crumbled anyway. Eventually, you finally find the king seemingly lying dead on his throne, with the dream nail dialogue of "no cost too great".
- It is said that the king had five elite knights under his command, but few people in the setting remember who they were. Ogrim, the Dung Defender, is the single one found still alive and well after all this time. His White Defender fight suggests that another knight is alive: Ze'mer, the Grey Mourner. She will hint at her being one of the five great knights when she is visited after acquiring the king's brand.
- Power Floats: Even if they do not have wings, some beings can levitate via unnatural means:
- The Soul Master can levitate above the ground, forcing the Knight to jump to hit him. Unlike winged bugs that fly, the Soul Master floats thanks to his arcane powers. His underclassmen, the Soul Twisters (and the Volt Twisters in the Colosseum of Fools) can also do this due to the same arcane powers.
- All Warrior Dreams, and even Revek can float because they are combative ghosts.
- Grimm and the Grimmkins can also float at will, which also overlaps with their Teleport Spam tendencies (they can teleport even in mid-air just like the combative ghosts).
- Power-Up Letdown: Out of the three Nail Arts the Knight can learn, the Dash Slash is probably the least useful, as it does the same amount of damage as Great Slash, can only be used in the middle of a dash which makes it easy to run into enemies when trying to pull it off before obtaining Shade Cloak or when it's on cooldown, and it's the only Nail Art that costs you Geo to learn.
- Power-Up Magnet: When equipped, the Gathering Swarm badge produces a swarm of tiny insects that follow the Knight around and automatically collect dropped Geo. In addition to acting as a timesaver, this is very useful for retrieving Geo that falls into spike pits, where it can't otherwise be retrieved.
- Pretty Butterflies: There are blue butterfly-shaped plants near some Lifeblood Cocoons. In larger Lifeblood rooms such as in the Howling Cliffs, there are plenty of live blue butterflies flying in the background.
- Product Delivery Ordeal: In one side quest, the Grey Mourner asks you to deposit a Delicate Flower on a grave in the Queen's Gardens, all the way on the opposite side of the map. The flower is in fact so delicate, it gets destroyed if you take any damage on your route. Fortunately, despite the Grey Mourner's description of the flower as unique and irreplaceable, you can go back to her to get a new flower as many times as needed to finish the quest.
- Production Foreshadowing: The Weaversong Charm's item description pretty much spoils the sequel's title of Silksong, as well as a build-up of that game's hinted plot—There are Weavers outside of Hallownest, and the Kingdom of Pharloom surprisingly contains a lot of references to their race, such as the abundance of silk and sound.Silken charm containing a song of farewell, left by the Weavers who departed Hallownest for their old home.
- Proud Hunter Race: It's implied that the species of the Hunter is this. He states that when he was young, he and his siblings hunted each other in the nest, and that he hunts only for his own sake, believing this to be the nature of the hunt.
- "Psycho" Strings: The Deepnest ambience mainly consists of atonal violin squeaks. The Forgotten Crossroads/Deepnest Battle Theme Music also uses this.
- Pulling Themselves Together: Wingsmoulds are indestructible and only serve as platforming tools. That being said, striking them will briefly shatter their shells and spill void, but they will revert to their normal state in just a few seconds.
- Purple Prose: Many Lore Tablets are written in an elaborate and fancy manner.
- Rare Random Drop: Essence can be obtained from killing regular enemies, but with a measly 0.33% chance of dropping. The chance increases if you equip the Dream Wielder or if you've spent more essence warping to a Dreamgate than you've earned through random drops, up to a maximum chance of 2.5%.
- Recurring Riff:
- "Hollow Knight", the theme played at the main menu has multiple renditions and its tune often gets reused in the bosses' soundtracks, such as in "Sealed Vessel".
- This treatment is also applied to the White Lady's theme, being reused in the White Palace background music, the Resting Grounds leitmotif, and the Boss Remixes of Hornet and the Dung Defender. It also plays over the "Elegy for Hallownest" epigraph at the start of the game. It's probably the Pale King's theme.
- Many stages reuse the rhythm or tune of other background music. One of which is the theme of Dirtmouth which is heard in the Greenpath track, and the Boss Remixes of the "Decisive Battle" track (used by multiple bosses), its own distorted version in The Collector's boss fight, and an accordion version played by Nymm.
- "Hollow Knight"
- Required Party Member: The Grimmchild is needed to highlight the Nightmare flames on the map and make the Grimmkins appear. There is also a subversion as the Grimmchild is required to start the boss fight with Grimm, and to enter his dream and challenge his Nightmare King version. But in both boss fights, the Grimmchild won't spawn despite being mandatory.
- Respawning Enemies: Minor enemies always respawn after leaving a room. Tougher ones only respawn after you rest at a bench.
- Rhymes on a Dime: Whoever wrote the Riddle Tablet. The lines make up a perfect rhyming poem.
- Right Hand Versus Left Hand: In the Journal entry for Nightmare King Grimm, the Seer states that the dream world used to be one, until it got split and separated from the nightmare world. You can tell the connection since Grimm's been producing a similar sprite of the essence, but is colored red instead. The catch is, while the Seer herself noted the nightmare realm's origins, Grimm never makes mentions of the moth tribe nor the Radiance, who are the key figures in the original dream world.
- Rise to the Challenge: A heroic version in the True Final Boss battle — when the Radiance is on her last legs, the shades of other vessels form a cloud of darkness that rises up with the player. Falling into it causes the knight to take damage and respawn.
- Robbing the Dead:
- You pick up Wanderer's Journals from... well, the corpses of dead wandering husks.
- You obtain the Mothwing cloak from a dead vessel in Greenpath.
- You obtain Joni's Blessing from Joni's corpse. His ghost may appear, but he will not begrudge you for the act since he became an amnesiac.
- According to the Hunter, the Husk Guards steal weapons from the remains of other creatures.
- Royal Blood: The Pale King's children were revealed to be the Vessels (including the playable Knight, the Broken Vessel, and the Hollow Knight), the other Siblings dumped into the Abyss, and Hornet, a half-sibling resulting from the Pale King and Herrah the Beast.
- RPG Elements: Geo is used to purchase upgrades and key items, and charms are switchable and can change the way the Knight plays by giving them additional properties.
- Rule of Three: Not quite to Arc Number extremes, but triads appear quite a bit over the course of the game.
- Three main characters (the Knight, Hornet, and the Hollow Knight)
- Three Dreamers (Harrah, Monomon, and Lurien)
- Three known vessels (the Knight, the Broken Vessel, and the Hollow Knight. However, Nosk's buildup may hint at more.)
- Three known rulers of Hallownest (the Pale King, the White Lady, and the Radiance)
- Three mantis lords (though a fourth was corrupted by the infection and was banished to the Queen's Gardens)
- Three unlockable spells (Vengeful Spirit/Shade Soul, Desolate Dive/Descending Dark, and Howling Wraiths/Abyss Shriek)
- Three Nailmasters (Oro, Mato, and Sheo). Each of them also represent one of the three Nail Arts that the Knight can learn.
- Three tiers in the Colosseum of Fools (Trial of the Warrior, Trial of the Conqueror, and Trial of the Fool)
- Most music that involves the main motif or motifs of major characters is set in 3/4 or 6/8 time.
- The Weaversong Charm summons 3 weaverlings that deal 3 damage per hit. When combined with Grubsong, these weaverlings give 3 Soul for the Knight whenever they damage enemies.
- The "Ritual" path of Grimm's quest requires giving three flames to the Grimmchild three times each.
- Sanity Slippage:
- Early on, you meet a miner singing to herself next to the Crystal Peak entrance. The further you go into the game, the more the poor girl loses her mind to the infection, until she becomes a regular husk miner like the ones trapped deep inside Crystal Peak.
- In a subversion, there are a couple of NPCs who are on the verge of losing their minds when you meet them, but they come to their senses and go back home when talked to.
- Save Scumming: The game keeps all of your progress when you quit to the menu and respawns you at the last-used bench when the file is loaded. The player can easily use this tactic to avoid risky situations, especially on low health so as to prevent death and lose all geo to a shade. Only have one mask left? Having trouble with a boss battle but need to return quickly to gather more items? Just reload your save file. However, there is a minor disadvantage, as your soul gauge will be depleted when you load a file. Some plot dialogues with NPCs (like Hornet in the Abyss) and cutscenes that are normally triggered via Backtracking may also be skipped entirely if you use this tactic.
- It is also a common trick used by speedrunners, since it saves a lot of time when you can just teleport to the last-used bench instead of manually backtracking your way back to it.
- This can also help the player to cheese the Steel Soul Mode.
- Scarred Equipment: Most official promotional artworks of some characters like the Knight depict their nail weapons in their old, cracked forms. This is then visible in the actual in-game sprites of the bosses, such as the Watcher Knights and the Hollow Knight.
- Scenery as You Go: The Dream World, where blocks and platforms rise up as you approach a ledge, and fall again once you run farther from the ledge.
- Sealed Evil in a Can: The infection is contained by a vessel that itself is canned inside the Black Egg Temple just below Dirtmouth town. The Seer eventually reveals that Radiance was the original deity of the locals. The infection is how it manifests itself after being sealed for so long by the Pale King.
- Sequence Breaking: Though the game starts out fairly linearly, it becomes fairly non-linear once the player has acquired the Mothwing Cloak and Mantis Claw, which are the basic mobility tools used in almost every area. However, there is still a loosely intended order that players are meant to go through, but Team Cherry purposely designed a number of sequence breaks to get into areas without the intended abilities, most of which involve hidden paths and breakable walls/floors. There are also a number of exploits or glitches that can be used to skip through areas, which were discovered but left in the game for advanced players to use in their speedrun attempts.
- It's intended for the player to have the Desolate Dive ability from the Soul Sanctum before going to Crystal Peak, but purchasing the Lumafly Lantern allows players to access it without ever visiting the Soul Sanctum.
- You are expected to explore the City of Tears and get at least one nail upgrade before defeating the Mantis Lords, due to their Beef Gate status. However, it's entirely possible to defeat them with the Old Nail via Cherry Tapping or to go around them in the Fungal Wastes entirely, which will allow you to access Deepnest and the adjacent areas before even going near the city.
- It's intended that the Knight travels through Greenpath before eventually finding where it met Hornet near the entrance and fighting her, but careful use of the Vengeful Spirit spell's small amount of knockback can get the knight up to the ledge where she first appears, cutting out most of Greenpath.
- There's an intentional skip to reach the Watcher's Tower early (ordinarily, it's restricted until players have the monarch wings to Double Jump with) by pogo-jumping off a statue with a nail hit.
- The Queen's Gardens are intended to be reached after gaining the ability to swim in acid, but careful use of the Crystal Heart super dash can thread between the acid and vines that would ordinarily kill a player; this was originally due to an oversight, but was left in the game after it was discovered by speedrunners.
- Normally, the Stag Nest in Howling Cliffs can only be accessed if the player has located all the Stag Stations. But with careful use of the wall jump, dash and double jump abilities, the player can draw a Vengefly near a wall to be used as a platform using a downward slash, then climbing up the ledge that leads to the Nest, as demonstrated in this video.
- Sequential Boss:
- Soul Master has two stages, and one heck of a fake-out between them.
- There are three Mantis Lords. You fight the first alone and then the other two at once.
- The Watcher Knights are also fought in pairs. Six large rolling beetles in total. You can insta-kill one before the fight by dropping a chandelier from the hidden room above.
- To obtain the best ending, you must fight the Hollow Knight and Radiance back-to-back, and the latter one has 5 phases in total.
- Shield Bash: Made possible via the Dreamshield, used by the playable character, and a boss:
- With the Dreamshield charm, the Knight can do it passively as the shield orbits around them, damaging enemies upon contact. Or, the player can also actively invoke this trope, since performing Nail attacks makes the Dreamshield bash outward.
- Markoth's Dreamshield orbits around him, damaging the Knight on contact. As the fight goes on, he can summon another copy and accelerate the speed of both shields.
- Sewing Needle Sword: The bugs of Hallownest mainly use nails as weapons, including variants such as claymore-like greatnails or spear-like longnails. Most examples are this in name only, as they resemble swords and spears far more than any real nail, but Hornet's own weapon is much more visibly a needle and thread, with a long strand of silk attached to its eye to allow her to pull it back to herself after throwing it at foes.
- Shield-Bearing Mook: Some enemies like the Husk Warriors and Great Husk Sentries, are equipped with shields to block your nail attacks.
- Shop Fodder:
- The various relics of Hallownest's past which the player can discover during their journey. Their only purpose is to be sold to an antiquity collector for geo; since they're historic artifacts of strictly academic value, they're essentially useless to the Knight but very valuable to a scholar and collector like Lemm. Since you lose all your geo if you die without killing your shade from your previous death, but collected items are always kept between deaths, they can be pretty useful for making up for such a mistake.
- In Steel Soul mode, where permadeath is in effect, rancid eggs become this, as Confessor Jiji is replaced by another NPC, Steel Soul Jinn, who offers to buy any rancid egg you show her. On the downside, this means Tuk, who normally sells you rancid eggs, had to be killed by the infection to balance things out.
- Shown Their Work: Many NPCs and enemies who look like bugs are obviously based on some real-life bug species, even if they are already near extinction, such as Willoh being based on a Giraffe Weevil. However, there are also subverted cases when it comes to characters with bug-based names not matching their actual species, like the Last Stag (who is actually a rhinoceros beetle) and Hornet (who is actually some sort of a spider based on her backstory).
- Sidequest: Being non-linear enough, you can interact with certain NPCs or objects that would provide you with rare items and upgrades for character progression, achievements, or unlockable title screens and endings. The Hidden Dreams, The Grimm Troupe, and Godmaster expansion packs also add more things to do apart from the main storyline.
- Sidetrack Bonus: As expected for a Metroidvania, wherein most secrets and hidden items are found from paths that stray away from the default route (In this game, the default route is the part of the map that is readily drawn by Cornifer when you've just bought a map from him).
- Slaying Mantis: There is a whole village of mantis warriors who have survived the plague that befell Hallownest. They will become peaceful towards you once you beat their lords in a duel. There is also a group of exiled, infected mantises living in the Queen's Gardens.
- Sliding Scale of Idealism Versus Cynicism: You'd be forgiven for thinking that Hollow Knight is on the cynical end of the scale, what with its bleak landscape, depressing atmosphere, and incredulous amount of ambiguity and fear (the world-building has been compared to Dark Souls many times), it seems like a shoe-in for a cynical game. You'd also be wrong: the game is surprisingly idealistic, with most of the non-aggressive NPCs being rather friendly with the Player, and quite a few of them actually care a lot about the Knight's health and safety. There's also the fact that there's plenty of Video Game Caring Potential, with the ability to help numerous characters with their problems, and they are (almost) always grateful for it. It all culminates in the game's true ending, where everyone who was taken over by The Corruption is freed and the bugs of Hallownest can finally live normal lives, with the lost souls of the abyss being able to rest in peace. The cost: The Hollow Knight sacrifices their life to make it a reality. This is foreshadowed by The Pale King.The Pale King: No cost too great.
- Sliding Scale of Linearity vs. Openness: Level 4 variant. Hollow Knight is a metroidvania in which some areas are locked until you have certain spells, artifacts, or charms. However, many areas can be reached through other less obvious methods, ranging from hidden paths to Sequence Breaking skips. You can defeat the final boss without exploring the entire game, the Hive especially.
- Sliding Scale of Parent-Shaming in Fiction: Type 3 variant. The Pale King and White Lady were King and Queen of Hallownest, with the Pale King ousting the previous ruler of bugkind in Hallownest, the Radiance, by essentially replacing her as the object of worship and physical God of Hallownest. The Radiance, enraged at being forgotten, forced her way into the dreams of the populace, and her rage manifested as a malignant infection that drives the infected mad and aggressive. Seeing this threat to his kingdom, and unable to find a solution, the Pale King became desperate and decided on a cruel plan—killing thousands of his own children to have them reanimated with Void as Vessels, which could then contain and seal the Radiance. The exact details of what he did are not known; however, from context clues in the game, it is likely that the Queen spread her "seeds" or left her eggs in the Abyss. Their spawn then died in the Abyss, and Shades from the Void became infused into their dead shells, taking their shape and purpose and becoming Vessels. These Vessels then competed with each other to crawl out of the Abyss by instinctively going towards the only source of light at the top of the Abyss drop. This light may have been from the Pale King himself, standing at the top of the Abyss and watching as the Vessels struggled towards him. The Vessels that failed to make it to the top fell down to the bottom of the Abyss, their shells cracking on impact and releasing their Shades, but now with no shells to give them purpose. This continued until the entire base of the Abyss is literally covered in thousands of broken bugshells, with aggressive lost Shades occasionally forming and dissipating. After getting the 'perfect' Vessel he wanted, the Pale King sealed the 'refuse and regret' away and refused to return to the Abyss or face those remaining Vessels ever again. Both parents were not entirely heartless, the Pale King was more of a Well-Intentioned Extremist and felt remorse but reasoned there "was no cost too great" in sacrificing his spawn for the sake of preserving the Kingdom and his subjects. The White Lady felt great shame for her part in the Vessel's creation, and despite her "voracious desire" to keep breeding, had herself physically bound to prevent herself from ever birthing more spawn as a kind of penance. Ironically, however, it is because the King was not entirely heartless and bonded with the original Hollow Knight and tarnished it with an "idea instilled" that doomed the plan, making all the sacrifices pointless.
- Smash to Black: The Godmaster endings end in this manner when the Hollow Knight wakes up and faces Hornet outside of the Black Egg Temple.
- Soft Water: As the Knight doesn't take fall damage, non-acidic water is absolutely safe no matter how high you fall from. Justified as given the scale of the game even the greatest possible fall is a couple of feet at most.
- Some Dexterity Required: While basic attacks can be easily performed due to the tight, default controls, Nail Arts on the other hand require more skill. You have to hold the attack button, but in the midst of a fight, you have to avoid taking damage as it can prematurely cancel the Nail Art, so you have to take into consideration the dodge and movement controls as well.
- Somewhere, an Entomologist Is Crying: In order to fit its stylization and narrative, the game portrayed some of the bugs used as inspiration with Artistic License, changing behaviors and other characteristics to better fit the story:
- The Mantis Tribe is portrayed as a village of ancient warriors with an honorable and strong sense of community. While they are indeed well-known for their hunting abilities, mantises in real life are mostly pretty solitary animals, only gathering to reproduce. Furthermore, the journal states that Mantis youth lose the ability to fly as they grow, while in real life mantises retain their wings throughout adulthood after developing them.
- Leg Eater is a reserved termite who gets enamored by the termite queen Divine, and when he sets off to meet her, it is heavily implied that he gets eaten by her. However, there is no sexual cannibalism among termites in real life. In fact, unlike ants, the termite queen and king form a monogamous lifelong pair.
- After the fly mini-boss Gruz Mother dies, a swarm of baby Gruzzers bursts out of her body. However, in reality, flies reproduce by laying eggs that hatch into maggots, which then must go through a pupal stage before transforming into adult flying insects. While there are viviparous flies that give live birth to maggots, such as the Tsetse fly, even then the offspring still cannot fly immediately like in the game.
- Songs in the Key of Panic: The game adds an Orchestral Bombing overlay to a dungeon's BGM in tense situations such as Multi-Mook Melee events or certain boss battles.
- Sound of Darkness: Zig-zagged; Creatures of the void make audible splashing and lashing noises when attacking, particularly with Soul, due to Void being a viscous fluid. However, when creatures born of the void try to vocalize, it has the characteristic of taking sound away from the environment.
- Sound of No Damage: When you hit something with your nail and the sound goes "tink", that target is invulnerable and you will be knocked back a little bit. If this sound doesn't play when you strike a wall, it means that the wall can be broken down, leading to a secret passage.
- Spiders Are Scary:
- The savage bugs of Deepnest are mostly variants of spiders.
- Hornet, despite her name, uses Razor Floss skills to attack and get around. You later find out her mother is Herrah the Beast, a member of the spider tribe. Also a subversion since Hornet is one of the good bugs.
- Spikes of Doom:
- Common environmental traps in the platforming sections. There are two variants of spiked floors — metallic spikes/shards that you can bounce off from using your nail, and large vines that you cannot bounce off from.
- Crystal Hunters can also temporarily create spiked crystals once their shard projectiles hit a solid object.
- Spin Attack:
- The Knight can learn a horizontal spinning blade attack called "Cyclone Slash" from Nailmaster Mato. The latter also exclusively uses it as his Signature Move during his Godhome boss fight.
- Great Nailsage Sly has some spinning moves, both vertical and horizontal, during his Godhome boss fight. This also includes a larger variant of the "Cyclone Slash" that Sly taught his student Mato.
- Splash of Color: Somewhat downplayed—although the aesthetic of the game is not truly monochrome, about half of the various environments of Hallownest have a heavily-limited, muted color palette of blues and grays, contrasted by the blindingly-bright orange of the Infection. The contrast is especially jarring after the Crossroads become overrun with the Infection in the back half of the game.
- Spread Shot:
- Flukenest converts the Vengeful Spirit spell into a short-ranged barrage of multiple flukes.
- Many ranged enemies that you can encounter late-game have this kind of attack, notably the Primal Aspids having nearly-accurate 3-way projectiles.
- Stat Overflow:
- Lifeblood Cocoons are scattered throughout the map, each one dropping two or three Lifeseeds when burst. Killing each Lifeseed grants an extra Mask of health above the normal maximum, but these cannot be healed after taking damage.
- Lifeblood can also be applied with the charms Lifeblood Heart and Lifeblood Core, or you can replace your entire health bar with an extended one made entirely of Lifeblood with Joni's Blessing.
- Stationary Enemy: Several enemies, in mainly two types:
- Grounded in one place and they cannot be moved not even by the knockback from the player character's weapon: Fool Eaters, Gulkas, Sporgs, Bluggsacs and Mawlurks.
- Charged Lumaflies and Wingmoulds are also immobile and float in the air in one place, and they are Invincible Minor Minions, with the latter even being used for puzzles, which require bouncing on them by striking them while they are below the player, so that the player could bounce off them before they split into pieces and get reassembled.
- Stealth Pun:
- The Hive Knight is a bee warrior who fights using a sharp, thin needle-like weapon. What's the connection? Because it stings!
- Hornet's weapon is explicitly labeled as a needle, and it is attached with silk at the endpoint via a small hole. This makes it literally a weaponized sewing needle. Quite a clever decision from Team Cherry as well, if you also count the fact that Hornet is born from a spider, and spiders like to "sew" their webs.
- Stop Poking Me!: Some characters can sense the Dream Nail's intrusion and are either amused or annoyed at you trying to read their minds.
- Story Breadcrumbs:
- Talking to NPCs and reading their minds, as well as using the Dream Nail on certain objects, will reveal several interesting details about the setting and the origins of the king and the infection. Of course, everyone who's not overly cryptic about it either is very hidden or will only spill the beans if you interact with them in some specific way.
- Various texts and lore tablets can also be found and interacted with. They are indicated via the "Inspect" prompt.
- The Relics, which Remm collects and deciphers additional lore from.
- Straight Gay: After crafting the pure nail, the Nailsmith will beg you to cut him down, as he has nothing left to live for. If you refuse, he will instead leave his home, meeting and moving in with Nailmaster Sheo. Although none of their dialogue together is explicitly romantic, the achievement you get for doing this perhaps indicates a romantic relationship: "Happy Couple".
- Stupidity Is the Only Option: In the Distant Village area of Deepnest, everywhere seems to webbed up by spiders. There are piles of corpses webbed up with spiders, and the Dream Nail reveals their last thoughts were of a surprise betrayal. Then you come upon a bench, surrounded by very odd-looking characters who just keep repeating the same few words, telling you they're your friends and urging you to rest. Falling for the Schmuck Bait is the easiest way to get to a monster's lair. The only other method involves destroying a false ceiling high in the air.
- Super Drowning Skills:
- Suspicious Videogame Generosity:
- An example that flies by the head of most first-timers is that they can actually use the Dream Nail on the sleeping watcher knights until the soul gauge is full, giving the player an advantage before the fight. The fight doesn't begin until the second gate at the other end of the room is triggered too close by getting near the doorway. There's a reason for this, as you get to fight a minimum of five watcher knights in the same room in order to proceed.
- Soul Totems are mostly placed near areas where you would definitely consume soul — whether it be on tricky platforming segments, before boss fights, or near delicate floors that must be broken using Desolate Dive/Descending Dark.
- Sword Lines: There is a white trail for the melee attacks of bugs who use bladed weapons.
- Sword of Plot Advancement: Getting the Dream Nail is mandatory to complete the game and to get the true ending.
- Takes One to Kill One: Only a Vessel could enter the Black Egg Temple and fight another Vessel inside it, according to Hornet, as that place is built to contain Vessels, while other entities could risk themselves entering. This is subverted in the end, as Hornet does manage to enter and give assistance.
- Tears from a Stone: Although subtle, it is invoked. After examining the statue of the Hollow Knight in the City of Tears, raindrops slowly drip in its head, following a visible tear dropping out from the statue's eye, making it look like the statue is crying.
- Tears of Blood: Black liquid drips from the eyeholes of some scattered corpses and even ghosts like No Eyes.
- Temporary Platform: Comes in three variants:
- Sections of ground that crumble upon stepping on them, giving the player a split second to step away before they collapse.
- The Queen's Gardens are littered with hinged platforms that swing down like trapdoors a moment after landing on them.
- Crystal Peak has a variant with crystal Spikes of Doom on the bottom that flips around when stepped on.
- Tenuously Connected Flavor Text: The Hunter's Journal ostensibly gives information on each of the game's enemies, but some of the entries are more along the lines of philosophical musings, or glimpses into the character of the Hunter himself. For example, the entry for Siblings talks more about the location they are found in, The Abyss:Hunter's Journal: Far down below us, beneath the kingdom, the air grows stiller and a sense of emptiness pervades. Can life flourish down there? If so, I will hunt it.
- Theme-and-Variations Soundtrack: Most songs incorporate variations of the title screen, Greenpath, or White Lady motifs.
- The Goomba:
- Crawlids and Tiktiks are slow, small, and don't actively pursue the Knight. Even with just one nail upgrade, they can die in one hit. The former is also the first enemy type that you encounter in King's Pass.
- Uoma are small jellyfish that do nothing but serve as platforming obstacles. They can be found in almost every room of the Fog Canyon.
- The Stinger: Completing Mister Mushroom's sidequest rewards you with a post-credits cutscene of him flying over Dirtmouth, followed by "To Be Continued" text, hinting at his possible return in future games.
- The Unintelligible:
- Mister Mushroom speaks in a scrambled language when you talk to him, but you can only understand what he's saying if you equip the Spore Shroom charm.
- Monomon's writings in the Teacher's Archives are mostly incomprehensible, except for some actual words that are occasionally inserted between them.
- Thick-Line Animation: The game's artstyle makes use of this for the bug characters.
- Tiny Guy, Huge Girl:
- Iselda towers over her husband Cornifer and most other NPCs, to the point where Elderbug expresses concern about whether the doorway to her house is tall enough for her to get in and out comfortably.
- If the implications about the White Lady being the Queen of Hallownest are true. She is enormous compared to the Pale King, who is relatively normal-sized.
- Tiny-Headed Behemoth: The Husk Guards have relatively smaller heads compared to their giant bodies.
- Title Drop: Not counting the Boss Subtitles at the final boss fight, the very first instance of "Hollow Knight" being mentioned in-story happens when you examine the monument in the City of Tears.
- Title In: The area's name gets shown in the center of the screen the first time you visit it. Subsequent visits would place it on the corner instead.
- Toilet Humor: The Dung Defender, true to his name, defends an enormous cavern filled with dung. His attacks all involve him swimming through it and/or hurling giant balls of it at you. On defeat, he "explodes" like most bosses, but rather than falling apart or simply disappearing, he gets flung into the background where he slowly sinks, face first, into his own... home, legs wiggling as he does. To top things off, the charm he drops makes the knight emit an aura of toxic brown gas.
- Certain NPCs will remark on the charm's smell. Most of them react poorly to it, but Leg Eater likes it enough to give you a discount, Dung Defender himself thinks it's the smell of justice, and the White Lady remembers the "potent smell" of her knight Ogrim, the Dung Defender.
- Training Dummy: Near Oro's house, there is an impaled Great Hopper corpse dressed with a Nailmaster outfit that acts like a dummy. Using the Dream Nail hints that Oro used it to train. Attacking it 25 times will cause two hostile Great Hoppers to fall from the ceiling. Resting in a bench allows the player to repeat this interaction with the dummy.
- Troperiffic:
- When you hear the word "Kingdom", it may mean one of two things: A place, or a group of people. But Hollow Knight uses both to the point that they are interchangeable in the narrative. The game exists in only one kingdom, takes liberties with the Metroidvania genre of exploration, and some character tropes that apply to a collective. As a result, Level Design or Setting tropes and many all-encompassing Characterization Tropes are everywhere, hence why the Kingdom of Hallownest as a whole has its own trope page here.
- For the After the End trope and all others that deal about an apocalypse and how it affects a place (e.g. ruining a kingdom), how it affects people (e.g. destroying their individual will), or how it affects time (e.g. if it gets recorded in history yet still affects the current events).
- Tropes about boss fights are abundant here as well; Boss Rush, Boss Game, Flunky Boss, Degraded Boss, Boss in Mook Clothing, Boss Subtitles, Contractual Boss Immunity, Optional Boss, Bullfight Boss, Dual Boss, Early-Bird Boss, Boss Remix, etc... There's too many too list, that it was just better to have a character page for the Hollow Knight bosses as seen here.
- A majority of Zote's Precepts are basically just discussing, lampshading, invoking, or defying some tropes and common knowledge, but passing them as if they're valuable life lessons.
- Truck Driver's Gear Change: The City of Tears theme shifts down a minor third in the last section of its loop, though only in-game and not on the OST.
- Two Halves Make a Plot: In order to unlock the path to the true ending, the knight must obtain the Kingsoul, a legendary Dismantled MacGuffin charm that symbolizes a "union between higher beings". The first half is obtained from the White Lady in the Queen's Gardens after some difficult platforming and a tough boss battle, and the second half is found in the White Palace inside the dream realm, after an even tougher platforming challenge than any that came before.
- Underground Monkey:
- Crawlids and Tiktiks are similar in size and appearance, but the latter has the ability to climb on walls and ceilings.
- Volatile Mosskin look very similar to regular Mosskin, but regularly emit Deadly Gas and explode after death.
- Fungified Husks, which as their name implies look like fungus-covered Wandering Husks, behave the same as Volatile Mosskin, except their Deadly Gas cloud is quicker to trigger and covers a larger area.
- Aspid Hunters are the standard of their species, Aspid Mothers periodically spawn Aspid Hatchlings at the player, and Primal Aspids are the Elite Mook variant, widely maligned for their three-way projectile attack that is irritatingly difficult to dodge.
- Bosses that leave a corpse can be Dream Nailed to fight an upgraded version with a different name, e.g. False Knight->Failed Champion, Soul Master->Soul Tyrant, and Broken Vessel->Lost Kin.
- The Infected version of the Forgotten Crossroads replaces Vengeflies, Gruzzers, Wandering Husks, and Leaping Husks with Furious Vengeflies, Volatile Gruzzers, Violent Husks, and Slobbering Husks, the first two of which go Action Bomb when killed, the third of which kamikaze charge the player before exploding, and the last of which has a Spread Shot Zombie Puke Attack.
- Crystallized Husks are crystal-encrusted Husk Miners armed with Frickin' Laser Beams.
- Volt Twisters, only encountered during the Trial of the Fool, are recolored and slightly redrawn Soul Twisters with lightning-based attacks.
- The Colosseum of Fools also has Sharp Baldurs, Armored Squits, Battle Obbles, and Death Loodles, which are spikier and more heavily armored than their main game counterparts.
- Mantis Traitors and Mantis Petras are upgraded versions of the Mantis Warriors and Mantis Youths, respectively; the former using a dive attack in addition to their Deadly Lunge, the latter throwing scythes similar to those of the Mantis Lords.
- The penultimate boss of Godmaster's questline is the Pure Vessel, an uncorrupted and therefore much stronger Palette Swap of the eponymous Hollow Knight with a new arsenal of attacks that deal twice the damage.
- Undying Loyalty: In Lurien the Watcher's chambers, there's a single infected husk marked as the Watchers_Buttler in the files. Dreamnailing him will have him promise to watch over his master as he sleeps. Tellingly, he has not attacked Lurien, despite being infected and in a prime position to do so.
- Unexpected Gameplay Change: Hollow Knight is chiefly a combat-focused platforming Metroidvania up until the White Palace (and by extension the Path of Pain), which consists of a series of Platform Hell gauntlets in the style of I Wanna Be the Guy, Super Meat Boy, et al.
- Unlockable Difficulty Levels:
- In the Hall of Gods, each boss has three difficulty levels. The first two start out unlocked, but Ascended difficulty must be beaten to unlock the Radiant difficulty.
- Steel Soul mode is unlocked by completing the game on the normal mode.
- Unstable Equilibrium: Because the Knight collects Soul by successfully striking enemies, doing well in a fight means you'll have more Soul at your disposal for both combat spells and healing. If you start getting knocked around, though, the lack of Soul can easily spiral into defeat.
- Updated Re-release: The Voidheart Edition is a compiled digital version for the PS4 and Xbox One with all four content packs readily available plus a couple more bug fixes, gameplay balancing, minor visual tweaks, and a new menu screen. The PC and Nintendo Switch versions later received this edition via a free update.
- Variable Mix:
- Most of the regional themes add a heavier orchestral track in action-packed situations. The Queen's Gardens BGM has an especially epic battle variation heard when fighting the Traitor Lord and his flunkies, which unfortunately was left out of the official soundtrack album.
- The City of Tears BGM starts with an oboe melody and piano arpeggio harmony indoors, then adds a One-Woman Wail and church choir outdoors.
- Troupe Master Grimm's battle music gains a metal guitar riff when he Turns Red and unleashes his Pufferfish Bullet Hell attack.
- The main Final Boss theme, "Sealed Vessel", starts out appropriately epic for the first half of the battle, then transitions with a Scare Chord to violin-based Sad Battle Music, which gradually adds back the other instruments as the Hollow Knight's HP dwindles. This second movement plays out in the same manner during the Birthplace flashback and the Path of Pain.
- Video Game Caring Potential:
- The Godmaster expansion added the chance to give Delicate Flowers to more characters with the purpose of lifting up their moods. For example, you can give one to Elderbug (at no risk to the quest itself). It doesn't seemingly unlock anything or give an achievement, but it brightens up the Elder's mood considerably and he holds it from then on.
- You can help some wanderers who are trapped or need to be rescued from nearby monsters, such as Zote and Cloth.
- After getting the Pure Nail, the Nailsmith would have lost his will to live now that he fulfilled his ultimate goal. He asks you to kill him with your nail, but you can refuse by leaving the area. Eventually, he will move to Sheo's hut, finding a new friend and a new hobby of crafting dolls based on the Five Great Knights.
- Video Game Cruelty Potential:
- You can collect essence from harmless ghost NPCs, though they give only a single essence each and it isn't necessary to collect them at all to get the final achievements associated with collecting essence. More than one player has absorbed them by accident while trying to read their minds with the Dream Nail, and in the Spirits' Glade at least, doing so will trigger Revek to constantly attack the knight until it leaves the area. There's also Marissa, a singing ghost in the Pleasure Tower whom you can sit down with and listen to her song, or outright Dream Nail to make her stop singing... permanently.
- Zote will be trapped and killed at a certain point if you don't help him. There's an achievement — "Neglect" — for letting it happen.
- There's also an achievement for killing the Nailsmith at his request after he fully upgrades your nail.
- The mantises from Mantis Village, the bees from the Hive, and the knight's siblings will eventually become friendly towards you in certain conditions, but you can still harm them anytime. They will fight back if you do, but the other mantises will still be friendly even though you just slaughtered their friend. Granted, they're a tribe of born warriors, with battle and killing being integral to their culture, so it makes some sense they would respect your combat superiority and your right to fight anyone at will.
- If you really want to, you can kill the Menderbug, whose only role is to go round behind the scenes and mend all the background objects you keep demolishing.
- You can hit Millibelle in the Pleasure Tower or the False Knight's living mace in the Forgotten Crossroads however many times as you like, or until you hit them to the edge of the screen.
- Video Game Cruelty Punishment:
- If you collect the essence of any of the ghosts in the Glade of Hope, Revek will relentlessly pursue and attack you (dealing two masks of damage per hit) until either you escape from the glade or you die, and he can't be hurt. He's the first ghost you can encounter in the glade and he warns you not to tamper with the graves.
- Land a cheap shot on Grimm while he's bowing politely to you? He screeches like a banshee and retaliates with his ultimate attack, which he normally doesn't start using until about halfway into the battle.
- Villain Teleportation: Multiple bosses are able to teleport, most notably the Soul Master, Troupe Master Grimm and Nightmare King Grimm, the Hollow Knight (to an extent), and The Radiance.
- Wake-Up Call Boss: Hornet Protector. Every enemy in the game so far has been slow-moving and could be beaten by simple button mashing or pattern recognition. The bosses you may have faced thus far (False Knight, Gruz Mother and Massive Moss Charger) are all big, slow and predictable, and are very simple once you learn their patterns. Hornet, by contrast, is barely bigger than the player character, is incredibly fast and hard to predict, and unlike the other bosses you've encountered thus far, you can't skip her, as beating her is a requirement for getting the Mothwing Cloak.
- Warp Whistle: The game has three of these.
- The biggest one is the stagway tunnel system, which takes the player to any of several locations around the map.
- The second are the trams, of which there are only two and which only take the player between two and three locations, respectively. Unlocking them also functions differently: unlocking new stag stations requires tracking down each station and paying a fee to unlock them, whereas riding the tram just requires finding a tram pass.
- The Hidden Dreams update adds the Dreamgate, which lets the player set down a "gate" at their current location and teleport back to it at any time, at a cost of just one essence per trip. This is only a one-way trip though, and unlocking the ability requires at least 900 essence. Can also act as an Escape Rope, though it takes several seconds to use and taking damage interrupts the process.
- Weaponized Offspring:
- Aspid Mothers intentionally give birth to their young hatchlings to deal with nearby intruders.
- Carver hatchers fire out dirtcarvers using their mouths. But even the Hunter is confused if the hatchers are indeed mothers, because the two creatures don't look that much alike.
- Wham Line:
- A line for the Failed Champion reveals that a maggot stole that giant armor while Hegemol was sleeping. This reveals a lot from the False Knight and False Champion boss fights — that a Great Knight now has an Ambiguous Situation on how his armor was stolen by a mere maggot, that Knight's current whereabouts, and that the maggot simply did the act to protect its brothers.Failed Champion: "I wanted it... the strength to protect the others... When I saw that Knight... sleeping... safe in his big armoured shell... It wasn't madness that drove me to it... I just wanted it..."
- Once you defeat Hornet in Kingdom's Edge, she will acknowledge the Knight's strength and will, letting them through the Cast-Off Shell. The wham line comes right after that, revealing the nature of the item she was protecting.Hornet: Then do it, Ghost of Hallownest! Head onward. Burn that mark upon your shell and claim yourself as King.
- This Lore Tablet inscription in the entrance of the Abyss, which reveals that the King ordered the Abyss to be sealed off, while the Player Character is still inside.Higher beings, these words are for you alone. Our pure Vessel has ascended.
Beyond lies only the refuse and regret of its creation. We shall enter that place no longer.
- A line for the Failed Champion reveals that a maggot stole that giant armor while Hegemol was sleeping. This reveals a lot from the False Knight and False Champion boss fights — that a Great Knight now has an Ambiguous Situation on how his armor was stolen by a mere maggot, that Knight's current whereabouts, and that the maggot simply did the act to protect its brothers.
- Wham Shot:
- The Pensieve Flashback scene in the Birthplace. Our Player Character Knight woke up in the bottom of the Abyss, struggling to climb back up the entrance. But as soon as it reaches the topmost ledge, we find out that the King has already chosen a Pure Vessel and seals off the entrance, causing the Knight to fall back down once more.
- The True Final Boss stage is brightly lit and gleaming with sunlight. The knight hops up to the top platform and brandishes its sword in challenge at the sun. The sun accepts and unfurls its wings, revealing it to be a sentient being called the Radiance.
- Where It All Began: The brazier in Howling Cliffs starts off the Grimm Troupe quest. It is also the same place where you have to visit again if you decide to go for the "Banishment" ending.
- Wizard Workshop: The Soul Sanctum, a secluded area high in the spires of the City of Tears where scholarly bugs performed arcane experiments in the nature of the soul, is a complex of opulent rooms filled with bookshelves and vessels full of soul energy.
- Yellow Lightning, Blue Lightning: Electric attacks and sources are colored blue, such as the sparks produced by Uumuu and the Charged Lumaflies.
- Zerg Rush:
- The Hive Knight's summoned Hivelings come in numbers from the ceiling and track down the Knight's current location.
- Some of the Knight's charm-summoned creatures (Hatchlings from Glowing Womb, Weaverlings from Weaversong, Flukenest-enhanced Vengeful Spirit) focus on one target at a time.
No mind to think
No will to break
No voice to cry suffering
Born of God and Void
You shall seal the blinding light that plagues their dreams
You are the vessel
You are the Hollow Knight.