This page details the Enemies and Bosses. Head back through here for other character pages. Unmarked spoilers ahead.
General

The basic enemies of the game. Darksign-branded undead humans who have lost all sense of self and mindlessly kill anyone nearby.
- Action Bomb: A few of the ones in the Cathedral of the Deep will set themselves on fire before charging at you and blowing up.
- Carry a Big Stick: The Lycanthrope Hunters on the Road of Sacrifices carry giant sharpened tree trunks as weapons.
- Elite Mooks: The hollow soldiers in comparison to normal hollows. The Greataxe and Halberd soldiers are even above them and pose a legitimate threat even in later levels.
- Empty Shell: There is nothing left of their original identities.
- The Goomba: They're very basic enemies and go down easily even at the beginning of the game. That said, they can still be very dangerous in groups.
- Our Zombies Are Different: They seem to retain at least a bit of their intelligence despite losing their minds. They're capable of using weapons (albeit not very skillfully) and some are capable of fighting in groups and planning ambushes for you. Also, they hunger for souls, not brains.
- Red Eyes, Take Warning: A few rare Hollows have red glowing eyes and have increased health and higher damage output.
- Zombie Apocalypse: The appearance of the Darksign is more or less what triggers the downfall of most of the world.

Fast, vicious attack dogs who have risen from the dead. Frequently seen with regular hollows.
- Angry Guard Dog: Many seem to guard random locations even when not being directed by human hollows.
- Beast with a Human Face: The versions that show up in Irithyll have exposed human skulls for faces.
- Body Horror: Their bodies are practically falling apart.
- Flash Step: The dogs can occasionally teleport behind you if you run away.
- Fragile Speedster: They move very fast and can dodge around your attacks easily, but almost any attack will knock them down and another will almost assuredly kill them.
- An Ice Person: The ones in Irithyll can inflict Frostbite.
- Underground Monkey: The dogs' moveset and model show up reskinned as a few different enemies, including the more bestial Ghru.
- Unique Enemy: There's exactly one Starved Hound with a maggot-filled belly, which can perform a grab attack on you. It's found on the Road of Sacrifices, and nowhere else.

Large rodents that dwell within the underground areas of Lothric.
- Giant Mook: Almost all rat packs encountered have at least one or two Large Hound Rats with them.
- Non-Indicative Name: They look and behave like previous rat enemies, so the "Hound" in their name may refer to them being as big as dogs.
- Recurring Element: Large rat enemies, a staple of Souls games.
- Respawning Enemies: The rats near the Giant Slave in Irithyll Dungeon will infinitely respawn.
- Rodents of Unusual Size: Rats that come in two sizes: as large as a dog and as large as a bear.
- Swarm of Rats: They are commonly found in packs of several sizes.

Gigantic crystal lizards mutated due to having consumed souls.
- Boss in Mook Clothing: These are the mature forms of the crystal lizards players have gotten used to slaughtering, and have since gained the ability to give and withstand massive damage. They also don't respawn.
- Breath Weapon: They can spit a vapor that causes crystals to erupt from the ground.
- Early-Bird Boss: There's one Ravenous Crystal Lizard located in the very first area of the game, which a sign warns players to avoid. A Boss in Mook Clothing at any other point in the game, this particular one is far beyond what the average player can handle with the stats and equipment they have at that point.
- From Nobody to Nightmare: They started out as the same cute little Crystal Lizards you're used to slaying for their drops. Then they started eating souls and the rest is history.
- Gemstone Assault: Their bodies are studded with crystals, which spring up in the wake of their rolling and breath attacks.
- Rock Monster: It is covered in crystals and Titanite scales.
- Rolling Attack: They can roll towards the Ashen One, leaving a trail of crystals in their wake. Those living in the Cemetery of Ash and Untended Grave can be lured into rolling toward the cliff.

Strange creatures that disguise themselves as treasure chests to lure in prey. When revealed, they prove to be formidable opponents, but slaying them will yield valuable treasures. Two variants can be encountered, one walking upright and the other crawling on all fours.
- Boss in Mook Clothing: They're unique, non-respawning creatures and they can be tough to take down.
- Chest Monster: As usual for the series.
- Eaten Alive: They will bite onto and start chewing you if they grab you (either when you open one up or as a regular attack), which is almost guaranteed to kill you at low levels, and severely damage you otherwise.
- Giggling Villain: They let out a strange, high-pitched giggle when attacking.
- Glamour Failure: Mimics have two defining features that distinguish them from normal chests: The chain on their side is curled towards you rather than away from you, and if one looks carefully enough, they still need to breathe with their lids slightly ajar, heaving up and down gently.
- Hammerspace: Their whole torso and legs comes out of the bottom of the chest when they get up.
- Hurricane Kick: One attack of theirs is a spinning kick that covers a lot of ground. It's rather silly looking.
- Jump Scare: You may open up an unassuming treasure chest only to get eaten alive.
- Lean and Mean: They're twice as tall as you are, owing to their extremely long legs.
- More Teeth than the Osmond Family: They have phalanges for teeth, which they will use to chomp you into pieces should they grab you.
- Recurring Element: Both the upright variants (from the first game) and the crawling variants (from the second game) appear and behave the same.
- Running on All Fours: The Dark Souls II variant of the normal Mimics will turn their mouth upside down and attack the player on all fours, along with spitting and charging attacks.
- Weaksauce Weakness: Although Mimics are some of the most dangerous enemies in the game, players can safely loot their items by using an Undead Hunter Charm on them. This is a Call-Back to previous games' use of Lloyd's Talismans.

They're back! The remnants of Lord Gwyn's knights from the first Age of Fire, the Black Knights were all incinerated to ash when their Lord linked the First Flame. Their suits of armor are all that remain, but they're still every bit as dangerous as they were in their prime.
- Animated Armor: They've been these for untold centuries, ever since their lord Gwyn linked the fire in his era.
- Back for the Finale: They return, with their design mostly unchanged, after being absent from Dark Souls II.
- BFS: The regular Black Knight Sword is pretty damn big on its own, but the Black Knight Greatsword is absolutely gigantic, being almost as tall as you.
- Black Knight: Well duh. However, while they fit the trope aesthetically, they're more like Tragic Monsters in practice.
- Boss in Mook Clothing: They have 1,200 health (same as early bosses like Vordt or the Crystal Sage), hyper-armor on all attacks, are very hard to stagger, and hit like freight trains, often harder than the actual bosses. As shown by hacking, a single Black Knight is capable of defeating mid-game bosses like the Abyss Watchers
 , the Old Demon King, and even Champion Gundyr.note Against an early boss like the Stray Demon, the boss would be lucky to last twenty seconds.
 - Elite Mooks: They reprise this role from the original game. This time, though, they respawn.
- Enemy Civil War: The Black Knights in the Demon Ruins will butcher any of the Ghrus that come near them.
- Fallen Hero: They were once Lord Gwyn's best and most loyal knights, but in the present day they've lost their minds and attack everything on sight.
- Large and in Charge: They're about two feet taller than you.
- Lightning Bruiser: They're faster than they were in the first game, and are absolutely relentless in battle.
- Tin Tyrant: Justified, as they're Animated Armor.
- Unusable Enemy Equipment: Inverted, strangely enough. Though the Black Knight Sword and Black Knight Glaive (formerly Halberd) can be found and used by you, all of the Black Knights in the game use either the Black Knight Greatsword or the Black Knight Greataxe.
Cemetery of Ash

The first boss, a formerly great warrior who succumbed to the Abyss long before the Unkindled had risen.
- Anti-Villain: Item descriptions indicate that Gundyr was fated to be a judge for any Ashen One who set out to save the Age of Fire. If true, this means that he is less of a random enemy, and more of a Fallen Hero who still follows his calling.
- The Corruption: He's infected with the Abyssal Pus Of Man, as evidenced by the black tentacles coming out of his back.
- Empty Shell: Implied. He drops no soul when defeated, because it was claimed by the Ashen One in the Untended Graves during the Age of Dark where Champion Gundyr failed to Link the Flame. What little there is left of him is an empty husk controlled by the Pus of Man.
- Expy: Being an ancient champion waiting to test the worth of a warrior, plus his overall design, brings to mind Old King Doran.
- Gameplay and Story Integration: His halberd is said to be indestructible and sure enough, its transposable version boasts the highest durability of all weapons in the game at 500. The second most durable weapon in the game, by comparison, has a durability of 340.note
- Impaled with Extreme Prejudice: He has the Coiled Sword impaled in him. Removing it from him wakes him up to fight you. He can also do this to you if his grab attack connects: he will lift you up, then impale you with his bardiche, before tossing you away.
- Mythology Gag: His armor resembles Old King Doran from Demon's Souls.
- One-Winged Angel: Once his health is reduced to half, the Pus of Man infecting him burst out to attack you. That said, this form is slower and its attacks are much more telegraphed, making it a case of Clipped-Wing Angel for some players.
- Wake-Up Call Boss: Unlike other first bosses like the Vanguard and Asylum Demon, Gundyr has a very advanced moveset. He's fast, aggressive, and uses combos, so dodging just once before trying to strike back often won't be enough and just staying away from him will provoke one of his deadly leaping attacks. While previous tutorial bosses were there to teach you to play, Gundyr is there to beat you.
- Weapon Specialization: He wields his unique bardiche. The lore on it states that it's made to be virtually indestructible, which meant that Gundyr was always fated to eternal service.
- Worf Had the Flu: While fast and very strong, the Gundyr that you meet at the start of the game is merely an empty shell controlled by an Abyssal essence, and fights like a weaker, slower, clumsier version of his old self. When you meet him in his prime at the Untended Graves, it becomes apparent that the starting level Ashen One wouldn't have made it to the shrine if he was at full strength.
Firelink Shrine

- Assist Character: If you kill him, you can summon him for assistance against Vordt of the Boreal Valley, the Dancer of the Boreal Valley (via Sequence Breaking), and Champion Gundyr.
- Boss in Mook Clothing: For how early he comes in the game (right after the tutorial). He's on par with a late-game Elite Mook, meaning he has the same number of hit points as Iudex Gundyr and higher damage output, on top of being both faster and a smaller target.
- Clothing Damage: According to the description on his clothing set, the reason his clothes are in such bad shape is due to him dodging many swords at once with amazing and masterful skill. The swords barely missed his body but cut into his clothes. However, the description also implies that this is just a story he made up to justify his clothes being in such a state, and also make himself sound more badass.
- Crippling Overspecialization: He is powerful in a sword fight, but he lacks any kind of armor or shield, making him easy to stunlock provided he doesn't do the same to you first. Or you can simply pelt him with arrows or magic from afar, which he has no defense against. Even if you don't do either of these things, his lack of armor allows him relatively easy to beat as soon as you meet him by entering a cycle of baiting his attacks, getting out of range, and striking him.
- Crutch Character: As a summoned NPC. Against Vordt of the Boreal Valley, he'll be more than enough to help you slay him, but he won't fare anywhere as well against Champion Gundyr. Downplayed as he can at least serve as a distraction while you heal.
- Defeat Means Friendship: If you killed him, he becomes a White Phantom and can be summoned for the boss fights against Vordt of the Boreal Valley, Champion Gundyr and if you killed Emma before facing Vordt, the Dancer of the Boreal Valley.
- Disc-One Nuke: His weapon, the Uchigatana, is an exceptionally powerful starting weapon. And if you decided to kill Emma and face the Dancer of the Boreal Valley, both the Uchigatana and the Sword Master himself can become handy for dishing out bleed damage against the dancer provided you can keep him alive in the boss fight (such as wearing Skull Ring to allure the dancer to you).
- Full-Frontal Assault: Downplayed. He looks effectively nude, but only it's because his tattered robe barely covers more than the base character model's underwear. In fact, his Loincloth actually covers less.
-
 Good Bad Bugs: Prior to Regulation 1.08, immediately re-summoning him right after he dies (or quitting the game immediately after he dies, continuing and re-summoning him) basically makes him invincible against both the Dancer of the Boreal Valley and Champion Gundyr. Just sit back and let the boss try fruitlessly to kill him while he slices off their health. This is now fixed and he will no longer become invincible under the aforementioned circumstances.
 - Katanas Are Just Better: He wields the Uchigatana and if you summoned him, the Chaos Blade as well.
- Master Swordsman: It's in his name. If you get close enough to him you'll quickly find out why.
- Secret Test of Character: Implied considering his weapon as an ally is the much stronger Chaos Blade rather than the Uchigatana.
High Wall of Lothric

The few remaining knights of Lothric left to guard the city — and like most of the kingdom, they've all gone hollow.
- Artificial Brilliance: Part of what makes them so dangerous to fight is that they have a counter for most of your moves and they will punish you for the smallest mistake.
- Badass Army: They are dangerous, highly disciplined fighters who will tear through unprepared players.
- BFS: A variant found only in Lothric Castle and the Grand Archives wields the Lothric Knight Greatsword and are ready to ruin your day.
- Elite Mooks: Lothric Knights are a cut above the rank-and-file hollows, but even they have their own elites: the blue-caped knights are more resilient, have glowing red eyes, are highly aggressive and can buff their weapons with increased damage.
- Knight in Shining Armor: Their armor is quite ornate and it's likely they were nobles before the city fell and they went insane.
- Lightning Bruiser: They're fast, they have lots of health, and they hit hard. The blue-caped ones are even more so, and some even carry greatswords.
- Luckily, My Shield Will Protect Me: Straight sword-wielding knights carry basic shields, while the spear carriers have greatshields. Getting around them is one of the challenges when trying to beat them, especially the greatshield and spear variant.
- Magic Knight: Some of them in the later stages can buff their weapon with Blessed Weapon or Crystal Magic Weapon.
- Master Swordsman: The straight-sword and greatsword wielders are even able to use their weapons' Weapon Arts.
- Red Eyes, Take Warning: As with the Hollows — red-eyed knights are harder to put down.
- Shield Bash: Both the straight sword and spear variants are happy to bash you in the face with their shields, either to create an opening or to prevent you from circling them.
- Warrior Undead: Although they've gone hollow, their swordsmanship hasn't diminished in the slightest.

Seemingly normal enemies who have actually been infected by the Abyss. Without warning, their inner corruption may spill out, transforming them into lethal piles of black sludge, claws and teeth.
- Cutting the Knot: Generic Undead infected with the Pus can easily be killed before they transform if the player hits fast and hard enough.
- Dark Is Evil: They're creatures of the Abyss, and the beasts they transform into have black flesh, and they are the only source of Dark Gems.
- Eldritch Abomination: They are parasitic creatures of the Abyss, made of writhing dark ooze with protruding tentacles, a serpentine head, and a single elongated arm.
- Kill It with Fire: They're extremely vulnerable to fire attacks. There's even a stash of firebombs right around the first one you need to pass.
- Living on Borrowed Time: Two dragons perched on Lothric Castle's gate are infected by Pus of Men, and both die when one of the Abyssal parasites bursts out.
- Lovecraftian Superpower: They seem to be normal undead before the black tentacles come exploding out of them.
- One-Winged Angel: Iudex Gundyr, a number of infected Hollows, and two dragons have become overtaken by the Abyss, and serpentine jet-black creatures with six glowing red eyes, a single emaciated arm, and horns erupt from their bodies when they're aggro'ed.
- Painful Transformation: You can hear screaming and ripping of flesh right the darkness erupts.
- Screaming Warrior: They scream exceptionally loud compared to other enemies.

Both large and stout, these are the former knights of Lothric who have since abandoned their original allegiance and have sworn themselves to the angels, siding with Gertrude and battling against their former comrades. Unlike their counterparts, they are capable of utilizing either very large halberds or pairs of twinaxes and are far more dangerous in close combat.
- Acrofatic: In spite of their ridiculously heavy weapons and equipment, the axe-carrying angel knights can roll, and the halberd carriers can be surprisingly agile as well.
- Bling of War: The three Gertrude's Knights that you meet at the top of Lothric Castle are adorned in shimmering golden armor.
- Boss in Mook Clothing: Their attacks are long, have large reach, and they can use a very dangerous miracle. Fortunately however, they can largely be avoided. The golden knights in Lothric Castle are even more dangerous, with new attacks, and defeating all three gives one of the rare Titanite Slabs. Defeating them can be more challenging than some bosses.
- Church Militant: They have sworn themselves to the angelic faith of Lothric, led by the Heavenly Mother Gertrude.
- Elite Mooks: Like the Lothric Knights, these guys are much tougher than your rank-and-file Hollow. And like the Lothric Knights, they even have their own elites, in the form of the three gold-armored Gertrude's Knights you can find at the top of Lothric Castle.
- Enemy Civil War: Corpses of both Winged Knights and Lothric Knights are littered about the approach to Lothric Castle, implying that the Winged Knights tried to storm the castle at some point to free Heavenly Mother Gertrude from her imprisonment.
- Expy: They bear a great physical resemblance to Sir Azan from Berserk, from their grinning helmets to his armor - their faithful allegiance to Holy Mother Gertrude even mirrors Sir Azan's own religious dedication to the Holy Iron Chain Knights.
- The Golden versions fight like, resemble, and have an "angelic" source of power similar to the empowered versions of Mozgus' inquisitorial torture squad. And much like Mozgus himself in his Apostle form, they can call down the power of blinding light to cause intense damage to their foes.
- Fat Bastard: They're pretty portly for knights. Equipping their armor, however, shows that it's made to be this 'round' implying they might not be fat themselves — like Smough's armor or Catarina armor.
- Gold-Colored Superiority: The ones found near a tower holding Gertrude's corpse wear golden armor, and they're far tougher than their normal counterparts, themselves already difficult to fight.
- Knight in Shining Armor: They've got quite the shiny, ornate armor, and they used to fight for Lothric's angelic faith.
- Spectacular Spinning: The halberd one can employ a devastating spin attack against you.
- Stout Strength: Their weapons are described as requiring inhuman strength to wield so they must have a lot of muscle even for their size. The axe-wielding ones can even roll!
- Weaksauce Weakness: Despite their impressive capabilities, they are very susceptible to the Rapport spell. This goes double for the golden version, as the fact that they're encountered as a group makes turning them on each other even easier.
- Wings Do Nothing: Their armor has ornamental wings on the back. The golden knights encountered on the roof of Lothric Castle have working angelic wings.
- Winged Humanoid: The Gertrude's Knights encountered at the top of Lothric Castle have functioning wings, which makes them much more mobile.
- Wolfpack Boss: On top of Lothric Castle right before meeting the Twin Princes, there are three Winged Knights in golden armor. They're tougher than the others (having 2,420 HP each and high damage output) and drop a titanite slab when you kill all three of them.

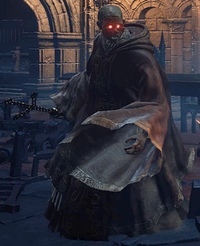
The first of the Red Eye Orb invaders, the Darkwraiths are the servants of the Primordial Servant Kaathe, originating in a country that succumbed to the Abyss in a past age. Despite their armor having nearly crumbled to dust from age, they remain formidable warriors, wielding a large broad-bladed sword and the Darkhand, an ancient humanity-draining relic of Londor.
- Age Without Youth: Not them personally (as we never see them out of their armor), but their armor is described as being so ridiculously ancient that it looks to be a hair's breadth from collapsing into dust.
- BFS: Compared to other straight swords, theirs are much bigger and heavier, even using the stomp art, something reserved for (ultra) greatswords.
- Elite Mook: It takes an army of Ghrus to take down one, and even then, a Drakwraith will curbstomp a good chunk of them.
- Enemy Civil War: The Darkwraiths in the Farron Keep will duke it out with any Ghrus in their aggro range. They're implicitly there to combat the Abyss Watchers for preventing the spread of the Abyss. Bringing them into the boss room will result in them attacking the Abyss Watchers.
- Life Drain: As in the first game, the Darkwraiths can use their Dark Hand to drain the life out of the player; players can later buy a Dark Hand of their own from Yuria of Londor and use it against other players in PvP.
- Mighty Glacier: Their attacks are very telegraphed, but they hit hard and have a decent amount of health.
- Power of the Void: They wield the Dark Hand, an ancient Humanity-draining Abyss-related relic of Londor that doubles as an energy shield.
- Skeletons in the Coat Closet: They wear spiky, skeletal armor, though it's deteriorated compared to their appearance in the original Dark Souls.
- Walking the Earth: Implied, as following the death of Kaathe, they've no purpose other than to kill anyone or anything unfortunate enough to run into them.
Vordt of the Boreal Valley
A former Outrider Knight of the Boreal Valley who has degraded into a feral beast. Massive but surprisingly fast, he wields a frost-enchanted greathammer and guards the path to the Undead Settlement.
- Animal Motifs: Resembles an angry bulldog, both in stature and behavior. Emma even calls him "The vile watchdog of the Boreal Valley."
- Battle Aura: In the second phase of his boss fight he radiates an aura of cold that causes Frostbite and discourages staying close to him.
- The Berserker: His ring, the Pontiff's Left Eye, has warped his mind and body into something more bestial. In stage two of his boss fight he becomes even more aggressive.
- Breath Weapon: He can spit a blast of icy vapor from his visor that causes Frostbite.
- Cool Mask: He wears an ornate mask in the shape of a bestial face, called the Frigid Valley Mask. It originally would have been obtainable, but was cut from the final release.
- Force and Finesse: A charging, rampaging beast contrast to the Dancer's flowing grace.
- Glowing Eyes of Doom: In the second stage of his boss fight his eyes glow blue.
- An Ice Person: Utilizes the Frostbite status during his fight.
- King Mook: He is a massive Outrider Knight, and shares many of his attacks with the smaller minibosses encountered throughout the game.
- Leitmotif: Vordt of the Boreal Valley
- Mighty Glacier: Slow, but hits hard with that giant mace of his. He becomes much faster once he Turns Red.
- Mythology Gag: The Outrider Knights share elements with the beast enemies of Bloodborne, FromSoftware's previous game.
- Primal Stance: He spends the entirety of his boss fight Running on All Fours.
- Ring of Power: The Pontiff's Left Eye transformed him into a rampaging beast.
- Screaming Warrior: His actions in battle are accompanied by a hollow metallic howling.
- Turns Red: Once his health is reduced to half, he will roar and his attacks become faster, often doing a triple charge combo.
- Unusable Enemy Equipment: Unlike most of the other (humanoid) bosses, his armor cannot be obtained by the player, although a player version was apparently planned (
 an unused helm exists in data).
 - Was Once a Man: Like all Outrider Knights, equipment given to him by Sulyvahn eventually transformed him into a beastly creature.

Another of Sulyvahn's Outrider Knights. She blocks the path opposite of Vordt, which leads deeper into Lothric Castle and ultimately to the Princes' keep. Like the Pontiff, she carries two blades into battle, one imbued with fire and the other with dark magic. Her slow, dance-like movements mask lightning-quick and devastating attacks.
- Achilles' Heel: She's extremely weak to Dark damage. Her Bleed resistance is also unremarkable, so bleeding her out is also a good strategy.
- Alliterative Name: Known in Spanish as the Bailarina del Valle Boreal.
- Beef Gate: She's a late-game boss, but she can also be encountered unexpectedly early. Just kill Emma and approach the beheading knight statue to trigger the fight. You can get into Lothric Castle early this way, but it won't be easy.
- Chekhov M.I.A.: Vordt's soul states that he's never too far from the Dancer's side. Turns out she's just up the staircase from his arena.
- Clingy Costume: The rings Sulyvahn gave her merged her armor with her skin.
- Confusion Fu: Her tells are some of the hardest to read in the game, and her attacks have pretty strict dodge timing on top of this.
- Dance Battler: As the name suggests, she moves as if she is dancing. Her footsteps even provide an accompanying tempo to the music.
- Dark Action Girl: She is a fiercely elegant combatant who attempts to kill the Unkindled One.
- Does This Remind You of Anything?: She enters the arena by messily dropping down from a portal in the ceiling, in a manner that greatly resembles an animal childbirth. She even starts off in the fetal position.
- Dragon Their Feet: She's one of Sulyvahn's Knights, but by the time you fight her (provided that you didn't partake in the Sequence Breaking mentioned above) you'll have already killed both Sulyvahn and Aldrich beforehand.
- Dual Wielding: She starts out wielding a flaming scimitar-like sword, and draws a dark-infused sword during the second stage of her fight.
- Fanservice: Her... well, posterior is rather jiggly and well modeled for such a monstrous creature, to say the least.
- Force and Finesse: Contrasts flowing slashes with her dual blades, against Vordt's rampages with the hammer.
- Hammerspace: After reaching falling below half of her health, she withdraws a second blade from an Abyss portal. During her second phase, she'll also use the same portal to power up her blades.
- Jiggle Physics: Her butt has them. Since her back tends to be one of the safer melee spots to attack her from, it will likely jiggle a lot during the fight.
- King Mook: Her armor is similar to the Pontiff Knights and some of her moves resemble the attacks the scimitar wielding knights use.
- Lady of War: A feminine fighter and sworn knight who fights with graceful dance-like moves. It's revealed she's also of royal blood, or at least used to be, potentially making her a Pretty Princess Powerhouse.
- Leitmotif: Dancer of the Boreal Valley.
- Mickey Mousing: Her footsteps echo in time to the beat of the music in her boss theme.
- Noodle People: Her ghost image◊ in Irithyll of the Boreal Valley is tall enough that her hips are level with your chest, but with such a skinny design that she's no wider than the Unkindled One.
- Physical God: Her soul description states that she's a daughter of the former Anor Londo royal family. The Dancer's Crown description further confirms this by saying that her veil is "an article of the old gods, permitted only for direct descendants of the old royal family." Given that you gain one of Gwynevere's miracles from transposing the Dancer's soul, it's heavily implied that she was one of Gwynevere's briefly mentioned children.
- Primal Stance: While she hasn't degraded quite as far as Vordt yet and her movements are unnervingly graceful and fluid, she still spends most of the battle stalking you around the arena bent so low that her head is often below her hips.
- The Smurfette Principle: The only explicitly female boss of the game before DLC, with the rest of the bosses being either male or some kind of non-human creature whose gender is impossible to tell (if it even exists at all).
- Spin Attack: One of her most dangerous moves involves unleashing a repeated spin attack with her two blades while moving towards the player. Even one successful strike can tear off a good chunk of health, and if you're caught it can easily turn into a killing move if she keeps hitting.
- Uriah Gambit: She is implied to be of royal blood, making her a potential threat to Pontiff Sulyvahn's influence. He had her forcibly conscripted into the Outrider Knights so that she would be sent far away and eventually degenerate into a frenzied beast due to the rings he gave her.
- Video Game Cruelty Punishment: If you kill the High Priestess Emma in the beginning of the game, your punishment is an early encounter with the Dancer, who is extremely difficult when you're supposed to fight her.
- Wake-Up Call Boss: Until her, most bosses can be managed with some use of strafing and blocking and aren't that bad if still you haven't mastered dodging yet. The Dancer, on the other hand, can easily break through all but the mightiest of shields with ease, hits like a freight train, and in her second phase, has long and drawn-out attacks with rather strict timings to dodge. Essentially, the Dancer is the point where the game asserts just how important dodge timing is this time around.
- Was Once a Man: Like all Outrider Knights, Sulyvahn's cursed ring eventually transformed her into a beastly creature.
Undead Settlement

Small, imp-like enemies who wear hoods used to humiliate criminals.
- Blow Gun: All of them can pull out one to pelt you at a distance, and some of them park themselves at high spots to snipe you.
- BFS: A few of them wield Flamberges, which is especially large compared to them, albeit without any degree of skill.
- Hot Blade: The ones encountered in the Grand Archives all have their weapons glowing red hot, and they hurt.
- In the Hood: They all wear a peculiar dark hood that covers their whole face and only has two eyeholes, attached to some sort of collar. Reading its description reveals that this hood is used to mark slaves and criminals.
- Powerful Pick: Many of them wield warpicks.
- Wall Crawl: They love hiding out of sight on walls or ceilings and dropping down on you when you don't expect it.
- Zerg Rush: Thralls will most often attack in groups, attempting to kill the player with their sheer numbers in an ambush.

Ministers of the Cathedral of the Deep sent out to convert the masses of undead in the settlement. They appear as grotesquely obese women wielding enormous maces and can use pyromancies to a limited extent.
- Artifact Mook: One Evangelist, presumably named Dorhys based on the miracle she dropsnote , is found locked up in a cell in Irithyll, screaming to herself. As all other Evangelists are found in areas near the Cathedral of the Deep, it's unknown how this one managed to get herself imprisoned all the way in Irithyll.
- Ax-Crazy: While this is a given for enemies in these games, the Evangelists are a particular notable because they're the only sort of Mook in the entire trilogy that is still clearly capable of speech, meaning that their craziness is very much their own.
- Carry a Big Stick: They wield enormous spiked maces to bludgeon you to death with. Even blocking the hits can cause bleed buildup, and taking the hit directly can send you flying a considerable distance.
- Elite Mook: In the areas that they're encountered in, Evangelists are definitely some of the toughest enemies that the player can face. They hit extremely hard, strike in multiple-hit combos with wide reach, have strong poise that makes them very difficult to stagger, can cast projectiles at you if you get too far away, and have a highly damaging grab attack. All this in the second area of the game.
- Evil Laugh: They sometimes chuckle heartily while attacking.
- Expy: They look a lot like Bishop Mozgus from Berserk. They even swing their heavy tomes at you in a manner similar to him.
- They are also essentially Gender Flipped versions of the Fat Officials from Demon's Souls, having almost the exact same outfit and fighting style.
- Fat Bitch: They're quite overweight, and definitely evil.
- Faux Affably Evil: They will speak sweetly and almost seductively to you while trying to murder you."Poor child... come to me!"
- Hell Is That Noise: You know one is nearby by the loud banging of their mace against the ground.
- Killer Bear Hug: One of their attacks involves giving you a bear hug after setting themselves on fire.
- Kill It with Fire: They'll light themselves on fire before attempting to grab the player.
- More Deadly Than the Male: Although unlike most examples, this is mitigated by the fact that they're far fewer in number than the common male hollows that they lead.
- Pest Controller: They use the Gnaw miracle from a distance, throwing swarms of insects to deal Dark damage and inflict bleeding. A unique Evangelist found hidden away in Irithyll will drop a stronger version of the miracle when killed.
- Playing with Fire: One of their attacks has them setting themselves on fire before attempting to grab and bear hug you to death.
- Pre-Asskicking One-Liner: They taunt you prior to their fire attack."I'll cleanse the bastard's curse!"
- Sinister Minister: They're from the Cathedral of the Deep, and signs of their depravity are visible all over the Undead Settlement, ranging from the strung up corpses everywhere to the Cage Spiders crawling about.
- Throw the Book at Them: They take the term "bible-thumper" quite literally, trying to hit you with their book when up-close.
- Torture Technician: They can be seen carrying several torture implements on their belts, including a Pear of Anguish.

Cages stuffed with dozens of still-living hollows that move and attack all at once.
- Body Horror: Dozens of still-living corpses stuffed within a tiny cage.
- Dung Fu: If they can't reach you, they'll throw Dung Pies at you.
- Ironic Juxtaposition: The Cage Spiders encountered in Irithyll Dungeon are filled with Jailers, the same enemies that patrol the area.
- Jump Scare: They're often hidden among many similar cages which don't come to life. That said, the living ones make small movements visible if you look closely enough, are distinctly more vibrantly colored, and can be locked onto, meaning you can distinguish between them from the fakes.
- Love Martyr: One of them can be found that is non-hostile. If spoken to, he refers lovingly to a "nana", which is heavily implied to be one of the Evangelists, who are likely responsible for his wretched condition to begin with. It's found in the same area as a non-hostile Hollow Manservant with an empty cage on its back, and its rhyme is a hint that you should get into the cage to find the Mound-makers covenant.

Huge undead who carry massive saws and sometimes mortar bowls filled with gore. Not terribly bright or fast, but they hit hard.
- The Brute: They rely entirely on strength to kill you, and some of their combos are them just smashing the ground over and over.
- Dumb Muscle: They're not that smart, but they're really strong.
- Impossible Item Drop: They drop the Great Machete, a weapon that they don't use, nor can they plausibly be concealing anywhere on them due to its large size. And just to make things even more confusing, later on in the game you'll run into a type of enemy that does use the Great Machete, but doesn't drop it.
- Improbable Weapon User: Some of them are armed with huge stone cauldrons, which they smash into the ground or throw at you if you withdraw too far in a fight.
- Mighty Glacier: They're slow and their attacks are easy to avoid, but they have a ton of health and are difficult to stagger.
- Serrated Blade of Pain: Their main weapon is a two-man saw that they can easily swing around with one hand due to their large size, and it builds up your bleed meter quickly.

Questing knights from the Boreal Valley who slowly degenerated into mad beasts due to the malignant influence of the rings gifted to them by their leader, Pontiff Sulyvahn.
- The Berserker: Once aggroed they absolutely never let up.
- Breath Weapon: They can spit icy vapor that causes Frost buildup.
- Boss in Mook Clothing: They're unique, non-respawning enemies that can be more difficult than some actual bosses.
- Degraded Boss: They're pretty much just smaller, faster versions of Vordt. Though "degraded" might not be the right word to use here...
- Easy Level Trick: The first one encountered between the Undead Settlement and the Road of Sacrifices can be baited into the hole at the lift, netting a instant kill. You can also simply run past it through the door to the Road of Sacrifices, which it can't go through, allowing you to whittle it down with hit-and-run tactics or ranged attacks. The second one encountered at Lothric Castle, while not exactly easy, can be baited to the Wyvern's fire breath. The third one averts this, though this is justified that it's hidden behind a illusory wall and you probably were prepared by the time you reach the Grand Archives.
- An Ice Person: They have ice based attacks and give off a freezing aura that will prevent your stamina from regenerating if you stay around them for too long.
- Lightning Bruiser: They move fast, are durable, and hit like a ton of bricks.
- Mini-Boss: They serve this role, being much tougher than your run-of-the-mill enemies that doesn't respawn upon death.
- Primal Stance: They crawl on all fours, showing how much they've degenerated.
- Sword and Fist: How they fight. A matching shield for them is never alluded to anywhere in the story, and although they attack with their weapons primarily, they will occasionally include an attack with their fists as well.
- Unique Enemy: Only three of them can be encountered, and none of them respawn.
- The Uriah Gambit: They were politically inconvenient back in Irithyll, so Sulyvahn forcibly conscripted them into service and sent them out with his Left and Right Eye rings which would slowly but surely turn them into feral monsters.

A demon among the last of those born of the Bed of Chaos. One appears to have just finished razing part of the Undead Settlement, while another is found in the Catacombs of Carthus guarding the path to the Smoldering Lake.
- Easy Level Trick: The first Fire Demon encountered is not much of a problem with Siegward assisting you. As for the second Fire Demon, the player can trigger skeletons to spawn by approaching it, and once a stray attack from the demon hits a skeleton, they will begin fighting the demon instead of the player. The skeletons are fully capable of killing the demon by themselves. This can also be done by kiting a Mimic in the same room to the boss.
- Interface Spoiler: The one in the Undead Settlement does not drop a soul, but still causes the game to register that you have killed a Fire Demon, making its items visible in the transposition menu long before you can actually get them.
- Kryptonite Factor: Like all Demons, they take more damage from Black Knight weapons.
- Last of Its Kind: The two Fire Demons, the Stray Demon and the Old Demon King are apparently the last four demons left alive. Once you've disposed of them, their kind are extinct until you reach the Dreg Heap in The Ringed City.
- Lightning Bruiser: It hits fast and hard and has a ton of health at this stage of the game when you fight it. Fortunately for you, you have Siegward and some skeletons plus potentially a Mimic, respectively, to help you fight the Fire Demons in both encounters.
- Unique Enemy: Only two of them are found throughout the game, fitting as their kind has nearly gone extinct.

Whenever a curse threatened the Undead Settlement, its residents would seal the curse away in the belly of this gigantic spirit tree. Over time, the curses took their toll on the tree, twisting it into a gnarled, pustule-covered monster.
- Attack Its Weak Point: Its only weak spots are the pustules on its body and the arm that erupts from its belly.
- Botanical Abomination: It's a giant mobile tree come to life after being corrupted by curses.
- Does This Remind You of Anything?: Its largest weak spot is the cluster of pustules between its legs.
- Expy: Of Exdeath of all things, with its backstory being identical.
- Flunky Boss: It's surrounded by a group of Hollows worshipping it, and more will fall from its branches as the fight progresses. Fortunately, it's capable of taking them out itself and they outright disappear in the second phase of the fight.
- Gone Horribly Wrong: Curses in the Dark Souls universe cannot be cured, they can only be transferred to something (or someone) else. Someone had the bright idea to use a giant tree as a public curse dump for the entire Undead Settlement, and the buildup of curses ended up warping the tree's very existence.
- Grapple Move: In the second stage of its boss fight, the hand that bursts out of it can grab and throw you, causing massive damage.
- Ground Pound: Its main means of attack is raising itself into the air and trying to sit on you.
- Irony: It's filled with curses. In the sewers nearby, there's a statue of Velka that can cure curses.
- Leitmotif: Curse-rotted Greatwood. It evokes a feeling of facing something extremely sinister, unnatural, and warped beyond comprehension.
- Logical Weakness: It's a tree, so naturally it is extremely weak to fire. Fortunately, the Mortician's Ashes are found nearby which allows you to buy Charcoal Pine Resin and Bundles.
- In addition, starting players may have chosen the Fire Gem as their Burial Gift, which Andre could infuse into a weapon of their choice, a solid choice for this boss fight in particular.
- Mighty Glacier: Moves very slowly, but attacks to anything other than the pustules neither hurt it or slow it down further. It'll simply sit on you.
- Mind Hive: Its soul can be transposed into the signature weapon of either Lucatiel of Mirrah or Earl Arstor of Carim, implying that the Greatwood is one of these and the two aforementioned characters' souls are somewhere in there.
- Optional Boss: Fighting the Greatwood is technically optional, as the player doesn't need to defeat it to travel to the next area, and the Giant Archer's damaging greatarrows can discourage a player from finding the boss arena. However, defeating it drops the Transposing Kiln, which allows Ludleth to turn boss souls into weapons, equipment, or spells.
- Turns Red: After doing enough damage, the Greatwood will cause the initial ground to collapse and drop you, it, and any surviving Hollows into the Pit of Hollows; it also grows another arm that can grab you.
- When Trees Attack: It's a possessed tree that sprouts arms and legs to attack you.
Road of Sacrifices

A scantily-clad female warrior wielding the Butcher Knife found in the Road of Sacrifices.
- BFS: Wields the Butcher Knife. Killing her will allow you to claim it for yourself.
- Dung Fu: Will throw Dung Pies at you if you get out of range of her Butcher Knife.
- I'm a Humanitarian: The Butcher Knife's description mentioned she developed a taste for flesh in the Undead Settlement.
- Life Drain: That Butcher Knife of hers restores a bit of her health for every hit she lands. She'll also use its weapon art, Sharpen, to increase her health stealing.
- Recurring Element: She's the third scantily-clad female warrior wielding the Butcher Knife to attack you in a swampy area, after Melinda the Butcher and Maneater Mildred.
Humanoid beings with birdlike features. When approached, large wings will sprout out of their backs which they will use to attack you from above. They seem to be descended from the Crow Demons that haunted the Painted World of Ariamis in the first game, moreso once you make it into the Painted World of Ariandel and find a settlement full of them.
- Bird People: Humanoids and avian features.
- Evil Sorcerer: The Storytellers seem to be shamans of a sort for the Corvians. They don't have a whole lot of spells aside from casting poison clouds and some pyromancy, however.
- Fragile Speedster: Once transformed, Corvians are very fast and very aggressive; however, they are still just as easy to stagger, so getting one good hit in can allow players to combo them into submission.
- Non-Malicious Monster: According to their item descriptions, they are just as scared of you as you are of them, and their desperate, flailing attacks are supposed to reflect that. You can also find two friendly Corvians in the Painted World, one only interested in laying down on a sweetly rotting bed and the other desperately wanting the decaying Painted World to burn and put its inhabitants out of their misery.
- Painful Transformation: Their wings explode out of their backs with a bloody ripping sound. The amount of time they spend convulsing beforehand gives you ample opportunity to walk up and backstab them.
- Patrolling Mook: While they don't patrol, Corvian Storytellers will alert their brethren when spotting the Ashen One, causing them to go berserk.
- Red Eyes, Take Warning: Red-eyed Corvians have more health and deal more damage.
- Sinister Scythe: Some Corvians wield the aplty-named Great Corvian Scythe as their main weapon. Based on the weapon's item description, it seems to have been inspired by Priscilla's scythe.Great scythe of the forlorn souls guided by heretical storytellers. The mistress of the Painted World is said to wield a great scythe herself.
Huge crabs that inhabit the swampy areas of Lothric, along with their smaller kind.
- Breath Weapon: They can shoot bubbly water out of their mouths if you get too far away from them. It does no damage, but slows you to a crawl when you're not dodging.
- Death or Glory Attack: When they rise up to slam their whole bodies down they can force you into this situation. If you are as close as you can possibly be, it's possible to trigger a critical attack on their weak point at that moment, but the window of opportunity is a small one.
- Giant Enemy Crab: They're anatomically normal crabs who just happen to be gigantic. For the giant variant, whenever they want to slam their whole bodies toward you, you can Attack Its Weak Point, see above for more details.
- Lightning Bruiser: They have tons of health, hit hard, and move surprisingly fast for their size.
- Screw This, I'm Outta Here: The crabs in the Road of Sacrifice can sometimes burrow themselves in the swamp midbattle, reappearing later at a distant location with their health restored.
- Underground Monkey: Three crabs encountered in a ravine in the Painted World of Ariandel inflict frostbite with their breath attack.

Ferocious, bestial creatures with large crosses affixed to their backs.
- Absurdly Sharp Claws: Despite their humanoid appearance, Lycanthropes carry no weapons, but their long claws are more than powerful enough to tear a person apart.
- Artifact Mook: A single Lycanthrope can be found locked in a cell in Irithyll Dungeon, far from where it's kind is normally encountered at the Road of Sacrifice.
- Brain Food: They'll happily start munching on your head should you get hit by their grab attack.
- Expy: They're quite similar to the Scourge Beasts from Bloodborne, sharing a similarly feral means of attack.
- Glass Cannon: They attack with a flurry of bites and slashes and can leap huge distances to try and attack you, but if you can land a hit they're fairly easy to stunlock.
- Mêlée à Trois: The imprisoned Lycanthrope at Irithyll Dungeon will attack the Jailers should it encounter them when freed.
- Non-Indicative Name: They bear no resemblance to the typical werewolves even in the slightest.
- Red Eyes, Take Warning: Unlike most enemies with whom red eyes signify a more dangerous version of that enemy, all Lycanthropes' eyes glow bright red.
- Screaming Warrior: They roar wildly when angered.
A red phantom invader wearing a distinct set of ornate yellow robes with a massive head wrap.
- Assist Character: If you join Rosaria's Fingers and increase your rank by offering Pale Tongues before defeating the Abyss Watchers, she can be summoned in Farron Keep, where she will teach you the Proper Bow gesture, and assist you in either clearing the area or fighting the Abyss Watchers.
- Combat Pragmatist: Is equipped with the Obscuring Ring, the signature ring of Rosaria's Fingers which makes the wearer invisible at a certain distance, enabling her to get the drop on you.
- Cool Crown: Wears the Xanthous Crown, which is less of a crown and more of a tornado shaped yellow head wrap that stands at least two heads above where yours ends, completely encasing it.
- Dark Action Girl: As an Invader, she is nothing but trouble.
- Defeat Means Friendship: If you've defeated Heysel's red phantom and have offered at least one Pale Tongue to Rosaria, she will be available as a white phantom against the Abyss Watchers.
- Easy Level Trick:
- When she first invades you in the Road of Sacrifices, she can be easily taken care of by summoning Holy Knight Hodrick as a purple phantom, then luring him into fighting her (he's hostile to everyone, and deals a heckload of damage), or hanging a bit off the top of the ladder down to Farron Keep (the same trick can be done to easy kill the Exile Watchdogs).
- In her second invasion in Farron Keep, you can climb up to the top of the ladder leading to the Old Wolf of Farron bonfire, wait for her to catch up to you, then kick/knock her off to her death.
- Evil Is One Big, Happy Family: Leonhard says that she views Rosaria's Fingers this way, and mocks her for it. True to form, she is available for sumoning in Farron Keep, should you join the covenant yourself.
- Magic Knight: She launches powerful sorceries from her pick, but she'll also give you a good wallop with it if you close the distance.
- Mutually Exclusive Party Members: She can only be summoned as a White Phantom if the Ashen One grants at least one Pale Tongue to Rosaria, and since this angers Sirris, this results in her being unsummonable, meaning that Heysel and Sirris can never be summoned alongside each other.
- Mythology Gag: She continues the long line of wearers of the Xanthous Set that started in Demon's Souls. Her Xanthous Crown also more closely resembles the one from Demon's Souls than the "chicken drumstick" from the previous two Dark Souls games.
- Powerful Pick: Heysel's Pick is a weapon that doubles as a sorcery catalyst.
- Rebellious Princess: The description on various Farron spells notes that Heysel is the daughter of the leader of the Undead Legion's acolytes, and had a few spells custom-tuned by the Crystal Sages.
- Was Once a Man: The Heysel Pick description mentions Heysel is a Finger of Rosaria, as the -finger title suggests. The Man-Grub next to Rosaria's bed drops the Heysel Pick and Xanthous Crown and shows up after Heysel's invasion and chance to be summoned as a phantom have passed.

Two unique NPC enemies that guard the entrance to Farron Keep. One carried a massive club, while the other carries a BFS.
- Acrofatic: Both the Exiles wear very rotund and heavy armor, but the one with the massive curved sword still uses it to flip about like a whirlwind.
- BFS: One of the exiles wields the Exile's Greatsword. Even the item description mentions how heavy the weapon is.
- Carry a Big Stick: One of them wields the Great Club.
- Easy Level Trick: By far the easiest way to defeat them is to run past them and hang off the ladder that goes down to Farron Keep, staying close enough to the top that they will try to attack you rather than climb down after you. This will almost always send them plummeting to their deaths, allowing you to climb down after them and pick up their loot. Even if they manage to tag you and send you plummeting down with them, you respawn. They don't.
- Legion of Lost Souls: As the only NPC members of the Watchdogs of Farron, they give the unit this image.
- Magic Knight: Both wear heavy armor, wield massive weapons, and can use healing miracles.
- The Remnant: Aside from other players who join the Watchdogs, these are the only members of the Undead Legion of Farron who have remained at their posts.
Twin siblings from Lothric, who are said to be the inheritors of old Big Hat Logan's legacy. One of them left to help train the fledgling sorcerers of the Abyss Watchers, while the other stayed in the Grand Archives.
- Call-Back: The Crystal Sages sought to follow in the footsteps of Big Hat Logan, explaining their enormous hats and use of crystal magic.
- Cowardly Boss: The boss Sage will make a great deal of effort to teleport from the player, and tries to hide amongst his clones.
- Degraded Boss: His near-identical sibling shows up in the Lothric Castle Grand Archives as a miniboss, minus the clones. The only visual difference between the two is that the one in the Farron Outpost is bald, while the one in the Grand Archives has hair. The one in the Grand Archives has all the same attacks (except for spawning clones), but has more health and does a bit more damage in general. She's also fought in an area where she can teleport up floors and force you to fight a bunch of mooks to get to her after you damage her a bit. All things considered, the "degraded" version is actually a tougher fight, but your character should be much stronger than they were when they fought the first Crystal Sage.
- Doppelgänger Attack: The boss Sage creates clones to attack you.
- Easy Level Trick: The one in the Grand Archives can be easily beaten by poisoning it a few times, hiding, and waiting for it to die. Its teleportation is apparently only triggered by you physically attacking it; poisoning it will cause it to just stay in place.
- Gemstone Assault: As their name suggests, they mainly fight by conjuring crystals using a crystal ball.
- "Get Back Here!" Boss: Half the difficulty of this fight is chasing him down after he teleports away and before he can get one of his spells off at you. In the second phase you won't even be sure if you're chasing the right one until you hit it or notice that the real one fires off purple spells while the clones fire blue ones. And you're doing this while trying to avoid powerful spells coming from multiple directions and with varying degrees of homing ability.
- The one in the Archives also teleports deeper into the library (multiple times) after taking enough damage, forcing you to fight past waves of enemies and avoiding cursed books to reach her.
- Glass Cannon: The Sage has miserable health for a boss, and makes up for it by throwing lots of spells and clones at the player.
- Leitmotif: Crystal Sages.
- Magic Missile Storm: He and his copies will happily spam crystal magic attacks that can transform the fight into a borderline Bullet Hell.
- Me's a Crowd: In his second stage he starts spawning duplicates every time he teleports.
- Royal Rapier: At close range, both sages will attack you with rapiers; the Crystal Sage's Rapier for the boss version, and an Estoc for the one in the Grand Archives.
- Recurring Element: The Crystal Sage is the latest in a line of Souls bosses who are Glass Cannons with powerful magic attacks, Teleport Spam, and the ability to flood the room with clones of themselves, just like the Fool's Idol and Pinwheel.
- Shout-Out: The sage's slow purple homing crystal attack bears a strong resemblance to the Vore's attack from Quake.
- Spot the Thread: As a boss, the clones he summons use blue-colored magic rather than the purple one the real one uses.
- Squishy Wizard: His health and defense are low compared to other bosses and his spells besides his teleport are easily interrupted, thus he makes up for it with decoys and magic spamming.
- Teleport Spam: As mentioned in the picture and under "Get Back Here!" Boss, half the fight is just chasing him down across the arena after he teleports away. The one in the Grand Archives gets an even bigger place to teleport around in.
Cathedral of the Deep

A warrior wearing the Brigand Set who attacks you on the stairs to the Cathedral of the Deep.
- Kukris Are Kool: Can throw kukris at you at range.
- Mythology Gag: He's dressed in the Brigand Set, wields an axe, and carries a Spider Shield; the starting equipment of the Bandit class in the first Dark Souls. The only difference is that he wields a Brigand Axe instead of a Battle Axe.

A warrior wearing the Fallen Knight Set who ambushes the player outside the Cathedral of the Deep.
- Combat Pragmatist: He's positioned in such a way that if you rush ahead to fight the Brigand on the stairs, he can ambush you from behind, turning it into a two-on-one battle.
- Dirty Coward: According to the Fallen Knight Set's description, the Fallen Knights were part of an order that was disbanded, causing them to flee from conflict until they were killed.
- Dual Wielding: Wields a Long Sword in his right hand, and a Bandit's Knife in the other.
- Kukris Are Kool: Can throw kukris at you at range.
Nimble undead assassins who tend to the graveyard outside the Cathedral. Undead will inevitably escape their coffins and claw to the surface, again and again, forcing someone to kill them to put them back into their grave. That someone is a grave warden, and they have gotten very, very good at what they do. They move extremely quickly and wield scimitars with deadly precision.
- Artifact Mook: Despite being associated with the Cathedral of the Deep, two Grave Wardens can be encountered at the Unattended Graves, which is said to be a parallel world to the Cemetery of Ash and Firelink Shrine.
- Ax-Crazy: It is their job to keep killing the endlessly rising undead in the Cathedral graveyard, and they seem to enjoy the job.
- Blood-Splattered Warrior: Their clothes are described as being soaked with blood.
- Dance Battler: Their movements are fluid and smooth as they chain their attacks together, almost like a dance.
- Dual Wielding: Grave Wardens wield the Warden Twinblades, a pair of curved swords that inflict the Bleed status effect.
- Lightning Bruiser: They're almost as fast as some of the enemies in Bloodborne, and they hit extremely hard with their scimitars.
- One-Steve Limit: They share a title with the Grave Wardens from Dark Souls II. It's unknown if they are actually the Fenito Grave Wardens like Agdayne from that game or if they're just Hollows whose titles match up.
- Overdrawn at the Blood Bank: According to their description, the Warden Twinblades are designed to inflict loss of blood and other bodily fluids on their victims, as it supposedly slows the reanimation process. Game-wise, they're one of the most effective Bleed weapons, as each hit with either sword will build up the Bleed meter.
- Playing with Fire: One of their attacks has the Grave Warden emit a stream of fire from their mouths.
- Sinister Scimitar: The weapons are paired curved swords, than can cause bleeding.

Corpses that have come back from the dead, now wandering the graveyards they were once buried in.
- Chest Burster: Infested Corpses, when approached, will have a Corpse Grub burst from their stomach.
- Kill It with Fire: Extremely vulnerable to fire, especially the Infested Corpses, who will writhe in pain when set aflame.
- Rise from Your Grave: Commonly found rising out of their graves.
- The Undead: Corpses that have been brought back to life.
- Zombie Apocalypse: Their increasing prevalence caused the Cathedral of the Deep to send out Grave Wardens to cull their numbers once they had risen. By the time of the Ashen One's arrival, the situation doesn't seem to have gotten any better.
- Zombie Puke Attack: Their range attack involves projectile vomiting a stream of maggots at the Ashen One.

The next stage of evolution of Infested Corpses, where the maggots take on an almost humanoid shape and being to roam around independently.
- Deadly Lunge: When spotting the Ashen One, they will rapidly crawl towards them before lunging at them.
- Kill It with Fire: Like all enemies with maggots, they are weak to fire. Arming a torch will get rid of the lingering maggots which cause the bleed effect.
- The Worm That Walks: It is made up entirely of maggots in the shape of a crawling humanoid.
- Zombie Puke Attack: It projectile vomits a stream of maggots when the player is afar. Additionally, its grab attack consists of it directly puking its maggots into the player.

Giants enslaved by the Cathedral of the Deep, now forced to serve as their guards.
- Faux Death: Amongst the dead Giant Slaves in the courtyard near Pontiff Sulyvahn's arena in Irithyll are two living Giants that will rise up when approached.
- Mighty Glacier: A given for Giant enemies.
- Mini Mook: The Giant Slaves in Irithyll are smaller compared to the other Giants and have much less health, but can respawn.
- Slave Race: Forced to work for the Cathedral of the Deep by guarding several key locations.
- Sleepy Enemy: All Giants in Lothric are encountered initially sleeping, and only start attacking if the Ashen One approaches and awakens them.
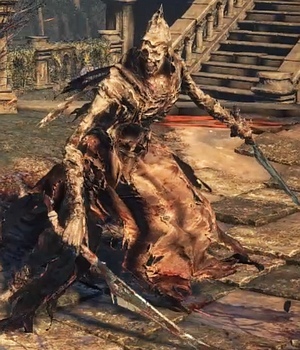
The priests of the Cathedral of the Deep, almost all of whom have hollowed. They wield candlesticks as catalysts, from which they fire fireballs and other miracles. Implied to be what remains of the Way of White after Allfather Loyd's fall from grace.
- Big, Thin, Short Trio: Come in three varieties.
- Kevlard: The fattest Deacons also have the best defenses.
- Large and in Charge: The fattest Deacons are implied to be of a higher rank, based on their robe color.
- Playing with Fire: Their main means of ranged attack is to shoot fireballs from their catalysts.
- Sinister Minister: They look like stereotypical Catholic priests, except they're insane undead in service to a Religion of Evil.
- Squishy Wizard: They go down pretty easily, but their spells can pose a threat.

Huge, hulking knights who have sworn themselves to the Cathedral of the Deep. They wield either greatswords or huge maces and can use miracles to a degree. A variant with recolored armor, the Consumed King's Knights, are also encountered in the Consumed King's Garden.
- BFS: The greatsword varieties use a sword big enough to give Dragonslayer a run for its money.
- Carry a Big Stick: Their maces are no joke, doing immense damage with every hit and leaving tiny points of light in their wake that explode.
- Church Militant: Naturally, given that they're sworn to the Cathedral. They even look like the historical Knights Templar.
- Elite Mooks: For the Cathedral of the Deep.
- Heal Thyself: If left alone with low health, they will cast Great Heal to restore their health.
- Large and in Charge: They tower above the normal opponents in the Cathedral.
- Light 'em Up: The mace-wielding knights can buff their weapons to leave explosive spheres of light.
- Luckily, My Shield Will Protect Me: The mace-wielding knights carry a large greatshield that is capable of protecting them from most forms of attacks, and which they're more than happy to use to bash your face in.
- Magic Knight: In addition to their weapons, they can also cast miracles like Force and Great Heal.
- Mighty Glacier: They're much slower than the Lothric Knights or Winged Knights, but they're incredibly difficult to stagger and they have tons of health.
- Palette Swap: The Consumed King's Knights use the same model and weapons as the Cathedral Knights, just colored blue.
- Status Buff: The mace-wielders have three to use at any time: casting a Heal spell, buffing their defense with Perseverance, and casting Blessed Weapon on their maces to leave the aforementioned points of light after their attacks. And they can stack the last two if they want to.
- Use Your Head: The greatsword-wielding Cathedral Knights will sometimes headbutt you to knock you back.
- Unskilled, but Strong: The Cathedral Knight Greatsword has a flattened edge that deals strike damage, making it more akin to a club with a greatsword's moveset than an actual sword. The sharpened tip allows it to be used for thrusting attacks as well.
A monstrous spider-like creature lurking in The Cathedral of the Deep. Another one can be found clinging to the roof of the cathedral in Anor Londo.
- Attack Its Weak Point: Hitting them in the head a few times will stagger them, leaving them open to a riposte.
- Boss in Mook Clothing: High Damage? Durable? Has the Curse aliment? Check.
- Breath Weapon: Like the basilisks, it can spit a cloud of gas which curses the player.
- Easy Level Trick: As massive, quick, and dangerous as these guys are, both can also be easily cheesed to death. The one in the Cathedral of the Deep is too big to fit through the door you came in through, so all you have to do is go out into the hallway and shoot/magic it to death or poke it with a polearm from complete safety. The one in Anor Londo doesn't know how to climb the stairs to the second floor and can't cross the threshold onto the circular elevator outside. Both spots allow for an effortless ranged kill and the latter also allows for the poking method if that's what you'd prefer.
- Glowing Eyes of Doom: Its eyes glow a sickly yellow.
- He Was Right There All Along: Angling the camera correctly will allow you to spot it lying in wait for you. The one in Anor Londo can be clearly seen if you go to the top of the stairs. It can even be attacked from this position!
- Hell Is That Noise: You know they're nearby by the signature clicking of their jaws/teeth.
- Jump Scare: It suddenly drops from the ceiling when you try to collect an item at the other end of a suspiciously large and empty room. The other one drops on you when you try to open the front door of the cathedral in Anor Londo.
- Lightning Bruiser: Very fast and can kill an unsuspecting player in moments due to its attacks causing curse.
- Multi-Armed and Dangerous: Its many limbs lend it the appearance of a mutated spider, and makes its attacks harder to read.
- Skeletons in the Coat Closet: It appears to be wearing skulls around its neck. It's not clear if these are part of the creature or the remains of its victims.
- Taken for Granite: The Deep Accursed's attacks inflict Curse on players, and it also has a cloud attack similar to that of Basilisks.
- Unique Enemy: One of the few enemies in the game that does not respawn. There's another one waiting in the cathedral of Anor Londo.
A red phantom invader on the Cathedral's ground floor, who wears a rather familiar set of spiky armor.
- Combat Pragmatist: His armor grants him the ability to damage opponents by ramming them while rolling, which means he can both attack and defend against attacks at once (albeit it’s chip damage). He can also inflict bleed with his sword and shield, which makes blocking his attacks a risky proposition, plus he won’t hesitate to overwhelm your defenses using his sword’s “stance” skill.
- Honor Before Reason: Unlike the other members of Rosaria's Fingers who are always equipped with the Obscuring Ring (that makes the wearer invisible at a certain distance), he is not and only fights you with his sword and shield, whereas the others use spells and items. Even more damning, he rarely uses an estus flask to heal himself. He might want to have what he considers a honorable duel (or a challenge for himself against an opponent who won’t reciprocate these conditions), or this is a Call-Back to Dark Souls where red invaders couldn’t use an estus flask (which is almost certainly the entire reason why the community considers healing during PvP dishonorable to begin with).
- Really 700 Years Old: If he is indeed the same Kirk, Knight of Thorns from Dark Souls, then that would put him on par with Patches; Karla; and Corynx for age, since they both lived during the first Age of Fire.
- Spikes of Villainy: True to his original incarnation, he wears the Armor of Thorns set that will slightly damage you should he roll into you or kick you. He also welds the Barbed Straight Sword and the Spiked Shield which cause bleed damage if he hits you with them. Finally, he drops his weapon and shield when you defeat him, and his armor can be found in Rosaria's Bed Chamber.

Horribly disfigured humans that now resemble grubs.
- Body Horror: Apparently, being reborn too many times degenerates you into a giant maggot.
- Was Once a Man: They are implied to be humans who went through too many of Rosaria's rebirths.
- Zombie Puke Attack: They can vomit maggots at the player, which inflicts Bleed if left for too long.

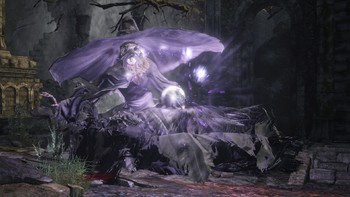
A horde of fire-slinging deacons, led by Archdeacon Royce. They keep watch over Aldrich's empty coffin at the heart of the Cathedral of the Deep.
- Achilles' Heel: The Deacons have several vulnerabilities.
- They tend to attack in packs... which makes them very vulnerable to attacks that hit multiple targets at once, such as a swing from the Farron Greatsword or a thrown firebomb.
- Only the possessed one has the presence of mind to resist the temptations of an Alluring Skull, and as such a well-thrown one can leave that one wide open for a beating.
- Bait-and-Switch Boss: Every conversation you have with NPCs, and all the information you have been given so far leads you to expect to encounter Aldrich, Saint of the Deep at the end of his cathedral. Instead, you encounter the Deacons, who stand watch over his coffin as Aldrich has left for Irithyll of the Boreal Valley, and Anor Londo beyond it.
- Big, Thin, Short Trio: The Deacons come in three varieties that happen to match up pretty well to this dynamic.
- Combined Energy Attack: In the second phase of the battle, when Archdeacon Royce himself appears, four unique casters will stand still and collectively charge a black energy ball to fire at the player. If the player allows them to keep charging the spell for enough time, the entire room will be covered in darkness, dealing unavoidable Curse buildup that means certain death.
- Crystal Dragon Jesus: They may as well be a bunch of Franciscan Monks/Papal Cardinals that happen to be worshiping an Eldritch Abomination, and their leader even dresses like the Pope!
- Deadly Lunge: The fat ones are fond of suddenly leap attacking you.
- The Dragon: Archdeacon Royce is Sulyvahn's right-hand man, being ranked just below him in the church, and you must fight him before you can enter Irithyll. He also used to be Co-Dragons with fellow Archdeacons McDonnell and Kilmt, until the former died and the latter left the organization to join Rosaria's Fingers.
- Face–Heel Turn: Judging by the description of Royce's robes, the Cathedral of the Deep was once part of the Way of White. While the Way Of White was always a bit Knight Templar, they did honestly believe their actions were saving people. On the other hand, the Cathedral of the Deep is undeniably evil.
- Fat Bastard: One of the deacon types is fat and has higher defense.
- Flunky Boss: A whole congregation worth of undead priests. Their main purpose is to body-block you from hitting the actual boss.
- He Who Fights Monsters: The Cathedral of the Deep were originally a vanguard against the Abyss, who captured Aldrich and imprisoned him within the Cathedral. They eventually succumbed to the very thing they were fighting and started serving Aldrich, even canonizing him as their patron Saint and setting up a system to continue feeding him.
- King Mook: The first phase of the fight has the assembled undead take turns as leader: A random priest will get possessed by a red orb, and only by killing him will the boss' health go down. At half health, the uniquely garbed Archdeacon will spawn and be the true King Mook that remains in possession of the boss essence for the rest of the fight.
- Kryptonite Factor: They are all Hollows, meaning the Hollowslayer Greatsword will make quick work of them.
- Leitmotif: Deacons of the Deep, featuring Ominous Latin Chanting, pipe organs, and church bells appropriately.
- No Body Left Behind: The Deacons are a notable aversion for the series; While their bodies all fade away at the end of the boss fight as usual, resting or reloading the area will cause Archdeacon Royce's corpse to spawn back in, allowing players to loot his unique armor set. This is notably the only time in the game a boss leaves earthly remains behind.
- Ominous Walk: They all move slowly towards you as a group, only occasionally moving faster if you're close.
- Religion of Evil: They worship Aldrich as a god.
- Shoot the Medic First: Two unique fat priests in blue will spawn alongside the Archdeacon and can heal the boss if not interrupted.
- Taken for Granite: Some of the Deacons' attacks will inflict Curse buildup.
Farron Keep

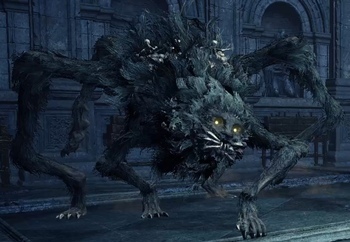
Savage beings corrupted by the Abyss who infest the swamp surrounding Farron Keep. Several variants are encountered, most of them wielding crude knives and spears coated with poison and shields, and some of them having degenerated to fighting with their bare hands or even running around on all fours like animals.
- Ax-Crazy: They're all violently insane, and some of them even lope around on all fours like dogs.
- Body Horror: They have strange growths on their heads resembling a fungus.
- Call-Back: Abyssal corruption turning people into mutated creatures with weird heads was also seen back in the Artorias of the Abyss DLC for the first game.
- Enemy Civil War: They often fight the Darkwraiths in the area. The Darkwraiths usually slaughter them, but they sometimes win through sheer numbers. The group found within the Demon Ruins on the other hand seem to have exterminated most of what's left of the Chaos Demons, though in turn are easily eliminated by the local Black Knights.
- Fragile Speedster: The more feral ones are very fast and agile but can be dispatched in only a couple hits.
- Goomba Stomp: The unarmed Ghru who still walk on two legs can jump high into the air and land on your head for massive damage.
- Poisoned Weapons: Both their weapons and shields are described as being coated with rotted waste, and have innate poison damage and resistance, respectively.
- Psycho Knife Nut: Many of them wield daggers that they will gladly slit your throat with if they get the chance.
- Unskilled, but Strong: The variants that stand up straight are a lot harder to kill, and hit a truck ton harder.
- Was Once a Man: They are the Abyss-tainted descendants of the acolytes of the Undead Legion.
- The Worf Effect:
- They're easily defeated by the Darkwraiths in Farron Keep and the Black Knights in the Demon Ruins, respectively; a single one of either can flatten entire packs of Ghrus.
- On the other hand, they inflicted this on difficult enemies from Dark Souls, including the Mushroom People, Capra Demons, and Taurus Demons.
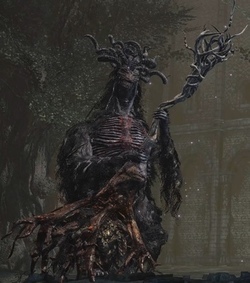
Towering creatures that seem to lead the Ghrus. They wield uprooted trees as both clubs and catalysts for their spells, and have a nasty habit of hanging out in the areas of the swamp where the muck is too deep to run away from them.
- Carry a Big Stick: They carry a whole tree and use it as a magic staff... and they'll also just hit you with it.
- Curb-Stomp Battle: The most likely outcome should one piss off the trio of Elder Ghrus hanging out in a certain corner of the swamp without separating them first.
- Evil Sorcerer: They can summon swarms of phantom projectiles or trigger a powerful blast by smashing their trees into the ground.
- King Mook: A larger, stronger version of the Ghru.
- Magic Missile Storm: Every single attack of theirs will create a swarm of magic skulls which will home in on the player after a few seconds.
- Mighty Glacier: They're enormous but very slow. Their deficiency in speed is negated by the fact that the muck in the swamp makes you even slower than them.
- Beware the Silly Ones: The giant eyes on their head are actually sacs, and their waddling gait makes them seem silly and harmless, but you won't be laughing when their curse cloud instakills you.
- Breath Weapon: As in every other appearance before, Basilisks breathe noxious gases that will raise the player's Curse meter if they stay inside for too long.
- Recurring Element: They behave exactly as they did in the previous two games, still as frustrating to fight as ever.
- Reptiles Are Abhorrent: They resemble lizards with unnaturally huge eyes.
- Taken for Granite: Their breath attacks inflict Curse, which if fully built up will instantly kill the player by turning them into stone.

A rather familiar-looking gigantic demon who roams around a broken bridge above Farron Woods.
- An Arm and a Leg: Focusing enough damage on any one of the Stray Demon's legs will cause it to shatter, crushing the other under the demon's weight and causing it to fall over. While its mobility is greatly hindered because of this, it can still flail about and deal a surprising amount of damage to players who underestimate it.
- Beef Gate: Subverted. His soul states that he was meant to be the Gatekeeper to Lothric, and the bridge he's on seems to have at one point been the main entrance to Lothric castle. However, by this point the bridge has been mostly destroyed and doesn't even connect to Lothric Castle, leaving the Unkindled to simply bypass him unless they deliberately seek him out.
- Boss in Mook Clothing: An almost literal version. He has more hit points than the early bosses and his attacks are heavily damaging even by mid game standards, but he doesn't have a fog wall or a screen-spanning health bar like a "real" boss.
- Breath Weapon: It can spit a barrage of boulders at a distance. The player can get this skill as a pyromancy by trading the demon's soul with Ludleth.
- Captain Ersatz: WOULD be one to the Iron Golem... if not for the fact you start the game at Lothric Castle and work your way down from it. However, like the Golem it can throw you off into a fatal pit, and additionally was stated to be the last line of defense for those that wished to enter Lothric itself, similar to the Golem being the last obstacle before entering Anor Londo.
- Grapple Move: It can grab you, and will more often than not follow up by throwing you off the wall to your death.
- Ground Pound: The signature butt-smash move from the first game returns.
- Last of His Kind: It, the two Fire Demons, and the Old Demon King are the last remnants of the demons born from the Chaos Flame. Kill them, and none are left until The Ringed City, when the Ashen One arrives in the Dreg Heap and encounters the Demon in Pain and the Demon from Below.
- Mini-Boss: Can't call it a real boss, yet it can kill a player quickly enough.
- Optional Boss: Only found in a very out of the way location, and it doesn't even have a boss health bar. The only thing that signifies that it is a boss, is that you get the Soul of a Stray Demon for beating it, if not that one would recognize it as a similar creature to the ones encountered in the Northern Undead Asylum and the Demon Ruins.
- Rock Monster: Unlike the Stray Demon in the first Dark Souls, it's made of stone. Given that the Old Demon King is a Plant Person, this particular Stray Demon could be made of petrified wood.
Assassins of Londor's Sable Church. Depending on your standing with Yuria, they're either your ally or enemy.
- Assist Character: If you're following Anri/Yuria's sidequest and are on good terms with Yuria, they can be summoned for assistance against the Abyss Watchers, Pontiff Sulyvahn, and the Soul of Cinder. If summoned against the former two, they will teach you the Duel Bow gesture upon being summoned.
- The Computer Is a Cheating Bastard: He has a Dark Hand+2 when you fight him, despite the fact that the player version of the weapon cannot be upgraded.
- Cool Mask: A gold smiling one.
- Magic Knight: In addition to their Manikin Claws, they also have a Witchtree Branch, which they use to cast Affinity.
- Malevolent Masked Men: Masked assassins who attack those that displease Londor.
- Poisonous Person: They can throw Poison Throwing Knives at you at range.
- Video Game Cruelty Punishment: If you've done something to anger Londor (by killing Yoel, Anri, and/or Yuria, or healing your Dark Sigils), they'll invade you twice; once in Farron Keep, and again in Irithyll.
- Wolverine Claws: They wield Manikin Claws if they're hostile. Defeating them for the first time will cause them to drop them.
Catacombs of Carthus
- An Arm and a Leg: Some of them revive without a few bones, and it actually changes their behavior. To wit;
- Full skeletons are normally equipped with a sword and shield, although there are a couple that use a bow and arrow to snipe at you.
- Skeletons without their left arm only have a sword and generally like to close distance as fast as possible.
- Headless skeletons (for some reason) are actually more cautious than their brethren and can even riposte you if you make the mistake of attacking while they are guarding with their swords. How the hell they can see to do this is a question for the philosophers.
- Anti-Regeneration: Blessed weapons prevent them from resurrecting themselves.
- Bait-and-Switch: Sometimes when you deplete their health bars they'll get back up to have another go at you, which can be particularly infuriating if you've already gone on your merry way. Best way to check is to look at your soul counter and see if they dropped any; if they didn't, then you better keep your guard up.
- Dem Bones: But of course.
- Glowing Eyelights of Undeath: The ones with glowing eyes are the ones that resurrect themselves, as described above. When they reform the glow effect is gone.
- Grievous Harm with a Body: If they catch you off guard or as a means to close distance, they'll sometimes do a spiral leap through the air at you. Better pray you aren't on a bridge with a Bottomless Pit under it when they do this.
- Power of the Void: As a ranged option, a few of them will chuck Hexing Urns at you which release homing Dark projectiles.
- Resurrective Immortality: As mentioned under Bait-and-Switch, they can sometimes get back up after you deplete their life bar. They only do this once though, mercifully.

Warriors from the desert land of Carthus, still dutifully serving their High Lord even after death. Swift and deadly, their curved weaponry has all been specially designed to spill as much blood as possible.
- Achilles' Heel: One good hit from a Strike damage weapon will break them apart. Even if they survive the first hit, they are easy prey for a follow up hit when trying to pull themselves together.
- Combat Parkour: The shotel-wielding skeletons can move with impressive speed, and can jump around and perform mid-air flips while attacking, making their movements hard to predict.
- Dual Wielding: One variation dual wields Carthus Shotels.
- Flash Step: They wear the Carthus Milkring, which makes the wearer invisible when rolling, and making them appear to do teleport-rolls in the style of the Old Hunter Bone from Bloodborne.
- In the Hood: They distinguish themselves from the regular skeletons of the Catacombs by wearing head shrouds.
- Kukris Are Kool: From a distance, they can throw kukris at you that build up Bleed damage from a distance.
- Large and in Charge: They're at least two heads taller than you and the average skeleton, and their bones seem to be denser as well.
- Lightning Bruiser: They're fast on the level of Bloodborne Hunters, and they can do massive amounts of damage in a short span of time. They also have a pretty respectable amount of health to make them even more troublesome to deal with.
- Overdrawn at the Blood Bank: All variants of Skeleton Swordsmen will inflict Bleed buildup with their weapons, whether they're blocked or not, and the shotel-wielders are fond of throwing waves of kukris at you from a distance to keep the pressure on you even if you retreat out of melee range. Near the end of the catacombs, there's even one wielding a curved greatsword that's been coated with Carthus Rouge.
- Damn You, Muscle Memory!: Just like in the last two games, sword-and-board builds/builds with over 70% weight ratio that don't really rely on rolling or dodging out of the way are going to have hard time with stamina management if they constantly block these guys.
- Fragile Speedster: They don't have a ton of health (especially in comparison to the first game), but they make up for it by being hard to hit and track due to their rolling.
- Legacy Character: Making a return from the previous two Souls games, and just as much of an annoyance as ever.
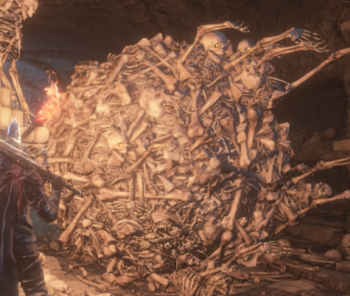
A giant conglomeration of skeletons in a vaguely ball-like clump, these guys will constantly roll up and down certain paths and flatten anything in their way. Great for luring enemies into, not so much when you get caught in it. They can be stopped, but only by killing a nearby skeleton that's controlling them.
- Body of Bodies: Much like Gravelord Nito, these boulders are made of a ton of skeletons all mushed and interlocked together. One of them also contains a baby crab, of all things, inside it.
- Corridor Cubbyhole Run: A rare 3D example, and one without the actual corridor or cubbyhole; the one rolling up and down the stairs can be avoided by stepping to the side near the candles, but go too far and you'll fall to your death.
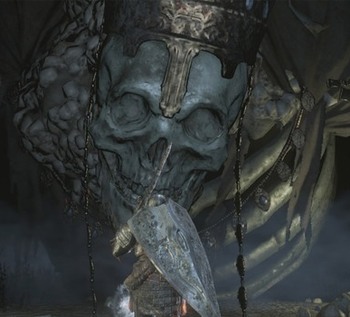
A titanic crowned skeleton, Wolnir was once the ruler of Carthus, a desert land renowned for its skilled swordsmen and unique pyromancy. A great conqueror of many kingdoms, Wolnir eventually encountered the Abyss and, in his attempts to harness its power for himself, became consumed by the darkness.
- Advancing Wall of Doom: The fog that surrounds Wolnir's lower body deals tremendous damage over time if players ever step in it, killing them in less than two or three seconds if they stay in it for too long. It follows Wolnir as he climbs up the incline at you.
- Attack Its Weak Point: Breaking his glowing magic bracelets knocks a rough third of his health off, and is recommended to put him down at all. He can be killed normally, it's just unreasonably difficult (even by Dark Souls standards).
- Attack of the 50-Foot Whatever: He's inexplicably titanic, even by the series' "giant skeleton" standards. It's unclear if this was a result of being exposed to the Abyss or sacrificing others to it to prolong his own un-life.
- Bad Boss: Completely uncaring of the skeletons he summons, as they'll more often get killed by his sweeping attacks rather than by your hand.
- BFS: He can summon a wicked-looking greatsword to attack you with. Of course, given his sheer size, it's about forty feet long and looks more like a dagger in his hand.
- Breath Weapon: One of Wolnir's attacks is to exhale a dark fog right below his head, which deals at least as much damage as the mist behind his torso.
- The Caligula: This guy might have been even worse than the Old Iron King. In life, he conquered the desert kingdoms of Carthus by brute violence, becoming their sole High Lord. When he fell to the Abyss, he began killing clerics and looting their corpses for bracelets that could stave off his demise. When that didn't work, he set up shop in the catacombs in a deliberate attempt to damn as many people as he could to the Abyss to prolong his own existence. His title in the Japanese script is even "Tyrant King".
- Cool Crown: A coronation crown with half-arches. Its item description says it was originally all of the separate crowns of the rightful lords of Carthus, until Wolnir stamped them out and ground their crowns to dust, causing them to fuse together.
- Dem Bones: Serves the role of requisite Souls series Skeleton Boss that was filled by Nito, the Skeleton Lords, and Darkbeast Paarl, except he's a couple of stories tall.
- Developer's Foresight: If Wolnir is defeated the normal way, via destroying his bracelets, he'll be pulled into the Abyss. In the unlikely event that he is instead killed by draining his health bar without breaking his jewelry, a different death animation will play.
- Dragged Off to Hell: His boss battle takes place on an incline. When you defeat him, he is pulled back down said incline and consumed by the Abyss. Averted if you kill him without breaking the bracelets (which takes forever); he simply crumbles into ash like any other boss.
- Easy Level Trick: Wolnir isn't immediately hostile the first time you teleport into his abyssal arena. You can take advantage of this by running to the right side as soon as you're in his arena, then run forward until you reach his left hand (your right). He won't aggro unless you hit him physically or get too close, giving you the chance to get some free hits in (and even break one of his bracelets if you're fast enough). Heck, it's possible to kill him without aggroing him this way by casting Pestilent Mist a few times and it will quickly eat through his health.
- Enemy Summoner: Armed skeletons periodically rise from the ground in front of him.
- Evil Overlord: A successful warlord turned monstrous master of the undead. It's right here in his name!
- Flunky Boss: Wolnir will use Summon Magic to call various types of skeletons to his aid during the fight, with each summon getting stronger the less HP he has; still doesn't stop him from destroying them with his own attacks though.
- Gashadokuro: He's a giant skeleton that only ever appears from the waist up and he has a single-minded desire to kill you. It is implicitly said that he became this after being consumed by the dark, his incredibly high body count probably having something to do with it.
- Half the Man He Used to Be: His legs and hipbones are simply missing; his skeleton ends with his spine. Because of this, he can only move by dragging himself up the hill by his arms. It's believed his lower body has already been taken by the Abyss.
- It Only Works Once: The first time you initiate the battle, you can get an easy hit on his bracelet. After that, you don't get a second chance.
- Jump Scare: The first time you enter his boss arena there's nothing there to greet you other than a couple of items on the ground. Going close enough to one of them to pick it up also illuminates Wolnir's enormous head.
- Karmic Death: You don't learn about this until after he's defeated, but Wolnir committed countless atrocities out of fear of being consumed by the Abyss. Guess what happens to him when you beat him?
- Leitmotif: High Lord Wolnir.
- Nay-Theist: In life, Wolnir never gave the gods the time of day. After falling to the Abyss, he prayed to the gods for the first, and likely only time, in his life.
- Our Liches Are Different: An ancient king who sought to escape death through dark rituals and at the cost of everyone else; he fits the criteria. Most liches aren't usually so massive, though. His form as a jawless skull-chalice is very reminiscent of a demi-lich.
- Outside-the-Box Tactic: Don't want to go through destroying the bracelets and fight it up close? Why just cast Pestilent Mist, Toxic Mist, or Poison Mist and watch as Wolnir's health decrease by percentage!
- Puzzle Boss: Any attacks to parts of Wolnir that are not his bracelets will deal minimal damage. Destroying the bracelets, on the other hand, will take off more than a third of his entire health bar. You can, however, defeat him without destroying the bracelets, but good luck in doing so.
- Recurring Element: Like the Dragon God from Demon's Souls and the Bed of Chaos from Dark Souls, High Lord Wolnir has three weak points that must be destroyed in order to defeat him.
- Shmuck Bait: When you first enter Wolnir's arena, the entire chamber is dark (unsurprisingly since you're apparently on the very edge of the Abyss itself) with the only thing visible being the glow of a single item (the Grave Warden Pyromancy Tome) lying on the ground. When you run towards it to pick it up, Wolnir will loom out of the darkness in front of you and the fight is on. You can get a slight warning if you notice the silhouette of his hand on the ground beside you as you approach, or you can see him waiting if you use a torch.
- Time-Limit Boss: It isn't immediately evident, but the fight against Wolnir takes place inside an enclosed room with a wall in the back, while Wolnir himself continually crawls towards you whenever he's not attacking. Destroying one of his bracelets will cause him to lose his grip and slide down a fair distance, however if you're not fast enough and/or unlucky, Wolnir will eventually pin you up against the wall and perform his breath attack, giving you no room to dodge it.
Smouldering Lake
- Assist Character: If you defeat him when he invades you, you can summon him in Smouldering Lake for assistance against the Old Demon King, or to help clear the area. You can even bring his friendly phantom along to fight his actual (corporeal) self!
- Badass Normal: Stuff listed under Noodle Incident aside, this guy is easily one of the toughest NPC fights that the game has to offer, to the point that he's compared to Black Iron Tarkus himself in terms of raw strength and deadliness. Expect to get your Unkindled ass handed to you many times by him.
- BFS: He wields the Fume Ultra Greatsword. Yes. THAT Fume Ultra Greatsword.
- Boss in Mook Clothing: For all but the heaviest builds, his attacks are capable of staggering a careless player in one or two strikes, which allows him to follow with a riposte that can easily one shot a player from full health, even when Embered. He's also tanky enough that he cannot be exploited by backstabbing like other enemies, and cannot be staggered out of his attacks when they're winding up. The trick is to stay back and either dart in for a few swipes between his attacks or use ranged weapons/spells. He can also potentially be kited to a Black Knight nearby or pushed into lava.
- Black Knight: Clad in the same Black Iron armor as Tarkus.
- Easy Level Trick:
- When he invades you, run across to Wolnir's side of the breakable bridge as soon as he spawns in and break it, preferably with him on it, so that he plummets to his death. If you're too early and he ends up stuck on the other side, his Artificial Stupidity makes it possible to get him to throw himself off the cliff anyway.
- When you fight him in the flesh, he has a couple:
- He counts as a normal enemy, making him susceptible to Alluring Skulls. Throw one into the nearby lava pool and watch him burn himself to a crisp in seconds flat. Then quit and reload the game to reset his loot back to his spawn position so that you don't burn yourself to a crisp trying to get it.
- If you get him to follow you upstairs to the bridge over his area, he will aggro the Black Knight up there. Let them duke it out, then whichever one is left will be weakened for you to finish off, if they don't both fall in the lava.
- Heel–Face Revolving Door: It is left ambiguous whether he is on the good side or the evil. His first appearance is being an invader in Catacombs of Carthus and gives you a gesture regardless of which kills the other. Should you defeat him there, he along with Cuculus will help you to defeat the Old Demon King together. And if you explore further in the ruin, you will find Tsorig in person, where he will attack you. You can even bring the Phantom Tsorig to fight against the real Tsorig.
- Hoist by His Own Petard: Yes, it is possible to make Tsorig fight himself. Just summon his phantom and bring it all the way to the lava pit where you encounter his physical self.
- Luckily, My Shield Will Protect Me: He uses Tarkus' Black Iron Greatshield.
- Noodle Incident: How the hell he managed to get a hold of Tarkus's armor and greatshield, the Fume Knight's Ultra Greatsword, and a ring from Eleum Loyce will probably forever remain a mystery.
- Recurring Element:
- He's an invader who becomes a friendly summon after defeating him, like Maneater Mildred from the first game and Melinda the Butcher from the second. Though instead of being a mostly-naked woman who invades you in the obligatory poison area, he's a man clad in huge heavy armor who invades you in the area immediately after the poison area.
- He's an invader who later appears in the flesh to fight you again, like Maldron the Assassin from the second game. Though nowhere near as much of a troll.
Also returning from the first game are the Demon Statues from Lost Izalith.
- Breath Weapon: They attack you by breathing fire.
- Living Statue: They're stone demon statues come to life.

One of the surviving remnants of the Chaos of Izalith. They are masters of chaos pyromancies and some good ol' fashioned machete wielding.
- Machete Mayhem: It wields a Great Machete to swing at you if you get too close.
- Multi-Armed and Dangerous: It has 4 arms, with 2 carefully protecting an orb of chaos.
- No Ontological Inertia: Upon its death, any remaining Floating Chaos orbs it created will disappear.
- Playing with Fire: It can throw 2 fireballs at a time from a great distance, use a fire stream when you get too close and even summon fiery turrets.
- Skull for a Head: Its head resembles a bird's skull.
- The Turret Master: When you are too far away, it casts the Floating Chaos, a levitating fiery orb which serves as an automatic fire turret. It can cast as many of these as it likes.
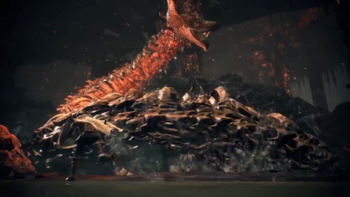
A colossal, bone-plated sandworm, capable of digging through the ground at high speed and spewing lightning from its gaping maw. As its name would imply, it once terrorized Carthus until the grave wardens drove it away, and made a new home out of the ruins of Izalith.
- Beef Gate: The first thing that players entering the area will see is the fog gate that leads to the Old Demon King in the distance; they will shortly discover that they aren't meant to head in that direction, as the sandworm blocks their way, and fighting it while also dodging the huge ballista shots is extremely difficult. Of course, with some good dodging, it is possible to run past the worm and reach the bonfire behind it, allowing players to fight the boss before even entering the ruins below.
- Breath Weapon: It can spit beams of lightning.
- Lamprey Mouth: It has a round mouth ringed by fleshy jaws.
- Mini-Boss: It doesn't get its own theme music like every other boss in the game, but it's a unique, tough enemy nonetheless that doesn't respawn upon death.
- Sand Worm: A giant, wormlike beast that tunnels through soil like a fish swimming through water. It can also spit lightening, much like the Mongolian Death Worm from real-life myth.
- Shock and Awe: Emits electricity. The reward for killing it is a powerful offensive miracle.
- Skeletons in the Coat Closet: Its exoskeleton looks like it's made of bones.
- Trick Boss: Its size, abilities, and mobility can make fighting it conventionally extremely difficult for melee builds... unless you simply stand behind it and a small jut of rock, drawing the ballista's fire to you, and thus the worm.

The charred, ashen remnants of an ancient demon, the last living witness to the Chaos of Izalith. His hammer is imbued with remnants of the original Chaos Flame.
- Boss-Arena Idiocy: His cave has pools of water in it, which will make the flames from his attacks go out near immediately.
- Death or Glory Attack: Making him lose almost all of his health will make the King try to kill you with an extremely powerful explosion. Unfortunately for him, he also takes all the fire out of him, reducing him to ineffectual flailing until he gets killed.
- Defiant to the End: The King's final attack listed above leaves him too weak to even lift his hammer, but it doesn't stop him from trying. He'll repeatedly attempt to drag himself back up to no avail until you finally kill him.
- Elemental Weapon: This hammer is a smoldering club, and will shoot out anything from fiery blasts to shockwaves.
- Eye Scream: At some point, he lost an eye to someone.
- Evil Old Folks: He's one of the oldest demons in the series, having been around since at least the events of Dark Souls and certainly looks the part. Unlike all other demons encountered in the franchise, his face has an elderly and grizzled appearance, which serves as a testament to just how ludicrously ancient he is. Despite his age, he's still the king of demons and has enough left in him to put up one hell of a fight against you.
- Last of His Kind: The last living demon, after having slain the Stray Demon and the two Fire Demons. Once this one dies, there are none left. This is subjected to Retcon in The Ringed City, where you will discover his son, the Demon Prince, within the ruins of Dark Souls I's Firelink Shine.
- Legacy Boss Battle: Oddly enough, he's a clone of Dark Souls' Firesage Demon, albeit rehauled to fit with Dark Souls III's boss dynamic.
- Leitmotif: Old Demon King.
- Optional Boss: Getting to him can be a mild case of Guide Dang It!, as it requires you to cut down the Catacombs bridge and go down it. Since the game outright warns you to steer clear of the bridge and look for another route, it's easy to sail right past it and move on to Irithyll.
- Plant Person: He seems to be made up of the white roots associated with Dark Souls' Lost Izalith and Dark Souls II's Old Chaos. And he's also animated with fire.
- Playing with Fire: As a demon, most of his attacks are fire-based, like summoning spreading rings of fire.
- Sole Survivor: He's stated to be one of the last surviving demons of Izalith, as the Chaos Flame that birthed and sustained them has been extinguished. This is best exemplified by the mountains of demon corpses that litter his arena, mostly of Asylum Demons and Capra Demons.
- Turns Red: With half of his health gone, his entire body will flare up with fire and he will unleash some incredibly complex pyromancy spells, all of which are very damaging. When his health is down to approximately 10%, he will fall to his knees and cast a very slow but damaging explosion. Afterwards, he is incapable of attacking and his flames go out.
- Wreathed in Flames: He's old and decaying, but he's got the last vestiges of the Izalith flames in him. He will cover himself in it after he's been hit enough times.
Irithyll of the Boreal Valley

Dog-like beasts of unknown origin. One guards the bridge leading into Irithyll proper, while two more guard the corpse of Archdeacon McDonnell.
- Achilles' Heel: They're highly vulnerable to Bleed, so a bleed weapon or Carthus Rouge (or both) simplify their battles.
- Ain't Too Proud to Beg: If you land a critical hit on it while its health bar is on its last legs, the Beast will lie on the ground with its hands clasped in a begging gesture. It could either be asking for mercy or a quick death.
- Attack Its Weak Point: While you can hit it anywhere most of its body takes reduced damage, but not the head. Not only does it take high damage if you hit it in the face, causing enough harm to the head will stagger it allowing for a devastating critical.
- Belly Mouth: They have Gaping Dragon-type vertical mouths on their bellies.
- Boss in Mook's Clothing: Despite having no boss bar, they are some of the most deadly, non-respawning enemies in the game: having huge health pools, and the ability to kill players with ease.
- Expy: One to three creatures — the Ammit from Egyptian mythology, the Beast of Darkness from Berserk, and the Watchdog of the Old Lords from Bloodborne.
- Enemy Rising Behind: The beast guarding the bridge will appear out of nowhere and a good distance behind you when you are trying to cross.
- Extra Eyes: They have six glowing orange eyes.
- Lightning Bruiser: Extremely fast and can destroy even high-level players in seconds.
- Malevolent Architecture: The first beast that is encountered is on the narrow bridge into Irithyll, where there's little room to dodge and you have the option to either fight or run... yet the water reserve that houses the two beasts is entered via a very long ladder that's perfect for dropping off for an easy plunge attack (which, more often than not, immediately puts the beast into staggered state for a free riposte). And to top that off, one of the beasts happens to be around a blind corner that prevents it from seeing the player or the ladder, meaning that the other beast can be easily aggro'd to the ladder without having to deal with both at once.
- Mini-Boss: Not a proper boss fight, but they have high HP and can handily wreck a player and like a proper boss, does not respawn on death.
- More Teeth than the Osmond Family: They've got two full rows of teeth in their crocodile-like maws, not to mention the mouths on their underbellies.
- Shock and Awe: They can shoot a blast of lightning from their mouths.
- Super-Persistent Predator: Did you run for your life across the bridge and through the barrier where the beast can't follow you further? Well, guess what? The beast jumps off the bridge and renews the chase as you wade through the lake later on, meaning you now have to run yet again or fight it in water that slows your movement to a crawl.
- Was Once a Man: The Pontiff's Right Eye Ring that you find from the first one you defeat implies that they used to be Boreal Knights who succumbed even deeper into beasthood than Vordt, the Dancer, or the lesser Outrider Knights have. This is further supported by the fact that, should they survive a riposte, they raise their front limbs in a praying gesture as if begging for their lives.

The elite guard of Pontiff Sulyvahn himself, frozen wraiths who use a very acrobatic fighting style and have a slew of offensive spells at their disposal.
- Bash Brothers: They're often encountered in pairs.
- Bling of War: Their armor is very opulent, and includes a small gold crown as headgear.
- Confusion Fu: They sometimes delay their attacks to throw off your dodge timing and catch you off guard. Fortunately, they can be hit while doing this.
- Elite Mooks: They're the personal army of Pontiff Sulyvahn himself.
- Evil Sorcerer: They can shoot Dark magic at you from a distance.
- Expy: They look a lot like the ghostly forms of the Nazgul in The Lord of the Rings.
- Glass Cannon: They hit really hard, especially with their ability to inflict Frostbite, but have low poise, so it's easy to stagger-lock them.
- An Ice Person: Their attacks inflict Frostbite buildup, keeping to Irithyll's snowy theme.
- Lean and Mean: They're very tall and emaciated.
- Master Swordsman: They're very skilled with their curved swords.
- Sinister Scythe: Exactly one Pontiff Knight in the game wields a scythe, located just before Sulyvahn himself.
- Sleeves Are for Wimps: Their armor noticeably lacks sleeves, particularly noticeable when you wear it yourself.

Larger and more elite knights in service of Sulyvahn. All of them are equipped with Immolation Tinders that are half flaming spear and half sorcery catalyst.
- Bling of War: Much like the smaller Knights, their armor is very ornate.
- Carry a Big Stick: They wield Immolation Tinders, which can be used physically as a halberd, or as a catalyst for sorcery.
- The Computer Is a Cheating Bastard: The pyromancies that they cast are quite different to the ones that the player can get, and several of them can go through walls and hit you even if the Witch casting them can't see you. Not to mention that, if you can get one of their Immolation Tinders to drop, you'll disocver that it's actually a sorcery catalyst and can't cast pyromancies at all.
- Impaled with Extreme Prejudice: If you get close to a Fire Witch to attack them, they may attempt to hit you with their catalyst; doing so will run you through with the sharp end, lifting you up and then tossing you a fair distance away.
- Knight in Shining Armor: Their armor looks quite fancy, and according to item descriptions, they used to be the holy knights of Irithyll until their hearts were swallowed by the Profaned Flame.
- Large and in Charge: They are about as tall as two of your character stacked on top of each other, and even dwarf the other Lean and Mean enemies in the area.
- Lean and Mean: Like their smaller counterparts, although their armor bulks them up a bit more.
- Magic Knight: Though dressed like knights, they primarily use fire spells, though they have no problem hitting you with their staff if you get close.
- Playing with Fire: In stark constraint to the other enemies in the area, they are equipped with spears wreathed in fire that they can use to cast damaging pyromancies. This is likely due to Sulyvahn's discovery of the Profaned Flame beneath Irithyll.
- With the differences compared to player pyromancies and using a sorcery catalyst, it all but confirms they are casting Flame Sorceries rather than Pyromancies.

Odd wraith-like beings that roam around Irithyll. They're quite slow but more than make up for it by being surprisingly damaging and invisible most of the time.
- BFS: Some of them carry Claymores.
- Bling of War: Distinctly averted in comparison to pretty much everything else in Irithyll; all they wear is a sackcloth and that's it. Considering that they're slaves, it's justified.
- Expy: They're basically smaller versions of the Mad Ones from Bloodborne, down to being hard to see most of the time and having Glowing Eyes of Doom.
- Glowing Eyes of Doom: They glow a stark white, and the eyes are really the only way you're going to be able to see them at a distance.
- Invisibility: Their defining trait. Aside from a small cloud of smoke and their eyes, you are completely unable to see them unless you get close to them. They can't even be targeted until they reveal themselves to you. Due to their status as slaves, this may be an enchantment on them designed to keep them out of sight, out of mind.
- Zerg Rush: There's one particular room that is absolutely lousy with these things, both upright and crawling. The room is also pitch-black, so the most common message seen upon entering the room is "Torch Required."

Giant spider-like creatures found near bodies of water.
- Big Creepy-Crawlies: They're giant water spiders or something.
- The Blank: They have no faces under their hair, just a blank slab of flesh.
- Non-Mammalian Hair: They have disturbingly human-like hair on their "heads".
- Vagina Dentata: Like the Gaping Dragon in the first game, these guys have a giant mouth where you'd expect their ribcage to be.

They're also back! Once the noble protectors of Anor Londo, the Silver Knights have fallen into corruption and now seem to fight for Pontiff Sulyvahn. This doesn't make them any less deadly.
- Ambiguously Human: Unlike the Silver Knights from the first game, who were clearly gods (as they take bonus damage from Occult weapons, which are meant for fighting gods), the Silver Knights here appear to be human, as they take bonus damage from the Hollowslayer Greatsword (which deals bonus damage to hollows; in Dark Souls, only humans can go hollow).
- Back for the Finale: Just like the Black Knights, they return after being absent from the second game.
- Badass Cape: Their armor comes with noble looking half-capes.
- Boss in Mook Clothing: Much tougher than the normal enemies in Irithyll.
- Elite Mooks: They're greater warriors than even the Pontiff Knights.
- Face–Heel Turn: Judging by the fact that they don't attack members of the Cathedral, it seems that they now serve Aldrich and Sulyvahn.
- Fallen Hero: See Face–Heel Turn. Willingly or not, they now serve the invaders of the city they were sworn to protect.
- Lightning Bruiser: Even moreso than the first game. Now they have an array of Bloodborne style dodges that will keep you from getting a good hit in while they tear you to bits.
- Schmuck Bait: When you first encounter them you'll see one standing still with his back to you, observing a painting of Gwynevere. Your initial reaction might be to quietly sneak up on him for an easy backstab, but if you try this you'll probably take a great arrow to the skull from his buddy on the ledge directly behind you who had you in his sights the second you stepped in the room.
- Shock and Awe: They can now imbue their weapons with lightning to do increased damage.
- Unique Enemy: For some reason, the three knights that first appeared in the painting gallery don't respawn when killed even though every other Silver Knights fought afterwards does.
- Unusable Enemy Equipment: Unlike the first game, the Silver Knight Straight Sword and Silver Knight Spear are both unobtainable by the player, although their armour set and shield are both still obtainable. Especially odd considering all of the Black Knight weapons from the first game are obtainable even though two of them aren't even used by any of this game's Black Knights.
- Black Knight: More apparent here than in Dark Souls II, as he is a Red Phantom that you have to defeat in order to progress Sirris' questline.
- Boss in Mook Clothing: Along with Hodrick, Creighton is the only NPC balanced to be fought by two characters, as you face him alongside Sirris. He has a metric ton of health, more healing and debuff options than almost any other invader, and he hits incredibly hard, being more than capable of killing either Sirris or the player in two or three hits.
- The Bus Came Back: He's apparently the same character from Dark Souls II, although he is much more Obviously Evil here than he was in that game. It would also seem that he got back at Mild-Mannered Pate.
- Combat Pragmatist: Just like the other members of Rosaria's Fingers, he is equipped with the Obscuring Ring which make him invisible at a certain distance, enabling him to get the drop on you. During his invasion against Sirris and later you, he will toss Duel Charm to negate Sirris's buff and yours and Undead Hunter Charm to prevent you from using your Estus to heal. And should he ran out of Estus himself to heal, he will pop a Divine Blessing to recover all his health back, making him the only NPC in the game to do so.
- Cutting Off the Branches: It would seem that he exacted his vengeance on Mild-Mannered Pate, no matter who you sided with in that sidequest in Dark Souls II.
- It's Personal: Will only invade you if you help Sirris fend him off in her world. Seems like he is still sore from his loss.
- Karma Houdini Warranty: Regardless of whoever The Bearer of the Curse helped, if they did, the survivor would not be seen again in II. He dies for real after invading the Ashen One twice.
- Man in the Iron Mask: Still wears a full metal helmet and face mask with chain mail guarding the back of his neck, thus obscuring his entire head. The mask is not technically part of the armor set but something Mirrah forces criminals sentenced to death to wear. The game questions why he's still wearing it.
- Odd Name Out: Sirris says he's a member of Rosaria's Fingers. If that's true, he's the only one without a "-finger" in his title.
- Old Soldier: Hacking into the files shows him as an old man.
- Retcon: Dark Souls II implied that he wasn't a really a knight of Mirrah and that he was only pretending to be one while using knockoff equipment (his axe didn't do any lightning damage for one thing), and that he was also a Serial Killer. This game changes it so that he was a real knight who dishonorably deserted his order (his axe does do lightning damage now). Though given that he now runs with Rosaria's Fingers and wears the mask of a death row inmate, the serial killer part is probably still true.

A powerful sorcerer from the Painted World of Ariandel who rules Irithyll and serves as spiritual leader of the Cathedral of the Deep. He wields two greatswords imbued with dark magic and fire, combining an aggressive fighting style with powerful sorceries.
- Achilles' Heel: His attacks can be parried and riposted, greatly simplifying the fight if you can get the timing down.
- Arc Villain: Alongside his master Aldrich, he's the main antagonist for the first half of the game, and indeed much of that time is spent dismantling the forces of the Deep before confronting Sulyvahn himself.
- Asshole Victim: He's the closest thing the game has to a Big Bad, usurped the royalty of Anor Londo, got rid of his opponents via Uriah Gambit while also transforming them into monsters, and that's not even all he's done to deserve getting squashed by a greatsword.
- Badass Preacher: He's not just the leader of the Cathedral of the Deep, but a mighty warrior in his own right, wielding two extremely powerful enchanted greatswords with ease while firing powerful sorceries at you.
- BFS: He has two, one imbued with the flames of the Profaned Flame, and one imbued with dark magic.
- The Blank: If you look closely, he has no face, just a bunch of roots/cloth covering a blank head.
- The Corrupter:
- He purposefully hands out rings to his Outrider Knights that drive them insane and turn them into bestial berserkers, including Vordt and Dancer.
- He seems to be one of the few characters in the game to have some sort of connection to the Abyss, as the Outrider Knights who serve him can travel through it. However, it's possible this is a manifestation of the Deep.
- Did You Just Punch Out Cthulhu?: He imprisoned Gwyndolin in the Cathedral of the Deep to be eaten by Aldrich. It's implied that Sulyvahn poisoned him.
- Disc-One Final Boss: He could legitimately be described as the Big Bad of the game if it weren't for the fact that he's killed about halfway through as you inexorably continue your quest to defeat the rogue Lords of Cinder. Even then, he still puts up one hell of a fight.
- The Dragon: The highest-ranking formal member of the Cathedral of the Deep and thus the number two to Aldrich.
- Dual Wielding: He wields the fiery Profaned Greatsword in one hand and the dark magic Greatsword of Judgment in the other.
- Dub Personality Change: A fairly extreme one, albeit one that still mostly fits all the available evidence and avoids Dub Induced Plot Holes. In the original Japanese text, rather than Aldrich's servant/handler/right hand man, Sulyvahn is a scheming opportunist who has manipulated, usurped, and backstabbed his way to the top of both Irithyll and Anor Londo, taking control of both and consolidating power for himself through combining religious and temporal authority. Then Aldrich woke up and showed up, and after a very-literal power struggle Sulyvahn was forced to cede control over Anor Londo and the few remaining gods he'd made into puppets to Aldrich, retaining control only over Irithyll itself and allying with the new power over the world. This is also why there's some battle damage on his model; the player catches him in the immediate aftermath of fighting Aldrich and losing, and why there's so little of the Deep in Irithyll itself. Note that he's still a villainous character either way, but some of his worst crimes, such as feeding innocent children to sate Aldrich's cannibalistic hunger, aren't present there.
- Even Evil Can Be Loved: Arguably the single most unambiguously evil character in all three games, yet the cut dialogue of a tree lady in Ariandel, assuming it actually refers to him, calls him "sweet child" and asks him to come home.
- Evil Overlord: The despotic ruler of Irithyll and Anor Londo, having conquered both and turned them into wastelands inhabited solely by his depraved servants.
- Evil Sorcerer: An exceptionally skilled sorcerer, able to wield both the Profaned Flame and the power of Dark despite those forces being diametrically opposed to each other. It's implied that he was originally a mediocre wizard of no renown, but discovering both the power of the Deep and Profaned Flame gave him ambitions of overthrowing the gods and ruling over the Age of the Deep alongside Aldrich, making him into the monster he is today.
- Expy: Pontiff Sulyvahn is quite similar to Griffith. Both started off as peasants who traveled to distant lands in search for their own kingdoms to rule and gained followers to help them fulfill their goals. They eventually achieve their goals of ruling a kingdom by joining a group of four supernatural beings, betray their followers, and commit a slew of atrocities one of which includes utterly destroying the mind of their female comrade. And while Griffith and Sulyvahn are far from the only threat the heroes have to face, they are the ones that gives them the most trouble. Plus, Sulyvahn's Corvian wings during his second stage brings parallels to Griffith's transformation from human to The Hawk Of Darkness, Femto.
- Fighting Spirit: In the second phase he creates a spectral copy of himself that fights in tandem with his normal body.
- From Nobody to Nightmare: Described as being a young sorcerer of no renown before his discovery of the Profaned Flame and self-styling as a false prophet.
- Ashes of Ariandel adds more to this. He was merely just another Corvian raised among forlorn beings in the Painted World. He left the painting, as well as his earliest sorceries, behind since he wasn't forlorn and had little use for the comfort of the painting. That someone of such humble origins amassed so much political clout and became the most unambiguously tyrannical character in the series is nothing short of impressive.
- Green-Eyed Monster: Item descriptions reveal that he was envious of and resented the rule of the old Gods of Anor Londo, leading to him overthrowing them and becoming the head of the city.
- Hate Sink: Like his boss Aldrich, Sulyvahn is one of the very few characters in the entire series who is both 1) sentient and 2) utterly lacking in any Tragic Monster traits or redeeming qualities whatsoever. He's responsible for a huge amount of the damage that has been done to the world as the Ashen One finds it, fed one of the last surviving gods (Gwyndolin) to Aldrich, at least three of the other bosses (Aldrich, Vordt, and the Dancer) are the result of his handiwork (four if you believe that he was the one who convinced Lothric not to Link the Flame) and above all, he has no clear motives beyond simply being a tyrant with a hunger for power. This (combined with his extremely difficult bossfight) makes it immensely satisfying when you finally get the chance to put the bastard down for good.
- The Heavy: Aldrich may be a Lord of Cinder and the Cathedral's canonized Saint, but Sulyvahn's the one who got all the authority. He's the public head of the Cathedral of the Deep, giving him great political clout, as seen by his conquest of Irithyll. He has alliances with numerous other evil sects, including Rosaria's Fingers and the surviving nobility of the Profaned Capital. His preservation of the Profaned Flame and personal grudge against the royal family of Anor Londor give him ties to multiple Ages of Fire and Lords of Cinder. He wields two greatswords; one imbued with the Profaned Flame and the other with sorcery — at the same time. Multiple lore significant characters have been directly victimized by him in their backstories. A significant percentage of the enemies you fight before and after him, including the vast majority of the Unique Enemy and Mini-Boss mobs, were part of his creations and private armies. This includes no less than two mandatory bosses, one of which is (meant to be) fought in the late game. You'll be hard pressed to find a more long-lived, malevolent, and most of all accomplished antagonistic figure in all the Soulsborne series. And unlike other contenders, you fight Sulyvahn at the height of his power. If he weren't fought during the relatively early mid-game, he'd probably qualify as a full-on Big Bad.
- His already important role in the game could potentially get even larger, depending on how you interpret the lore. Statues can be found in the High Wall of Lothric displaying Prince Lothric wielding the Profaned Greatsword, a weapon that Sulyvahn, himself, wields. As a great sorcerer and potentially the first scholar of the grand archives, this suggests that Sulyvahn may have been the one who doubted the linking of the flame and fostered Lothric's cynicism towards the ancient fire. This would make Sulyvahn responsible for just about everything in the story of Dark Souls III.
- Hellfire: He discovered the Profaned Flame beneath the tundra of Irithyll, a possible Call-Back to the Old Chaos burning beneath Eleum Loyce in Dark Souls II, and can call upon it.
- Hoist by His Own Petard: In order to keep up the facade that the Outrider Knights would eventually be able to come home, Sulyvahn gave his "important" ones a Small Doll, which would reassure the holder and let them cross the barrier blocking the city from outsiders. One of these people dropped his at the Cathedral of the Deep, so the Ashen One is able to get in. Whoops.
- Homage: His habit of handing out cursed rings that slowly corrupt their wielders into monsters, combined with the Ringwraith-esque appearance of his most powerful minions, seem to be deliberately evoke Sauron.
- Impaled with Extreme Prejudice: One of his strongest attacks impales you on his sword.
- Karmic Death: Anri of Astora is available as a summoned phantom for his bossfight, and it's strongly implied that they (together with Horace) were the only two people ever to escape from being devoured by Aldrich. Because Sulyvahn was the one who kept Aldrich fed to further his own power, this means that you get to help Sulyvahn's only surviving victim put him down at his moment of greatest power. Furthermore, Anri is so insanely tough at this point in the game that they can easily power through most of Sulyvahn's attacks and drawing aggro away from the player. This effectively trivializes the fight and as a result it can very easily turn into the Ashen One shouting encouragement from afar while Anri tosses Sulyvahn around like a ragdoll.
- Leitmotif: Pontiff Sulyvahn.
- Large and in Charge: Supreme leader of the Church of the Deep, and one of the tallest humanoid characters in the game. He's almost twice as tall as the Ashen One.
- Lightning Bruiser: More often than not, he'll lunge and swing at you so quickly that he might as well be flash stepping you.
- Manipulative Bastard: Heavily implied with some of his actions in the backstory. For example, he gets rid of political threats to his rule by conscripting them into his Outrider Knights and then sending them off on missions where they are doomed to either die or lose their minds, all while falsely promising that they would be able to come home.
- Muscles Are Meaningless: While extremely tall, Sulyvahn is also quite skinny. Yet he's capable of leaping dozens of feet into the air and can swing around two hundred+ pound BFSs at greater speeds and with greater ease than a regular man would a two-pound arming sword.
- Near-Villain Victory: Is on the cusp of victory at the outset of the game, having already conquered both Irithyll and Anor Londo and fed Gwyndolin to Aldrich, and he's all set to conquer more considering that no other faction is strong or united enough to stop him. Then the Ashen One waltzes in and kills both him and his master, permanently (and unceremoniously) putting an end to his ambitions.
- One-Winged Angel: At half health he grows two masses of black roots or stiff tentacles from between his shoulder blades that vaguely resemble wings and afford him a glide attack. Ashes of Ariandel reveal that he originally came from the Painted World, which suggests that he's a Corvian. That would certainly explain the wings. He also spawns a spectral clone of himself and starts using more powerful attacks, such as leaping dozens of feet into the air and then propelling himself at you, throwing powerful soul arrows, and slamming into the ground to release a large firery explosion.
- Planimal: He sprouts black wings from his back like a Corvian when at half health, but made of what appears to be tree branches rather than flesh and feathers. Given that his birthplace was the Painted World of Ariandel, one can assume that he is half Corvian and half Birch Woman. The Birch Woman guarding the Snap Freeze sorcery has some Dummied Out dialogue where she calls for her child to come home. Since Sulyvahn invented Snap Freeze, this implies he's the child, and that particular Birch Woman is his mother.
- Psycho Supporter: This guy is the reason that you have to spend so much of time hunting down Aldrich. The Cathedral of the Deep and the organization around it were built with the two-fold purpose of funneling sacrifices to Aldrich and protecting him after the clergy was corrupted. When Aldrich was revived along with the rest of the Lords of Cinder, Sulyvahn spirited him off to the ruins of Anor Londo at the first opportunity. He's also the one responsible for feeding Gwyndolin to Aldrich.
- Really 700 Years Old: It's unknown as to how old he really is, but he's old enough to have either seen the Profaned Flame ravage Yhorm's kingdom, or have found a remnant of it soon after.
- Self-Duplication: Spawns a phantom double after his transformation. The phantom actually performs the same moves as Sulyvahn, albeit at a slower pace.
- Sinister Minister: His title of "pontiff" means "pope", meaning he's more than likely the highest member of the Cathedral of the Deep. Yorshka's dialogue and the item description of the Golden Ritual Spear implies that the "pontiff" title was gained when he usurped control of Irithyll and Anor Londo from Gwyndolin and falsely declared himself the leader of the moon-worshiping religion in Irithyll related to the Darkmoon Knights.
- Sword Beam: In his second phase, one of his attacks is a horizontal energy beam fired from his dark magic sword.
- Tyrant Takes the Helm: Conquers Anor Londo and Irithyll from their original rulers and installs himself as an all-powerful dictator.
- Undignified Death: Based on how he did that much of a setup to usurp Ithryll and Anor Londo from the Gods, you killing him midway into the game before even finding out what he did is essentially this for him.
- Uriah Gambit: The Outrider Knights exist for the sole purpose of getting rid of people he doesn't like. The knights will either be killed in battle or his Pontiff's Eye rings will make them devolve into mad beasts while far away from Irithyll. Even if they do manage to make their way back, he set up a magic barrier at the entrance that can't be passed through unless you're carrying a doll, and he presumably didn't give any of them one. In any case, they will be in no position to challenge Sulyvahn's authority. The Dancer of the Boreal Valley, for instance, was a daughter of the royal line who he conscripted into the order — presumably to get her out of the way.
- The Usurper: Takes control of Irithyll from the line of Gwyn and his family, proclaiming himself pontiff, and begins ruling the city as a tyrant.
A pair of warriors found in a courtyard just outside Pontiff Sulyvahn's arena.
- Dual Wielding: One dual-wields Drang Hammers, and the other Twinspears.
- Magic Knight: In addition to their melee weapons, they can also buff their weapons with Dark.
- Mythology Gag: They both use paired weapons and are from the land where Dark Souls II takes place, the only game in the series which properly implemented a Dual Wielding system.
- The Remnant: Drangleic fell a long time ago, leaving these guys to eke out a living as sellswords.
For info on his boss battle and lore, go to Dark Souls III: Lords of Cinder.
Irithyll Dungeon

The cruel jailers of Irithyll's dungeons. They wield branding irons that prevent you from using Estus and can drain your max health just by looking at you. You read that right.
- Aristocrats Are Evil: They used to be noblemen in the Profaned Capital. When that city fell, they joined up with Pontiff Sulyvahn, and now luxuriate in torturing the prisoners of Irithyll's dungeons.
- Cool Mask: They wear the Aristocrat's Mask, which indicates they used to be noblemen in the Profaned Capital.
- Death Glare: When their eyes turn red, hide. Your health bar will shrink just by being in their sight. The bar regenerates after about 20 seconds, but your health doesn't, making fighting them in the open is a very risky prospect.
- Evil Laugh: They will giggle ominously while pursuing you.
- Lean and Mean: They're very tall and thin, though the robes draped over them obscure this somewhat.
- Mythology Gag: Their design and function serves as a Call-Back to the Jailers in the Tower of Latria from Demon's Souls, as well as inhabiting an area that has several architectural similarities to that area.
- Ominous Walk: The sound of their footsteps echo through the halls of the dungeon. For added effect, they never move faster than a slow, stalking walk even while attacking you.
- Torture Technician: Their bread and butter; they were originally nobility of the Profaned Capital that delighted in torturing Undead in cruel and creative ways, and they all carry a large branding iron as a weapon.
- Wardens Are Evil: Not only do they abuse prisoners, they served under Pontiff Sulyvahn.

Huge, mutated creatures that haunt the dungeons of Irithyll. They resemble massive tadpoles with vaguely human faces and wield a variety of sorceries against you.
- Body Horror: They're giant, baby-faced tadpoles with no eyes.
- Evil Sorcerer: They carry around small catalysts that they use to fire missiles at you.
- Eyeless Face: They seem to have eyes, but they're covered over with skin.
- Hell Is That Noise: Their shrieks echo throughout the dungeon even before any of them are encountered.
- Nothing Is Scarier: One of them, encountered in a darkened, out of the way cell on the top floor of the dungeon, does absolutely nothing to attack you at all. It just stands against the wall, staring blankly into nothing. It's pretty creepy to walk into a room and turn around to just see this thing standing in the corner not doing anything.
- Was Once a Man: The fact that they use catalysts against you, with one even dropping a rare Sorcery when killed, heavily implies that they used to be human sorcerers who were imprisoned and experimented upon by Sulyvahn's lackeys.
- BFS: He wields the Murakumo, one of the Curved Greatswords.
- Bow and Sword in Accord: He wields an Arbalest crossbow and the Murakumo.
- Continuity Nod: Alva is a character first mentioned in Flavor Text in Dark Souls II. Now we finally get to meet him in person.
- Happy Ending Override: Alva's story originally ended with the Bittersweet Ending of him failing his quest to save his love interest Saint Serreta, but ending up still finding love with his former enemy Zullie the Witch, and it would seem that they went on their merry way in one of the few Golden Endings for any named character in this series. It would seem that, given his change in title from "the Wayfarer" to "Seeker of the Spurned" that he lost Zullie somewhere along the way and is invading other worlds to try and find her. Made even worse in The Ringed City, where he invades the player yet again... right next to Zullie's corpse.
- Red Baron: His original epithet was "The Wayfarer" and he now goes by the title of "Seeker of the Spurned."
- Together in Death: Maybe, depending on how one interprets the Locust Preacher's words (the Locust Preacher being an Unreliable Expositor at best). According to it, Alva and Zullie were reunited in the Abyss.
The Profaned Capital
Survivors of the Profaned Capital that decided to stay in the city rather than journey to Irithyll after Pontiff Sulyvahn took over. They are adept in harnessing the Profaned Flame, which they use to great effect against you.
- Lean and Mean: Comes part and parcel with being a Palette Swap of the Irithyll Jailers.
- Light Is Not Good: They use fire based attacks and are dressed all in white, but they're certainly not to be messed with.
- Palette Swap: They're essentially white-robed Irithyll Jailers that have a different weapon and moveset.
- Playing with Fire: They shoot Profaned pyromancies at you, and they can do so from a surprising distance away. The first group encountered even controls a large brazier that bombards you from afar with fireballs.
- Squishy Wizard: Have about as much health as the Irithyll Jailers but lack the abilities of the Jailers to eat your health bar, slow you down, or block your Estus recovery. The only thing that they have to their credit is a proper ranged option with their Pyromancies.
- Torture Technician: The description of the daggers they drop note that they were said to enjoy wounding others.
- Zerg Rush: The few times you encounter them they're in a group of at least four, which makes up for the Squishy Wizard status.

Giant, grotesque baby-like beings with a tumorous, oozing hand for a head and multiple eyes in its stomach. Some appear to be sleeping and are non-hostile until you attack them.
- Achilles' Heel: They have a ton of poise and health, they hit rather hard, and they have a deceptively wide attack range. But they're very susceptible to blood loss. One hit from any bleed-inducing weapon with Carthus Rouge will instantly inflict blood loss.
- Boss in Mook's Clothing: They are unique, non-respawning and are very dangerous.
- Eyes Do Not Belong There: There appears to be clusters of eyes nested in their bellies.
- Giant Hands of Doom: It has a giant hand for a head, which can be used to grab and eat you.
- Karma Houdini: According to the description of the weapon Eleonora, they went unpunished after the creation of the Profaned Flame, living their lives without cares. At least until the player comes along.
- More Teeth than the Osmond Family: They've got a ton of teeth surrounding their hand head, and on their actual hands.
- Odd Organ Up Top: They have a massive hand-like head and their palms have a gaping hole lined with teeth.
- Rolling Attack: They lie flat on their stomachs and roll over comically in an attempt to injure you.
- Unique Enemy: Uniquely, none of the 4 monsters of respawn upon being killed.
- Was Once a Man: It is implied that these beasts were once women and had caused the curse of the Profaned Flame.
- All There in the Manual: The Japanese guidebooks give his name as "Eamon".
- Magic Knight: He's able to use magic, AND he has a giant hammer he can use to engage in melee combat.
- Magic Staff: He wields a powerful staff, based on the one used by Big Hat Logan from the first game.
- Squishy Wizard: He can deal a lot of damage if you're not careful, but is pretty easy to stagger.

Large stone beings equipped with either a lance or a flaming great hammer, and can use powerful Profaned Flame pyromanices to give you a hard time. They also show up during parts of Lothric Castle.
- Boss in Mook Clothing: They serve as this in function; they're large, have high health and defenses, a difficult to predict moveset, and powerful attacks that can put some serious hurt on you.
- Large and in Charge: They're taller than Pontiff Sulyvahn, and that's even without their heads.
- Lightning Bruiser: They're deceptively swift for their size and have the ability to fly short distances to close the gap between you and them. They can also lay you out flat with their attacks should they connect.
- Playing with Fire: They use a few pyromancies against you, especially the ones that have the Gargoyle Great Hammers.
- Rock Monster: They appear to be made from stone, though it's not clear if they used to be statues or were created in some other way.
- Wing Shield: They can shelter themselves behind their wings for defense, which stagger you when you hit them but still causes a small bit of Scratch Damage due to their wings still being a part of them. Fortunately, they can still be guard-broken.
Lothric Castle
Dragonslayer Armour
A reanimated suit of Dragonslayer Armour that protects the entrance to the Grand Archives. It attacks with a massive circular greatshield and lightning-enhanced axe, crafted from re-purposed pieces of the armor.
- Animated Armor: Its soul description says it was an abandoned set of a Dragonslayer's armor, until it was reanimated by the Pilgrim Butterflies who fly over the boss arena. The weaker version fought in The Ringed City has been reanimated yet again, not by the Butterflies but apparently simply by its residual knowledge of the "memory of the hunt". The numerous corpses of Harald Knights surrounding it show that it has been busy before you get there.
- Assist Character: The Pilgrim Butterflies — essentially crosses between the Bed of Chaos and Moonlight Butterfly — fire barrages of dark magic and shoot explosive beams of dark energy from the sidelines.
- Degraded Boss: The Iron Dragonslayer, a weaker version of the Dragonslayer Armour, can be encountered in The Ringed City, and drops its armor set upon defeat. The description of its armor confirms that it's the very same one you fought on the bridge in Lothric Castle, as eons have passed since then.
- Kryptonite Factor: Because it is animated by the Pilgrim Butterflies, the Armour is of the Abyss. As such, the weapons transposed from the Soul of the Blood of the Wolf, the Farron Greatsword and the Wolf Knight's Greatsword, deal extra damage to the Dragonslayer Armour.
- Legacy Boss Battle: Subverted. It's a suit of armor worn by a Dragonslayer who served the gods of Lordran, but is otherwise not the armor worn by Ornstein. You eventually find out that Ornstein was actually searching for the Nameless King, who was heavily implied to be the Firstborn Son of Gwyn, at Archdragon Peak, since that's where you find his armor.
- Leitmotif: Dragonslayer Armour.
- Lightning Bruiser: With emphasis on the Lightning part. Not only is the Armour frighteningly fast with its axe, which it swings very frequently for high damage, but it's also extremely light on its feet, being capable of chasing you all around the boss arena if you try to run away to create distance. It also uses its shield for both protection and bashing you as part of its many attack combinations.
- Luckily, My Shield Will Protect Me: It has an enormous, ornate shield.
- One-Steve Limit: Presumably to avoid the confusion between the boss and Ornstein's set, this boss's name is spelled Armour to differentiate it.
- Power Trio: The Sacred Oath miracle is the tale of the Sun's firstborn (the Nameless King), his faithful first knight (Ornstein), and the brave dragonslayer who served them both (the Dragonslayer Armour's wearer).
- Shield Bash: It uses its shield as a weapon almost as much as it uses the axe, weaving the two together into devastating combos. Trying to block it with your own shield is practically guaranteeing getting staggered.
- Shock and Awe: Its axe is electrified, and when doing a two-handed Shockwave Stomp, the weapon's lightning intensifies, and the attacks's impact makes a deafening thunder sound.
- Shockwave Stomp: One of its deadliest attacks, where it temporarily puts its shield away and handles its axe with two hands, before swinging downwards in front of it, leaving specks of lightning in its wake.
- Slasher Smile: The helmet spot a wicked set of sharp looking teeth, giving it a smile or wicked grin.
Consumed King's Garden

Oceiros, the former King of Lothric, wanted to harness his royal blood to achieve great power. Along the way, he discovered the secrets of the Grand Archives and became consumed by the knowledge stored there, which cost him his mind.
- Abusive Parents: He might care about his dear Ocelotte, but his treatment of his sons Lothric and Lorian leaves a lot to be desired, siring them specifically to create an heir to link the First Flame, and forcibly enjoining their souls and destinies when Lothric showed no signs of developing correctly.
- Action Dad: He has three sons (that we know of), Lorian, Lothric and Ocelotte, and at the start of his battle is seemingly cradling Ocelotte in one of his arms.
- Benevolent Architecture: His second phase is an utter nightmare to deal with in a fair fight, but you can very easily get him stuck in the little alcove behind the big tree in his boss arena, allowing you to cheese him to death with arrows in almost complete safety, with the only thing you need to worry about being his crystal breath.
- Body Horror: Choosing to worship Seath of all dragons did a number on him.
- Boss Banter: He is one of the very few bosses in the series that speaks several lines both in his boss cutscene and during the first third of the fight. Once the player depletes a decent chunk of his health, which coincides with Oceiros realizing that either he's not holding his son or that his invisible (similarly to Priscilla) and supposedly invincible crossbreed child turned out to be useless, he screams and then stops talking for the remainder of the boss fight.
- Breath Weapon: His second phase has him occasionally breathe out a jet of mist that crystallizes everything it touches.
- The Caligula: He was once the king of Lothric, before he grew an obsession for the secrets he found in the Grand Archives that once belonged to Seath the Scaleless.
- Crazy Sane: His delusion that his likely long-dead son Ocelotte is still alive and needs his protection helped him hold on to a bit of his sanity even after studying Seath's secrets warped him into a grotesque parody of a dragon. When he finally realizes his son is gone, he snaps and devolves into a mindless raging beast.
- Deadly Gas: His first phase can cast Pestilent Mist.
- Divine Date: It's heavily implied his queen and the mother of his children was Gwynevere, Princess of Sunlight, which if true means he was married to a goddess (until she mysteriously disappeared after their last son was born).
- Draconic Humanoid: Like the members of the Path of the Dragon covenant, Oceiros transcended humanity by worshiping a dragon. Specifically, the Paledrake Seath the Scaleless, whom Oceiros ends up resembling.
- Eyeless Face: His head's model does have some eye sockets, but they're empty, and he's fittingly blind.
- Implacable Man: After the former king of Lothric went mad, his subjects sent numerous assassins to get rid of him, but none of them ever returned. This was presumably even before he mutated into a dragon hybrid, and he is still sitting in his chamber when the Unkindled arrives to finally finish him off.
- Kung-Shui: Destroys what's left of his arena as you fight, especially when he goes feral.
- Leitmotif: Oceiros, the Consumed King.
- Lightning Bruiser: In his second phase, he drops his staff and becomes a feral beast, relentlessly attacking you with barely-telegraphed charges that cover the entire length of the room in an instant, extremely fast tail whips with a huge radius, and crystal breath that causes Curse status.
- Magic Staff: Wields one in his first phase to use crystal magic, as well to simply bean the player over the head with it. He drops it in his second phase but retains a crystal breath attack.
- My Rules Are Not Your Rules: Normally, Pestilent Mist will do damage to anyone inside the cloud, including the person who cast it, but Oceiros is immune to his own mist.
- Mythology Gag: A lot of his characterization and appearance is one to Bloodborne. He was driven mad by Things Man Was Not Meant to Know, he bears a resemblance to the Kin type enemies and certain Old Ones, he devolves over the course of the fight from cogent and Affably Evil to a frenzied, howling beast, and he is obsessed with a child born of god-like beings much like the Old Ones were obsessed with having children with regular humans as they could have none of their own.
- Optional Boss: Getting to him requires a short detour, and his death is not required to advance the main plotline. However, beating him also unlocks Archdragon Peak and the Untended Graves, along with their respective bosses.
- Papa Wolf: His initial dialogue has him state that he will not give up his son Ocelotte to anyone, as the boy is all he has left.
- Protectorate: He's convinced that the Ashen One has come to kidnap or assassinate his charge, Ocelotte the "child of dragons", hence why he attacks you.
- Running on All Fours: After losing a third of his health, Oceiros drops all pretense of trying to club you with his staff and simply goes feral, attempting to crush you in his blind rampage.
- Tragic Monster: Once the king of Lothric, his obsession with studying Seath's secrets led him to throw it all away, ultimately turning him into a grotesque monster. By the time you encounter him, his last bits of sanity are clinging to the belief that his youngest son is still by his side. When that fails and he finally snaps out to the truth, he screams in anguish and goes on a blind rampage like the beast he's become.
- Turns Red: When you initially face Oceiros, he stands on two legs and attacks rather calmly to protect his "son". Once you've done enough damage, he'll realize he's holding nothing and the player having to deal with his Unstoppable Rage and Villainous Breakdown as he runs on all fours makes up the rest of the fight.
- Unstoppable Rage: Once he breaks out of his dementia and realizes that his son isn't there, his composure completely shatters and he regresses into a feral beast, thrashing about in a blind rage trying to kill you.
- Villainous Breakdown: Hit him a few times, and he'll spout additional dialogue, realizing that his treasured Ocelotte is nowhere to be found. He completely loses it and starts attacking you like a savage animal.
- Vocal Dissonance: His spoken dialogue is deep and croaky. His battle shrieks, not so much.
Archdragon Peak

Reptilian humanoids with snake heads wrapped in shrouds. Come in both regular man-sized versions that carry a curved sword and small shield, twin knives, or a spear and greatshield, and giant versions that carry massive axes (occasionally on chains that give them amazing reach). And they all can spit homing fireballs at you.
- Breath Weapon: Some of them can spit fire at you.
- Epic Flail: Some of the larger Man Serpents carry chain-axes, allowing them to hit you even at range.
- Expy: Their hunched posture and ragged clothing makes them look more like the Fishmen of Bloodborne's Fishing Hamlet than the original Man Serpents of Dark Souls 1, who stood up straight and wore very little clothing. The dual-knife Man Serpents even fight and move very similarly to the dual-knife Fishmen.
- Fragile Speedster: The dual-knife snake men are evasive and fast hitting, but have no poise or means of defense besides occasionally switching to a parrying stance.
- In the Hood: They're covered from head to toe in ragged hood and robes that initially mask their serpentine nature, until they decide to extend their necks.
- Lightning Bruiser: The big ones move about as fast as their smaller cousins but hit like freight trains with their axes and take a lot to stagger.
- Luckily, My Shield Will Protect Me: Some Man Serpents carry a Small Leather Shield, while others carry an Ancient Dragon Greatshield.
- Snake People: More apparent when they use their snake bite attack as it stretches their necks out to ridiculous proportions and exposes their fangs and the front part of their faces.

Creatures that share a superficial resemblance to the Crystal Lizards but are slightly larger and can actually fight back against you unlike their smaller cousins.
- Crouching Moron, Hidden Badass: Not necessarily moronic given that they're lizards, but their rather dopey appearance belies their strength. They have a very respectable amount of health, boast a lot of resistances given their sturdy nature, and can give players just as bad of a time as the Snake Men that share their zone with some of their attacks.
- Incendiary Exponent: They can breath small spurts of fire as a ranged option.
- Mundane Solution: There's one easy way to deal with these things: perform a kick. This will knock them back a considerable distance, and savvy players can simply maneuver them near an edge and then kick them over for an easy kill.
- Rolling Attack: They've taken a page from the Bonewheel Skeleton's book and have a forward roll move that can catch unwary players or those used to blocking off guard. Becomes Hilarious in Hindsight given that the Bonewheel Skeletons that they emulate have been nerfed over the course of the series, making the creatures copying them more deadly than they are now.
- Enemy Summoner: Of particular note in that they can summon either Drakeblood Knights from Dark Souls II or warriors wearing Havel the Rock's set from Dark Souls.
- Snake People: They're humanoids with snake heads, but have heads modeled after those of cobras rather than the viper faces that other Snake Men have.
- Squishy Wizard: By the point in the game where you're likely to encounter them you're going to have weapons and equipment that can cut through their meager defenses like butter, but they make up for it by casting very damaging spells and summoning tough enemies to slow you down.
- Artificial Stupidity: After taking enough damage, he will attempt to use his shield's weapon art to encase himself in stone to increase his defense but if you managed to interrupt him before he finish, he will keep attempting to use the weapon art until he succeeded. Result? You can easily chain backstab him to death without him attacking back.
- Carry a Big Stick: Or petrified dragon's tooth, but that's just semantics.
- Continuity Nod: He's a very obvious one to Havel the Rock from Dark Souls, and most people seem to think that he is Havel. The conflicting descriptions on his weapon, greatshield, and armor leave some ambiguity as to whether the soldier encountered at Archdragon Peak is Havel himself or simply one of his loyal followers.
- Guide Dang It!: You receive the Dragon's Tooth and Havel's Shield when you defeat him, but getting the armor is a bit of a hassle. To receive it you need to go back to the bridge where you fought the Stray Demon in Farron Keep after beating him; it'll be on a body at the far end of the bridge on the side you fight the Demon on.
- Immovable Object: Normally averted due to poise only influencing hyper-armor on attacks and rolls for players and NPCs in this game, but his shield's weapon art allows him to encase his entire body in stone and absorb every hit he takes with next to no damage at the cost of his movement being glacial at best.
- Mighty Glacier: Played straight in the lore but was initially subverted in the actual game. The lore states that those who wear the armor of the Rock never flinch from battle, but due to poise being non-existent for players and NPCs in this game it is quite possible to stun-lock this guy. He still has a ton of health, moves slowly, and hits like a building just fell on you, but he does not have the legendarily unflinching status of Havel himself. Following several rounds of patching though and an explanation of how poise actually works, the status has finally been re-affirmed. It's one thing to whale on him when he's doing nothing, but heaven help you if you try to take a swing when he's winding up for an attack.
- Knight in Shining Armor: They wear the Drakeblood Set.
- Mighty Glacier: They're quite tough, and can hit pretty hard, but their attacks are quite slow.
- Shields Are Useless: They have Spirit Tree Crest Shields, but don't really use them, instead opting to two-hand their swords.
- Shock and Awe: The Drakeblood Greatswords they wield can inflict lightning damage.
- Blue Blood: His crown would seem to indicate this, although his complete lack of any other clothing save for some pants certainly tarnishes the look.
- Continuity Nod: A pretty obvious one to Undead Prince Ricard from Dark Souls. He resides in a similar area as Sen's Fortress, appears to be some form of royalty given his crown, and wields Ricard's Rapier against you. Whether or not he actually is Ricard is still up for debate, although not out of the realm of possibility given how becoming Unkindled works in relation to the regular Undead.
- Royal Rapier: Fits the image with his crown and choice of weapon, although his lack of any other regalia (or even a shirt) is certainly odd.
- The Undead: Possibly, if he is Undead Prince Ricard. However, he doesn't appear to be Hollow since his skin is still intact and unmarred, which might indicate that he became Unkindled somewhere down the line.
Ancient Wyvern

A massive, bone-white dragon that guards the entrance to Archdragon Peak.
- Breath Weapon: Constantly breathes fire as its primary attack.
- Damage-Sponge Boss: You can fight it like you would a normal enemy or boss, but it takes a while to kill it by swinging at its legs.
- Degraded Boss: Inverted in the early game and played straight in Archdragon Peak itself. It shares the same basic design and form as the many dead dragons you see on the High Wall of Lothric (as well as the one living one on the High Wall and the pair at the entrance to Castle Lothric), except it's far larger in size. In Archdragon Peak itself you encounter another one that blocks your path as you're going up to the Great Belfry bonfire.
- Flunky Boss: The fight against the Ancient Wyvern takes place in a large sprawling level with corridors and stairways filled with Snake-Men, meaning that you'll have to fight them and the boss at the same time, though they Snake-Men aren't immune to the wyvern's breath attacks.
- Forgot I Could Fly: Despite having wings it's possible for it to get glitched in a wall and then fall to its death.
- Giant Flyer: Larger than the generic wyverns in the rest of the game, and flies into the arena after you've entered. It's inconsistent about flying during battle though; if you attempt to navigate the area to do the plunging attack, it will sometimes hover in the air to reach you easier with its fire breath, but it never attempts to reach you, nor does it try to get out of the way.
- Leitmotif: Ancient Wyvern.
- Level in Boss Clothing: While the player can (ineffectually) fight the dragon normally, they are expected to traverse the arena, fight off the mooks, and reach the cliff where they can plunge attack the boss.
- One-Hit Kill: The boss's arena is actually a gauntlet filled with snake-men the player can run through. Traversing the gauntlet will lead to a broken bridge directly over the dragon's head, which the player can drop down on, killing the boss in one blow.
- Possibly justified: Its weakness is partially shared by the next boss you find in Archdragon Peak, and without this end-game tutorial the latter boss is immeasurably harder, even by Dark Souls standards.
- One-Hit-Point Wonder: If you go for the plunge attack in order to kill it.
- Outside-the-Box Tactic: The way the Ancient Wyvern is programmed, landing an attack while above its head will trigger the special plunge animation and instantly kill it. However, one doesn't need to get all the way to the top of the arena to land the attack, all it takes is a jump attack from the platform behind it.
- Playing with Fire: Has the standard fire breath attack, which it will use judiciously to prevent you from reaching the plunge attack cliff.
- Puzzle Boss: Like High Lord Wolnir and Yhorm the Giant, it is technically possible to beat the Ancient Wyvern by slowly and ineffectually whittling away at it with normal attacks. However, the numerous messages on the ground indicate that the player should traverse the level and find a location from which they can perform a plunging attack against it.
- Tactical Suicide Boss: The plunge attack wouldn't work if the dragon simply got out of the way. Yet somehow, it decides to move to that exact spot at the end of the arena, allowing you to land the perfect plunge.

A King from an age long past. He rides a crow-like stormdrake called the King of the Storm into the first phase of the battle. In the second phase, the king absorbs the fallen drake's soul, enhancing his spear with lightning for a brutal one-on-one duel.
- Achilles' Heel: High lightning resistance will take a lot of the bite out of his second phase. Notably, the Dragonslayer Greatshield almost trivializes the on-foot section of the battle.
- All-Powerful Bystander: Possibly for the entire Age of Fire. As Gwyn's firstborn and inheritor of his power of Sunlight, the Nameless King clearly has power comparable to his father, and unlike the other great Lords like Nito, the Witch of Izalith or Gwyn himself, the Nameless King's power has not faded with time, which would make him one of the most powerful figures of the entire series. Despite this, he has had almost no impact on the events of any of the games, choosing to simply sit upon Archdragon Peak for thousands of years before the Ashen One finds him.
- Ambiguous Situation: It is debatable on if his gaunt appearance is caused by his advanced age, or somehow being very badly burnt by his own father when he was cast out.
- Antagonistic Offspring: The lore reveals him to be Gwyn's long-lost firstborn son, whose name was stripped from the annals of history.
- Anti-Frustration Features: After killing the King of the Storm, when you begin the second phase against the Nameless King himself you're automatically set facing him, no matter where you were on the map. Also, whenever you die, your souls will be right outside the fog gate—and the trip from the closest bonfire to the fog gate itself is a mercifully short one with no enemies along the way.
- Badass Longrobe: As much as it looks like a cape, that long piece of cloth that flows in the wind is attached to his waist. He's also very fitting for an Optional Boss, considering just how brutal he gets in the second phase.
- Battle in the Rain: A very literal instance of the trope, as ringing the bell causes storm clouds to come in from nowhere and form a solid path to his arena. You fight the Nameless King in and on a rainstorm, with the rain pouring down and clouds making the floor.
- The Beastmaster: A particularly strange yet awesome example of one, considering that he's managed to tame a Stormdrake. This is even more remarkable due to him being Gwyn's firstborn, as it explains why Gwyn had him Unpersoned from the annals of history.
- Blood Knight: The Great Lightning Spear's description says that Gwyn's firstborn "had respect only for arms, and nothing else."
- Brought Down to Badass: As Gwyn's first born, it's possible that he was even more powerful when he was still allied with his father. Besides his extremely advanced age at this point, legends state that Gwyn stripped him of his godly status, thus implying that the god-like being you face is still just a fraction of what he was at full strength.
- Call-Back:
- The lore of his items, keeping with the lore found back in Lordran, as well as the elements of his visual design such as the crown and his sandals, all reveal that he is Gwyn's long-mysterious firstborn son.
- Not only is his fighting style once dismounted quite reminiscent of Ornstein, his hesitation before absorbing the soul of his mount brings to mind Ornstein doing the same before absorbing Smough's. The Leo Ring description hints that Ornstein was trained by the Nameless King, so this is likely an intentional reference.
- Speaking of Ornstein, the reason why you find his armor in the area is because he was searching for him in the first place, having left long before Aldrich and his Deacons of the Deep invaded Anor Londo.
- Damage-Sponge Boss: He boasts a remarkable amount of health for a boss, and this coupled with his extremely powerful attacks makes him one of the most dangerous bosses in the game—the general consensus is that players find him even more difficult than the final boss. The King of the Storm has a fairly reasonable 4,500 health, but the Nameless King himself has about 7,100 health, and boasts greater defenses to boot, though this defense is evenly spread across his body, unlike the Stormdrake.
- Dragon Rider: He rides a dragon-like creature referred to as a Stormdrake by item descriptions, and whose epithet is the King of the Storm.
- Dual Boss: In the first phase of the fight, you have to kill the King of Storm while the Nameless King throws lightning bolts at you and swings around his spear to complement the stormdrake's strikes and fire. In the second phase, the Nameless King absorbs his partner's power to take you on 1 v 1.
- Face–Heel Turn: In ancient times, he turned against Gwyn and fought alongside the dragons. If you're going by the interpretation that he is indeed Gwyn's firstborn, which the game basically all but spells out for you.
- Feathered Dragons: The King of the Storm is a "stormdrake" with dark-blue scales and feathered wings, the only such creature the Souls series has ever shown.
- Fisher King: As Gwyn's firstborn and inheritor of his power of Sunlight, he is presumably the reason why Archdragon Peak has a bright sun and clear blue skies despite the light fading literally everywhere else in the world.
- Giant Flyer: Something as large as the King of the Storm shouldn't even be flying at the speeds that it actually does.
- Greater-Scope Paragon: It's all but stated that he's the nameless founder of the Warriors of Sunlight, one of the most outright good aligned covenants in the series.
- Hitbox Dissonance: While he is the King of the Storm, his Swordspear attacks can hit you even if you are a foot or two beneath them. The hitboxes of his Stormdrake landing are similarly generous for him.
- Impaled with Extreme Prejudice: Shares Ornstein's signature move from the first Dark Souls by lunging at you and stabbing you, before holding you up in the air and surging you silly with lightning, tossing you away after it's done. Since the Leo Ring states that Ornstein trained under the Nameless King himself, it's very likely that this was done on purpose.
- Kung-Shui: Knocks down the statues in the area during the fight, especially while on the King of the Storm.
- Last of His Kind: The last remaining god from the Age of Fire.
- Leitmotif: Nameless King. The second phase, where you fight the Nameless King himself, contains hints of Gwyn's theme, which further suggests their relation.
- Lightning Bruiser: More than twice the player's height, hits like a ton of bricks, can leap dozens of feet into the air, and swings his spear as if it were a short sword. Despite his size and power, he can dash at fast speeds to rapidly close the distance if you try running.
- No Name Given: Not the Nameless King himself, although that one's obvious, but his Stormdrake. In the Japanese version, the boss title is just "The Nameless King" for both phases, while the English version named the first phase as "King of the Storm" for the Stormdrake.
- Old Master: Despite being thousands of years old, his abilities seemingly haven't waned in the slightest. He is possibly the oldest adversary that the Unkindled One will face, and one of the most dangerous. If finding Ornstein's armor nearby is any indication, the Dragonslayer found out the hard way that his former mentor is still leagues above him.
- Physical God: He's one of the last of the deities of the Age of Fire and is Gwyn's firstborn. His item descriptions label him as a god of war, implying he is considerably powerful even by the standards of deities.
- Razor Wind: Stray too far away from him and he'll whip up a wave of dust in your direction just by swinging his spear.
- Sequential Boss: You first fight him while he's mounted on his Stormdrake. After downing the boss's health for the first time, a cutscene triggers where he absorbs his mount's soul to empower himself, initiating a battle with him on foot.
- Shock and Awe: He fights incredibly similar to Dark Souls's Dragonslayer Ornstein in his second phase. Between impaling you with a lightning-imbued spear, generating lightning out a simple foot stomp, and even outright calling a thunderbolt to strike you from afar, even Ornstein would cry with envy. This is an intended parallel, as the description for the Leo Ring states that Ornstein trained under Gwyn's firstborn, who is all but stated to be the Nameless King.
- Superboss: Functions as one for the base game. The Nameless King is only found in a far-off area accessible late into the main quest, and carries major lore significance as the traitorous firstborn son of Gwyn alluded to since the first game. He's also easily one of the most punishing bosses in the game, boasting an insanely diverse and hard-hitting movepool across two phases, combined with a bucketload of health. There are even incredibly ominous warnings next to the switch that causes him to show up, which urge you to go finish your business at the Peak before you pull it.
- Super Mode: Like Ornstein and Smough, the Nameless King absorbs the soul of his partner halfway through the battle to power himself up.
- Super Prototype: His sword spear is described as the earliest form of cross-spear. While the massive blade of the spear allowed it to function as a combination large sword, pike, lance, and spear, later iterations had smaller blades presumably due to the original version being difficult to master.
- Super-Strength: The Nameless King is ridiculously strong even by the standards of bosses in the series. He can shatter solid stone structures the size of a small house with the air pressure he generates by swinging his spear.
- Theme Song Reveal: During his second phase, his Leitmotif contains notes from Gwyn's theme, hinting at the Nameless King being Gwyn's firstborn.
- Turns Red: You managed to kill the giant, fire-breathing drake he was riding on, great! Too bad that this just pissed him off, he absorbed its soul, and he is coming at you like a whirlwind of lightning, blades, pain, and death. Yeah, the rider is a LOT more dangerous than the mount.
- Unperson: As his name suggests, his identity was lost. It's strongly suggested by items that this is because he's Gwyn's firstborn, the records of whom were eradicated because he chose to side with the dragons against his father.
- War God: His soul describes him as a 'dragon-slaying god of war'. This status is another hint that he is Gwyn's firstborn.
- Weapon Specialization: The lightning-imbued swordspear he wields is exclusive to him. The weapon is a cross between a sword and a spear, and is essentially a two-handed sword with a spear-length hilt. It is designed to hunt dragons in the age of the gods.
- Wild Hair: Has long white hair that is so unkempt, it almost gives one the impression that it's floating.
Untended Graves

In the past, there was a champion who arrived late for the festivities, only to find his Fire Keeper dead, and a bell that would not ring. In this Age of Dark, he would encounter another champion who would bring him hope that the First Flame would be linked once more.
- Achilles' Heel: For how aggressive he is, his attacks can be parried and riposted. If you can get the timing down, this makes the fight somewhat easier.
- Badass Normal: Champion Gundyr doesn't have the Abyss coming out of his neck nor does he have any magic attack or any major gimmick to give him an edge. Champion Gundyr is just really, really good with a halberd. And yet, he stands out as one of the toughest, most intense bosses in the game
- Foe-Tossing Charge: His shoulder charge moves, which he can even do mid halberd-combo to blow you away.
- Gameplay and Story Integration: His halberd is said to be indestructible and sure enough, its transposable version boasts the highest durability of all weapons in the game at 500. The second most durable weapon in the game, by comparison, has a durability of 340.note
- I Am Not Left-Handed: Like most bosses, he has a second phase. Unlike most bosses, there's no notable change in his attitude or appearance, he simply starts hitting harder and faster. The implication seems to be that he wasn't taking you seriously as a threat until then.
- Impaled with Extreme Prejudice: If he manages to grab you, he will lift you up before impaling you with his halberd, then tossing you a good distance away.
- Leitmotif: Iudex Gundyr, like his original counterpart.
- Lightning Bruiser: Moreso than his Iudex counterpart, he has the health and damage output befitting of an endgame boss and he is quick on his feet and can turn on a dime mid charge, especially once he Turns Red. This makes for a relentless boss battle with few openings as you're reeling from one attack after another.
- Optional Boss: Trying to get to him is optional and doesn't progress the main quest of killing the Lords of Cinder, on top of being fairly out of the way just like Oceiros (fought in the previous area). However, he's a mandatory boss for the alternate ending, "The End of Fire", as the item required to activate the "End of Fire" ending, the Fire Keeper's Eyes, is in a hidden room past his arena, and the player cannot access said room without defeating him.
- Palette Swap: While not literally, this version doesn't have protruding black tentacles on the back of his head, instead activating glowing red eyes for his second phase.
- Red Eyes, Take Warning: Unlike the first Gundyr, this one's second phase only indication is the red eyes, where he becomes much more agile and powerful.
- Roundhouse Kick: He doesn't have the Abyss coming out of his neck anymore, but he's got high spinkicks that will absolutely blow you away.
- Suspiciously Similar Substitute: To the Stray Demon and Demon Firesage. Like them, he's a reference to the first boss of the game, fought in a return visit (of sorts) to the original area like the Stray Demon, and with the same theme (like the Firesage).
- Sword and Fist: Like Iudex, he can punch or kick you, but will do it a lot more and much faster. He mostly does it in as a counter to players attempting to circle-strafe his weapon attacks.
- Turns Red: Once his health is depleted to half, he enters his second phase where he hits much faster and harder.
- What Could Have Been: An In-Universe example. The majority of items linked to Gundyr indicate he would have become a Lord of Cinder had he arrived on time to Link the Fire. Arriving late, the Fire had faded, causing Ludleth to be sent to the past to link the fire ahead of him. With no fire to link, he's become a judge for the Ashen One after being defeated.
- You Are Too Late: The main reason of this version's existence as opposed to Iudex Gundyr. He simply arrived too late to Link the Fire in time. The Untended Graves are surmised to be a sealed-off area belonging to an alternate world where the Fire has gone out for good, one which was avoided by sending Ludleth of Courland into the past to link the fire in place of Gundyr.
Grand Archives

The scholars of the Grand Archives, sorcerers by craft, tend to their candles with a reverence that exceeds the simple burden of labor. They know dangers of the Archives' store of knowledge all too well.
- Body Horror: They dunk their heads into molten wax as a means of protecting themselves from the cursed books within the Archives. There's even a cut piece of equipment called the Scholar's Shed Skin, which was basically the wax on their heads having been removed and worn like a mask.
- Evil Sorcerer: Employ a variety of sorceries against you, and are all clearly insane.
- Squishy Wizard: If you've leveled your weapons properly for the area, most of them go down in only one or two hits.
- Animal Motifs: Lions, as his name and armor implies.
- Assist Character: Can be summoned for assistance against Vordt of the Boreal Valley (but not against the Dancer, since he'll use a Black Separation Crystal if you kill Emma).
- Continuity Nod: He wears the Faraam armor set from Dark Souls II and has the title of Lion Knight, implying he came from Forossa.
- Enemy Mine: Even though Albert serves and protects Prince Lothric, he will assist the Unkindled in killing Vordt of the Boreal Valley, implying that the forces of Lothric are opposed to the forces of Irithyll.
- Fighter, Mage, Thief: The Fighter of the trio.
- Mage Killer: Carries the Golden Wing Crest Shield, which not only has decent magic reduction, can send spells back if parried correctly.
- Still Wearing the Old Colors: Even though the Kingdom of Forossa hasn't even existed since before Dark Souls II, he still wears his old armor and goes by his old title of Lion Knight.
- Achilles' Heel: All of Kreimhild's attacks are reliant on being able to cast spells; cast Vow of Silence on her, and she'll do nothing more than wave her catalyst at you and scratch her head, not even attempting to use her rapier.
- Action Girl: She's got some hard-hitting spells and can give you trouble.
- Artificial Brilliance: Trying to R1 mash her? Just like Hodrick, she's good at parrying.
- Artificial Stupidity: On the other hand, she'll rarely ever take adantage of her godly parrying ability to riposte you with her rapier. Instead, she'll usually try to Crystal Soul Spear you, which gives you ample time to recover from being parried.
- Avenging the Villain: Her staff's description says that she was the favorite pupil of the Crystal Sages, and she invades you in the Untended Graves to avenge the death of one — or both, if you have gone through the Grand Archives. You later fight her in-person at the top of the Grand Archives, this time accompanied by Lion Knight Albert and Black Hand Kamui.
- Fighter, Mage, Thief: The Mage of the trio.
- Magic Staff: Uses the jagged and blunt Sage's Crystal Staff, which she can drop in-person in the Grand Archives.
- Royal Rapier: Her melee weapon is the Crystal Sage's Rapier, which the player can obtain by transposing the Crystal Sage's soul.
Black Hand Kamui
Kamui is among the hunters known as the King's Black Hands, he looked after the prince. Kamui brought Onikiri with him to the Undead Settlement, where he forged Ubadachi, and was finally prepared to join the ranks of the royal hunters.
- Bow and Sword in Accord: In addition to his paired swords, he carries a Composite Bow to pelt you with from afar.
- Dual Wielding: He wields Onikiri and Ubadachi, paired katanas.
- Fighter, Mage, Thief: The Thief of the trio.
- I Choose to Stay: And to protect Prince Lothric.
- Katanas Are Just Better: And he dual wields them.
- Poisoned Weapons: He shoots Poison Arrows with his bow.
- Shadow Archetype: To Black Hand Gotthard, who fled the castle and sided with you.
Kiln of The First Flame
Soul of Cinder / Incarnation of Kings / The Red Knight

The incarnation of all the Lords of Cinder across the ages. He (or it?) is the last boss standing in the way of rekindling or extinguishing the First Flame.
- Achilles' Heel: During its sorcery stage, using Vow of Silence on it will completely cripple it, as pretty much all its attacks in that phase are sorceries.
- The Archmage: Its gestalt nature allows it perform nearly ever type of magic in the series.
- Alas, Poor Villain: Ever character aware of its existence can express only pity for it, and once it's on its last legs it abandons all of its awe inspiring sorcery and fancy weapon-shifting for one last desperate battle using Gwyn's sword. Reflecting its nature as the worst symptom of the endless ruin and decay brought into the world because one arrogant, selfish king just couldn't let go of power.
- All for Nothing: The Soul of Cinder is the last obstacle in your way of reaching the last remnants of the First Flame. Regardless of its efforts, it must be destroyed in order for the story to end, and as it is every single Lord of Cinder from across the ages as well as everyone who linked the Flame, you essentially undo all of it's efforts to keep the Age of Fire going.
- All Your Powers Combined: It's an amalgam of every single Lord of Cinder across history, and demonstrates so by using sorceries, miracles, and pyromancies alongside a plethora of melee weapons.
- Anthropomorphic Personification: Although it is a gestalt of every Lord of Cinder who ever linked the First Flame, even more than that the Soul of Cinder fundamentally is the First Flame, assuming physical form to defend itself.
- The Assimilator: Every soul that sacrificed themselves to relink the flame has become a part of it, adding their skills and abilities to it.
- Animated Armor: A suit of charred, blackened armor that serves as a vessel of the First Flame.
- Badass Cape: Once upon a time, at least. The tattered, burnt remains of what was likely a magnificent cape are visible on its shoulders.
- Beat Them at Their Own Game: In his scimitar stance, the Soul of Cinder can parry and riposte the player (it itself is immune to those). Given the fact that Gwyn (who was infamously weak to that tactic in the first game) is part of it, it is a nice revenge from the first Lord of Cinder.
- Book Ends: The first Dark Souls ended with a fight with Gwyn, and the third and last installment ends with a rematch against him of sorts, as the Soul of Cinder's second phase.
- BFS: It wields the Firelink Greatsword, which in its default, curved sword, and final Gwyn phase forms is a massive blade.
- Call-Back: The Soul is not only a reference to Gwyn, but to every Chosen Undead ever created by players, hence its incredibly varied moveset in the first phase and use of a variety of techniques from Dark Souls. It even dies in the same manner as Gwyn's from the first game.
- Code Name: Presumably to protect its status as the final boss, as the game's mascot he's referred to as the "Red Knight".
- Combat Parkour: When wielding a curved sword, it can do the very distinctive backflips enabled by the Dark Wood Grain Ring in Dark Souls.
- This backflipping technique is also reminiscent of the Throne Watcher and the Burnt Ivory King from Dark Souls II.
- Combo Platter Powers: As a result of its nature. Vastly superhuman strength,note durability, and speed, healing magic, pyrokinesis,note electrokinesis,note , sword beams, the ability to emit poison, biological immortality, powerful focused energy beams, weapon conjuring, immunity to toxins, the list goes on.
- Composite Character: It's every Lord of Cinder in the game, as well as everyone that ever linked the flame. This is reflected in its design, with its armor incorporating charred elements of pieces worn by characters who have linked the fires: Its chest piece is like that worn by Yhorm the Giant, the armor on its arms is a mix of the Alva set from Dark Souls 2 and the Elite Knight set, its red colored cloth is from the Alva set, its greaves are from the Elite Knight set, and his helm is from the Elite Knight set (melted into the shape of a crown).
- Confusion Fu: Will shift between a variety of different fighting styles to keep the player guessing.
- Crown-Shaped Head: Its helmet has been deformed by the flame's heat in such a way that it now vaguely resembles a crown.
- Determinator: The Soul is the literal physical embodiment of the unbreakable resolve every warrior that linked the First Flame had to never let it die out. And even now that's barely more then cinders, it won't let the Ashen One end it all without one last dance.
- Dueling Player Characters: If the Chosen Undead and the Bearer of the Curse both decided to link the flame in the previous games, then they are a part of the Soul of Cinder itself and effectively BOTH serve as the Unkindled's final adversary.
- Exactly What It Says on the Tin: It's called the Soul of Cinder because it is basically every Lord of Cinder coalesced into a single form. Its Japanese title is even more literal: Incarnation of Kings.
- Face on the Cover: The Soul of Cinder is the knight seen on the cover of the game, and served as the game's marketing mascot. Also doubles as a Mascot Villain.
- Final Boss: The final antagonist and boss of the story is fittingly the final obstacle to your determining the fate of the First Flame. It may as well also be considered that it is also the final boss for the whole series — even Slave Knight Gael, who is considerably stronger and faster, is still chronologically fought before the Soulnote .
- Flaming Sword: In all its forms, its Coiled Sword — the Firelink Greatsword — is wreathed in flames.
- Guardian Entity: It is the combined form of everyone who ever linked the First Flame, manifested as a guardian of the Flame itself.
- Humanoid Abomination: The amalgam of the souls of every single person in history who linked the First Flame, wielding all the power expected of such a being.
- I Am Legion: None of the lore associated with it refers to the Soul using gender-specific terms, indicating that it is not a single being, but several beings in one.
- Also, given the already present gender ambiguity of The Abyss Watchers, this also supports the idea that the title of, "Lord of Cinder," is a universal formality for both male and female champions rather then a gender-specific term.
- It Only Works Once: In the first game many people simply parried Gwyn to death. That doesn't work on Soul of Cinder when it enters its Gwyn phase, essentially forcing the player to fight Gwyn properly without cheese to fall back on.
- Kamehame Hadoken: It can use the Soul Stream sorcery, which is basically a giant beam of magic energy not unlike the Kamehameha in appearance.
- Last Stand: The world is dying. The Age of Fire is at an end. There's no hope of stopping it or delaying it any further. The only thing the Soul of Cinder can do is let the Flame burn for just a little longer...or be destroyed in the ensuing battle against you.
- Leave Him to Me!: In a unique way. After the Unkindled One has beaten the first phase of the Soul of Cinder, essentially beating every previous protagonist, the Soul of Cinder switches to using the moveset of Gwyn, the first Lord of Cinder. This, combined with Gwyn's theme playing, works in much the same way as Gwyn casting off the others to take care of the Unkindled One himself.
- Legacy Boss Battle: It's two in one, first serving as an embodiment of every character who linked the First Flame, and becoming Gwyn for its second phase, complete with Gwyn's theme beginning to play when it enters it.
- Leitmotif: Soul of Cinder, which turns into a slower, even more melancholic version of Gwyn's theme in phase two.
- Lightning Bruiser: Much like Gwyn, it's really fast and hits really hard, except that it possesses a far more diverse moveset and gets even faster during its second phase.
- Magic Knight: In the first stage of the fight it can turn its Coiled Sword into a staff and uses the Crystal Soulmass, Crystal Soul Spear, Soul Spear Barrage, Soul Stream, and Soul Greatsword sorceries. It can also use the Power Within, Great Combustion, Toxic Mist, and Great Fireball pyromancies in its scimitar stance, and the Wrath of the Gods, Great Heal, and Bountiful Sunlight miracles in its spear stance. In the second phase of its boss fight, it uses the Sunlight Spear, Lightning Stake, and Lightning Storm miracles.
- Mascot Villain: It is the figure seen on the game's cover, and was featured prominently in official merchandise... some of which incorrectly identifies him as the protagonist rather than the final boss.
- Mercy Invincibility: A peculiar trait of his infamous 5-hit combo is that every hit after the first one ignores invincibility from rolling. The player will not be blown into the air but will still take damage, with a sparkle as a visual cue to let them know.
- Mercy Kill: The Fire Keeper pretty much states that this is what you're doing to it. Confirmed if you listen to Ludleth of Courland talk in his sleep, as his nightmares/memories of relinking the fires has him begging the gods to end his eternal suffering of incineration. Even as they fight tooth and nail to keep you from snuffing it out, the souls trapped inside the First Flame are in agony.
- Mirror Boss: No matter what type of character you have played as, Soul of Cinder has a similar move set to you. This means that. at some point in the battle, you will be essentially fighting yourself. You even find the Soul of Cinder sitting at a bonfire, exactly like every player character in the series does. Soul of Cinder is what Miyazaki wanted Gwyn, Lord of Cinder, the Final Boss of the first Dark Souls, to be. Minus the Morph Weapon, it is everything he was supposed to be.
- Merger of Souls: Formed from the souls trapped inside the First Flame by their linking of it as The literal translation of its Japanese name, "Incarnation of Kings", and the description of its soul reveal that it is the manifestation of everyone who has ever linked the First Flame.
- Morph Weapon: The Soul of Cinder wields a Coiled Sword that can transform between different four Weapon Classes, even a Staff.
- Multiple Life Bars: The Soul of Cinder's two phases each have their own full life bar.
- Non-Malicious Monster: Despite its appearance, state of being, and power, the Soul of Cinder is harmless to anyone who doesn't mess with the First Flame, and even maintains enough respect for the Ashen One to give them a proper burial at the beginning of the game. The reasons it attacks you are ambiguous.
- O.O.C. Is Serious Business: The very first hint you get that this boss is not like any of the others is that it's sitting before the First Flame... in very much the same way that the player character rests before a bonfire in all of the games.
- Physical God: The physical avatar of the First Flame. The Firelink Greatsword's description outright refers to it as deific, and it wields almost every type of magic possible.
- Playing with Fire: Like Gwyn, it imbues his sword with flames in the second stage of the boss fight, and can use those flames to create explosions when it enters Gwyn mode and at the end of it 5-hit combo.
- Previous Player-Character Cameo: Done uniquely. The reason the Soul of Cinder has such a varied moveset in the first phase is to represent all the Chosen Undead and Bearers of the Curse who linked the Fire, as lore-wise those player characters are part of it.
- Red and Black and Evil All Over: It is the final boss, and his armor is red and burnt black. In a subversion, though, it is only hostile to you because it guards the First Flame and will not let you decide its fate without fighting it first.
- Removed Achilles' Heel: The parry tactic used in the original Gwyn boss fight doesn't work against its second stage.
- Reverse Grip: When attacking with Sorcery it flips its sword around in its hand to function as a staff.
- Rogue Protagonist: Provided players chose to link the Fire in Dark Souls and Dark Souls II, the Chosen Undead and the Bearer of the Curse are a part of it.
- Sad Battle Music: When it enters phase 2, its bombastic and epic theme (which already carries an air of melancholy) slowly fades into the piano chords of "Gwyn, Lord of Cinder", reflecting the impending end of the game and of Dark Souls with it.
- Sequential Boss: There are two phases to the final fight with the Soul Of Cinder when you pass the final fog gate and enter the main ruins of the Kiln at the end of the game. After you deplete it health bar in the first phase, it begins glowing with red fire and it slams its sword into the ground, creating an explosion and recharging its health bar, and it will fight like Lord Gwyn for the second phase.
- Sinister Scimitar: One of its movesets has it transform the Firelink Greatsword into one. The "Red Knight" statue included with the Collector's Edition of the game depicts it Dual Wielding scimitars.
- Shock and Awe: The biggest hint that Gwyn is a part of it is that it uses a Sunlight Spear Miracle. It also knows the Lightning Storm miracle, which rains down an entire barrage of Sunlight Spears from the sky.
- Shoot the Shaggy Dog Story: The Soul of Cinder is the embodiment of everyone who has linked the First Flame in their efforts to keep the Age of Fire alive. Since it is the final boss of the game, it is your objective to end the Age they wanted to continue (at least in three of four endings).
- So Last Season: Unlike Gwyn, who was notoriously vulnerable to parries and ripostes, the Soul can't be parried.
- Stance System:
- In the first stage of the battle, the Soul of Cinder alternates between four movesets: a straight sword, a staff, a spear and miracle chime as well as a curved sword and pyromancy flame. Hidden within the game files is an unused fifth stance, where it sets himself and the Coiled Sword alight and uses it like a greatsword.
- In the second stage of the battle, the Soul of Cinder uses an augmented version of Lord Gwyn's moveset.
- Sword Plant: When you first enter the arena, it's sitting on the ground with its sword planted in front of it, which it then draws as you approach. It plants the sword again when entering phase 2, and as the end to its notorious five-hit combo, creating an explosion of fire each time.
- Theme Music Power-Up: When it assumes its Second Phase, Soul of Cinder’s otherwise original theme is overhauled with bits from Lord of Cinder, Gwyn’s theme; with that Soul of Cinder starts fighting almost the same way as Gwyn did, but extremely more aggressive. Eventually, the rest of the song falls away, leaving the piano and violin alone to carry on as the fight nears its end.
- Theme Song Reveal: When it enters his second phase, the piano chords of Gwyn's theme from Dark Souls start playing, indicating the Soul's original identity.
- Tomato in the Mirror: In a meta-sense; provided you had your previous player characters link the First Flame, you'll be going up against them as the last obstacle of the game.
- Turns Red: Well, Red-er. When you get its health very close to zero initially, it then jams its sword into the ground, regaining its health and entering phase two, in which it uses a souped-up version of Lord Gwyn's moveset.
- Wham Shot: A Wham Musical Cue. As the first phase ends, the Soul begins fighting using a very familiar combat style... and then three piano notes ring out, and you know exactly who you're fighting.