CONTAINS UNMARKED SPOILERS
open/close all folders
Main Characters
Quote


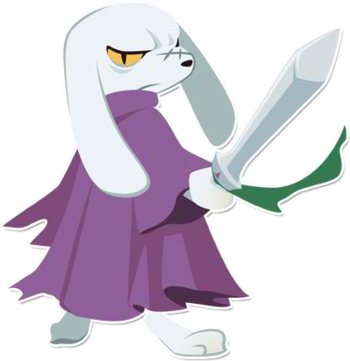
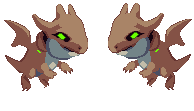
The Player Character. An amnesiac young man who awakes in a small cave in the depths of a strange island. He eventually discovers that he's really a scout robot from the surface.
- Amnesiac Dissonance: At the start of the game, he immediately begins assisting the Mimiga in their fight for survival against the Doctor. It's eventually revealed that he was one of many robots sent from the surface to kill the Mimiga and claim the Demon Crown. If you restore Curly's memories, she remembers that the two of them were made to destroy the Demon Crown, so he's actually doing what he was made for after all.
- Amnesiac Hero: He has no memory of his name or original mission at all. He was really a robot soldier sent from the surface. He also never recovers his memories; Curly Brace has to tell him all this after she recovers her own memory.
- Army Scout: He is an armed scout robot of a very special and advanced type: he can effectively pose as a human.
- Artificial Human: His injuries can be healed by a medical doctor. Additionally, he can eat food, drown in water, and even have sex. Despite all of that, he is an armed scout robot, despite his human-like limitations, abilities and appearance. Most of the characters in the game don't realize that he's anything less than human until the truth is revealed by Professor Booster, and even he had to look twice before he believed it."So you're one of the... I hadn't even noticed. My my, you certainly are well-built." - Kazuma Sakamoto"Man, these's sprinklers just... Whoops. Not supposed to talk to humans." - a Mimiga, talking to Quote.
- Badass Adorable: Official art depicts him as a rather cute teenager.
 He's a Lightning Bruiser One-Man Army who was literally built for war.
 - But Not Too Foreign: Sue Sakamoto was unable to decipher the English text written on his hat. The impact of this is mostly Lost in Translation, since the English translations aren't in Japanese. It's likely he was intended to be an American. This is further supported by his main gun, which is shown to be a revolver in all of the official artwork.
- Defeat Equals Explosion: In the event that he dies, he will violently explode.
- The Drifter: An interesting case. His lack of memory leaves him with nowhere specific to go, and he spends his time randomly drifting from one area to the next and assisting everyone he finds. The result is essentially a Knight Errant.
- Elites Are More Glamorous: He's a special kind of Army Scout, of which only two are known to exist in the entire world.
- Force and Finesse: He is implied to be the "Finesse" to Curly Brace's "Force", even though gameplay tends to contradict it. The official◊ artwork◊ consistently◊ shows their preferred weapons to be a revolver and machine gun, respectively◊. It's also worth noting that Quote is The Quiet One and Curly Brace is a Genki Girl.
- The Gunslinger: Of the Vaporizer variety. Quote carries a huge variety of highly improbable guns and enough ammunition to singlehandedly obliterate a super-tank supported by various mooks.
- Heroic Mime: During the main game, he almost never says anything, but characters often react as if he had. This implies that his dialogue is possibly meant to be imagined by the player. However, he does make player-selected Yes/No responses to questions, and at one point speaks a verbal password. When you're playing as Curly, he only talks out loud exactly once, implying instead that he normally just doesn't talk.
- Hyperspace Arsenal: He can carry vast amounts of weaponry.
- In-Series Nickname: "Mister Traveler" - the only moniker he's ever given in official media, specifically in a manual written years after the game was released. Chako effectively gave him this nickname shortly after meeting him."Goodness, that's a dangerous item you've got there. Are you a traveler?"
- Kleptomaniac Hero: Quote doesn't seem to have any problem with stealing things and not returning them. He steals the Polar Star—the first gun he gets at the beginning of the game—from a hermit blacksmith. Later, he can take the Bubbline from Mimiga Village, and later on, Curly's Panties. He also steals various keys that go to important things like power generators. The player doesn't have to return any of it. However, in the case of the Polar Star, returning it to its owner comes with a very substantial reward.
- Kleptomaniac Hero Found Underwear: He can optionally find Curly's Panties in a hidden passage of the Colons' house in the Sand Zone. They don't do anything... except in the Plus edition, where they unlock Curly as a playable character.
- Lightning Bruiser: He is very nimble (especially with the Booster upgrades), wields plenty of powerful weapons, and can potentially survive a lot of damage with sufficient Health upgrades.
- Nice Guy: He helps people for seemingly no reason at all, other than the fact that he wants to.
- No Name Given: Subverted. His name is "Quote." It's said only once in the whole game when Curly recovers her memories (or, if you're playing in Curly Mode, the only line he says out loud).
- The Quiet One: During the main game, he almost never says anything, but characters often react as if he had, implying that dialogue is possibly meant to be imagined by the player. However, he does make player-selected Yes/No responses to questions, and at one point speaks a verbal password. When you're playing as Curly, he only talks out loud exactly once, implying that he normally just doesn't talk.
- Red and Black and Evil All Over: With that red hat and black shirt, you start off with everyone thinking you are a battle robot from the surface sent to kill the Mimiga. The fact that you are a robot soldier, (and stark white) only adds credibility to the trope. Later on, you learn that you were sent to destroy the Demon Crown rather than the Mimiga.
- Revolvers Are Just Better: The official artwork indicates that his favorite gun is the Polar Star handgun.
- Ridiculously Human Robots: He can do a lot of extremely human things that - at first blush - don't make any sense for a combat robot to do. It starts making sense when it's revealed that he was made to assassinate a specific individual, a job that would be much easier as human lookalike than it would be otherwise.
- Robo Romance: The Iron Bond he shares with Curly can be interpreted this way.
- Robot Soldier: Several non-player characters remark that he is a "soldier from the surface". As it turns out, all such soldiers were robots. Specifically, he's an armed scout robot. This is made jarring by how amazingly human he is.
- Savvy Guy, Energetic Girl: Quote is The Quiet One and the official artwork indicates that he is also The Stoic. Conversely, Curly is an upbeat Genki Girl.
- Scarf of Asskicking: He always wears a green scarf.
- Series Mascot: He shares space with Balrog, and is easily the most recognizable character in the franchise.
- The Stoic: In his official artwork, in the game itself, in battle and out... he doesn't seem to emote at all. However: his feelings do occasionally show through his face as well as his actions, which is revealed in a scarce few of the game's ending illustrations. In particular:
- He really likes Jenka's dogs.
- In a moment when he very nearly fell off the Outer Wall, he has a distinct Oh, Crap! expression on his face.
- But most importantly, he is visibly angry◊ during the fight with Misery, during which he is using King's Blade instead of Nemesis.note
- He really likes
- Superior Successor: Between his hat having Curly's name on it in concept art, implying it used to be hers, her greater show of initiative and personality, her superior outfitting with a Machine Gun and Air Tank (which can create a shield), and her recount of the past implying that she had taken point, all signs suggest Curly was the leader of the duo ten years ago, and Quote was her sidekick. Come the events of the game, the positions are reversed, and he succeeds in completing the mission where she failed to finish the job.
- Super-Soldier: He demonstrates himself to be far faster, stronger and tougher than the other soldiers from the surface. In fact, he and Curly Brace defeat a horrific monster that completely annihilated an entire platoon of said soldiers in a Curb-Stomp Battle. Later on, he defeats it again by himself.
- Sword and Gun: Once the player acquires the Blade, this trope comes into play thanks to Hyperspace Arsenal (since he can switch weapons instantly). Some of the official artwork deliberately invokes this.
- Theme Naming: Quote marks " are widely used in programming software. He shares this theme with Curly Brace: Curly Braces { } are also widely used in programming software.
- Unusual Ears: His ears are Robot Antennae.
Curly Brace
Mimiga Ally


A mysterious young woman who seems to know a bit about our hero.
- Action Girl: Like Quote, she's a combat robot sent from the surface. She's more than competent in battle as a result. Her Machine Gun can generate enough recoil to carry her into the air, and she has zero problems wielding it.
- Army Scout: She's Quote's partner in battle, and was made for the same purpose that he was.
- Artificial Human: She's the same kind of robot as Quote is. As such, her injuries can be healed by a medical doctor, she can eat food, drown in water, and even demonstrates powerful motherly instincts.
- The Atoner: She remembers that many, many Mimiga were slaughtered by robots from the surface. She also knows that she is one of those robots. She spends her time making up for it by caring for a bunch of Mimiga children. Subverted when she regains her memories and remembers that she and Quote were actually sent to destroy the Demon Crown instead of obtain it, meaning they never killed any Mimiga in the initial raid.
- Badass Adorable: She's incredibly cute, considering the fact that she's a deadly robot.
- Back-to-Back Badasses: In the Sacred Grounds, if you got the Iron Bond item, she'll ride on the main character's back, shooting things with her Machine Gun.
- Blood Knight: She's distinctly excited by the prospect of fighting, and is always at her most enthusiastic immediately before of after a fight. However, she distinctly avoids attacking any creature that doesn't attack her first, even if it's an obstacle she could easily kill."Lets go! There's a whole nest of monsters waiting for us!!"
- Break the Cutie: She's had quite the rough time.
- The Chew Toy: She seems to have a mild case of this. While a lot of the things that happen to her are completely terrible, she also suffers milder inconveniences that seem like they were meant for humor.
- Contractual Boss Immunity: Aside from preventing drowning, her bubble tank also grants her a Deflector Shield that makes her immune to the otherwise overpowered missiles.
- Defeat Means Friendship: The first time she meets Quote, she assumes (for very good reasons) that he's there to kill the Mimiga like the other robots before him. After defeating her, she actually listens to him, and puts her weapons down.
- Deflector Shields: Her Air Tank doesn't just keep her oxygenated: during the fight against her, it's revealed that it's able to generate a bubble shield that effectively makes her immune to rockets.
- Deuteragonist: She's effectively a second protagonist alongside Quote. This is emphasized in the true ending.
- Elites Are More Glamorous: She's a special kind of Army Scout, of which only two are known to exist in the entire world.
- Failure Knight: She instinctively knows that she failed in whatever her original objective was. Once her memories are restored, she runs off to defeat Ballos on her own since she failed to do so before, and ends up horribly injured in the attempt.
- Force and Finesse: Curly Brace is implied to be the "Force" to Quote's "Finesse", even though gameplay tends to contradict it. The official◊ artwork◊ consistently◊ shows their preferred weapons to be a revolver and machine gun, respectively◊. It's also worth noting that Quote is The Quiet One and Curly Brace is a Genki Girl.
- Gameplay Ally Immortality: During the segment in the Labyrinth where she fights alongside the protagonist, she is completely invincible. She can even walk through spikes unharmed.
- Genki Girl: Upbeat is pretty much her default mood.
- Going Commando: This trope is heavily implied by the fact that her underwear ends up in her partner's inventory and remains there for the rest of the game.
- Guest-Star Party Member: During the second half of the Labyrinth, she will directly assist Quote in fighting the Gaudi.
- The Gunslinger: Just like Quote, she wields ludicrously massive guns as if they weigh nothing at all.
- Heroic Sacrifice: After the battle with the Core, she gives you her Air Tank and drowns in your place. She can be revived if you ignore the injured Booster and pick up a tow-rope in the chamber.
- Hidden Depths: It's not very often that a Genki Girl who also happens to be a purpose-built war machine has crisis of conscience.
- It's All My Fault: She has a tendency to blame herself whenever anything goes wrong.
- Kill the Cutie: If you don't have the right items when the times comes, she will die.
- Lightning Bruiser: She's the same sort of scout robot as Quote, and thus has exactly the same abilities as he does.
- Mama Bear: She has a strong motherly instinct, which prompts her to try to kill the player the moment she's aware of them.
- More Dakka: Her Machine Gun takes the trope farther than usual, thanks to its ability to refill its own ammunition over time. She'll offer it to you after beating her; taking the Polar Star in return. Later in the game, she can also wield a permanent Level 1 Nemesis which has a similarly ludicrous firing rate and no ammo limit at all.
- Ms. Fanservice: She's very cute and beautiful for a Robot Girl soldier, and wears a red/pink tank top that exposes her midriff and baggy trousers that expose her lower legs. She's a very competent fighter too, enhancing her attractiveness to the Amazon Chasers out there.
- Nice Girl: She and Quote have a little misunderstanding when they first meet, but even then it only happened because she was trying to protect some Mimiga kids she was taking care of. She offers her Machine Gun in exchange for the Polar Star, effectively downgrading her arsenal just to assist you. She also sacrifices herself to keep you alive for no reason other than that she wanted to.
- Poor Communication Kills: She attacks the player character almost immediately after he meets her, on the entirely reasonable assumption that he intends to kill the Mimiga she's sheltering. However, he was actually there to rescue them.
- Ridiculously Human Robots: Just like Quote, she can eat and digest food, among lots of other little things.
- Robo Romance: The Iron Bond she shares with Quote can be interpreted this way.
- Robot Soldier: Just like Quote, she is an armed scout robot.
- Savvy Guy, Energetic Girl: While Curly is an upbeat Genki Girl, Quote is The Quiet One, and the official artwork indicates he is also The Stoic.
- Short Tank: She's a born soldier who wears trousers and a tank top, has a huge gun, loves to fight, loves Mimiga, and is an adoptive mother.
- Small Girl, Big Gun: Curly's gun◊ seems to be about as big as her body.
- Super Not-Drowning Skills: Thanks to an oxygen tank that she carries around, an oxygen bubble forms around her every time she steps foot in water. She gives it to you after the Core fight, causing her to drown.
- Super-Soldier: Just like Quote, she demonstrates herself to be far faster, stronger and tougher than the other soldiers from the surface. In fact, she helps Quote defeat a horrific monster that completely annihilated an entire platoon of said soldiers in a Curb-Stomp Battle. That is, a team of two handled what a team of 50 could not.
- Survivor Guilt: She has an interesting twist on this trope. She remembers that the Mimiga were slaughtered by robots from the surface... she also knows that she is one of those robots. She spends her time making up for it by caring for a bunch of Mimiga children.
- Theme Naming: Curly Braces { } are widely used in programming software. She shares this theme with Quote: Quote marks " are also widely used in programming software. Similarly, she named her adoptive children the Colons : which are also widely used in programming software.
- Unusual Ears: Just like Quote, her ears are Robot Antennae.
Sue Sakamoto
Looks up to her brother


Click here to see spoilers
A fiery young girl being pursued by the Doctor's henchmen.
- Badass Boast: She gives one before fighting Igor. She fearlessly tells him to "Bring it on!", boasting that she's stronger than her brother. However, that doesn't mean much as said brother isn't particularly strong. It doesn't end well for her.
- Boisterous Weakling: She has a lot of bark, and absolutely no bite. Case in point, just as she encounters a frenzied Mimiga, she brags about how she can take him on because she defeated Kazuma in a fight. He beats the crap out of her in exactly three blows.
- Bratty Half-Pint: She's got issues, and she takes them out by picking fights with pretty much everyone, despite being too small to hurt anyone.
- Damsel in Distress: She ends up in harrowing, potentially deadly situations and needs help pretty much constantly.
- Demonic Possession: The Doctor takes control of her body in the final battle.
- Forced Transformation: She wasn't originally a Mimiga. She was transformed into one by Misery.
- Promoted to Playable: The Nintendo Switch version upgrades her status to playable for a second player.
- Tsundere: First time you meet her, she gets rather annoyed if you say you wanted to save her (and annoyed if you say no), but she eventually softens.
- With Great Power Comes Great Hotness: The moment she gets possessed by the Doctor, she not only becomes far more powerful, she transforms into an athletic Human/Mimiga hybrid that looks for all the world like a human girl wearing a fetish suit that resembles what a Playboy Bunny would be as a Fur Bikini.
- "X" Marks the Hero: She has a distinctive X-shaped scar over her nose. It's even visible in her human form.
King
The Leader

- Always Someone Better: While King is a very powerful warrior, Arthur is always implied to be stronger and is far more celebrated. King is also said to be trying to prove he is just as strong.
- Big Brother Instinct: He's very protective towards Toroko.
- Backup from Otherworld: The fully upgraded Blade doesn't launch Sword Beams. It launches King's spirit, which swipes at anything he's targeting.
- Cool Sword: King owns a very powerful sword. And he passes it onto your hands after taking a fatal blow from Misery.
- Face of a Thug: He certainly looks rather sinister, but he's a case of Good Is Not Nice at worst.
- Glass Cannon: He beats Balrog, who is a Stone Wall, in a single blow. However, all it took was a single hit from Misery's thunderbolt to defeat him.
- Good Scars, Evil Scars: Has a nasty scar on across his face, which adds more to his Face of a Thug, but he's unarguably good.
- I'll Kill You!: He says this to Doctor verbatim when he meets him.
- Not Too Dead to Save the Day: As mentioned above, the third level power for the sword is not as much throwing the sword as it is sicking King's soul at the enemy.
- Papa Wolf: Disturb his village and its inhabitants, and you will face his wrath."If we don't get Toroko back safely, I swear I'll tear you limb from limb!"
- Poor Communication Kills: He imprisons Sue for provoking the Doctor to take Toroko from the village. However, he comes around and releases her once she explains the situation to him.
- Red Eyes, Take Warning: He's easily the most easily angered and violent person in Mimiga Village. However, he's a good guy regardless of this trope applying to him. Pixel confirmed that King's temper is a result of him eating red flowers. He cooked them, which gave him strength but didn't turn him.
- Sacrificial Lion: He is the leader of and strongest resident of the Mimiga Village, and an important character, but he ends up murdered in the Sand Zone.
- Testosterone Poisoning: He's rage prone, and extremely powerful for his diminutive size, especially when compared against other Mimiga, who are typically weak and docile. He got this way by eating cooked red flowers.
- A Tragedy of Impulsiveness: He wasn't fast enough to save Toroko. He figured he could at least get revenge by taking on the Doctor by himself. It didn't work.
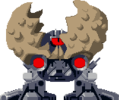
Balrog
Misery's punching bag

Click here to see his whole body
An anthropomorphic bar of soap under the command of the Doctor.
- Affably Evil: Despite being on the villains' side, Balrog is very cordial to the player. In their first encounter, if the player tells Balrog they don't want to fight him, Balrog will actually listen to them and leave them alone. Balrog does fight the player a few other times, but only because he has to. This is a clue that he is Forced into Evil.
- Ambiguous Robots: He is said to be an anthropomorphic bar of soap, however, he possess noticeably robotic traits, such as visible slits for his arms, can fire a salvo of missiles from his body, and possess a visible exhaust vent on his rear.
- Bait-and-Switch Boss: After you turn on the power on in Grasstown/Bushlands, the robot Malco prepares to attack you. Then Balrog shows up and crushes him, commencing a boss fight.
- Bewitched Amphibian: On the third encounter with him, he gets transformed by Misery into Balfrog.
- Boisterous Bruiser: He's an all-around fun loving dude with a generally pleasant and lax attitude, who takes to his every action with a lot of enthusiasm.
- Bullfight Boss: During the first fight with him, all he does is rush you. He's easy to dodge if you know what you're doing, but if you don't, he can easily kill you with his Super-Strength. Averted with his later boss fights where he learns new attacks.
- The Brute: He's the Doctor's strongman.
- Catchphrase: Huzzah! (or "Oh yeah!" in commercial English versions)
- The Cavalry: In the Best ending, he saves Quote and Curly Brace from Ballos' Seal Chamber just in the nick of time.
- Cephalothorax: Balrog's face dominates his entire torso. In fact, it's such a large face that only half of it is depicted in his speech bubble portraits.
- Defeat Means Friendship: You must fight him multiple times. However, after the Doctor is defeated, he immediately reforms. As it turns out, he never even wanted to follow the Doctor's plans: he just had no choice.
- Dynamic Entry: His usual method of entering a building is to smash through the wall or ceiling while yelling his catchphrase.
- Heel–Face Turn: In the good ending, he and Misery are freed from the Doctor's influence, which leads to Balrog pulling a Big Damn Heroes to save Quote and Curly from Ballos' Seal Chamber as it closes in on them.
- Flying Brick: Almost literally. He's a sentient brick of soap who can take an utterly massive amount of damage and keep on going, and he can fly at appreciable speed.
- Forced into Evil: Turns out there's a reason for his villainous behavior: he's forced to obey whoever wears the Demon Crown. When freed, he quickly pulls a Heel–Face Turn.
- Gentle Giant: This guy twists the trope in knots. Under normal circumstances, Balrog is nice to a fault. However, he is cursed to be subservient to whoever wears the Demon Crown. As a result, he will do things that are decidedly unpleasant if and when he is ordered to. However, he is not cursed to serve Misery, who - like him - must also serve the wearer of the crown. Misery generally mistreats him, but his childlike personality prevents any sort of retaliation, to the point where he's practically a Butt-Monkey. In the credits, he is actually credited as "Misery's Punching Bag".
- Incoming Ham: He always yells Huzzah! before making an entrance.
- Just Following Orders: Unlike most people who invoke this trope, Balrog physically cannot resist the orders he's under, as he is being magically compelled to follow them. The moment he is free from that magic, he quits evil entirely.
- Living Weapon: He is one for whoever wears the Demon Crown.
- Macross Missile Massacre: During the final fight with him, he can launch a volley of missiles at Quote or Curly.
- Morphic Resonance: In his giant frog form, his eyes don't change much except for their pupils, which are slightly narrower, and he has pink spots under his eyes where the stripes would be in his normal form. And his forelegs are the same color as his arms do in his normal form.
- Names to Run Away from Really Fast: His name sounds worthy of Demon Lords and Archdevils.
- Psychopathic Manchild: The disconnect between the almost child-like way he carries himself and the monstrous things he does during the story is astonishing. For one thing, during the Sand Zone part of the game you can come back to Jenka's house after getting the last dog for her and find the rest of them noticeably absent and Balrog gloating about having the key to the warehouse. This could be seen as him killing her dogs as an interrogation method to make her give him the keys. For another he force-feeds Toroko red flowers, basically killing her. The real kicker is, he actually isn't psychopathic. The Demon Crown has him under a spell that compels him to do as he is ordered. Once the spell is broken, he's basically a harmless goofball.
- Recurring Boss: You will fight him four times throughout the first half of the game.
- Skippable Boss: The first fight with Balrog can be skipped wholesale by answering "no" when he asks if you're going to fight him.
- Stone Wall: He isn't particularly fast, and his attacks are pretty weak, but considering how often you fight him and how much punishment he can take, he's an absolute brick.
- Super-Strength: He can fling gigantic, several-hundred ton boulder through the air.
- Sympathetic Sentient Weapon: It's not actually his fault that he keeps trying to kill you. He's under a curse.
Misery
The Doctor's servant


- Be Careful What You Wish For: She was the one who wanted the Demon Crown to exist in the first place, for her personal use. When she forced Ballos to create it, he responded by forcing her to serve whoever wears it.
- Boss Bonanza: She's the first of a triple boss fight, the next two being the Doctor and the Undead Core.
- Claimed by the Supernatural: When she made Ballos create the Demon Crown, he responded by forcing her to serve whoever wears it. Additionally, when the doctor came back to life, she hates it and tries to kill him again, only to end up possessed by him and unwillingly transformed into a hideous beaked dinosaur thing.
- Combat Pragmatist: "Fair" is not in her vocabulary. She will happily teleport her foes away with her magic or sic someone or something else on them rather than fight. When forced to fight, she likes to teleport around the battlefield, floating well out of reach, shooting magical blasts and teleport/dropping heavy objects on her enemy's head instead of actually fighting.
- Demonic Possession: She gets possessed by the Doctor in the final battle.
- Disproportionate Retribution: Upon being ordered by the Doctor to capture Sue Sakamoto, she mistook Toroko for Sue, and got punished for her error. She replied by opportunistically turning Toroko into a monster for daring to be the wrong person.
- The Dragon: Due to her brainwashing, she's now the Doctor's most competent and loyal servant.
- Eerie Pale-Skinned Brunette: Her gray-white skin and dark blue hair evoke this trope.
- Even Evil Has Standards: The way that she reacts when the Doctor cheats death indicates that she has a limit to what she'll (willingly) tolerate.
- Familiar: She's unwillingly bound to the wearer of the Demon Crown.
- Forced into Evil: Zigzagged. Her actions under the Doctor itself is influenced by him wearing the Demon Crown just like Balrog, meaning that she did not have agency over her most heinous on-screen acts. She did however, force Ballos to create the crown only for him to curse the crown to make sure she had to obey its wearer.
- Forced Transformation: She has a penchant for turning people into various creatures. She transformed Sue and Itoh into Mimiga, and Balrog into Balfrog.
- "Get Back Here!" Boss: Her tendency to flee around the arena can be pretty frustrating.
- Hoist by His Own Petard: She had her uncle Ballos use his godlike magic to create the Demon Crown for her, which he did — and also cursed her to be subservient to its wearer.
- Jerkass: She's too happy to personally send multiple characters (including Balrog) to the Labyrinth with the expectation that they will never escape. Even worse, early on in the game, the Doctor orders her to capture Sue Sakomoto. She ends up mistaking Toroko for Sue, and brings her to the Doctor instead, earning herself a beating. Later on, the Doctor orders her to test the Red Flowers on a Mimiga, and Misery breaks into an enthusiastic grin before choosing Toroko as the test subject, which effectively kills her. Consider for a moment that Misery was there during the last war on the Island, when the Mimiga ate the flowers en-masse to avoid being driven to extinction, she doesn't need to test the Red Flowers because she knows exactly what they do.
- "Balrog. Feed this one a flower."
- Just Following Orders: She is under a curse that forces her to serve whoever wields the Demon Drown. However, unlike Balrog, she often smiles at her work because she enjoys causing misery. Even if this is excluded (she's brainwashed by the Demon Crown curse), the whole curse in the first place is still her own fault.
- Karmic Transformation: For someone with a penchant for transforming people into various creatures, it's fitting that she gets turned into a monster herself.
- Laser-Guided Karma: The voice in the Sacred Grounds reveals that she's the one who made Ballos create the Demon Crown in the first place. She ends up being taken control by some of the most depraved villains possible in a video game.
- Let's You and Him Fight: She prefers to let other people fight her battles for her.
- Living Weapon: In an attempt to prevent Misery from claiming the Demon Crown for the sake of power, Ballos cast a curse on it to make sure anyone who wears the crown controls her. It just happens that the current owner of the Crown is the Doctor.
- Meaningful Name: She has caused, and enjoys causing, great misery.
- More Deadly Than the Male: She forces Toroko to eat a red flower and turn into a vicious monster, abuses Balrog and is in general, a depraved Sadist, unlike Balrog who was more or less an inefficient villain. This was when she's brainwashed — she did force Ballos to create the Demon Crown, after all.
- Names to Run Away from Really Fast: Her name is Misery, for crying out loud.
- The Noseless: She's the only character in the game who doesn't seem to have a nose.
- Pet the Dog: In the best ending, she sent Balrog to rescue Quote and Curly Brace from the Seal Chamber the moment Ballos was destroyed. She had no real reason to do it and she spends most of the time brainwashed by the Doctor, meaning that she was not supposed to know who Quote is to begin with.
- Pre-Final Boss: Of the normal route, she’s the last boss that isn’t some form of the Doctor.
- The Punishment: In her reckless ambition, she forced Ballos to create the Demon Crown, so that she could harness his out-of-control magic for herself. In response, he cursed her so that she'd be enslaved to whoever wears the crown.
- Really 700 Years Old: She's older than the Demon Crown is, and that crown has had four owners.
- Red Eyes, Take Warning: Her eyes are both blood red, and she is far from being the nicest of people. After Ballos is defeated, her eyes turn brown. They were red due to her connection to Ballos' power through the Demon Crown.
- Sadist: She likes making people suffer in various ways.
- Screw This, I'm Outta Here: She doesn't stick around after getting beaten.
- The Starscream: Heavily implied. Out of her worst for being brainwashed, she did force Ballos to create the Demon Crown so she could harness her power. Ballos obviously does not let her get her way.
- Too Dumb to Live: It's clear that forcing Ballos, an almighty Mad God of a sorcerer to create something that grants you absolute power so you could grab it is not a good idea.
- Villain Teleportation: She likes to Teleport Spam during her boss fight.
- Would Hurt a Child: When ordered by The Doctor to test the Red Flowers on a Mimiga, she specifically selected Toroko as the test subject, being well aware of their effects on Mimiga. Later on, she threatens — in dead earnest — to kill Sue if Quote doesn't back down.
The Doctor
The power-snatching betrayer


- Ax-Crazy: He wants to get an army of Mimiga together and hype them up on the Demon Flowers, creating his own personal army through which he'll rule the world amidst destruction. To this end, he's more than willing to kill anyone and everyone in his way, including children and his own associates once he has no more use for them.
- Bad Boss: He doesn't truly care about his associates, and is willing to kill them if he thinks they are no more use to him.
- Badass Longcoat: He always wears a long, white labcoat. After you beat the first phase of your battle against him, he loses control of his power, goes berserk, and his long lab coat gets torn apart.
- Big Bad: He orchestrates the takeover of the island and enslavement of the Mimingas.
- Bitch in Sheep's Clothing: This is how he obtained the Demon Crown. He manipulated his co-researchers into entrusting him with serving as their medic, having planned to take the Demon Crown for himself all along. During the present events of the game, he's Obviously Evil.
- Boss Bonanza: With Misery and the Undead Core.
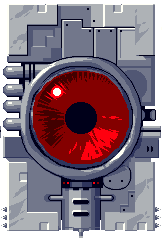
- Crown of Power: The Demon Crown worn by the Doctor grants him supernatural abilities such as levitation, teleportation, and psychic powers. However, it comes at the cost of making its wearer go mad from power, leading to the Doctor's demise at the hands of Quote. It's later revealed that the Demon Crown is a product of Ballos, and as long as he's still alive, the Demon Crown will continue to resurrect itself even when it's destroyed.
- Deader than Dead: His soul is destroyed while fused with the Undead Core.
- Demonic Possession: After his body’s death, his soul pulls this on the Core to become the Undead Core, the Final Boss.
- Drunk on the Dark Side: He really enjoys abusing his power.
- Energy Beings: He briefly becomes a cloud of magically sustained consciousness suspended in a
 cloud of blood that can possess living things.
 - Everyone Calls Him "Barkeep": He is called The Doctor by everyone. His real name is revealed to be Fuyuhiko Date after defeating the Heavy Press.
- Evil All Along: Averted in the game proper, where the first description of him by the Mimiga makes it clear that he's Obviously Evil, but played straight in a letter written by Sue Sakamoto that reveals how the Doctor first got his hands on the Demon Crown. He pretended to be humble in his profession as a medical doctor and gained the trust of the research team investigating the floating island, but in reality he knew about the Demon Crown and its incredible powers from the beginning, and wanted it for himself.
- Evil Genius: He's apparently a biochemist in addition to being a medical doctor. While the Red Flowers are Psycho Serum to Mimiga, humans are immune to their effects. The Doctor was able to concentrate the enraging element of the Red Flowers into a form that could affect humans regardless.
- Evil Is Not a Toy: It looks like he gets his Karmic Death in his boss fight this way... then he possesses the island's Core.
- Evil Overlord: He is the ruler of the island. This position is granted automatically to whoever possess the Demon Crown, because its power is so great that no typical person can challenge the one who possesses it.
- Expy: He bears quite the resemblance to Colonel Muska, both in his appearance, goals, and personality.note
- Faux Affably Evil: He is very formal and polite, and absolutely psychopathic.
- Final Boss: The last opponent of the normal ending, fusing with the Core to become the Undead Core after both of his human forms were defeated.
- Four Eyes, Zero Soul: He wears glasses... and a helmet full of evil magic that he intends to use to destroy the world's armies in his bid for world conquest.
- Four Is Death: He is the fourth user of the Demon Crown, and kills King and Toroko indirectly. He also is the last user of the Demon Crown, permanently if Ballos is killed.
- From Nobody to Nightmare: Starting out as a seemingly ordinary medic and biochemist whom the research team recruited for their investigation on the floating island, he reveals himself as a power-hungry psychopath who was only in it for the Demon Crown and its supernatural powers. With it, he quickly became the island's despotic ruler and plans to raise an army of mindlessly enraged Mimiga with the Red Flowers to Take Over the World.
- Good Powers, Bad People: He was a seemingly ordinary medic who served the research team as such when they investigated the island, but his true goal was to take the Demon Crown and use its supernatural powers to Take Over the World.
- Hate Sink: Is intententionally written to be as vile as possible just to make sure the player would hate his guts. Most of the people around him are either just nice people or flat-out brainwashed, and even Misery has a Pet the Dog moment without being brainwashed. This guy has no redeeming qualities whatsoever and is outright created to be evil for the sake of it.
- Hoist by His Own Petard: His decision to inhabit the Core is what ultimately gets him Killed Off for Real.
- Immortality Immorality: Misery doesn't take it well when he comes back from being disintegrated.
- It's All About Me: He has his eyes set on world domination with the powers of the Demon Crown, and is willing to do anything to achieve that goal, empathy be damned.
- Lack of Empathy: He sees everybody around him as pawns to be used for his own purposes, including his minions Misery and Balrog who are cursed to obey whomever wears the Demon Crown.
- Light Is Not Good: He dresses in a white labcoat, and is rotten to the core.
- Mad Doctor: He is a medic and biochemist, and performs dangerous experiments on unwilling living beings with no regrets.
- Morally Ambiguous Doctorate: In fact, he was the medical doctor working with the research team, but his true intentions for working with the research team was to get his hands on the Demon Crown. He performs experiments on his enemies using Red Flowers throughout the game.
- Obviously Evil: From the very first description of him by the Mimiga, you know this guy is a monster — and then you meet him in-person in the Sand Zone, where he, Misery and Balrog subject adorable, innocent Toroko to a Fate Worse than Death as a mindless Berserker that Quote has to kill to put her out of her misery, all while the Doctor has a remorselessly smug demeanor, complete with Scary Shiny Glasses. Definitely a good guy.
- Scary Shiny Glasses: His eyes are always obscured by the glare of his glasses.
- Screw the Rules, I Have Supernatural Powers!: Thanks to the Demon Crown, he can basically do whatever he wants. He wants to make everybody his slave.
- Sequential Boss: The boss fight against him has three stages.
- Smug Snake: In the original game, the Doctor has only one portrait — a smug smile that oozes with his smugly evil nature and extreme confidence in his superiority.
- The Sociopath: All he cares about is having absolute power over everything and everyone — the lives he violates and ruins along the way don't concern him. He was manipulative even before he got his hands on the Demon Crown, as he joined the research team and served as their medic specifically so that he could, well, get his hands on the Demon Crown.
- Super-Power Meltdown: After taking enough punishment, he loses control of his power, causing him to—much like enraged Mimiga—turn into an overly muscular hulk with a bad case of mindless rage.
- Take Over the World: His ultimate goal is to use the Demon Crown to conquer all the countries of the world.
- Teleport Spam: A tactic that he relies way too much on during the first phase of the boss battle against him.
- Third Eye: His Crown has a third, blood red eye◊ that observant players will find quite familiar.
- Villain Teleportation: He has the ability to teleport whenever his arbitrary whim desires it.
- Would Hurt a Child: He would kill anyone that gets in his way, regardless of age.
Important Characters
Arthur
A Mimiga warrior, and Toroko's brother. He was killed by the Doctor.
- Loved by All: All of the Mimiga think the world of him.
- Posthumous Character: He died before the events of the game.
Toroko
Nice and Courageous


Click here to see her original design
A young Mimiga and Sue's friend.
- Beware the Nice Ones: She's a sweet girl normally, but when force-fed the Red Flower, she became bigger, faster and much stronger than other frenzied Mimiga.
- Blush Sticker: She has two permanent ones.
- Death of a Child: She's not older than ten years when she's killed by the Doctor and his servants.
- Fate Worse than Death: She is forcibly fed Red Flowers by the Doctor and his minions, permanently turning her into a mindless monster with no known cure. Quote has no choice but to give her a Mercy Kill.
- Hope Spot: Just as Toroko is being force-fed the Red Flowers, Quote and King both arrive to save her... too late. King gets there first and is promptly murdered by the Doctor. Quote arrives just in time to put Toroko out of her misery, and be present for King's final seconds alive.
- Mercy Kill: The only thing Quote can do to stop the now monstrous Toroko, after King had already been fatally injured by the Doctor. She can’t be changed back, and she is now a mindless monster, so she has to be put out of her misery.
- Nice Girl: She's extremely friendly and loyal.
- Only Friend: Among the island's inhabitants, she is Sue's only friend.
- Ridiculously Cute Critter: Somehow, she's even cuter than your average Mimiga.
- Shoot the Dog: Once she's been force-fed the Demon Flowers, she goes crazy, forcing the player to kill her themselves.
- Silence Is Golden: The usual victory fanfare is replaced with complete silence when Quote is forced to Mercy Kill her after she's force-fed a Red Flower and goes berserk.
- Superpowered Evil Side: The Red flowers permanently transform her into a rampaging monster that is more than willing to kill anything and anyone, including her old friends.
- Too Good for This Sinful Earth: She's absolutely the most innocent character in the cast. She dies first, and everything goes downhill from there.
- Tragic Monster: She turns into a mindless weapon of death upon being force-fed demonic flowers.
- Uncanny Family Resemblance: To Jack, of all people.
- Mistaken Identity: She is mistaken for Sue early on. This leads to her death.
- You Don't Look Like You: She was substantially redesigned in versions of the game distributed by Nicalis, giving her droopier ears and an overall fluffier appearance. Her clothing also changed shape.
Kazuma Sakamoto
Sometimes reliable brother

- Butt-Monkey: He is mostly seen trapped in a warehouse whining, and his younger sister Sue beats the crap out of him often.
- Didn't Think This Through: Played for Laughs when he starts the ignition of a motorcycle in the Grasstown/Bushlands with Professor Booster as passenger... whereupon he realizes too late that he has no idea how to control the motorcycle. It goes about as well as you'd think it would, with the exception of him and the professor surviving. Not so much the poor motorcycle.
- Dirty Coward: Of all the characters, Kazuma is the most cowardly. At the beginning of the game, he's begging for help from his little sister, who is in actual danger. Near the endgame, he decides to abandon the island, leaving behind his sister and the rest of his companions. Accepting his offer to go with him leads to the game's worst ending.
- Distressed Dude: He's first met locked up inside a shelter, calling his little sister for help.
- Eyes Always Shut: His eyes are always closed in both in his overworld sprite and portrait.
- Hollywood Hacking: He's the one who finds the correct password to hatch a Sky Dragon egg.
- Non-Action Guy: To extreme levels. He makes no effort to fight at all, and demonstrates that he is the most cowardly person on the expedition by far.
- Pointless Band-Aid: Has one on his left cheek. It may not be pointless - he probably got it from Sue.
Jenka
Keeper of the Sand Zone

- All-Powerful Bystander: She's just as powerful as Ballos and could have killed him when he lost his mind, ending the drama before it began... but she couldn't bring herself to kill him.
- Chekhov's Gunman: She is Ballos' sister, and the one who sealed him away after he went out of control. She is also Misery's mother.
- Miniature Senior Citizens: She's the same height as the hero, who's half the height of most humans.
- Retired Badass: Again, she sealed Ballos after he went insane. That must have required really strong magic.
- Theme Naming: Jenka is named for the Finnish letkisjenkka dance, which even provides the music for her theme tune.
Itoh
The Mimiga-like coward engineer

- Cowardly Lion: He eventually overcomes his fear to help Momorin construct the escape rocket.
- Forced Transformation: He's a human who was transformed into a Mimiga by Misery.
- Mr. Fixit: He's an engineer.
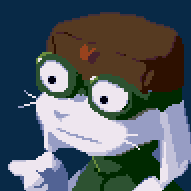
Professor Booster
Sue's grandfather figure

- Jet Pack: He will give one to you over the course of the game.
- Meaningful Name: He created a jetpack after he realized that they should have brought jetpacks for the research team's scientific expedition. Its name? The Booster 0.8, upgraded to the improved Booster 2.0 if the player makes a convoluted decision during the game.
- The Professor: He went with a team on a scientific expedition, only to realize too late that they should have brought jetpacks along for greater mobility. So... he built a jetpack in his spare time while on the expedition. He is also one of the very few characters who knew on first sight that Quote was a robot.
- Red Herring Mole: Professor Booster appears as a grumpy-looking, old scientist in a white coat wearing opaque, signal red glasses. It doesn't help that the game's main antagonist throughout the story is also a doctor in a white coat wearing opaque, Scary Shiny Glasses. Nonetheless he never switches sides, and even stays loyal, possibly until his death, giving away an item to the protagonist with his last bit of strength that he could otherwise have used to save himself.
- Unexplained Recovery: He survives his fall in the Labyrinth if the player ignores him and returns to Arthur's House alive and well without explanation, with the upgraded Booster 2.0.
- Violation of Common Sense: There is a point where he falls and gets major injuries. If you follow him down and try to help, he will give you the Booster 0.8 and succumb to his wounds. Ignore him completely and he will come back alive and well with an improved Booster 2.0.
Momorin Sakamoto
Sue's mom

- Badass Normal: She survives being thrown off the island by the Doctor. Then, after climing back up, she personally organizes the resistance against him.
- Deadpan Snarker: Momorin's commentary on the Doctor trying to throw her off the island once she's done her job for him is to dryly retort about how "chivalry is dead, let me tell you,"note Sue definitely got a bit of her attitude from Momorin.
- Mama Wolf: Not that she could personally do anything about it herself, but Momorin does take particular offense to the Doctor taking Sue with intent to feed her red flowers with the rest of the Mimiga. Consequently, she near-immediately sends the One-Man Army that is Quote right to the Doctor's doorstep.
- You Have Outlived Your Usefulness: The Doctor had Momorin tossed off the side of the island not long after the group's arrival, once she confirmed the existence and location of the red flowers. Somehow she survived just fine and snuck her way into the Plantation anyway, helping the player directly in reaching the Doctor as a bit of payback.
Tetsuzou Kamadani (Unmarked Spoilers)
The Hermit Gunsmith

- Author Avatar: He seems to be a metaphor for Daisuke Amaya's views on the relationship between game designers and consumers.
- Desperately Looking for a Purpose in Life: It turns out, part of his angst was his lack of purpose. Upon seeing how Quote appreciates his work, he devotes himself to the creation of weapons that others can appreciate.
- Flawed Prototype: The Polar Star is essentially this trope. It's an incomplete version of the ultimate weapon.
- It Was a Gift: Return his gun and he will give it back to you... after he's finished it.
- A Master Makes Their Own Tools: He believes in this idea very strongly. He further believes that anyone who uses another person's weapon and calls it their own power is "witless". His opinion changes somewhat if the player returns his weapon.
- Sugar-and-Ice Personality: While it's obvious that he'd be upset that you stole his weapon, his dialogue indicates that he's a generally misanthropic grump. However, once he sees that someone actually appreciates his work, he warms up an awful lot.
- Ultimate Blacksmith: He can turn the Polar Star into the Spur - generally considered the strongest weapon in the game. The Spur increases in power as you hold the trigger, firing on release. At no charge, it is equal to the max level Polar Star, and at maximum charge it fires a beam that is so amazingly powerful that at can and will kill and over-penetrate most things in existence with a single shot. Chaba - an arms dealer in the Labyrinth who is a talented gunsmith himself - calls the Spur "the Ultimate weapon".
Ballos (Unmarked Spoilers)

Click here to see his second form

Click here to see his final form

Jenka's remorseful younger brother
Once Jenka's kind and loving brother, now a mad sorcerer trapped in the depths of the island. He knows this full well, and is waiting for someone strong enough to finally put him out of his misery.- The Ageless: He cannot die naturally, instead needing someone to kill him.
- Ambidextrous Sprite: Averted. His eyes keep their proper colors no matter what direction he faces.
- And I Must Scream: His powers are beyond even his control now, and has been living a long time with that in mind.
- Anti-Villain: Of the Woobie and Villain in-name only type. All he ever wanted to do was to do good. Now, that he physically cannot do good anymore, he only wants to die. He still seems to possess some sense of justice: when his niece forced him to make the Demon Crown for her use, he responded by cursing her so that she would instead be the slave of whoever wore it for eternity. Considering what the Demon Crown can do, that's hardly a case of Disproportionate Retribution.
- Badass Longcoat: He wears one during the first phase of your battle against him, and just like the Doctor, loses it at the second phase of the battle.
- Boss Bonanza: Comes right after the Heavy Press.
- Being Good Sucks: He was tortured by his jealous king because the people loved him too much. The rest is history.
- Being Evil Sucks: Even after giving into his inner demons, Ballos could only watch (and laugh) as everything he's built up literally burns to ashes in front of him. What little hope he had left has diminished, and things like the Demon Crown all-but-ensured that said hope was never coming back. By the time Quote and Curly find him in the Seal Chamber, he's literally begging them to kill him.
- Being Tortured Makes You Evil: He was tortured until his massive magic reserves exploded and destroyed the city he loved. His mind couldn't take the strain. Since that moment, he's been a danger to himself and everyone else.
- Body Motifs: His right eye is red, and there are two eyes on his robe, both of which are red. With the exception of the Red Flowers, every single thing that is connected to his out-of-control magic has one or more red eyes.
- Death Seeker: He waits for the person who can finally kill him and subdue his powers. It sure doesn't stop him from putting up a fight, though.
- Driven to Villainy: He didn't want any of this. He didn't work towards it in any way. It was thrust upon him by a self-important Jerkass of a king who was jealous of his popularity.
- Even Evil Can Be Loved: His sister Jenka couldn't bring herself to kill him after his mind broke under torture and his magic ran wild. Instead, she sealed him away within the floating island the game takes place on.
- Evil Is Burning Hot: His hometown erupted in flames the moment he lost control. After his death, a bunch of unknown voices call out statements such as "It's so hot..."
- Evil Is Visceral: In his final form, his eyes and mouth are filled with red stuff that seems like blood, except it takes the form of screaming faces, most likely all the people he's killed.
- Greater-Scope Villain: While he's not directly commanding the Doctor, he created the Demon Crown, and as long as he's alive, the Demon Crown will always regenerate after being destroyed.
- Hate Plague: Personified, whether he likes it or not. His rage and insanity, coupled with his out-of-control powers, causes both the Demon Crown and Demon Flowers to exist.
- I Cannot Self-Terminate: The last thing he says to you before his death is "Now kill me... or I... shall kill you!"
- Jerkass Genie: His niece found him and pressured him into making her a crown imbued with his powers. The caveat to that? She's bound to the crown and whoever wears it; she doesn't get to wear it herself. As horrible as that fate is, she arguably deserved it.
- Lightning Bruiser: He's extremely tough, deals a lot of damage with each hit, and surprisingly fast for his size in all forms.
- Load-Bearing Boss: The walls of the room you fight him in start to close together after you beat him. As far as the plot, though, this trope is inverted: his magic is what's pulling the island down after the Core has been destroyed. Killing him causes the island to stop falling.
- Loved by All: Narrowly averted. While Ballos was much loved by the people within the kingdom he once lived in because he was that much of a Nice Guy, he was disliked by his jealous king. Unfortunately for Ballos, his king had the power and resources to torture him to the point that his old personality is forever lost.
- Mad God: Driven insane by the brutal torture his king subjected him to, he now lies within the island as his infinite powers continue to grow, waiting for someone to kill him (while he also tries to kill them). His powers have grown far out of his control and, coupled with his rage, have created a number of dangerous objects around the island as well as constantly pulling the island downwards.
- Nice Guy: He used to be a nice guy. He isn't anymore, to his dismay.
- No Good Deed Goes Unpunished: He never did anything wrong. His sincerity and unfailing devotion to helping his fellow people are what led to his jealous king sentencing him to insanity-inducing torture. Everything else that happened was an uncontrollable side-effect of that insanity: the fiery blast that killed his home and family wasn't his fault, the Red Flowers are manifestations of his rampaging magic that leak out beyond his influence, and Misery was the one who forced him to make the Demon Crown, which he has no control over.
- Nightmare Face: His last form is a giant ball with his face on it, with the eyes and mouth open, vacant, and filled with screaming red faces.
- Physical God: He possesses power far beyond normal beings.
- Sequential Boss: You face his default form, then a giant version of his head, and finally a giant bloody version of his head.
- This also extends to his boss fight in The Binding of Isaac: Four Souls Requiem. Ballos is one of the only Epic Bosses that can be killed multiple times in one game note . Since he awards two souls on defeat, players can win the game very quickly by fighting him twice, though they'll have to contend with him having higher attack power.
- Shock and Awe: One of his attacks is to rain down lightning bolts.
- Superboss: While he is the True Final Boss, he counts due to the route to the Golden Ending being filled with Guide Dang It! moments, residing at the end of a Brutal Bonus Level, and being significantly longer and more difficult than any other boss in the game. And there are no checkpoints.
- Theme Naming: Like his sister Jenka, Ballos is named for a Greek folk dance.
- True Final Boss: You only face him at the end of the "True Ending" route.
- Walking Spoiler: The fact that he exists is a huge spoiler in of itself and you only hear about him if you're on the route to the Golden Ending. Nothing else about him is revealed until the final dungeon.
- Woobie, Destroyer of Worlds: Sure, he might have caused most of the trouble in the game's history, but it's hard not to feel sorry for him after you hear what he's been through.
Ballos' King (Unmarked Spoilers)
The king whom Ballos used to serve. He became jealous of the wizard's popularity with his people and subjected him to Cold-Blooded Torture, driving him to insanity.
- Asshole Victim: He was killed by Ballos, along with everybody else in the kingdom, when the latter lost control of his powers in his rage and pain at being tortured. While everybody else was an Innocent Bystander, the King deserved it.
- Death by Origin Story: He died long before the story's present events begin, when Ballos lost his mind under torture and his magic destroyed the kingdom. Considering that he was the one who tortured Ballos in the first place, no tears are shed.
- Didn't Think This Through: He never considered what an absolutely stupid idea it was to torture someone who was not only popular among his subjects, but an extremely powerful magic user — or if he did, he just plain didn't care.
- Evil Is Petty: It doesn't get much pettier than torturing someone for being loved more than yourself.
- Flat Character: We don't learn much about him beyond his jealousy regarding Ballos' popularity with his people. His relevance to the story correlates to how Ballos began his Start of Darkness.
- Greater-Scope Villain: He is responsible for Ballos' fall from a sane Nice Guy to a self-loathing Woobie, Destroyer of Worlds who can't control his own powers.
- Green-Eyed Monster: He couldn't tolerate Ballos' popularity with his people eclipsing his own, and subjected him to intense torture to the point his magic ran wild, destroying the kingdom and killing everybody within it, including the King himself.
- Hate Sink: He was a petty, selfish ruler who subjected Ballos, a then-good man to intense torture because he couldn't tolerate the people loving Ballos more than himself, driving Ballos to insanity in the process. He therefore serves as a source of scorn from players and to provide sympathy fuel for Ballos.
- It's All About Me: He was a selfish jerk who tortured Ballos because he decided that the latter was loved too much, resulting in Ballos losing control of his powers and unwittingly setting most of the story's events in motion.
- Jerkass: From what little we learn about him, he was not a nice king at all, torturing a then-benevolent wizard for no reason other than jealousy at his popularity.
- Lethally Stupid: He unwittingly brought about the destruction of his own kingdom when he couldn't keep his jealousy of a powerful, benevolent wizard in check and decided that torturing said wizard into insanity was a good idea.
- No Name Given: His name is never revealed.
- Posthumous Character: He's been deceased for a long time by the time the game's present events begin, and is only talked about when discussing Ballos' backstory.
- Revenge Before Reason: He tortured Ballos into insanity as revenge for eclipsing himself in popularity, not caring that it was very unlikely that torturing a powerful wizard would go well for him. Surprise, surprise, he ends up dead.
- Small Role, Big Impact: It's unlikely that the Demon Crown would have come into existence the way it did had he not broken Ballos' mind via torture.
- Too Dumb to Live: It's not very wise to torture a powerful wizard to the point they can no longer control their powers, out of nothing more than petty jealousy at their popularity.
- Unwitting Instigator of Doom: There's no way he could have predicted that torturing Ballos would eventually lead to the creation of an Artifact of Doom at the behest of the latter's niece, said niece being cursed to serve whomever wears said artifact, war being waged between robot soldiers and Mimiga over the artifact, and a Mad Doctor trying to Take Over the World using—you guessed it—the artifact; but most of the story's tragic events can be traced back to him doing exactly that.
- Walking Spoiler: He's closely connected to Ballos' backstory, so talking about him in any amount of detail will spoil important plot-points.
Bosses
Igor
Rabid Mimiga who kidnapped Sue

Click here to see his whole body

A frenzied Mimiga. He kidnaps Sue in the Egg Corridor. It is implied he was the caretaker of the Dragon Eggs, as the 3DS version reveals the ID Card is his.
- Degraded Boss: He reappears on The Balcony as a slightly stronger regular enemy, jumping higher and firing off more projectiles than he did before.
- The Igor: It's in the name. He was the assistant to whoever was trying to breed Dragons in the Egg Corridor. After that person left, Igor stayed behind and consumed Red Flowers to enable himself to defend the eggs."GRRRR... NO ONE MAY TOUCH MASTER'S PRECIOUS EGGS!"
- Riddle for the Ages: He's the only Mimiga to consume raw Red Flowers and retain even a tiny degree of sanity, but how he managed to do that is left unanswered.
Omega
Machine-monster that lurks in the sand
- Bait-and-Switch Boss: Misery's the bait, Omega's the switch.
Puu Black
Ghost in the clinic
- Ambiguously Related: Puu is clearly a member of Balrog's species, but it is unknown if the two know each other or what relationship they have.
- Inconsistent Spelling: His name is spelled "Pooh Black" in the Aeon Genesis Translation.
- Kaizo Trap: After killing him, it is still possible to take damage and even die if you touch his remaining bubbles.
- Palette Swap: Of Balrog, for the most part. There are subtle differences between Balrog's sprite and Puu Black's.
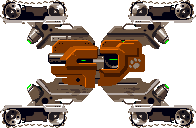
Monster X
Big boss in the labyrinth
Click here to see its true form
A large "X" shaped tank that appears in the Labyrinth.
- Bullfight Boss: Monster X charges left and right trying to run over the player. After a few passes, it will stop to deploy its turrets and shoot them.
- Cores-and-Turrets Boss: When it opens up to shoot, the player can destroy its turrets to expose its actual weak point, which is a core underneath the turrets.
- Cats Are Mean: It's a cat, who is trying to kill you with a tank!
- Macross Missile Massacre: Once its turrets are gone, it fires swarms of fish-shaped missiles at the player.
- Meaningful Name: Monster X is shaped like an X.
- Multi-Directional Barrage: There's no point in trying to find a safe spot where its weapons can't reach you.
- Panthera Awesome: The tank is piloted by a ludicrously huge housecat that comically flies out when the tank explodes.
- Telescoping Robot: It hides its weapons under impenetrable covers that retract when it's about to shoot.
The Core
Heart of the island

Click here to see spoilers
A large, multi-segmented monster that lives in the center of the island.
- Attack Its Weak Point: The only acceptable target is its face: everything else is covered in an invincible shell.
- Boss Bonanza: The second fight with it comes right after Misery and the Doctor.
- Climax Boss: Both times you fight this thing are hugely important events in the plot.
- Cores-and-Turrets Boss: The Core consists of a large central monster, surrounded by a bunch of smaller, near identical monsters that act as its "limbs". The "limbs" are fully indestructible, and act to protect the center "body", both by blocking your attacks and firing projectiles of their own.
- Disc-One Final Boss: The first fight with the Core marks the point of no return.
- Final Boss: If you did not met the criteria for the Best Ending, the Core will be the last thing you fight, resulting in the Island falling from the sky.
- Genius Loci: Whatever this creature is, it's stated by Misery to be the heart of the Island that the game takes place in. It also does not take too kindly to non-native life forms such as Quote and Curly and tries to kill and/or devour them when they enter its chamber.
- Load-Bearing Boss: The Core's power keeps the island floating in the air. More specifically, it keeps Ballos's magic from making the island fall. If it is destroyed, the island will fall. Misery is understandably pissed off at you when you almost destroy it.
- Nightmare Face: It has no distinct face during its first battle, only nine eyes. However, when the Doctor possesses it, it gains several nasty looking faces that indicate when it's vulnerable and what attack it's going to use.
- Perpetual Smiler: It might be because of the Pareidolia effect, but the opening of the core where its face pops out looks very similar to a wide smile.
- Underwater Boss Battle: In the first fight, it can raise the water level in the chamber in an attempt to make you drown.
- Wave-Motion Gun: When it is low on health, it will fire a trio of massive energy spheres that do absolutely ridiculous damage.
Ironhead
Big fish in the island's artery

- The Cameo: Ironhead is a character from one of Studio Pixel's earlier games.
- Flawless Victory: Defeat him without getting hurt and you will get an Alien Badge and see a bunch of squid swim across the screen.
- Giant Space Flea from Nowhere: He appears with no Foreshadowing at all, and the only indicator that a bossfight is coming up is a status message saying that something's approaching.
- Underwater Boss Battle: He is fought in the Waterway's Main Artery, which is completely filled with water.
- Unexpected Shmup Level: The battle with him involves some unique mechanics that can be confusing, namely the ability to move in all directions, and the inability to aim.
The Sisters
Twin dragon surprise attackers
- Dual Boss: Provides the trope image. Both dragons attack you at once, and have a shared health bar.
- Empty Room Until the Trap: After opening the box, the exits disappear...and the Sisters appear out of nowhere.
- Giant Space Flea from Nowhere: They come completely out of nowhere, and have no relevance to the story. Their boss battle is even completely optional.
- Optional Boss: The only reason to fight them is to get a rocket ammunition which is purely optional.
Ma Pignon
A tasty mushroom

- Doppelgänger Attack: One of its attacks involves it jumping into the ceiling and summoning a number of clones. Those are weaker than the real one, and can be destroyed.
- Jerkass: To put it bluntly, you probably won't feel sorry about having to feed it to Curly due to how obnoxious it is.
- Let's Meet the Meat: The "I want to live!" kind.
- Route Boss: Required in order to get the best ending.
- Troll: Before fighting it, you have to get the Mushroom Badge from it by answering a series of questions designed to confuse you. Then, you find out it has no use. Talking to it again will initiate the bossfight.
The Red Ogre/The Red Demon
True heroes meet the...

- Chekhov's Gunman: Briefly mentioned by Jack in an optional dialogue in the Assembly Hall earlier in the game.
- Giant Space Flea from Nowhere: Barely averted, since he gets a optional mention. His appearance in the Last Cave (Hidden) is rather sudden, though.
- Oni: What his design is based off of. His original Japanese name is even Akaoni (red oni).
- Palette Swap: Of the generic enemy Droll.
- The Plus version takes it a step further and gives him a Head Swap as well, making him look more like an actual demon.
- Route Boss: Only present in Last Cave (Hidden), only accessed if the player has the Booster 2.0.
- Spam Attack: Like the Drolls he throws blades, but he throws three at a time, pause, then three more, rinse and repeat.
- Taken for Granite: It turns into stone when defeated.
Heavy Press
The swollen mech
- Boss Bonanza: With Ballos.
- Flunky Boss: Its only direct attack is its lightning strike. During its boss battle, two Rollings appear, and Butes constantly spawn from the sides of the room.
- Kaizo Trap: Heavy Press falls through the floor after being killed. The punishment for standing underneath it when it does so is instant death. That is, unless you abuse Mercy Invincibility via one of his minions.
- One-Hit Kill: If you don't step out of the way as it falls through the floor after defeat, you will die instantly.
- King Mook: It's a basically larger version of the Presses seen throughout the game.
- Pre-Final Boss: Penultimate boss of the true ending, as well as the game as a whole.
- Route Boss: Can be fought only in the True Ending route.
- Shock and Awe: It has a lightning attack which strikes directly below it that it uses every so often.
- Stationary Boss: It only ever moves after its health bar is depleted to crash through the floor. The main threat in its boss fight is the enemies present.
G-Clone

- A.I. Breaker: The Mooks it spawns won't attack you when you stand on the block at the very left.
- Mook Maker: Curly clones, to be precise. Naked ones, at that, which attack by grappling you.
- Optional Boss: Boss of the Wind Fortress, which itself is only unlockable in Plus-based versions.
Other Characters
Jack
Number-Two

- Character Tic: Pointing at people. Also staring at them.
- Hat of Authority: His hat seems to be a Russian styled military hat◊ with a chevron.
- Number Two: He identifies himself as the number-two of the village. When spoken to, he speaks the clearest and most directly of all the Mimiga in the game.
- Sole Survivor: Out of the Jack/Toroko/King trio, it's implied that he's the only one who didn't die during the game.
- What Happened to the Mouse?: The last time he can be seen is in a Plantation prison. He disappears completely without a word thereafter.
Santa
The cowardly loner

- A Day In The Lime Light: Is the player character in Cave Story's Secret Santa.
- Big Ol' Eyebrows: His eyebrows are massive.
- Lovable Coward: He's afraid of the Critters that surround his home, so much so that he left his house keys behind and wouldn't go back to get them, despite possessing the Fireball gun, which is an excellent weapon on that terrain. Chako calls him a scardey-cat.
- Malevolent Architecture: His house comes complete with a spike-trap you can fall into for no other reason than to warn players.
- Schmuck Bait: The spike-trap in his house comes with a very obvious warning.Watch out! Deathtrap to your left! One touch means instant death!
- Ship Tease: With Chako. The epilogue shows that he never wanders far from Chako after leaving the island.
- Stealth Pun: A necessary bomb ingredient, charcoal, its found in his house. He also gives a gift to the player in exchange for finding his key.
Chako
The colorful Mimiga

- Adaptational Skimpiness: her design in the original PC game indicates that her clothing is no different than any other Mimiga's. Her updated design in the ports includes far more revealing clothes that are essentially underwear.
- Bowdlerize: In the 3DS remake, if Quote sleeps in Chako's bed, he'll wake up to find her sleeping on the floor instead of next to him. However, he still gets her lipstick, so someone was not paying full attention.
- Event Flag: To pass through the fireplace, you need a jellyfish juice. Said jellyfish juice comes from a giant jellyfish that appears only once you have tried to pass through said fireplace.
- Good Bad Girl: Unambiguously so. She's a very friendly character, and has not one reservation about sleeping with Quote immediately after meeting him.
- Inconsistent Spelling: Her name is spelled Chaco in the Aeon Genesis translation, and Chako in the Nicalis translation. The latter is generally accepted as correct, as it is a -ko name, is present in Pixel's original filenames, and is reused in Cave Story's Secret Santa.
- Intimate Healing: Sleeping with her restores your health.
- Non-Mammal Mammaries: Chako is the only Mimiga in the game who has breasts. While they were only barely visible in the original PC version due to graphical limitations, the enhanced graphics of the ports make them much more obvious.
- Malevolent Architecture: Her fireplace contains a passage to the rest of Grasstown/Bushlands. You must put out the fire with Jellyfish Juice.
- Optional Sexual Encounter: If Quote sleeps in her bed after she mentions the jellyfish juice, he will wake up with her sleeping next to him. He obtains her lipstick, which is useless outside of getting 100% Completion.
- Robosexual: She can sleep with Quote. Despite all appearances, Quote is a very human-like robot. She likely already knows, even though the player doesn't yet.
- Sherlock Scan: Implied. She can tell that Sue Sakamoto is a human despite the fact that she was magically changed into a Mimiga. She even claims "my eyes can't be fooled".
- Ship Tease: With Santa. The epilogue shows that she never wanders far from him after leaving the island.
- The Power of Love: After the fight with the Muscle Doctor, talking to Chako repeatedly will cause her to compare Quote with Arthur. This will cause all of the caged Mimiga to generate hearts over their heads. They function as health packs, and they are the only way to regain health before fighting the Undead Core.
Malco
Power Supply Bot

- Because You Were Nice to Me: Despite his initial aggression, Malco helps Quote after the latter helps him out.
- MacGyvering: He can make a bomb out of charcoal, gum, and jellyfish juice.
- Robo Speak: In the Aeon Genesis translation he always speaks in ALL-CAPS.
- Tin-Can Robot: He certainly gets crushed like one thanks to Balrog.