open/close all folders
Americans
Private First Class/ Corporal Boyd Travers
Boyd Travers
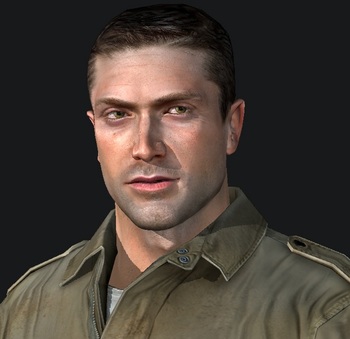
The Hero of the story. A paratrooper serving in the 82nd Airborne Division, and later, the 17th Airborne Division.
- Anti-Armor: Is more than once tasked in this role, either with anti-tank rockets or anti-tank grenades.
- Cold Sniper: He's a pretty good shot with the Springfield, and maintains his calm composure throughout.
- Do-Anything Soldier: Regular paratrooper, to sniper, to demolitions expert.
- Demolitions Expert: Is always assigned to destroying enemy equipment using explosive charges.
- Everybody's Dead, Dave: At the end of the game, he's pretty much the sole surviving original member of his squad from Sicily.
- The Hero: The story is seen solely through his perspective, and he's the focus from beginning to end.
- It's Raining Men: He's a paratrooper, and pretty much every mission starts with him jumping out of a plane.
- One-Man Army: He can pretty much wipe out platoons of enemy soldiers when given the right weapons for the job.
- Player Character: Of Airborne.
- Plunger Detonator: Uses one to destroy the Flak tower in the final mission, due to Setzer dying before he could use it.
- Rank Up: Is promoted to Corporal after Operation Market Garden. And after Setzer's death, it's heavily implied he's been promoted to Sergeant as well, judging by his character model in promotional material featuring Sergeant's stripes on his uniform.
- Silent Protagonist: As usual par the course of the other entries in the franchise, he never utters a single word.
- Sole Survivor: By the end of the game, he's the only member of his original squad from as far back as the Sicily drop to survive unscathed.
Sergeant Dane
Dane

"I can't stand Setzer, anyway..."
Travers' squad leader during the drop in Sicily.- Headbutting Heroes: With fellow Sergeant Setzer.
- Killed Offscreen: Implied, considering the German counterattack on Adanti pretty much overran all the positions the American paratroopers captured, including the one he was holding position.
- Jerkass Has a Point: He does prove to be right with regards to the paratroopers being spread thin, as this gives the German forces around the village an opening to counterattack. Him holding position in the town however, while holding some merit, proves to be futile, as the Germans storm the town with armored vehicles.
- The Neidermeyer: In comparison to Sgt. Setzer. Rather than help to secure the rest of the town and help reinforce Setzer, he decides to "hold position" instead, assigning Wirth and Travers to do it instead.
- What Happened to the Mouse?: He's never seen again after sending Wirth and Travers to reinforce Setzer. Though considering the German counterattack not too long after they leave, it's most likely he was Killed Offscreen in the ensuing chaos.
Sergeant Setzer
Setzer

"You! Travers! You fight with us."
Travers' and Wirth's squad leader for most of the game.- Demolitions Expert: Late into the game, he's put in charge of the demolitions team tasked with planting explosives in the Flak tower.
- Dropped a Bridge on Him: He and Wirth die in an ambush by Fallschirmjagers in the final mission.
- Headbutting Heroes: With fellow Sergeant Dane.
- The Leader: Of Travers' squad throughout the game.
- Sergeant Rock: Compared to Sergeant Dane. His Establishing Character Moment is to order Travers to help the rest of his squad move up, while ordering Wirth, who's Pinned Down, to head to Col. Webb's headquarters to request reinforcements. He even calls Dane a "lazy bastard" just to show that he's not the type who would give up easily.
- Supporting Leader: While he's the leader of Travers' squad, he isn't the protagonist and the one doing all the heavy lifting, and is only mostly there to give orders to him.
- Taking You with Me: He manages to kill several German troops who had ambushed him and Wirth, before finally bleeding out and dying.
Private Wirth
Wirth

"Come on, Travers! We gotta secure the rest of the town!"
One of Travers' squad mates, whom he has served alongside with since Sicily.- Demolitions Expert: Is assigned to engineer duty under Setzer in the final level, and helps set up the explosives needed to blow up the Flak tower.
- Dropped a Bridge on Him: He's killed in an ambush by Fallschirmjagers after having just escaped the Flak tower.
- The Generic Guy: Amongst the main cast, he's the one with the least characterization.
- Killed Offscreen: Unlike Setzer, he's already dead by the time Travers makes it to his position.
- The Lancer: The closest one Travers has throughout the game. He's the only other named soldier whose voice is heard consistently throughout the campaign.
- Oh, Crap!: He gives a silent one upon finding out that there are German reinforcements in the basement of the flak tower.
- Satellite Character: His main role is providing Travers and Setzer with additional help.
- Taking You with Me: It's apparent that he's at least managed to kill several of his attackers before getting shot to death by the time Travers finds his body.
Harding and his Spotter
Harding and Harding's Spotter

Harding's corpse, with his wounded spotter just behind him
A sniper team that Sgt. Setzer's squad was assigned to relieve. By the time Travers and Setzer get to them, Harding has since been killed, with his spotter getting badly wounded.- Agonizing Stomach Wound: If one takes a closer look at where the spotter was shot, you can notice him writhing in pain and covering his abdomen with both hands. Ultimately subverted as, despite his agonizing pain, he manages to survive the ordeal and help Travers kill the enemy sniper.
- No Name Given: Harding's spotter is never named, despite teaching Travers on how the Springfield worked.
- Posthumous Character: All the player gets to see of Harding is his corpse.
- Sniper Rifle: Harding's weapon is a scoped Springfield, which his spotter tells Travers to use against the enemy sniper who ambushed them.
- Target Spotter: The spotter's job, of course, at least until he and Harding were ambushed. He manages to spot for Travers instead, while also teaching the Private on how to use the Springfield.
- What Happened to the Mouse?: The spotter is never seen again after Travers and Setzer head back into Adanti, though it's presumed he survived the ordeal.
Colonel Scott Webb
Webb
Battalion Commander and Travers' commanding officer. He narrates all after-action reports for each respective level.- After-Action Report: This is pretty much his role in the game.
- Big Good: As the leader of Travers' battalion and the highest ranking soldier on the American side, he's the closest thing to one in the game.
- Character Catchphrase: "Colonel Scott Webb, after action report..."
- The Faceless: His voice is heard narrating after-action reports, but he himself is never seen in person.
- Non-Action Guy: Due to his rank and position, he's forced to sit out away from the fighting.
Corporal Kish
Kish

"Care to join us? I guarantee you, it'll be a blast..."
An engineer from the 36th Infantry Division, US 5th Army, assigned to destroy artillery positions during the Salerno landings.- The Cavalry: His unit was assigned to rendezvous with Travers' unit and help them destroy the German artillery further in the ruins.
- Demolitions Expert: He and his squad are pretty much assigned to the job of helping to destroy German artillery.
- Hero of Another Story: It's heavily implied he's seen more combat than Travers at the point the two of them meet.
- The Engineer: He leads an entire of squad of combat engineers.
- The Leader: Of his engineer unit.
Private Rossum
Rossum

"Of course we are! We're Airborne!"
A soldier in Travers' unit, who participates in the Normandy landings alongside Cpl. Towne.- All There in the Manual: His and Towne's names are only revealed in the Concept Art Gallery videos, specifically the one about animation capture.
- Badass Boast: His quote shown here, which he says in response to Towne's reluctance to help the 4th Infantry Division Pinned Down on Utah Beach.
- Uncertain Doom: He's last scene is him charging heavily defended German positions on Utah Beach, although considering his voice is heard in later levels, it's possible that it's him.
- What Happened to the Mouse?: As mentioned in Uncertain Doom, he disappears from the plot, apparently getting killed by the Germans defending Utah Beach. Although, given that his voice is still heard in later levels, it's also possible he survived.
Corporal Towne
Towne

"Wait? We're going down there, into the trenches!?"
Another soldier in Travers' unit during the Normandy landings, who is squadmates with Pvt. Rossum.- All There in the Manual: His and Rossum's names are only revealed in the Concept Art Gallery videos, specifically the one about animation capture.
- Uncertain Doom: Like Rossum, he disappears from the plot following the clearing of Utah Beach, with the heavy implication that he was Killed Offscreen. Though considering that his voice is still heard in later levels, this is left ambiguous.
- What Happened to the Mouse?: Much like Rossum, he disappears from the plot after his only cutscene. As mentioned in Uncertain Doom though, it's very likely that he survives into the later levels, albeit offscreen.
Axis Soldiers
Italian Blackshirts


Top: Italian Blackshirt; Below: Vicecapo Blackshirt
Italian Soldiers defending Sicily, they are the first enemies encountered during the drop in Adanti. They come in two variants: Italian Blackshirts, and Vicecapo Blackshirts.- The Goomba: They're the weakest enemies in the game, and are only encountered in the first level. When the German Heer soldiers show up about halfway through the level, your C.O. even notes that unlike the Italians, the Germans actually know how to fight.
- Improperly Placed Firearms: They're shown using German weapons like the Mauser Kar 98 rifle or MP 40 in place of the more appropriate Carcano rifle and Beretta Model 38, respectively.
- Unique Enemy: They're only encountered in "Husky", where they're replaced by the Heer halfway into the mission.
Heer


Top: Tropical Heer Infantry; Middle: Heer Officer; Below: European Heer Infanty
Soldiers of the Regular German Army, and the first German units encountered. They come in three variants: Tropical Heer Infantry, European Heer Infantry, and Heer Officers.- Authority Equals Asskicking: Subverted with the Heer Officers. The European Heer Infantry are considered as the deadliest of them all due to their capability of killing players in 2-3 hits depending on the difficulty.
- Mooks: They are the standard enemy infantry for the first half of the game.
- Unique Enemy: One Heer Officer is equipped with a Kar 98 sniper rifle rather than the usual MP 40. He is to be killed as one of your primary objectives.
- The Tropical Heer Infantry themselves only appear in Husky, and are replaced by the European Heer Infantry from Avalanche onward.
Waffen-SS


Top: Waffen Infantry; Second: Waffen Officer; Third: Waffen Senior Trooper; Below: Waffen Storm Leader
One of Germany's elite troops. Compared to the Heer, they are equipped with more automatic weapons, and are often seen supporting tanks. They come in four variants: Waffen Infantry, Waffen Officer, Waffen Senior Trooper, and Waffen Storm Leader.- Authority Equals Asskicking: The Officers and especially the Storm Leaders. The Storm Leaders in particular are excellent shots and have the most health of any enemy in the game other than the Nazi Storm Elites.
- Cold Sniper: The Senior Troopers, who are snipers armed with Gewehr 43 sniper rifles.
- Elite Mooks: At first, they seem to be this when they're first introduced during the Avalanche mission. However, they're easily gunned down like the Heer Infantry, and turn out to be subversions and more of...
- Played straight, however, by the Storm Leaders, who are very competent shots and can kill players in two-four shots.
- Subverted as well by the Senior Troopers. While they are competent snipers, they are ultimately outclassed and later replaced by the deadlier Fallschirmjager Snipers.
- Fake Ultimate Mook: The Infantry and Officer variants turn out to be this, despite the buildup in the game that they're far deadlier than their Heer counterparts. The Senior Troopers, while having the same lethality as the Fallscirmjager Snipers, have less health and overall less combat effectiveness than the latter. Averted with the Storm Leaders, who are far better shots and are just as advertised.
- More Dakka: Compared to their Heer counterparts, and to a degree, the Fallschirmjager, they are armed with a much bigger number of automatic weapons, namely the MP 40 and Stg 44.
Fallschirmjager


Above: Fallschirmjager Infantry; Middle: Fallschirmjager Commander; Below: Fallschirmjager Sniper
German Paratroopers, and one of Germany's elite troops. Compared to most of the Waffen-SS, they are far more competent in firefights and can give even experienced American troops a run for their money. They come in three variants: Fallschirmjager Infantry, Fallschirmjager Commander, and Fallschirmjager Sniper.- Authority Equals Asskicking: The Commanders.
- Cold Sniper: The Fallschirmjager Snipers, who, like the Waffen Senior Troopers, are armed with Gewehr 43 sniper rifles.
- Elite Mooks: Are far better shots than most of the Waffen-SS counterparts, and are much harder to take down in a firefight, as they tend to fire from cover and throw grenades more.
- Evil Counterpart: To the American paratroopers.
- It's Raining Men: Subverted. While they are paratroopers, they are never shown jumping out of aircraft. Truth in Television, as by this point the war they've been relegated to becoming regular infantry.
- Unique Enemy: The Fallschirmjager Infantry. Only a squad of them appear during Varsity, defending the factory housing the railway cannon and unfinished tanks.
Panzergrenadier

- Anti-Armor: Their designated role, as shown in their introduction late in Market Garden.
- Anti-Infantry: They can and will use their Panzerschrecks against Travers and other American paratroopers, being very effective at taking out entire squads as well as almost your entire health bar.
- Gas Mask Mooks: Justified. They wear gas masks in order to protect themselves from their Panzerschreck's backblast.
- Glass Cannon: They can deal a lot of damage to Travers and other American paratroopers, but they themselves can be killed with only a few bullets.
- There Is No Kill Like Overkill: They can and will use those Panzerschrecks against you and the other paratroopers accompanying you.
Nazi Storm Elite

- Boss in Mook Clothing: They deal far more damage and have far more health than every other enemy infantry type in the game, with only the Tiger I tank being more powerful.
- Dual Boss: A pair of them show up as a boss fight of sorts at the end of Mission 5. They're encountered semi-regularly throughout Mission 6, the final mission of the game.
- Gas Mask Mooks: They wear gas masks like the Panzergrenadiers, but their purpose this time appears to be for intimidation, rather than any practical purpose.
- Heavily Armored Mook: They can take up to 4 times the amount of damage that would kill every other enemy infantry type.It's heavily implied that they're wearing flak jackets under their uniforms, which allows them to take much more damage than other German soldiers.
- Made of Iron: They are capable of taking almost an entire Thompson magazine, a few headshots, or even two rockets, before going down.
- Mighty Glacier: Unlike other German infantry units, they can only advance slowly due to the combined weight of their armor, weapon, and ammunition.
- More Dakka: They wield hand-carried MG42s and fire them from the hip.
- Unusable Enemy Equipment: Unlike other German troops whose weapons can be used one way or another, Travers cannot carry or wield the portable MG42s used by them.
Tiger I Heavy tank

- BFG: Its 88mm KWK 36 gun. Its shell is so massive, that even a near-miss can cause moderate damage while also causing Shell-Shock Silence.
- The Dreaded: Whenever one appears, expect a Mass "Oh, Crap!" from your squadmates. And with very good reason, as only dedicated anti-tank weapons, something the American paratroopers are almost always short on, can take one out.
- Mighty Glacier: It can deal massive damage to anything that comes near it, whether its lightly-armed infantry or Allied tanks. However, thanks to being a heavy tank, it can only move at a snail's pace.
- More Dakka: All of these tanks come with a co-axial machine-gun to defend against infantry trying to take them out.
- Tank Goodness: Whenever they appear, expect them to kill several of your buddies before you manage to take one out.