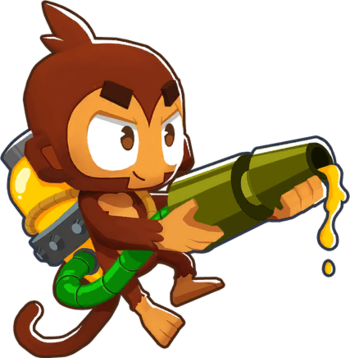
The various defensive monkeys and towers that can be placed to aid the fight against the bloons.
Towers introduced in Bloons Tower Defense:

The most basic unit you get. Shoots a single dart that pops a single bloon (except in 6, where it can now pop 2).
Its upgrade paths in BTD5 are the Spike-o-Pult, which launch spiked balls that can pop a very large number of bloons before stopping, and Super Monkey Fan Club, which temporarily transforms it and other nearby dart monkeys into Super Monkeys.
In Bloons TD 6, it keeps the Spike-o-Pult and Super Monkey Fan Club upgrade paths, respectively adding to them the Ultra-Juggernaut which can split into even more Juggernaut balls, and the Plasma Monkey Fan Club which converts nearby Dart Monkeys into Plasma Monkeys. It also adds the Crossbow upgrade path, which specializes in popping multiple layers at the same time and culminating in the Crossbow Master, dealing high damage at a rapid pace from long range.
Its Paragon upgrade is the Apex Plasma Master, which rapidly fires bouncing, splitting, spiked plasma balls to decimate everything on the screen.
- All-Encompassing Mantle: x/4 Dart Monkeys have green ones in BTD5. The Crossbow Master wears a black one in 6.
- All Your Powers Combined: The Dart Monkey Paragon, the Apex Plasma Master, rides a gigantic ballista crossbow which rapidly fires three plasma Ultra-Juggernaut balls, combining the attacks of the Ultra-Juggernaut, Plasma Monkey Fan Club, and Crossbow Master.
- Automatic Crossbow: Bottom path Dart Monkeys in 6 equip a fast-firing crossbow.
- Boring, but Practical: Cheap, simple, yet undoubtedly effective, with its upgrades surprisingly carrying over well into the lategame. Even the Apex Plasma Master is Boring, but Practical by Paragon standards, being weaker but comparatively cheap.
- Composite Character: The Spike-o-Pult was one of the new towers in BTD3, but BTD4 fused it with the Dart Monkey due to their similarities and has remained one of its upgrade paths since then.
- Critical Hit: The Sharp Shooter upgrade in BTD6 causes one out of every few shots to deal much more damage. This ability gets enhanced for the Crossbow Master
- Elemental Rock-Paper-Scissors: Juggernaut deals five times the damage to Ceramic Bloons, while the Ultra-Juggernaut bumps it up to eight times (five times for the split balls). The Apex Plasma Master deals 105 Ceramic damage at base.
- Hyper-Destructive Bouncing Ball: In BTD6, the Spike-o-pult and its upgrades throws spiky balls that can bounce around obstacles. While it's a niche utility for the most part, it's good for maps with a lot of obstacles, especially after an update that allows a bouncing spikeball to re-hit a Bloon. The Ultra-Juggernaut is nightmarishly strong in maps like Moon Landing and Cornfield because of all the obstacles the balls can bounce from.
- Magikarp Power: Because the power of the basic Dart Monkey is low, the difference between it and a fully upgraded version is immense. The basic version throws a small dart a moderate distance about once a second for one damage. The Ultra-Juggernaut throws a gigantic spiked ball that can pierce through tons of Bloons and split into even more projectiles; the Plasma Monkey Fan Club can transform other Dart Monkeys into powerful Super Monkeys with plasma vision temporarily; and the universally useful Crossbow Master shoots giant armor piercing drill-bolts halfway across the map eight times a second for six damage with a ton of pierce, can see and hurt anything, and does massive fifty-damage hits more than once a second. If you can afford the Paragon upgrade, the Apex Plasma Master, you get a rapid-firing tower that launches heavily-damaging projectiles that cover nearly the entire map.
- Multi Shot: Triple Shot allows the Dart Monkey to throw three darts at once.
- Non-Indicative Name: Dart Monkeys who have the Spike-o-pult upgrade or the Crossbow upgrade and above are still called Dart Monkeys.
- One-Hit Polykill: A Dart Monkey can upgrade to pop 2, then 4 bloons per shot if fired down a straight line. On the other hand, the Spike-o-Pult can pop up to 18 bloons in one go, and the Juggernaut can pop up to 104.
- Pinball Projectile: Juggernaut shots can bounce off of walls that would block other projectiles.
- Recursive Ammo: The Ultra-Juggernaut fires one Juggernaut ball which splits into six more.
- Siege Engines: Spike-o-Pult and Juggernaut have the monkey switch out their hand-thrown darts for a slower-firing catapult which launches giant spiked balls.
- Spike Balls of Doom: The Spike-o-Pult launches large spiked balls that can pop up to 18 bloons. Juggernaut's spiked balls are several times the monkey's size. The Ultra-Juggernaut then bursts into six more Juggernaut balls when reaching the edge of the screen.
- Starting Equipment: The first monkey you unlock in every game it appears in. Even in a session, it's also the cheapest Monkey available to buy. In BTD6, there's even a Tech Tree upgrade that makes the first Dart Monkey free to place.
- Super Mode: Super Monkey Fan Club transforms it and around 10 other Dart Monkeys in its vicinity into Super Monkeys for 15 seconds. BTD6 adds a further upgrade, Plasma Monkey Fan Club, which converts up to 20 Dart Monkeys and grants them plasma vision.
- This Looks Like a Job for Aquaman: The Juggernaut and Ultra-Juggernaut upgrades are much more useful in maps where they can bounce a lot, such as Cornfield, Moon Landing, Encrypted, or Hedge. This also applies to the Paragon, Apex Plasma Master: maps which have tight quarters can drastically magnify the damage it puts out, making it very cost-efficient for a Paragon (and it is already the cheapest Paragon in the game).
- Zerg Rush: Their cheap costs allows them to be spammed quite liberally. It's even encouraged with the Super/Plasma Monkey Fan Club ability, which temporarily superbuffs other Dart Monkeys. In 6, the Monkey City upgrade of the Village also gives you one free Dart Monkey every round.

A short-ranged tower that fires 8 tacks all around it. Excellent for corners or other choke points.
Its upgrade paths in BTD5 are the Tack Sprayer, which launches 16 tacks instead of 8 and can be upgraded to the Ring of Fire, which shoots an unavoidable circle of flames, and the Blade Shooter, which fires large blades with increased popping power and can be upgraded to the Blade Maelstrom for a deadly barrage of saw blades covering the whole screen.
BTD6 changes up these paths. Its first path is the Hot Shots, which slightly increases attack speed, can pop lead, and leads to the Ring of Fire and Inferno Ring abilities, the latter of which can periodically fire a powerful meteor with infinite range. The second path is the Blade Shooter, which is similar to how it was in BTD5. Its third path is the Tack Sprayer, which also is mostly unchanged, but leads to Overdrive and The Tack Zone, which fire huge amounts of tacks at an extremely high rate.
- Boring, but Practical: Not a very flashy attacker, but the Tack Shooter is very cheap and one of the most cost-effective ways to thin out bloon rushes: in theory, it can do 8 damage per shot without needing any upgrades, much more than any other similarly-priced base tower (though reaching this maximum is very situational and only possible in certain positions).
- Close-Range Combatant: Has incredibly short range which emphasizes its dense spray of tacks well. It does have several upgrades to mitigate this weakness, however.
- Deadly Disc: The Blade Shooter upgrade allows them to fire buzzsaws instead of tacks which are harder to miss and can pop more bloons.
- Exactly What It Says on the Tin: While most of the upgrade descriptions are very direct, the Tack Shooter deserves a mention.Faster Shooting: Shoots tacks faster.Even Faster Shooting: Shoots tacks even faster!
- Fire-Breathing Weapon: The Ring of Fire shoots a fiery burst that burns through bloons, including Lead and Frozen bloons.
- Multi-Directional Barrage: Their specialty is firing all around themselves indiscriminately. Blade Maelstrom allows it to unleash this on the entire screen.
- Multi Shot: Tack Shooters fire 8 shots at a time, and with the Tack Sprayer upgrade that can increase to 18.
- Non-Indicative Name: Tack Shooters with the Ring of Fire upgrade or the Blade Shooter upgrade and above are still called Tack Shooters.
- One-Hit Polykill: Blade Shooter allows it to tear through multiple bloons per shot, while Ring of Fire lets it pop up to 60 per burst. Blade Maelstrom and Super Maelstrom, on the other hand, can pop many, many more Bloons per blade.
- Scissors Cuts Rock: The Super Maelstrom upgrade allows the Tack Shooter to pop Lead bloons with regular blades, even though the previous upgrades cannot do so.
- Sentry Gun: Subverted. It appears to be a fully-automatic bloon-popping machine, but as seen in Bloons TD Battles 2, there's a monkey hiding inside.
- Simple, yet Awesome: The bottom path upgrades, instead of giving it more powerful projectiles or new abilities, just directly upgrade the Tack Shooter's rate of fire and let it fire more and more tacks, to devastating effect.
- Spike Shooter: It shoots 8 tacks in a ring around it, which can be increased in number as it upgrades. While the bottom path increases the amounts of tacks fired to a ludicrous level, the top and middle path replace the tacks with something else, however.
- Storm of Blades: Its Blade Maelstrom ability produces this, though with sawblades.
- Truth in Television: Bloons Monkey City reveals that the Ring of Fire uses Thermite
 , an extremely flammable incendiary exponent, as fuel.

A short-ranged support tower that unleashes cold blasts to briefly freeze bloons solid. Frozen bloons cannot move, but also cannot be harmed by piercing weapons.
In BTD5, its first upgrade path grants it the Arctic Wind ability, which greatly increases its range and slows down all nearby bloons, and Viral Frost, which causes frozen bloons to freeze any other bloon that touches it. Its second upgrade path grants it Ice Shards, which causes frozen bloons to explode when popped, damaging other nearby bloons, and Absolute Zero, an active ability which freezes every bloon on the screen except for MOABs.
In BTD6, its upgrades are changed. The top path contains Ice Shards, and adds the Embrittlement and Super Brittle abilities, which increase damage taken by frozen bloons. The middle path contains the Arctic Wind, Snowstorm (an active ability similar to Absolute Zero in BTD5), and Absolute Zero upgrades. The bottom path is the most unique, granting the Ice Monkey a Cryo Cannon which doesn't freeze bloons in a circle around it, but rather shoots explosive projectiles that can freeze foes from afar, and can be further upgraded with Ice Shards and Icicle Impale, which deals extra damage to MOAB-class bloons. All tier 5 abilities are capable of freezing MOABs.
- All-Encompassing Mantle: An 4/x Ice Tower has a blue one in BTD5.
- Amazing Technicolor Population: Most of the standard monkeys are brown, but Ice Monkey has white fur and dark blue skin.
- Battle Aura: Arctic Wind gives it an aura that passively slows bloons just by being near them.
- BFG: The Cryo Cannon upgrade and further iterations. Special mention to Icicle Impale, whose cryo cannon is so big that the Ice Monkey wielding it has to lean to counter its weight.
- Bigfoot, Sasquatch, and Yeti: The tower's appearance in BTD5 and games after it have a yeti-like design with white, slightly scruffier fur, fitting with their ice powers. It's more pronounced in upgrades such as Ice Shards or Super Brittle.
- Close-Range Combatant: Has incredibly short range. Cryo Cannon remedies this by turning it into a more standard shooting tower with a long attack range.
- Damage-Increasing Debuff: The Embrittlement upgrade makes all bloons affected by an Ice Monkey's freeze take more damage while frozen, including MOAB-class bloons (although they still can't be frozen). Super Brittle significantly improves the damage amplification.
- Early Installment Character-Design Difference: In the first four games, Ice Towers were machines like the Tack Shooter and Bomb Tower, appearing as a snowglobe-like device that froze surrounding Bloons. The fifth game changed the tower into a white yeti-like monkey with ice powers, and this was kept starting from Bloons Monkey City alongside changing its name from Ice Tower to Ice Monkey.
- Harmless Freezing: Prior to BTD6, Ice Monkeys can't damage bloons until they are upgraded with Snap Freeze.
- Herd-Hitting Attack: The main draw of using the Ice Tower is its very high popping power for a base tower, even more than that of a Bomb Tower.
- An Ice Person: Originally the tower was a freezing machine, but BTD5 onwards makes it an ice-elemental monkey.
- Improvised Platform: The Arctic Wind upgrade in 6 freezes nearby water, allowing land-based towers to be placed on water, which normally would be impossible. Notably, this allows normally land-based units to benefit from buffs normally exclusive to aquatic towers, such as Carrier Flagship and Energizer.
- Kill It with Ice: With the Snap Freeze upgrade, frozen bloons are popped once. In BTD6, this ability is included by default.
- Literally Shattered Lives: Weaponized with Ice Shards - frozen bloons will explode into damaging ice shards when popped, hitting even more bloons around it.
- Mythology Gag: The "Snowstorm" upgrade for the Ice Monkey in BTD6 has it stand atop a miniature mountain that looks incredibly similar to the original Ice Tower.
- No-Sell:
- Absolute Zero can freeze White and Zebra bloons, which are normally immune to its attacks.
- In BTD6, they're immune to the freezing effects in the Glacial Trial map.
- Scissors Cuts Rock: The Icicle Impale upgrade allows the Ice Monkey to pop and freeze White and Zebra bloons.
- Status Effects: Can freeze enemies, and slow them with certain upgrades.
- Support Party Member: In games before BTD6, it can't deal damage without Snap Freeze, but can immobilize and slow down enemies. In BTD6, it gains increased supportive utility with its new paths, such as the Embrittlement and Super Brittle upgrades, as well as the Icicle Impale, slowing even the toughest of MOAB-class bloons to a crawl.
- Unwanted Assistance: Ice Towers can occasionally be seen as this, since frozen bloons can No-Sell piercing weapons.
- The Virus: Viral Frost has an interesting variation. It freezes bloons so cold that any bloon that so much as touches a frozen bloon will also be frozen solid. This allows the freeze to spread incredibly fast, pretty much completely immobilizing all and any bloons aside from MOAB-classes.

A mid-ranged cannon that launches explosive bombs to deal area damage.
In BTD5, its first upgrade path has the Cluster Bomb ability, which launches secondary bombs from the explosion to increase the affected radius, and Bloon Impact, which briefly stuns affected bloons. The second upgrade path focuses on damaging MOAB-Class bloons with MOAB Mauler, which deals extra damage to them, and MOAB Assassin, which fires a powerful missile towards the nearest MOAB and deals huge damage.
BTD6 changes around the upgrade paths. The first one leads to Bloon Impact, which can be upgraded into the even more powerful and explosive Bloon Crush, stunning crowds of bloons with the sheer explosive force of the blasts. The second remains mostly the same, with the addition of the MOAB Eliminator, which deals much more damage with a shorter ability cooldown. The bottom path gains Cluster Bombs, and can be upgraded to have the smaller bombs each explode into a cluster bomb again with Recursive Cluster and the more devastating Bomb Blitz, which deals huge damage to everything onscreen the moment a bloon leaks.
- Boring, but Practical: The Bomb Tower has arguably the least impressive upgrade cosmetics of any tower, which is particularly notable in BTD6. While the majority of the towers get some drastic makeovers with only a few upgrades, and are borderline unrecognizable once they get to tier 5, the Bomb Tower tends to look more or less exactly as it did at level 1, just bigger and with some color highlights. The only path that drastically changes its appearance is path 2 which instead turns it into a missile launcher, in which case it's basically just a black missile with a face painted on it.
- Cartoon Bomb: What it normally fires, unless you upgrade it into Missile Launcher.
- Crippling Overspecialization: The second upgrade path for the Bomb Shooter is very good at dealing with MOAB-Class Bloons (as well as decent against Ceramic Bloons) as the names of their upgrades imply, but it's underwhelming against everything else.
- Desperation Attack: Bomb Blitz's hidden ability, which wipes the screen if a life is lost.
- Elemental Rock-Paper-Scissors: MOAB Mauler and MOAB Assassin incur massive damage to MOAB-class bloons.
- Flechette Storm: The Frag Bombs upgrade causes each bomb to shatter into deadly shrapnel. Note that this allows the Bomb Tower to pop Black and Zebra Bloons, which otherwise No-Sell its attacks.
- No-Sell: While Black/Zebra/D.D.T bloons normally are immune to its blasts, Frag Bombs allows it to damage explosive-resistant enemies nonetheless. While it loses this ability when it upgrades to Cluster Bombs, it regains it with Bloon Impact, which is able to pop explosive-resistant bloons with raw blast power. In addition, MOAB Eliminator can deal damage to Black/Zebra bloons even though it's an explosive.
- Recursive Ammo: The Cluster Bombs upgrade causes its bombs to split into 8 more bombs upon impact. Beware that this will override Frag Bombs, allowing Blacks/Zebras to No-Sell its attacks once more (although the following upgrade, Bloon Impact, allows it to pop Black/Zebra bloons by virtue of its sheer power). Returns in 6, with the next upgrade allowing its recursive bombs to recur again every few shots! It doesn't actually split into more explosions, rather it repeats the main cluster bomb twice. It still does loads of damage.
- Scissors Cuts Rock: The Cluster Bombs upgrade (and subsequent Path 3 upgrades) in BTD6 allow the Bomb Shooter to damage Black and Zebra Bloons regardless of cross-pathing. On other upgrade paths, MOAB Eliminator and Bloon Impact provide the same trait.
- Sentry Gun: It's an autonomous cannon which fires at nearby bloons automatically. Bloons Pop shows that it can talk.
- Smart Bomb: Its Bomb Blitz upgrade automatically deals heavy damage, enough to wipe out most bloon types, with a huge series of explosions triggered when a life is lost.
- Status Effects: Bloon Impact hits bloons so hard that it momentarily stuns them along with damaging them. In BTD6, Bloon Impact can be upgraded even further to Bloon Crush, which stuns longer and can affect even MOAB-class Bloons.
- There Is No Kill Like Overkill: MOAB Assassin can One-Hit Kill anything that isn't a ZOMG, a BAD, or a boss, but there's nothing stopping you from using it on normal bloons either. This isn't the case in BTD6, as the ability cannot be triggered if a MOAB class bloon isn't on screen.
- Weapon of X-Slaying: The MOAB Mauler has no special traits outside of dealing significantly more damage to MOAB-Class Bloons than against anything else.

The most expensive but arguably most powerful monkey. Shoots long-ranged darts at, what else, Super-Speed, and can be upgraded to use powerful Eye Beams.
Its final upgrades in BTD5 are Temple of the Monkey God, which sacrifices nearby towers to increase its power, and Technological Terror, which wields two independently-aimed guns and can create a powerful pulse that annihilates anything in a short radius.
BTD6 allows it to improve the previous paths into the True Sun God and The Anti-Bloon respectively, and also adds the Dark Knight upgrade path, which can pop and knock back any type of bloon (including camos), deals greater damage to MOAB-class bloons, and briefly blocks all damage to your lives whenever a bloon leaks if fully upgraded. With a Monkey Knowledge perk, a fully built True Sun God can sacrifice an Anti-Bloon and Legend of the Night to become a Vengeful True Sun God, one of the strongest individual towers in the entire game.
- All Your Powers Combined:
- The Temple of the Monkey God gains more projectiles depending on how many towers it consumes. If you have a max-sacrifice Temple, it could be firing rockets, buzzsaws, ice blasts, tornadoes, and glue blasts along with its sun beam.
- With an update for BTD6, There Can Be Only One.note
- Arm Cannon: The Technological Terror boasts two of these that apparently fire beams of antimatter.
- Attack of the 50-Foot Whatever: The True Sun God is absolutely enormous, dwarfing even the temple it uses as a meditation platform.
- Awesome, but Impractical: The Sun Temple in both games it appears in. It's without a doubt the strongest offensive tower in the game, and its sacrifices can make it even stronger and more versatile. However, in order to fund such a temple requires income that can easily win most standard game modes ten times over, and affording a temple is nigh-unfeasable in CHIMPS as you simply don't gain enough money over the course of the game for one. Temples truly shine in freeplay, where the Zerg Rush of high-tier blimps justifies the cost in investing in one.
- Badass Boast: The Sun Avatar's description in previous games.In BTD4: Legend speaks of a being that fears no bloon.In BTD5: It is said that bloons dare not touch the sun.
- The Big Guy: Super Monkeys are by far the largest of the monkey towers (with the Super Monkey in BTD6 being as large as a house, even!), as well as the tower with the greatest offensive strength.
- Blue Is Heroic: Their default outfits have blue, and they're heroes.
- Captain Ersatz: Super Monkeys are, what else, a monkey Superman.
- The Cowl: In BTD6, the third upgrade path starting with Dark Knight turn the Super Monkey into a Batman look-alike.
- Critical Hit Class: The second upgrade path in BTD6, from the Robo-Monkey upgrade onwards, allows the Super Monkey to deal critical hits every few shots (the frequency and damage multiplier increasing with each upgrade).
- Cybernetics Eat Your Soul: Bloons Monkey City states that Technological Terrors have lost the last of their monkey biology to become popping machines.
- Cyborg: Robo-Monkey is half robot. Technological Terror forsakes the last remnant of the monkey.
- Early-Bird Cameo: In BTD4] Expansion, the map "Monkey Temple" has a special secret where you can sacrifice a large amount of cash and towers to activate the temple's power, turning it into a powerful tower that can help pop the bloons. The Sun Temple would become a proper tower/upgrade in [=BTD5 as the Super Monkey's final top path upgrade.
- Eye Beams: Can be upgraded to shoot lasers from its eyes. It can then be upgraded further to fire plasma, then sun rays.
- Fluffy the Terrible: Frankie Fitzgerald. Sounds like a normal name, but it belongs to the Vengeful True Sun God, one of the most powerful towers in the entire BTD6 game.
- Guide Dang It!: In BTD 6, the Super Monkey's darts look just like the basic Dart Monkey'snote , and since they're both just called "darts" by the game, it's intuitive to think they'd have the same in-game properties.
- However, each individual dart thrown by the Super Monkey only pops a single Bloon before disappearing, unlike the Dart Monkey's threenote .
- This makes the (basic) Super Monkey's damage still impressive against single targets, given its sheer fire rate, but somewhat underwhelming against crowds of massed Bloons, for a reason that's not immediately obvious from the in-game information alone.
- Guns Akimbo: The Robo Monkey uses a pair of blasters that can target bloons independently.
- Human Sacrifice: The Temple of the Monkey God will sacrifice and consume all towers nearby upon his purchase. However, each tower absorbed will boost his already-staggering power even further.
- Humongous Mecha: The Technological Terror, and by extension the Anti-Bloon.
- Infinity +1 Sword: By far the most expensive tower to buy and even more expensive to upgrade, but boasts impossible firepower. Especially the Sun God upgrade path, as they are the most powerful and the most expensive upgrades to purchase in every game they've appeared in. They even have a sacrifice ability unique to them which increases their powers even more - the True Sun God upgrade costs more than certain Paragon upgrades and is just as powerful (if not more) than them, despite "only" being the final top path upgrade for the Super Monkey.
- "Instant Death" Radius:
- The Technological Terror's ability instantly kills any non-ZOMG within its range.
- The Anti-Bloon's variant comes not only with a bigger radius but packs damage even greater than a Tsar Bomba.
- Later-Installment Weirdness: The Sun God upgrade was renamed to the Sun Avatar in BTD6, as a way to differentiate them from the new True Sun God upgrade.
- Logical Weakness:
- Being gigantic temple structures or a massive Physical God monkey, the Temple of the Monkey God in BTD5, as well as the Sun Temple and True Sun God in BTD6, cannot be relocated by the Support Chinook ability.
- Since the Sun Temple feeds on a Legend of the Night in order to become the Avatar of the Vengeful Monkey, the black hole passive ability is lost - this is essentially the lone noticeable disadvantage from the upgrade. Furthermore, the Legend of the Night itself and the Anti-Bloon cannot be obtained again unless the Avatar is sold.
- The Minion Master: In BTD6, a Sun Temple or above with sufficient magic sacrifices will spawn miniature Sun Avatars to fight alongside itself. Aside from its tiny footprint, they're as deadly as the real deal.
- Money Multiplier: The Temple of the Monkey God, Sun Temple, and True Sun God can give money at the end of a round with sacrificed Support towers. The amount of money depends on how expensive the sacrifices were.
- Multi Shot: Many Super Monkey upgrades increase the amount of shots it puts out through this way, since it's already attacking at near-max speed:
- The Sun Avatar fires 3 sunrays at a time.
- This is the Robo Monkey's entire gimmick, doubling up on its main blast attack.
- Dark Champion dual-wields shuriken blades.
- Nerf: In BTD6, the Super Monkey's footprint is much bigger,note preventing stacking as many Super Monkeys as you could before.
- No Kill like Overkill: You can't really get much more overkill than popping balloons by summoning a vengeful god.
- One-Hit Kill:
- The Tech Terror comes with the Bloon Annihilation ability, which instantly fries everything up to BFB bloons within range and deals immense damage to anything that survives. Upgrading it into The Anti-Bloon increases the Annihilation's damage and range.
- The Legend of the Night has a passive ability where it summons a black hole whenever a Bloon is about to leak. The black hole will delete any Bloons that come into contact with it, no matter how strong. Yes, this includes the BAD, which is immune to any other forms of instant-kill. This comes at the price of not gaining any money from the deleted Bloons, and the ability has a long cooldown before it can activate again.
- One-Hit Polykill: While a normal Super Monkey can only pop 1 bloon per dart (although it throws them like a machine gun), the path 1 upgrades increase its pierce to 2, 4, 18, and 50 respectively. Tech Terror can pop up to 7 per shot if fully upgraded.
- Physical God: The Sun God and Temple of the Monkey God. BTD6 allows it to be upgraded further into the True Sun God, and the weaker Sun God upgrade is renamed Sun Avatar. The True Sun God can even spawn smaller Sun Avatars to attack Bloons.
- The Power of the Sun: The Sun Avatar and Temple of the Monkey God use sunrays to attack, which can pop any kind of bloon except the new Purple Bloons in the case of the Sun Avatar, and even that can be solved with the Monkey Knowledge, "Strike Down The False".
- Red Eyes, Take Warning: Technological Terror, the Anti-Bloon, and The Avatar of the Vengeful Monkey have these. Considering how powerful these towers are, the warning should be heeded by the bloons.
- Scissors Cuts Rock:
- Even though it's a well-established fact in the franchise that Lead Bloons are immune to sharp projectiles and lasers, Robo-Monkeys in BTD5 could pop Lead Bloons even when they lacked the Plasma Blasts upgrade. This was fixed in BTD6, where it requires said upgrade or Tech Terror to pop Lead Bloons on its own.
- In BTD6 the "Strike down the false" monkey knowledge allows Sun Avatars to pop purple bloons while Sun Temples and the True Sun God can do so by default. The Dark Champion and the Legend of the Night upgrades are also capable of popping all bloon types. The Middle Path Super Monkey is capable of bypassing its resistances as well with the Anti Bloon upgrade, while the Tech Terror can do so as well if it uses the annihilation ability.
- Simple, yet Awesome: The Sun Avatar fires 3 streams of sun energy at the bloons. Not very flashy compared to the temples, but it excels at taking down bloon rushes and getting enough of them will crush even the strongest bloons like they're nothing. A Sun Avatar with Knockback is arguably one of the best towers in 6, as its high pierce coupled with the Knockback and Ultravision upgrades allows it to single-handedly deal with nearly all bloon rushes that can be thrown at it.
- Shout-Out:
- The default look of the Super Monkey is clearly based on Superman with its blue suit and red cape.
- The visor the Super Monkey gets with the Laser Vision upgrade resembles the one used by Cyclops.
- The Robo-Monkey upgrade gives the Super Monkey RoboCop's helmet.
- The Dark Knight upgrade is based on Batman, wearing a cowl and throwing batarangs.
- Slow Laser: Its laser and sun-based attacks do move pretty fast, but they're still very clearly not moving at the speed of light.
- Super-Strength: How else could it fire 20 darts a second at a distance that even a missile launcher couldn't hope to surpass?
- Superman Substitute: Blue, red and yellow color scheme? Check. Badass Cape? Check. Super-Strength? Check (see above). Chest Insignia? Check. It even acquires Eye Beams on one of its upgrade paths.
- Superpowered Evil Side:
- The Temple of the Vengeful Monkey, a red-and-black Temple of the Monkey God that transforms from it for a short time through an activated ability unlocked with a Tier 4 Super Monkey Lair. While it only lasts a couple of seconds, it increases its range while massively increasing its already-ludicrous damage output.
- In BTD6, if you fulfill certain requirements when upgrading into a True Sun Godnote , it will transform further into the Vengful True Sun God. It acts the same way as a normal True Sun God, except it's red and black and deals doubled damage with all attacks.
- Teleportation: In BTD6, the Dark Knight upgrade gives it the ability Darkshift, which allows its to teleport and move a short distance. Upgrading to Dark Champion allows it to teleport anywhere.
- Underwear of Power: They're superhero-like towers and they look like they're wearing underwear.
- Unrealistic Black Hole: The Legend of the Night upgrade allows the Super Monkey to summon a black hole when any Bloon is about to leak. It can instantly make any Bloon disappear, no matter how strong (except bosses). On the other hand, it only affects the Bloons and doesn't affect anything else. The Monkeys can stand one inch away from the black hole and suffer no ill effects. The black hole will also disappear after a few seconds.
- Was Once a Man: Going down the Robo Monkey path transforms the Super Monkey into a killer cyborg, sacrificing their original monkey self in the process. Upgrading them to a Technological Terror is mentioned in Bloons Monkey City to "remove the last vestiges of monkey biology", meaning that Tech Terrors are no longer simian.
- Weaksauce Weakness:
- In BTD5, for all of its immense power, the Super Monkey has no normal upgrades that help with Camo Detection. That means that without anything else to fire at, a Tier 3 Super Monkey Lair, or a Monkey Village nearby, a max-sacrifice Temple of the Monkey God will be unable to stop a single Camo Red Bloon passing by (Tech Terror can use Bloon Annihilation to fry it). However, BTD6 adds the Ultravision upgrade which not only allows it to see but deal extra damage to camo.
- In BTD6, Laser Vision, Plasma Vision, and the Sun Avatar cannot harm purple bloons without the appropriate Monkey Knowledge/external upgrades.
Towers introduced in Bloons Tower Defense 2:

A mid-ranged tower which shoots piercing boomerangs that can return to it.
Its final upgrades in BTD5 are Glaive Lord, which throws ricocheting glaives and is surrounded by orbiting blades, and Turbo Charge, whose bionic arm has great attack speed and can temporarily be further boosted.
In BTD6, its first two upgrade paths are similar, but it gains the Kylie Boomerang as its third upgrade path. This boomerang flies in a straight line instead of a curve, and can be upgraded with the MOAB Press and MOAB Domination upgrades to deal increased damage and knockback to MOAB-class bloons.
Its Paragon upgrade is the Glaive Dominus, which maintains the orbital blades and throws both streams of ricocheting glaives and long-ranged explosive shots. It also buffs the attack speed of all Primary towers, including Paragons.
- All-Encompassing Mantle: The Glaive Lord sports a grey one. In 6, this specific color of cloak is given to MOAR Glaives, while the Glaive Lord itself is draped in purple.
- All Your Powers Combined: The Glaive Dominus, the Boomerang Monkey Paragon, rapidly fires glaives in a straight line from its mechanical arm, including a slower-firing longer-range throw which can explode and knock back MOAB-class bloons, on top of being surrounded by three orbiting glaives. These attacks combine the traits of the Glaive Lord, Perma-Charge, and MOAB Domination.
- Artificial Limbs: The Bionic Boomer upgrade replaces its right arm with a mechanical one that can throw boomerangs much faster.
- Battle Boomerang: Uses these to attack, which appropriately return to it. It can be upgraded to throw bladed glaives, fire incredibly fast, or push back MOAB-class Bloons.
- Boomerang Comeback: The idea behind the Kylie Boomerang upgrades in BTD6. While other projectiles can only hit the same Bloon once, the kylie boomerang can hit multiple times. So it can fly past a Bloon, hitting it, then hit it again on the way back.
- Boring, but Practical: MOAB Press might look like an unassuming upgrade, especially when compared to other Tier 4 upgrades, but it's incredibly cheap for its tier, and the MOAB knockback can prove to be surprisingly effective, especially with other countermeasures such as MOAB Glue from a Glue Gunner.
- Crippling Overspecialization: The top path upgrades are highly effective at shredding through regular Bloons, but can’t do much against MOAB-classes. This causes them to fall off later in the game, especially past round 80, where Super Ceramics with much more HP start spawning.
- Master of the Levitating Blades: The Glaive Lord has two glaives that permanently revolve around it, tearing through anything they touch. In BTD6, it's improved to have three rotating glaives which start moving really fast whenever Bloons are near. The three rotating glaives become even more deadly for the Glaive Dominus.
- More Dakka: Turbo Charge, an ability which temporarily gives it a massive attack speed increase. In BTD6, the Perma-Charge upgrade permanently grants the Boomerang Thrower the massive speed boost, while giving it another ability that increases damage instead.
- One-Hit Polykill:
- The Boomerang Thrower by default can pop 4 bloons (3 before BTD6), but this can be upgraded to 7, and then 18.
- The Glaive Lord upgrade gives the Boomerang Thrower three rotating glaives with an incredibly high pierce, being able to pop up to 8000 bloons at the same time, per glaive.
- Pinball Projectile: The Glaive Ricochet upgrade allows glaives to bounce between bloons.
- Playing with Fire: Its Red Hot Rangs upgrade sets its projectiles on fire, allowing them to melt Lead Bloons.
- Precision-Guided Boomerang: The boomerang it throws has a curved trajectory, and hitting Bloons won't change its path. It only disappears when it has hit enough Bloons. The Glaive Ricochet upgrade changes it into a throwing glaive that can seek another target after it hits a Bloon. The Kylie Boomerang even allows the Boomerang to hit the same Bloon multiple times while midair.
- Vibro Weapon: The Sonic Boom upgrade is implied to turn its boomerangs into this, allowing them to shatter Frozen bloons.
A deployable hazard that lays on the path and pops bloons that run into it. Each pile of Road Spikes can pop 10 or 11 bloons.
- Boring, but Practical: A cheap, spammable source of instant damage: yet they can be used to fend off early rushes or even be spammed in the late game to get a bit more damage on MOAB-class bloons.
- Crutch Character: For a certain definition of "character". Road spikes can be useful for saving you some lives, but they can't pop enough bloons to recoup their price, so relying too much on them will end up costing you money that could have gone towards more permanent towers and upgrades, crippling your late-game defense.
- Demoted to Extra: In BTD6, it's only available as a Power purchasable with Monkey Money or in Geraldo's shop.
- Spikes of Doom: Well, they're just a pile of tacks, but still.
A deployable hazard which lies on the path, slowing down bloons that run into it. Each glob of Monkey Glue can slow down 20 bloons before wearing out.
- The Artifact: Bloons TD 4 kept it as an item, despite introducing the Glue Gunner, which fulfilled much the same role. It was later removed from BTD5, and only returned in BTD6, as the Glue Trap.
- Boring, but Practical: It's not flashy and doesn't do any direct damage, but it's a great way to slow down the huge rushes of Yellow, Black, and White Bloons in its debut game.
- Demoted to Extra: In BTD6, it's only available as a Power purchasable with Monkey Money or in Geraldo's shop.
- Sticky Situation: It slows down the first 20 bloons that come into contact with it by gumming them up with glue. Exaggerated in BTD6, where it glues up to 300 bloons at a time.
- Took a Level in Badass: The Glue Trap glues 15 times as many bloons as the old Monkey Glue, and with Monkey Knowledge, it even works on MOABs.
Towers introduced in Bloons Tower Defense 3:

A tower which launches spiked balls down the track, able to pop a lot of bloons with a single shot. It's only available as its own tower in BTD3, as it was turned into an upgrade for the Dart Monkey starting with the fourth game.
- Demoted to Extra: Or rather, demoted to upgrade. In BTD3, it was its own tower, with its own set of upgrades. This didn't last, as in later games, it's turned into an upgrade for the Dart Monkey.
- Multi Shot: Can be upgraded to shoot three projectiles at the same time. Or at least that's what it says; in practice, it makes the projectile bigger to make it easier to hit bloons.
- One-Hit Polykill: Can pop up to 6 bloons per shot, which can be increased to 20 with the Juggernaut upgrade.
- Spike Balls of Doom: Its projectile consists of large, powerful spiked balls that crush bloons in their way.
A deployable hazard which lies on the path for 5 seconds before exploding violently.
- Awesome, but Impractical: While it sure looks cool, it requires precise timing to even hit targets, and if it does it only takes off one layer, as opposed to the Road Spikes which are far easier to use and take off 11. However, they can be used to deal with Leads if your defense isn't built up enough yet. The Mobile versions of BTD5 and its spinoffs Nerf the blast radius of the pineapple pretty hard, making it even tougher to hit those random leads in the former and Bloons Monkey City. Although Bloons TD Battles has no placeable pineapples, the above still applies to the pineapples dropped by the Monkey Ace.
- Demoted to Extra: In BTD6, it's no longer usable as a road item, and is only available as an upgrade for the Monkey Ace.
- Land Mine: Functions as one for Bloons.
- Nerf: In its debut game, it's able to take off multiple bloon layers if they're close to the center of the explosion. Later games make it so the explosion only does one layer's worth of damage no matter what.
- Stuff Blowing Up: An explosive pineapple.

A little beacon that boosts the power of all towers within its radius. Its final upgrade lets it activate the Super Monkey Storm.
In 5, it became the Monkey Village. Its final upgrades lets it either attack bloons with a powerful laser while decreasing the ability cooldown of all towers in its radius, or massively buff the damage and attack speed of towers while allowing them to damage any bloon type.
In 6, its final upgrades cause it to make the 1st and 2nd tier upgrades of all Primary monkeys free while adding a ballista attack of its own note , make its ability affect every tower on screennote , or cause it to absorb all Banana Farms in its range and generate its own incomenote .
- Armor-Piercing Attack: The Monkey Intelligence Bureau upgrade grants all towers in range the ability to pop any bloon type with their attacks, even bloons that would normally be immune to them.
- Drums of War: The Jungle Drums upgrade buff nearby towers, making them attack faster.
- Early-Installment Weirdness: In 3 and 4, it's a rather modern beacon, while in 5 and 6 it becomes the Monkey Village, depicted as a hut made of straw (in its base form, at least).
- Fun with Acronyms: The M.I.B. upgrade stands for Monkey Intelligence Bureau. Fittingly, the icon in 6 is a monkey dressed in black suit and sunglasses, or in other words, a Monkey in Black.
- Jungle Drums: The appropriately named Jungle Drums upgrade, which fits with the jungle hut appearance of the unupgraded Village. You never hear the actual drums, though, and it functions as a buff to nearby towers.
- Money Multiplier: The Monkey Town upgrade lets nearby towers get more cash for each pop. The Monkeyopolis upgrade absorbs all nearby Banana Farms and start generating its own money.
- Roboteching: Its Mega Ballista attack in 6 shoots a projectile that can change directions midway in order to chase bloons.
- Support Party Member: Can't attack, but makes other towers in its range more powerful and cheaper. However, each game has a powerful weapon as a final upgrade, starting with a one-shot Super Monkey Storm in 3 and 4, a laser in 5, and a homing Deadly Disc in 6.
Towers introduced in Bloons Tower Defense 4:
A mid-ranged support tower which fires globs of glue at bloons, greatly slowing their movement speed.
Its final upgrades in BTD5 are Bloon Liquefier, which deals high damage over time to splattered bloons, and Glue Striker, which attacks at a vastly increased rate and can rain glue onto all bloons on-screen.
BTD6 adds a new upgrade path which can affect MOAB-class bloons with MOAB Glue, cause popped bloons to release a stunning splatter with Relentless Glue, and temporarily immobilize affected bloons outright with Super Glue. The previous two paths are also upgraded into The Bloon Solver, which deals tremendous damage over time while leaving behind hazardous glue puddles, and Glue Storm, which also increases the damage taken by bloons hit.
- Area of Effect: The Glue Splatter upgrade allows his shots to explode, gluing up to 6 bloons (20 in BTD4) in one hit.
- Balance Buff: Gained the ability to damage (and, in one upgrade path, slowdown) MOAB-class bloons in BTD6, making it not completely useless in the late-game.
- Crippling Overspecialization: The top path upgrades can melt even the toughest regular bloons in seconds, but are almost helpless against MOAB-class bloons.
- Crutch Character: In BTD4 and BTD5, Glue Gunners provide effective support against regular bloons for a good price, especially with their Glue Splatter upgrade. However, they can't touch MOAB-class bloons and can't slowdown Ceramic Bloons (though they can damage them), which causes them to become more and more irrelevant as the game progresses. Not the case in BTD6, however, where each of the paths has something to offer in the late-game.
- Damage-Increasing Debuff: Starting from 6, the Glue Storm ability will cause all bloons on the screen to take increased damage while the ability is active.
- Damage Over Time: The Corrosive Glue and its upgrades pop affected bloons gradually. It starts off slowly, only dealing 1 damage every two seconds (barely enough to overcome the healing of a Regrowth Bloon), but it quickly ramps up until The Bloon Solver can deal 90/60 damage per second to Ceramics and MOAB-Class Bloons.
- Death from Above: Its Glue Striker ability rains glue from above.
- Hazmat Suit: Any Glue Gunner with at least one Tier 2 upgrade will have one. Depending on the upgrade path chosen for Tier 3, the headgear will either be a sealed hood and gas mask (Bloon Dissolver and Bloon Liquifier), a balaclava with spectacle goggles (Glue Hose and Glue Strike), or a hazmat helmet with an opaque visor (MOAB Glue and Relentless Glue).
- Hollywood Acid: The Corrosive Glue and its following upgrades (Bloon Dissolver and Bloon Liquefier) can eat through bloons, with the latter two doing so at a ridiculous speed. Fittingly enough, the glue turns green when you get them.
- Magikarp Power: Slowing bloons down is not a particularly useful skill if you can just pop as many as you can. However, upgrading it can enhance the glue to near-instantly melt through regular bloons, cause glued bloons to take more damage, or even heavily slow down MOAB-classes as well.
- Nerf: In BTD4, the Glue Splatter upgrade let the Glue Gunner coat up to 20 bloons with glue at once. From BTD5 onwards, it was reduced to just 6.
- Overshadowed by Awesome: The Bloon Solver is a very effective upgrade when it comes to melting even Super Ceramics and lesser MOAB-Class Bloons, but it's heavily outclassed by The Biggest One, a tower with a similar purpose, but that can damage a lot more Bloons at once and destroy Super Ceramics faster, leaving a slightly cheaper cost and the slowdown as the only aspects in which The Bloon Solver is better.
- Sticky Situation: The Glue Gunner's entire purpose is to use sticky glue to slow down enemies.
- Support Party Member: Without Corrosive Glue (or MOAB Glue when targeting MOAB-Class bloons), a Glue Gunner can't deal damage and can only use its glue to slow down foes. Even with Bloon Liquefier, it still possesses incredibly weak attack power against MOAB-class bloons.
- You Are Already Dead: Any standard bloon hit by the Bloon Liquifier is as good as dead, it'll just take a while for it to pop. The Bloon Solver does so much damage to ceramic bloons that even fortified super ceramics in late game rounds won't survive.

A unique tower that orbits its runway in a set path, firing 8-directional bursts of darts every now and then.
Its final upgrades in BTD5 are Spectre, which rapidly fires darts and missiles directly at bloons, and Ground Zero, which shoots homing darts and can drop a powerful bomb that massively damages all on-screen bloons.
BTD6 changes up the upgrade paths. The first path, the Fighter Plane, fires more darts and targets MOAB-class bloons with powerful missiles, and gains the Operation: Dart Storm ability that once belonged to the Spectre path, with the final upgrade being the Sky Shredder which fires rings of darts everywhere. The Bomber Ace path drops many small bombs whenever it passes over the track, and gains the Ground Zero ability which can be upgraded to the even bigger Tsar Bomba. The Spectre is moved to the Neva-Miss Targeting path, and has the Flying Fortress final upgrade which triples its already insane firepower.
Its Paragon upgrade is the Goliath Doomship, which rapidly fires both straight and homing missiles in all directions along with a powerful frontal gun, and can coordinate nuclear bombing runs with its ability.
- All Your Powers Combined: Its Paragon, the Goliath Doomship, fires rings of missiles in all directions, salvos of homing anti-MOAB missiles, and two streams of darts from its frontal guns, while also gaining an activated ability that calls in mini-planes to carpet bomb a set path on the map, dealing damage in the tens of thousands at minimum and stunning non-BAD targets that survive - combining aspects of the Sky Shredder, Tsar Bomba, and Flying Fortress.
- Ballistic Bone: In BTD6, an unlockable cosmetic option during Halloween replaces the Ace's darts with sharpened bone fragments.
- Cool Plane: Depending on which upgrades are selected, the appearance can go from the basic biplane to planes that resemble cooler aircraft, including:
- A Supermarine Spitfire for thr Fighter Plane upgrade.
- A De Havilland DH.98 Mosquito for the Ground Zero upgrade.
- An AC-130 Gunship for the Spectre upgrade.
- A B2 Spirit Stealth Bomber for the Operation: Dart Storm upgrade.
- A TU-95 Bear Bomber for the Tsar Bomba upgrade.
- A Kalinin K-7 Bomber for the Flying Fortress and Goliath Doomship upgrades.
- A mix between the American B2 Spirit Stealth Bomber and the Chinese J-20 Wēilóng Stealth Fighter for the Sky Shredder upgrade.
- Death from Above: While the Monkey Ace in general could be placed firmly under this trope, it has the ability to periodically drop Explosive Pineapples with the Pineapple Present upgrade. The Bomber Ace upgrade in 6 replaces the pineapples with a more powerful stream of bombs. Then of course, there's the Ground Zero/Tsar Bomba ability, which drops a nuclear bomb.
- Depth Perplexion: The Ace is presumably flying high over the battlefield, and its darts aren't aimed downwards (as they can pass through the bloons without hitting the ground), yet it can pop them despite the fact that the darts should just be passing over its targets.
- Early-Installment Weirdness: In its debut appearance in 4, the Monkey Ace was able to be placed anywhere on the screen, as it didn't have an actual footprint. This made selecting one to upgrade it difficult as you had to click the Ace itself. All further appearances of the Ace require placing down its runway first, limiting the amount of Aces one can have per level, but making managing the Ace much easier.
- Flechette Storm:
- Operation: Dart Storm and Ground Zero can fire massive storms of darts with each volley. Spectre, however, uses an unyielding, aimed stream of darts and grenades.
- Dart Storm's fifth-tier variant, Sky Shredder. Twice as many darts that fly twice as fast, shoot twice as often, and do over 3 times the damage.
- Grenade Spam: Spectre spams deadly bombs along with its aimed dart stream. Bomber Ace is no slouch in this department either; position it properly and give it the Rapid Fire upgrade, and it'll carpet-bomb the track around it.
- Homing Projectile: The Neva-Miss Darts upgrade causes its darts to home in on foes.
- Macross Missile Massacre: The Goliath Doomship replaces the darts it normally fires with lots and lots of missiles.
- Magikarp Power: A Monkey Ace is relatively costly while also being rather weak. Although it fires eight darts at a time with high pierce in its base state, most of its shots will miss due to how it flies around and shoots all around itself, so its damage potential is not very high. However, once you buy higher-tier upgrades, it starts to make up for this weakness via sheer projectile count, darts that follow bloons or are aimed at them, or the powerful ability to drop a huge screen-wiping bomb.
- Mechanically Unusual Class: Monkey Ace is the first of two moving towers in the series, flying around in a preset path and firing either at set intervals or at the closest bloons.
- More Dakka: The Spectre upgrade turns the Ace into a rapid fire gunship that launches many bombs and darts towards Bloons. The Flying Fortress gets two more of these.
- Multi-Directional Barrage: Fires 8 darts in a ring around it. Lots More Darts upgrades this to 12 and Operation: Dart Storm to 16, before Sky Shredder increases it to 32.
- Nerf: It was given a footprint (in the form of a runway) in BTD5 to prevent the near-infinite stacking of Monkey Aces that could be performed in the previous game.
- One-Hit Polykill: Each of its darts can pop 15 bloons to make up for their generally low hit rate.
- There Is No Kill Like Overkill: Even in a world of over-the-top weapons, Ground Zero still stands out for letting you drop a nuclear warhead in order to pop a couple balloons.
- You Nuke 'Em: Ground Zero lets you drop a nuke on the bloons... and the Tsar Bomba upgrade lets you drop an even bigger nuke on them. The Goliath Doomship's ability carpet bombs the target path with mini-nukes.

A strange tower which has infinite range and targets a set area with periodic, explosive mortar strikes. Its final upgrades in BTD5 are The Big One, which shoots shells with large explosions, and Artillery Battery, which shoots three times as fast with an ability to stun the entire screen.
In BTD6, the top path is relatively unchanged, with the addition of The Biggest One as its final upgrade. The second path focuses on attack speed, resulting in Artillery Battery again, but with some lower upgrades replaced. Those replaced upgrades are the basis for the bottom path, which focuses on debuffs and Damage Over Time, with the final upgrade Blooncineration dealing massive burn damage while leaving behind pools of fire.
- Damage Over Time: The Burny Stuff upgrade lets the Bloons it hit be set on fire, dealing minor damage over time. The Blooncineration upgrade as well as the last three top path upgrades greatly increase the amount of damage dealt.
- Death from Above: The Pop and Awe ability calls in a hail of explosives to bombard the entire screen, dealing massive damage and immobilizing everything hit.
- Grenade Spam: Artillery Batteries triple the fire rate of the Mortar Monkey, barraging the target location with countless shells. Their Bombardment ability momentarily quadruples their fire rate.
- Injured Vulnerability: The Heavy Shells upgrade causes its shells to deal bonus damage against both armored and stunned Bloons, and its final upgrade Pop and Awe significantly boosts its damage against stunned targets in particular. This synergizes with its ability, which stuns every Bloon on the screen.
- Mechanically Unusual Class: Mortar Towers were the first towers with adjustable aiming, since their reticles can be set to any point on the map for them to launch strikes at.
- Nuke 'em: The last few upgrades in the top path boast radiation symbols on their cannons, implying their shells are literally nuclear in nature. Fittingly, they forgo other gimmicks like rapid fire or debuffs in favor of massive explosions that deal severe damage in a huge area.
- Playing with Fire: The Mortar Tower's bottom path allows it to set bloons on fire. The Blooncineration upgrade massively boosts its burn damage and lets its shells leave pools of fire on impact.
- Power Nullifier:
- Signal Flare allows a Mortar Tower to permanently remove camo from bloons hit by its blasts.
- The Shattering Shells upgrade allows the mortar to remove all special bloon properties off bloons it hits, including the Fortified Property off of bloons up to BFBs! The Paint Stripper Monkey Knowledge allows this upgrade to also remove camo from DDTs.
- The Blooncineration upgrade allows the Mortar Tower to remove all properties off DDTs.
- Shockwave Stomp: The Shell Shock upgrade causes each shell to release a larger blast wave on impact, dealing additional damage and stunning Bloons too close to the impact site.
- Stuff Blowing Up: Specializes in this. It even comes in three distinct flavors, with heavy nuclear shells in the first path, rapid-fire shells in the second path, and crippling incendiary shells in the third path.
- Weapon of X-Slaying: Downplayed with the Artillery Battery and Pop and Awe upgrades. Both upgrades give the Mortar extra damage against BADs and Boss Bloons, an otherwise exclusive ability to the Paragon towers, with Pop and Awe also giving an extra bonus for all other Artillery Batteries.

A mid-ranged tower who uses magic blasts. They will gradually learn more spells to add to their attacks as they level up.
Its final upgrades in BTD5 are Tempest Tornado, which blows bloons back to the entrance, and Summon Phoenix, which summons a fire-breathing bird to roast bloons.
BTD6 renames it to the Wizard Monkey. Though the fire upgrade path remains with a few changes, the air path is gone, being given to the Druid instead. The Archmage path focuses on improving the Wizard's basic magic bolt, increasing its range, speed, and power against MOABs, with the final upgrade adding the Dragon's Breath and Shimmer abilities of the other paths. The Necromancer path allows the Wizard to remove camo from bloons and summon undead bloons that float in reverse and damage enemy bloons on contact, with the tier 5 ability upgrading it to zombie MOABs and BFBs.
Its Paragon upgrade is the Magus Perfectus, which utilizes a Stance System with two modes: one that uses a comparatively weak laser beam that builds up a pool of mana, and one that constantly consumes its mana to fire powerful attacks and summon a Dark Phoenix to decimate Bloons if it has enough mana. It also has two abilities that consume all of its mana to use: Phoenix Explosion ignites all bloons for massive damage while summoning zombie ZOMGs proportional to the amount of mana consumed, while Arcane Metamorphosis sacrifices the Dark Phoenix to temporarily transform the Magus into a super-powered phoenix form, with the duration scaling with the amount of mana the Magus had at the time of use.
- Action Bomb: The Paragon Phoenix can be commanded to explode using the Phoenix Explosion ability, which does massive damage and ignites bloons near the phoenix. Of course, since it's a phoenix, it comes back none the worse for wear.
- All Your Powers Combined: Its Paragon, the Magus Perfectus, charges up graveyard mana using a draining beam and uses it to power Arcane Spikes and a Dark Phoenix to decimate the bloons and resurrect them as minions. It can also consume it all to ignite all bloons and resurrect an army of zombie ZOMGs, or consume its mana and Phoenix to enter a Phoenix Super Mode that uses jets of flame that leave walls of fire. This skillset combines all of the best aspects of the Archmage, Wizard Lord Phoenix, and Prince of Darkness.
- The Archmage: Becomes one with its final top path upgrade in BTD6. It's such an expert in magic that it can cast Shimmer and Dragon's Breath despite the fact they can't be purchased alongside the Archmage upgrade path.
- Blow You Away: The Air path in BTD5 can summon a tornado to blow away bloons.
- Boring, but Practical: In BTD6, the top path focuses on improving its basic attack without adding new ones. Certainly not as flashy compared to summoning undead bloons or phoenixes to fight for you, but a top path monkey wizard is a solid general option against anything that isn't a purple bloon.
- Casting a Shadow: In BTD6, the bottom path focuses on dark magic, spreading a dark aura that removes camo property and summoning undead Bloons.
- Cool Chair: The Prince of Darkness, the third path tier 5 Wizard, is depicted as sitting on a throne. He doesn't even turn when shooting at Bloons.
- Dark Is Not Evil: The Necromancer path Wizards dabble with necromancy, look imposing, and wear dark clothings. However, they're still fighting alongside other monkeys.
- Decomposite Character: The Wizard Monkey from BTD6 kept the second path upgrades from the Monkey Apprentice from the previous game, whereas the top path upgrades went to the Druid instead.
- Difficult, but Awesome: The Magus Perfectus is a very hands-on Paragon, and demands careful management of its Stance System and Mana Meter to maintain the effectiveness of its attacks, as well as timing when to consume all the mana to use one of its abilities while accounting for the period of relative weakness after. However, with sufficient micro, the Magus can become a powerhouse even by Paragon standards, and has multiple ways to totally eradicate even the toughest foes.
- Do Not Touch the Funnel Cloud: The 3/x and 4/x upgrades in BTD5 allow the wizard to launch tornadoes to blow back and even pop bloons. Said tornadoes only affect bloons they touch.
- Gathering Steam: How the Necromancer path works. When nearby Bloons are popped, the Necromancers store them in their "graveyard". Summoning undead Bloons remove them from this graveyard. This means they generally need to pop Bloons with their other attacks (or have nearby allies that can pop Bloons) before they can start summoning undead Bloons. Once they do, however, the undead army can usually pop enough Bloons to keep the graveyard full by themselves.
- Girls with Moustaches: According to this blog by Ninja Kiwi, all Wizard Monkeys can grow beards regardless of gender since said beards can be created with magic.
- Hot Wings: Summon Phoenix conjures up a massive fire-breathing phoenix that circles the screen for 20 seconds, doing heavy damage to whatever it hits. BTD6 lets the Wizard himself transform into a much more powerful Lava Phoenix, which, in addition to stronger fire breath, also shoots highly damaging meteors; the standard phoenix will also permanently stick around when the Wizard Lord Phoenix upgrade is purchased.
- Lightning/Wind Juxtaposition: In BTD 4 and 5, one of his upgrades allows him to summon tornadoes and the next level upgrade electrifies the tornadoes he summons. In BTD 5, he also has an upgrade allowing him to shoot lightning bolts before the tornado upgrade.
- Magma Man: The Wizard Lord Phoenix's eponymous transformation appears to have a body made of lava, as seen on its tail.
- Master of All: The Archmage can use abilities from all three crosspaths (Arcane Spikes, Dragon's Breath and Shimmer) when that's normally not possible.
- Necromancer: The final bottom-path upgrades on BTD6 allow Wizard Monkeys to summon undead bloons to damage any living bloon on their path. With the Prince of Darkness upgrade, it can summon undead blimps (up to BFBs) as well. Magus Perfectus improves on this to summon undead ZOMGs.
- Nerf: In BTD6, the Wizard Monkey's starting attacking type was changed from plasma to energy, meaning it cannot pop Lead bloons unless supported by other towers or upgraded.
- Playing with Fire: One upgrade path focuses on fire magic. It can shoot fireballs, spray a stream of flames, and summon a phoenix.
- The Red Mage: Archmage's ability to cast powerful arcane bolts, Dragon's Breath, and Shimmer at the same time embodies this, since otherwise these abilities are otherwise on mutually exclusive paths. The same applies to Magus Perfectus.
- Shock and Awe: One upgrade in BTD5 fires a bolt of electricity which arcs between bloons.
- Simple, yet Awesome: The first upgrade path in BTD6 simply focuses on enhancing the basic magic bolt, to devastating effect.
- Wizard Classic: The top path upgrades in 6 gives the Wizard Monkey a pointy hat, a long robe, a magical staff, and a long white beard.

A long-ranged tower that can only be placed on water, and targets bloons with rapid, heavy darts.
Its final upgrades in BTD5 are Aircraft Carrier, which sends out miniature Monkey Aces that shoot and spray darts while flying, and Monkey Pirates, who have an independently firing cannon on their ship and can instantly take down the strongest bloon on-screen.
In BTD6, the Monkey Buccaneer can fire simultaneously from both sides of the ship. In addition to keeping and improving the previous two paths with the Carrier Flagship and Pirate Lord, it also adds the Merchantman upgrade path, which focuses on income generation by making extra money at the end of each round.
Its Paragon upgrade is the Navarch of the Seas, which unleashes curtains of gunfire while commanding three fighter jets to bombard bloons with missiles, and can automatically hook any non-BAD blimps that enter the screen for an instant kill, or manually hook any non-boss target up to twice per round. It also retains its income generation and buff to water monkeys and Aces, notably being able to buff the attack speed of the Goliath Doomship.
- All Your Powers Combined: Its Paragon, the Navarch of the Seas, rapidly fires upgraded darts and bombs from its six cannons, releases 3 planes to attack the Bloons with streams of darts and anti-MOAB missiles, constantly hooks in and instakills all MOAB-Class Bloons (up to ZOMGs) that appear on-screen, gains an activated ability that is able to hook in any (yes, ANY) MOAB-Class Bloon, generates tons of money after every round, buffs all Monkey Aces and water towers and allows you to place down two other towers on its upper decks - combining all of the best aspects of the Carrier Flagship, Pirate Lord and Trade Empire.
- Cool Boat: Its final upgrades, especially the aircraft carrier. In BTD6, the Carrier Flagship upgrade is so big that you can actually put two smaller towers on top of it.
- Dressed to Plunder: As a base tower, it wears the classic bicorne hat, but going into the Cannon Ship path gives it more pirate gear like an Eyepatch of Power and Hook Hand, and even a golden tooth!
- Edible Ammunition: The Grape Shot upgrade lets the buccaneer shoots sharpened grapes. It can also be upgraded to Hot Shot, which sets the grapes on fire.
- Grenade Spam: Cannon Ships can fire cannonballs much faster than you'd expect. It gets even more outlandish with its upgrades, as the Pirates and Pirate Lord can be rapidly firing up to six cannonballs at a time without slowing down.
- Intrepid Merchant: The aptly-named Merchantman path introduced in 6 allows Buccaneers to double as end-of-round money generators.
- The Minion Master: The Aircraft Carrier upgrade gives the ship three mini-aircraft that can travel anywhere in the map and shoot at Bloons.
- Money Multiplier: The Merchantman path in BTD6 sacrifices firepower in exchange for granting bonus money at the end of each round.
- Necessary Drawback: The Monkey Buccaneer is both strong and cost-effective, but is balanced out by being one of two towers that can't be placed on land.
- Nerf: Due to the reordering of the various upgrades, in BTD6, you cannot have a Destroyernote with Grape Shotnote and Crow's Nestnote .
- One-Hit Kill: The Monkey Pirates have the MOAB Takedown ability, which instantly takes down the strongest bloon on the map, excluding ZOMGs (and unlike similar abilities that instantly destroy MOAB-Class bloons, this one does not leave any child bloons on the track). It can be further improved with the Pirate Lord to target up to three MOABs (or a ZOMG plus a MOAB, BFB or DDT) and grants extra money for each one. The Navarch of the Seas Paragon upgrade takes it even further with its manually activated harpoon as it can take down a BAD from full health in a single hit (the only other tower that could do this at the time, the Legend of the Night, specifically requires the BAD to be about to leak) albeit only twice per round, while it has secondary harpoons that work exactly like the Pirate Lord upgrade (except they are used automatically).
- The Pirates Who Don't Do Anything: The Monkey Pirates don't really do anything pirate-y other than gaining the ability to plunder MOABs.
- Privateer: The basic Buccaneer before going down any specific path resembles a pirate, but wasn't specifically identified as such. It's only after going down the Pirate path do they get called that.
- Spread Shot: The Grape Shot upgrade lets the Buccaneer shoot grapes in a fan-shaped spread.
- Support Party Member: The Carrier Flagship passively buffs the attack speed of all aquatic towers and Monkey Aces.

A special tower which does not attack, but instead produces bananas that can be collected for cash.
Its first upgrade path in BTD5 focuses on increasing money earned by picking up bananas with the Banana Republic and Banana Research Facility upgrades. The second path turns the farm into a Monkey Bank, removing the need to manually pick up every banana and adding interest to the cash stored inside.
BTD6 grants the Monkey Bank path the ability to take out a $10,000 loan which must be repaid, and can be upgraded to Monkey-nomics which simply gives you the money rather than lending it. It also adds the Marketplace path, which removes the need to pick up bananas yourself and provides support buffs to Merchantmen Buccaneers, and can be upgraded to Monkey Wall Street which generates tons of money and lives and auto-collects bananas from other farms nearby.
- Boring, but Practical:
- Does absolutely no damage, but is vital to most strategies since it allows you to afford more upgrades for your other towers.
- The third path upgrades in BTD6 don't generate as much money per round like the first path, nor allows you to get a massive instant cash injection as in the second, but they give consistent amounts of money, don't require any kind of player intervention to collect the money (the first path needs manual collection or Monkey Farmers before the bananas expire, and the second path does not give you the money until you collect it), and can boost the income of the similarly reliable Merchantmen.
- Early-Installment Weirdness: In BTD4, Banana Farms did not actually produce bananas during the round, and instead merely gave you money at the end of it. The next game would give the Banana Farm the ability to throw bananas into the battlefield (and making you pick them up), with the "money at the end of the round" ability only returning in BTD6 for the Banana Farm's final Path 3 upgrade, Monkey Wall Street, as well as the Monkey Buccaneer's main Path 3 upgrades.
- Healing Factor: Banana Farms in 5 and 6 gain the ability to restore lives; however this feature is locked behind a Premium upgrade in the former, and a Monkey Knowledge in the latter. Monkey Wall Street on the other hand always generates lives after every round.
- Money Multiplier: The purest example in the game, as it does nothing except give you money. All its upgrades are just different flavors of making more money, from raw income generation, to interest-based money storage. The Central Market and Banana Central, more literally, increase the income generated by other towers (Banana Research Facilites and Merchantmen/Trade Empire, respectively), and a Banana Farm's presence within range increases the money generated by a Jungle's Bounty druid.
- Support Party Member: The only tower with no offensive capabilities whatsoever. Makes up for it in cash gain.
- The bottom-path farm in 6 is more focused on this, weirdly enough. The third tier, Marketplace, removes the "collect bananas" mechanic entirely, instead directly increasing your money count with each ticknote . Central Market ups the income, and also increases the value generated by Merchantmen Monkey Buccaneers; a useful addition to the Trade Empire. Lastly, Monkey Wall Street gains the ability to automatically collect bananas and crates for you, making them a great companion to top-path farms, Supply Drop snipers and Support Chinooks, and even Bloon Trap engineers.
- Useless Useful Spell: Until BTD6's Version 2.0 patch, it was possible to place Banana Farms in C.H.I.M.P.S. mode, even though income generation is disabled and thus made Banana Farms completely useless. It's still possible to do so in Challenge Editor if one chooses to.

A unique, infinite-range tower which fires towards your cursor location. Fires extremely quickly but inaccurately. Also hits camo bloons by default in 4 and 5.
In BTD4, it can be upgraded to fire laser blasts. 5 adds the Ray of Doom, a devastating Wave-Motion Gun, while the second path has Hydra Rocket Pods, which replaces the darts with small missiles, and the Bloon Area Denial System, which now fires three rockets at a time and grants the Rocket Storm ability, which can shoot up to 100 missiles at once.
BTD6 keeps similar upgrade paths, also adding the M.A.D. (MOAB Assured Destroyer) after the Rocket Storm upgrade, which reduces the Dartling Gunner's rate of fire in exchange for launching huge missiles that do devastating damage to MOAB-class bloons. In addition to the laser and rocket paths, BTD6 also has a new upgrade path, which makes the Dartling shoot slower and reduces its range, but now shoots bursts of highly damaging buckshot, with the Bloon Area Denial System and Bloon Exclusion Zone granting it several barrels that can be set to automatically target nearby bloons like a regular tower.
- Anti-Frustration Features: In BTD5, there's a specialist building that adds the option to have the Dartling Gunner constantly shoot towards one fixed point, in case you don't want to be manually aiming the thing all the time. It comes with the tower in 6. If you have a specific Monkey Knowledge perk, it even provides an activated ability that instantly unlocks all locked Dartling Guns in case of an emergency, even providing a swivel speed bonus in the process.
- Cool Chair: In BTD6, the Ray of Doom takes the form of a seat with an attached Wave-Motion Gun, so the monkey gunner can sit back in style while vaporizing swathes of bloons.
- Crippling Overspecialization: The M.A.D upgrade is, as the full name implies, extremely effective at popping MOAB-class Bloons, with the M.A.D. being one of the few towers that can easily take down a BAD and its MOAB-class spawn all by itself. However, its slow attack rate actually makes it worse at dealing with Ceramics and below than the previous upgrades, with even weak bloons being liable to slip through it. The Ray of Doom has the reverse problem: while it easily vaporizes any amount of BFBs and below, it has a relatively low single target damage for its price, and can struggle popping Z.O.M.Gs and especially the BAD.
- Discard and Draw: The high tier upgrades in 6 tend to play around with the base concept of the Dartling Gun.
- The Plasma Accelerator is very strong, but the laser will stop where your cursor is instead of going on infinitely. This means you need more micromanagement to use it well. Additionally, it no longer ignores obstacles, meaning that vision blockers will stop the beam dead in its tracks.
- The M.A.D. deals humongous damage to MOAB-class bloons, but also significantly reduces its attack speed. It actually performs worse against regular Bloons than the preceding upgrades.
- The buckshot path in general discards the Dartling's infinite range and fast attack speed for high damage bursts. The fourth and fifth tier upgrades also lets the Dartling automatically target Bloons, making it more similar to a regular tower.
- Expy: The Bloon Area Denial System and Bloon Exclusive Zone BTD6 are based on the Vickers turret's upgrade chain in SAS Zombie Assault TD, most notably the Area Denial Weapons System and Zeus Exclusion Zone, from whom it gets its names from. Similar to the latter Zeus Exclusion Zone, the BADS and BEZ have multiple independent turrets that can aim at separate targets or focus on a single one.
- Fun with Acronyms:
- Bloon Area Denial System, or B.A.D.S. for short.
- 6 adds the M.A.D. upgrade, short for MOAB Assured Destroyer.
- Gatling Good: If you don't go for its first upgrade path, which turns it into a Wave-Motion Gun. It eventually upgrades to fire rockets at a Gatling gun rate.
- Guide Dang It!: In BTD 6, the Dartling Gunner has the exact same problem as the Super Monkey - its shots look just like the earlier-unlocked Dart Monkey's, and they're both just referred to as "darts" by the game.
- However, just like the Super Monkey, each individual dart shot by the Dartling Gun only pops a single Bloon before disappearing, unlike the Dart Monkey's One-Hit Polykill abilities.
- This, again, makes it much less able to handle crowds of massed Bloons than it initially appears - though its initial performance is proportionate to its price, and when you're expected to get it, so it's not a weak tower - just a bit counterintuitive.
- Humongous Mecha: The M.A.D upgrade replaces the gun with a large robot that shoots giant rockets out of its arms. It's still the shortest of the tier 5 Dartling upgrades.
- In Name Only: The Bloon Area Denial System upgrade in 6 is vastly different than in 5. In 5, it's an upgrade that makes the Dartling shoots 3 rockets with every attack and has the Rocket Storm ability. In 6, the Rocket Storm is now its own upgrade. Meanwhile the Bloon Area Denial System is now an upgrade for the newly added Buckshot path, appearing as a tower with 4 independently-attacking cannons.
- Irony: The Faster Barrel Spin upgrade in 6 is on the same path as the M.A.D which fires significantly slower than a regular Dartling Gunner.
- Macross Missile Massacre: The B.A.D.S. in 5 fires a spread of 3 rockets at a very high rate and has the Rocket Storm ability, which fires 5 volleys of up to 100 rockets each at the nearest bloons onscreen. In 6, the Rocket Storm comes back as the 4th upgrade of the middle path and is upgraded into much larger missiles by the M.A.D. The actual volume of rockets is less impressive at first, but then you realize it scales with attack speed buffs, which can massively improve the missile volume.
- Mechanically Unusual Class: The Dartling Gunner is one of the few towers that has to be aimed manually. However, the Bloon Area Denial System upgrade in BTD6 can be set to act more like a normal tower, automatically targetting nearby bloons.
- More Dakka: Its fire rate is initially high, but not overwhelming. However, it definitely qualifies for this trope once it upgrades to Faster Barrel Spin.
- Nerf: In BTD6, the Dartling Gunner cannot hit camo without Advanced Targeting or external camo support.
- Short-Range Shotgun: The Buckshot upgrade has the side-effect of getting rid of the Dartling Gun's infinite range ability. On the other hand, it's short-ranged burst deals massive damage.
- Shotguns Are Just Better: The Buckshot path introduced in 6 converts the Dartling Gun from a rapid-fire minigun to a slow-firing but potent scattergun. Upgrading it further ramps up the fun by adding three more guns with the Bloon Area Denial System, and the Bloon Exclusion Zone gets even more guns!
- Slow Laser: The Laser Cannon upgrade makes the dartling shoots laser projectiles instead of darts. It still takes time for the lasers to move and hit the bloons. Averted with the Plasma Accelerator and the Ray of Doom, which are constant streams of lasers.
- Spread Shot: The buckshot upgrade in 6 shoots bursts of round pellets in a conical spread.
- Wave-Motion Gun: The Ray of Doom fires a beam that is long enough to extend across the map and has practically infinite popping power, making it very effective against large groups of bloons.

A tower which periodically deploys slightly weaker road spikes in a small area around it. The spikes can hit camo bloons by default.
Its upgrade paths in BTD5 are Spiked Balls, which creates powerful spiked balls that deal extra damage against ceramic and can be upgraded to explosive Spiked Mines, and Spike Storm, which can periodically cover the whole track in road spikes.
BTD6 adds a third path, which increases the power and lifespan of the spikes, making them nearly permanent.
- Boring, but Practical: All the Spike Factory does is place road spikes on the track. On the other hand, it's a very effective way to prevent losing lives through bloons that leak through your defenses, while also providing camo countermeasures and, depending on the purchased upgrades, extra damage against Ceramics or MOAB-class bloons, or incredibly powerful mines that can destroy almost anything.
- Magikarp Power: The bottom path's upgrades are mostly weak, focusing on utility and spike lifespan instead of directly increasing its power. However, reaching the capstone upgrade, Perma-Spike, transforms it into one of the strongest towers in the game, giving it extraordinarily powerful spikes that can persist between rounds and stack up to an absurd degree as a result. It's one of the few towers that can effectively solo a BAD.
- Mighty Glacier: The Super Mines upgrade greatly reduces the Spike Factory's fire rate, but it deploys very powerful mines that can destroy the outer layer of a MOAB or DDT in one hit.
- Spikes of Doom: But of course. It drops piles of tacks, which can be upgraded to explosive spiked balls or police-style caltrops that devastate bloons that pass over it.
- Stone Wall: With an emphasis on the "wall." Spike Factories don't have much range, and the actual area of their damage is very small and concentrated. High tier spike factories like the Super Mines and Perma-Spike even have a dramatically-reduced attack speed to compensate for their heavy ordnance. That said, the mechanics behind spikes means that the damage they deal is tremendous, bringing any bloon that collides with their spikes to a screeching halt. Spike Factories are the strongest defensive tower, bar none.
- Stuff Blowing Up: Spiked Mines and Super Mines blow up when they run out of spikes.
- Spam Attack: The second path upgrades in 5 and 6 make the Spike Factory shoot out spikes at increasing speeds. Faster Production and Even Faster Production are obvious, Spike Storm produces a massive amount of spikes to cover the whole track, and Carpet of Spikes regularly sets down entire Spike Storms.
- Trap Master: A mechanical version of this trope; it lays Spikes of Doom on the track to pop bloons that slip through your main defense, but generally becomes of little use once bloons get past it. Upgrades can allow it to become a primary part of your defense instead of just cleanup.
A tower that summons bees that stick to Bloons, stinging them repeatedly until the Bloon is eliminated. First appeared in BTD5 as a Special Agent, but was later added to BTD4 Mobile as a regular tower. Doesn't appear in BTD6.
- Ascended Extra: It was merely an Agent in BTD5, but became a full tower in BTD4 Mobile.
- Bears Are Bad News: The only tower that is operated by an animal other than a monkey, instead being a bear holding a beehive.
- Bee-Bee Gun: Uses bees to attack.
- Call-Forward: It was added to the mobile version of BTD4 after it was added to BTD5.
- Put on a Bus: Does not appear in BTD6, neither as a tower nor an agent.
- Weaksauce Weakness: Has no way to pop frozen, lead, or MOAB-class bloons.
Towers introduced in Bloons Tower Defense 5/Battles

A tower that slowly fires powerful shots that pop 2 layers of bloon on hit, and has unlimited range.
Its final upgrades in BTD5 are Cripple MOAB, which stuns MOAB-class bloons when they are shot, and Supply Drop, which grants extra money when used.
BTD6 keeps the Cripple MOAB and Supply Drop upgrades, adding the Shrapnel Shot and Bouncing Bullet upgrades to the latter which allow the Sniper to hit multiple bloons with one shot, and the Elite Sniper which drops much more valuable cash crates and gives other Snipers the Elite targeting priority. The Semi-Automatic upgrade from 5 is moved to the bottom path which gradually increases the Sniper's firing speed to ridiculous levels, ending with the Elite Defender which mows down anything in its line of sight and can shoot even faster if a bloon leaks.
- Always Accurate Attack: One of the few hitscan attackers in the series. Thus, if it can see a bloon, it'll hit it.
- Artificial Brilliance: Invoked by the Elite targeting option granted by the Tier 5 Elite Sniper. When a Sniper is set to Elite targeting, it'll initially target the strongest enemies to maximize their damage, but will switch to targeting the first enemy if it sees that the bloons are getting far enough down the track. It also causes them to prioritize Ceramics over other bloon types in most situations.
- Damage-Increasing Debuff: In 6, the Cripple MOAB upgrade also causes the Sniper's attacks to debuff MOAB-class bloons it hits, briefly increasing their damage taken.
- Desperation Attack: The Elite Defender gains increased fire rate the closer a bloon is to the exit. Actually leaking a bloon will temporarily quadruple its already insane fire rate.
- Improbable Aiming Skills: No matter the distance, the Sniper Monkey will never miss. Even if it's using a fully automatic rifle that puts out over a dozen rounds per second, every single one of these bullets will end up in a Bloon. There's no aiming or reload time, either: as soon as the Sniper's target is destroyed, it will immediately snap to the next Bloon and keep firing without breaking its rhythm.
- Mighty Glacier: Sniper Monkeys have a sluggish attack rate unless they get speed upgrades, but they deal multi-layer damage from the start and can get upgrades to increase their damage further. The top path in particular is entirely focused on buffing the Sniper's effectiveness per hit, to the point where it eventually becomes able to annihilate any regular bloon in a single shot and deal tons of damage to blimps.
- Mobile Shrubbery: The artwork for Cripple MOAB in both 5 and 6 depict the sniper wearing a ghillie suit, perfect for hiding in bushes.
- Money Multiplier: The Supply Drop ability calls in a Dart Storm-like plane that drops a crate containing between $1,200 in cash. This is the only ability in BTD5 Flash to start on cooldown when placed. The Elite Sniper upgrade in BTD6 increases the amount of money that the crate contains alongside its other benefits.
- More Dakka: In BTD6, the third upgrade path focuses on attack speed. Somehow, the monkey is still able to make long range, high-precision shots even when using a fully automatic rifle.
- Pinball Projectile: The Bouncing Bullet upgrade allows the sniper's bullets to bounce to other targets after hitting the first.
- Sniper Rifle: The Sniper's weapon of choice. It lets the Sniper shoot anywhere on the map, except those blocked by obstacles.
- Support Party Member: Unless you invest in the Sniper's bottom path, its skills won't be too terribly effective at raw DPS, but its crowd control abilities (in the top path) and money-making abilities (in the middle path) make up for this. The Tier 5 upgrades of those respective paths are even more directly support-oriented, as Cripple MOAB adds a Damage-Increasing Debuff to any MOAB it hits (even the BAD or bosses!), while Elite Sniper grants increased fire rate and the Elite targeting priority to all other Snipers.

A relatively fast tower that can naturally see Camo bloons, throwing shurikens with 2 pierce each.
Its final upgrades are Bloonjitsu, which throws five shurikens at the same time, and Sabotage Supply Lines, which slows bloons. BTD6 adds the Grandmaster Ninja and Grand Saboteur as final upgrades to the original two paths, and adds a third upgrade path who specializes in using Sticky Bombs to deal massive delayed damage to MOAB-class bloons.
Its Paragon upgrade is the Ascended Shadow, which provides global camo detection and massive damage against them, can rapidly throw extremely potent shurikens and splitting flash bombs, use devastating sticky bombs against MOAB-class bloons, and has a global Sabotage aura that slows down everything on the screen outside of BADs and Bosses, while crippling the durability of all non-Boss blimps.
- All Your Powers Combined: The Ninja Monkey Paragon, the Ascended Shadow, hurls seven huge homing shurikens at a time and tosses out a spread of flash bombs every seven throws. These bombs explode into three smaller seeking shurikens each. It also applies a permanent speed reduction to all Bloons short of B.A.D.s or Boss Bloons, reduces the HP of all non-boss blimps that spawn, and throws card-shaped Sticky Bombs at MOAB-Class Bloons (with said bombs doing more damage than First Strike Capability). Finally, it gives all towers permanent camo detection and can hit camouflaged bloons for even greater damage. This power set combines features from the Grandmaster Ninja, Grand Saboteur, and Master Bomber.
- Caltrops: In 6, the Ninja can throw caltrops on the track, which pops any Bloons touching them.
- Cool Mask: The Sticky Bomb and Master Bomber upgrades give the Ninja a cool-looking mask depicting an oriental demon.
- Gratuitous Ninja: Then again the devs are called Ninja Kiwi.
- Multi Shot: Can be upgraded with Double Shot, Bloonjitsu (5 shuriken), and Grandmaster Ninja (8 shuriken) for vastly increased popping power.
- Nerf: Due to how its upgrades were redistributed in BTD6, Ninja Monkeys can no longer have Ninja Discipline, Distraction and Seeking Shuriken at the same time.
- Percent Damage Attack: While the Grand Saboteur's ability is active, all new blimps will spawn with only 75% of their original HP, which can get ridiculous when you factor in freeplay scaling. The Ascended Shadow can apply this effect permanently.
- Simple, yet Awesome:
- The Bloon Sabotage ability. It's not flashy, it doesn't wipe out bloons with a firework show, and it didn't even have an animation in 5. That said, Sabo's ability to reduce the movespeed of all bloons on screen by half is widely considered to be one of the strongest activated abilities in the game, making it invaluable support in late rounds.
- The Ninja Monkey overall counts as such. Despite merely throwing a single shuriken at a time, it's the only non-Hero tower that can directly target Camo Bloons when not upgraded, and packs decent attack speed for a somewhat low cost. Its higher upgrades on the top path just increase the amount of shurikens it throws each time, but are still highly effective.
- Stealth Expert: Being a Tower Defense game, there isn't any need for the monkeys to actually hide. That said, the Ninja's stealth aspect is represented in it being capable of seeing Camo Bloons without any upgrades. In 6, it can take it a step further by outright stripping Camo from struck bloons with Counter-Espionage, while the Paragon Ascended Shadow can turn your entire army into these while also gaining the ability to hit camos for even more severe damage, making it especially effective against
 DDTs.
DDTs. - Sticky Bomb: The third path in BTD6 grants the ninja the ability to throw these, allowing it to destroy MOAB-class bloons with ease.
- Stock Ninja Weaponry: The Ninja's basic attack is throwing shurikens, it can set up caltrops, and also throw flash bombs.
- Support Party Member: The second path in BTD6 sacrifices the Ninja's offensive potential in order to provide knockback, camo removal, increased attack speed for nearby Ninjas, or speed and health reduction of incoming bloons.
- Technicolor Ninja: Unupgraded, it wears bright red ninja clothing. While there are some upgrades that turn the clothes black, they don't last long as further upgrades turn them colorful again.
- Trick Bomb: Its third upgrade path in 6 focuses on various bombs. The first one is a flash bomb that briefly stuns any Bloons it hits, and the latter is a Sticky Bomb that deal massive damage to MOAB-class bloons.
- True Sight: It's the only non-Hero tower that can attack Camo Bloons without any upgradesnote .

A monkey who wields a fast-firing nailgun that pops 3 bloons per shot. Its upgrades let it construct various devices to help in popping Bloons.
Its final upgrades in BTD5 are Bloon Trap, which lets the Engineer lay down a trap that converts passing Bloons into cash, and Overclock, which can greatly boost one tower's attack speed for a period of time.
In BTD6, the Engineer's top path focuses on building sentries. Sentry Expert lets it build many different sentry types, while Sentry Champion, its final upgrade, replaces these with powerful turrets that rapidly fire plasma bolts before violently exploding. Its second path grants it the Overclock ability, which hugely boosts a tower's attack speed; this can further be upgraded to Ultraboost, which leaves the affected tower with a small permanent boost which stacks up to 10 times. Finally, the third path has the Engineer wield two guns for doubled attack speed, as well as a Bloon Trap which can grant extra money from popped bloons, and can be upgraded to the XXXL Trap, capable of holding up to a ZOMG.
Its Paragon upgrade is the Master Builder, which can deploy three devastating Mega Sentries that each use their own methods of attack and create their own unstable plasma sentries, on top of being able to self-destruct for tremendous damage. The Master Builder itself also gains three powerful nail guns that can pin down anything below a BAD, and can Overclock itself each round to give itself a permanent stacking attack speed buff.
- All Your Powers Combined: Subverted. While the Master Builder is formed as a fusion of the Sentry Champion, Ultraboost, and XXXL Trap, it functions much more like a powered-up version of Sentry Champion, and doesn't have the Cleansing Foam, Overclock, or Bloon Trap abilities available. The only remnants of the other paths are its ability to buff itself in a manner similar to Overclock, and its ability to Pin targets with multiple nail guns.
- The Engineer: Well, duh. While it can shoot at Bloons with its nail gun, its main power is to set up various contraptions like sentries and traps to help against the Bloons.
- Gathering Steam: The Master Builder's attack speed increases slightly every round it's deployed, up to a limit. By the time it actually hits this limit, however, its 3 guns will be attacking together for a total hit rate of about 60 times per second.
- Guns Akimbo: One upgrade in BTD6 makes it dual-wield its nail guns, doubling its attack speed.
- Made of Explodium: The last upgrade on the top path in BTD6 has the engineer shoot out plasma spewing sentries that violently explode when their time is up. A particularly effective strategy is weaponizing this by manually selling the sentries when enemies draw near, turning them into on-demand bombs.
- Mini-Mecha: The Master Builder, the Paragon for the Engineer, is a robot suit several times the controlling Engineer's size.
- Money Multiplier: Manually emptying the Bloon Trap gives twice as much money as usual for the bloons it captured. However, if you're too slow to react, it will empty automatically and give only the normal amount.
- More Dakka: The Overclock ability doubles the attack speed of a single selected tower for an entire minute, but only has a 45-second cooldown! In 6, its tier 5 upgrade, Ultraboost, does not only the above, but also grants a small permanent speed boost after the Overclock boost is used up. This stacks up to 10 times, effectively letting a single tower have the Overclock effect passively. And then you add the actual Overclock buff to it.
- Nail 'Em: The Monkey Engineer's primary weapon is its trusty nailgun. Unupgraded sentries also fire nails as projectiles.
- Power Nullifier: With the Cleansing Foam upgrade, it can spray foam onto the field that removes camo and regen properties from bloons, and also pops leads.
- Purple Is Powerful: The Sentry Champion has a purple color scheme, representing how its sentries are the most powerful ones.
- Sentry Gun: Several of the engineer's upgrades revolve around building these to assist in poppage. The 1/0 engineer is easily one of the best starting towers in the game, especially with the tier 4 specialty building. The top path Engineer in 6 specializes in building sentries, eventually capable of building sentries with varied damage types such as bombs, lasers, and string waves of plasma (the last of which are unstable, causing them to violently explode when time is up. This is taken to a head with the Master Builder's three Sentry Paragons; they fire a Plasma Accelerator beam/plasma balls/anti-MOAB rockets respectively, and are each a Paragon-tier defense, alongside spawning even more sentries that function like the Sentry Champion's. They also explode when redeployed or sold.
- Support Party Member: Naturally, since it's classified as support. It has offensive capabilities, especially as the top path focuses on its sentries, but you'll find much greater use using the middle path upgrades. Its Paragon, however, is dedicated fully to offense.
- Trap Master: It can lay down Bloon Traps on the track, which trap and instantly kill the Bloons that pass over them. In 6, it can lay down XXXL Traps, which can trap an entire ZOMG at once.
- The Turret Master: The Engineer's most distinctive trait is the ability to set up automatically-shooting sentry guns. The Master Builder takes this a step further — it can build 3 Mega Sentries that deploy their own sentries.

A tower that sucks in single bloons, shreds them, and spits the remains out the back, likely to be sucked right back up.
Its final upgrades are Super Wide Funnel and Supa-Vac.
- The Cameo: During BTD6's update 31, a broken and rusty Bloonchipper makes an appearance in the map Junkyard.
- Put on a Bus: Of the towers that did not appear in BTD6 at launch, the Bloonchipper is the only one that was confirmed to not be returning in a later update, not counting Special Agents.
- Weapons That Suck: And shred bloons, even MOABs when at 4/x, to bits.
- Wood Chipper of Doom: Pretty much the game's own deadly woodchipper. It can suck bloons, spit out the remains, suck in the remains, and when upgraded, it can suck in MOAB-class Bloons, making it supremely useful to the monkeys, and extremely lethal to the Bloons.

An air-based tower that follows your touch or mouse pointer around the map and fires 2 darts per shot, each with 2 pierce.
Its final upgrades are Apache Dartship, which has massively increased firepower with missiles and a machine gun, and Support Chinook, which can move other towers around and drop supply crates full of cash and extra lives.
BTD6 adds the Comanche path, which can fire missiles, slow down MOAB-class bloons and summon extra helicopters as Bloons get closer to the exit. The other paths gain extra upgrades as well, with the Apache Prime boasting a devastating arsenal of weapons, and Special Poperations allowing the Chinook to deploy a monkey Marine to shred Bloons with a powerful dart rifle.
- Bigger on the Inside: The only explanation as to why the Chinook upgrade allows you to reposition big towers like Flavored Trades and Tech Terror despite them being bigger than what the inside size of the Chinook suggest. Though it has its limits with the Chinook being unable to reposition towers like Sun Temples and Aircraft Carriers.
- Cool Plane: Well, Cool Helicopter. The upgrade paths are based on real life helicopters, the Apache, Chinook, and Comanche.
- Death from Above: The Door Gunner perk for Military Knowledge allows a Support Chinook to pick up a tower below tier 5 and have it open fire on enemies while it carries them around.
- Depth Perplexion: The Razor Rotor upgrade can somehow pop bloons despite the fact that the rotor should be above the bloons. Its upgrade artwork implies the helicopter is leaning downward towards the track to shred bloons.
- Energy Weapon: The Apache Prime upgrade trades darts for laser projectiles that do more damage and have more pierce, and its primary machine gun is changed to fire far deadlier plasma bolts.
- Flying Saucer: Its purchasable skin for BTD Battles turns it into a flying saucer.
- Healing Factor: Support Chinook's Supply Crate grants lives to you when you activate its ability.
- Helicopter Blender: The Razor Rotor upgrade, which can pop any kind of bloon that gets near the helicopter.
- It's Raining Men: The Special Poperations fifth tier upgrades allows the Chinook to temporarily deploy a super-powerful Monkey Marine that shoots bloons to oblivion with a machine gun. It can also do a different version of this by picking up a tower and airdropping them somewhere else to wreak havoc.
- Macross Missile Massacre: The Apache Dartship can periodically fire a salvo of homing rockets that can track bloons anywhere on the map. Upgrading to Apache Prime significantly increases their damage against blimps.
- Magikarp Power: The Chinook upgrade path mostly focuses on being support. The final upgrade, Special Poperations, however, lets it deploy a very powerful Marine Monkey vapable of tearing bloons to shreds.
- Mechanically Unusual Class: The Heli-Pilot can fly to wherever you tap your screen or move your pointer, hover in one spot, patrol between two set points, and even chase after the bloons.
- The Minion Master: The Comanche Defense upgrade lets the Heli summon up to three smaller helicopters depending on how close the bloons are to the exit. The Comanche Commander makes all three smaller helicopters permanent.
- Money Multiplier: The Support Chinook's Supply Crate drops a supply crate that alternates between giving $1500 and $2000 in cash and granting between 50 and 75 lives in BTD5. In BTD6, it drops both crates at once that each gives $1550 and 10 lives per use. Special Poperations improves the crates to $4500 and 25 lives.
- More Dakka: The Apache Dartship upgrade installs a machine gun and homing missiles, significantly improving the Heli's power.
- Support Party Member: The Chinook upgrade path focuses on blowing back Bloons, moving towers, and making money. Its only offensive upgrade is Special Poperations.

A water-based tower that shoots homing darts even when unupgraded. It is notable for its Advanced Intel upgrade, which allows it to shoot bloons that are in range of any other tower on the map.
Its upgrade paths in BTD5 are Submerge and Support, which stops it from attacking but removes camo from passing bloons and can be upgraded with a Bloontonium Reactor to rapidly pop nearby bloons, and the Ballistic Missile, which fires powerful missiles and can gain the First Strike Capability ability, which fires a missile powerful enough to instantly erase almost any bloon.
BTD6 mixes up the upgrade tree, and adds a third path, whose Armor Piercing Darts deal extra damage to MOAB-class bloons, and has the Sub Commander ability to increase the power of other nearby subs. The Bloontonium Reactor also gets upgraded into the Energizer, which deals much more damage while further reducing ability cooldowns (especially for other water-based towers) and boosting Heroes' EXP gain, and First Strike Capability into Pre-Emptive Strike, which launches a not-as-deadly but still extremely strong missile at any MOAB-class Bloons that appear on the track.
Its Paragon upgrade is the Nautic Siege Core, which launches an unending barrage of airburst rockets at any target in range of itself or other towers while nuking anything that enters the screen with pre-emptive missiles. It can also submerge to generate an extremely powerful radiation aura that vaporizes most lesser threats, while retaining the Energizer's passive and granting offensive buffs to Subs and Heroes in its range. Either form also has access to the Final Strike ability, which unleashes a delayed nuclear barrage that obliterates and irradiates an area of its choosing.
- Action Initiative: The aptly named Pre-Emptive Strike instantly strikes every MOAB-class bloon that enters the screen with a lethal missile, instantly destroying weaker blimps before they can even make a move.note
- All Your Powers Combined: The Monkey Sub Paragon, the Nautic Siege Core, has the psuedo-infinite range of Advanced Intel and fires an unending stream of sharply homing airburst missiles, along with pre-emptive missile strikes on every bloon that enters the screen. In its submerge mode, it gains a much stronger radiation aura and retains Energizer's cooldown reduction passive (which can now also affect Paragons in range), in addition to granting hefty damage and pierce buffs to Subs and Heroes in the radius. Finally, it has the Final Strike ability which, after a 15 second delay, strikes targets with three nuclear missiles that do tremendous damage and leave behind lethal pools of radiation. This power set combines features from the Energizer, Pre-Emptive Strike, and Sub Commander.
- Flechette Storm: Airburst Darts make the Monkey Sub's darts explode into even more darts upon impact. Combined with the massive fire rate increases of other upgrades, it results in this.
- Hot Sub-on-Sub Action: Averted; Monkey Subs cannot attack when submerged, instead only performing supportive abilities. They must be surfaced to fire darts or missiles.
- "Instant Death" Radius: The Energizer's radioactive aura completely obliterates any standard bloon, doing 3 damage every third of a second without any other upgrades. For reference, ceramics have 18 total layers. They don't survive longer than 2 seconds.
- Macross Missile Massacre: Pre-Emptive Strike, the final upgrade on its second path, increases its base missile attack rate to once every half second, but where it really shines is when it launches a MOAB Assassin at EVERY blimp that dares enter the screen. By the time this upgrade becomes affordable and relevant, the game will be throwing MOAB-class bloons at you en masse, resulting in this trope. The Nautic Siege Core takes things up a notch by firing pre-emptive missiles at anything that enters the screen, even regular bloons.
- Mook Commander:
- The tier five Sub Commander provides a massive pierce buff and doubled damage to all Monkey Subs in its radius. With the appropriate Monkey Knowledge, the range limitation is removed, and all subs onscreen get the bonus just for having a Sub Commander on the track. This is particularly notable with another Sub armed with Pre-Emptive Strike, as while the doubled damage won't affect First Strike Capability, it will affect its pre-emptive missiles, which until later Freeplay will give them enough damage to severely injure or one-shot anything below a B.F.B. before they can even enter the screen.
- The Bloontonium Reactor reduces the cooldown of nearby water tower abilities (read: First Strike, MOAB Takedown, and Pat Fusty and Admiral Brickell's abilities) by 15%. Energizer halves water tower ability cooldowns, and reduces the ability cooldown of all other towers on screen by a fifth.
- The Nautic Siege Core retains Energizer's functionality while providing massive offensive buffs to Heroes and Subs in its radius,note and can notably also grant a smaller 10% cooldown reduction to any Paragons in its radius.
- More Dakka: Third path upgrades on the Monkey Sub add more guns which means more firepower. Sub Commander gets special treatment: its base fire rate is doubled compared to a Triple Guns sub, meaning it shoots 6 times as fast as a base sub.
- Necessary Drawback: Like the Monkey Buccaneer, its strong power is balanced out by needing a body of water to be placed in.
- Nuke 'em: The First Strike Capability's signature ability launches a powerful nuclear missile at the strongest bloon on screen. Few things can survive this. The Nautic Siege Core's Final Strike launches three even stronger ones which not only do far more damage, but also leave behind damaging radiation.
- One-Hit Kill: First Strike Capability launches a super-powerful missile at the strongest bloon on the map, dealing 10,000 damage on impactnote as well as significant splash damage. At the time of its introduction, this could instantly and completely destroy any bloon, notably being the only thing that could definitively one-shot a Z.O.M.G.,note and any surplus damage from destroying the initial target was shunted onto nearby bloons, allowing it to possibly eliminate groups of blimps at a time. Even when the B.A.D. was introduced, it still remained a useful tool for taking it down as it can take out half of a B.A.D's base HP in one shot,note and will more often than not completely obliterate the thing if it deals the finishing blow, sparing you the trouble of dealing with its children if you've softened up the blimp beforehand. Its immense damage also makes it a valuable asset against early Boss Bloon tiers, especially for speedruns.
- Power Nullifier: A submerged Monkey Sub can remove camo from bloons that pass through its radar.
- Recursive Ammo: Airburst Darts make the main dart explode into several smaller darts.
- Roboteching: The main attack of the Sub homes onto bloons. Comes in handy when one of its upgrades gives it basically infinite range.
- Russian Fashion: The commander of a First Strike Capability sub wears a distinct ushanka in place of the other subs' navy cap.
- Sickly Green Glow: Bloons affected by the Bloontonium Reactor are indicated with a bright green glow. Getting Heat-tipped Darts will cause the aura to turn red instead, indicating that it can now melt through Leads.
- Stance System: The Submerge and Support upgrade (along with its upgrades) gives the Submarine a "Submerge" command. When submerged, it stops shooting darts, but instead emits sonar waves that removes camo properties. Further upgrades also let the sonar waves damage bloons and reduce ability cooldown of other towers.
- Support Party Member: A Submarine specced for Path 1 has virtually no offensive power, but has a wide variety of utility functions. It starts with the ability to permanently reveal Camos near the Sub and decreasing the cooldowns of nearby water towers, but Energizer causes it to halve the cooldowns of all nearby water monkeys, increase the XP gain of all nearby heroes by 50%, and passively grant 20% cooldown reduction to every tower on the screen.
- Target Spotter: With the Advanced Intel upgrade, every other tower becomes one to the Monkey Sub, being able to target any Bloon that is within another tower's range (even of those that can't attack, such as Banana Farms), and can target Camo Bloons as long as that other tower can target them as well.
- Abnormal Ammo: The projectiles of the Special Agents include bees, acorns, coconuts, banana peels, watermelons and their seeds, and snowballs.
- A Day in the Limelight: BTD5 features a special mission, "For Their Eyes Only", where Special Agents are the only towers allowed.
- Ascended Extra: In the mobile version of BTD4, the Beekeeper is a full-fledged secret tower introduced as a promo for the fifth game, and has its own upgrades.
- Bears Are Bad News: The Beekeeper is a surly, frowning brown bear, and it commands a hive of angry bees to attack with, though it's on the monkeys' side.
- Bee-Bee Gun: The Beekeeper fires out bees that stick to bloons and deal Damage Over Time. The Beekeeper Pro gets an ability that swarms them onto a hundred bloons at once.
- Bullet Seed: The Watermelon Spitter chews on a watermelon when left alone to build up seeds, then rapidly spits them out at passing bloons. The Pro version can spit out the whole watermelon as a projectile.
- The Cameo: In BTD 6, the Tribal Turtle (well, Tribal Tortoise) appears as a purchasable cosmetic item in Contested Territory mode.
- Chuck Cunningham Syndrome: Since Special Agents were dropped as a mechanic for Bloons Tower Defense 6, every Special Agent vanished except for the Portable Lake, the Pontoon, the Monkey Farmer, and Super Monkey Storm, which were made into Powers instead and cannot upgrade into Pro variants.
- Coconut Meets Cranium: The Tribal Turtle throws a coconut with every other attack, which pierces more bloons, breaks Lead Bloons, and deals extra damage to Ceramic Bloons.
- Combat Tentacles: The Portable Lake Pro's activated ability, "Activate Sea Monster!", calls up an unseen sea creature's tentacle, which attacks several bloons before submerging.
- Crutch Character: Most of the combat-oriented Special Agents are very powerful for the early-game, but due to having no upgrades, are unable to compete later in the game.
- Evolving Weapon:
- Every Special Agent turns into a Pro version once it is bought enough times, making it permanently stronger while keeping its cost the same.
- The Bloonberry Bush grows five more thorns for each round it's out for a maximum of 200, using up those thorns when a bloon runs into it like a pile of Road Spikes. The Bloonberry Bush Pro produces creepers that can grow as well.
- A new Radadactyl hatches out of the nest and begins swooping every round, for up to five Radadactyls.
- Hulking Out: The Angry Squirrel turns green and grows larger whenever a bloon leaks, making it attack faster and giving it camo detection and lead damage for a limited time. Angry Squirrel Pro turns purple when in its anger mode, and only needs to throw enough acorns to transform.
- Kill Sat: The Bloonsday Device unlocks an activated ability that causes it to fire an orbital laser, which is guided with the mouse and deals high damage to anything it touches. The Pro version leaves behind damaging plasma on the track.
- Non-Standard Character Design: The Special Agents are some of the only non-monkey animals seen in the series, making them stand out next to the main towers.
- Smart Bomb: Super Monkey Storm, an ability of the Monkey Beacon prior to it getting changed into the Monkey Village, is a screen-wipe that is guaranteed to pop every standard bloon and deal high damage to MOAB-class bloons.
- Snowlems: The Mad Snowman is a living snowman who throws freezing snowballs at the bloons, but melts away after 10 rounds (20 in its Pro form).
- Support Party Member:
- The Meerkat Spy provides camo detection to any towers in its radius. The Meerkat Spy Pro swaps out its eyepatch for a laser eye and gains the ability to attack.
- The Pontoon and Portable Lake act as platforms to place land towers on water or water towers on land, respectively. While the Portable Lake Pro gets an activated ability that summons a sea monster tentacle to attack bloons, the Pontoon can't attack at all and its Pro upgrade enhances the range of towers placed on it.
- The Banana Farmer exists to automatically collect Banana Farm drops. Once it becomes the Monkey Farmer Pro, it can spread banana peels onto the track to knock bloons back, but still can't pop them.

- All Your Powers Combined: As a 4/4 tower in function, he has the Tempest Tornado of the Monkey Apprentice's first path and the Dragon's Breath and Summon (Super) Phoenix of its second path, along with every previous spell. His appearance reflects this, as he has the Prophet Eyes of a Master of Fire and is Flying on a Cloud like the Master of Air.
- The Archmage: The closest thing the Wizard Monkeys had to one before the fifth-tier Archmage and the Magnus Perfectus paragon in the sixth game, as the Wizard Lord can cast every spell and has an empowered ability as well.
- Evil Laugh: He lets out a sinister laugh whenever he feeds on a tower.
- No Fair Cheating: If you think you could simply spam Special Agents as a stand-in for your towers, he will not consume them and will just leave, resulting in a Non-Standard Game Over.
- One-Shot Character: While Wizard Lords can be bought as decorative items in Bloons Monkey City, the tower itself has only shown up in one special mission of the fifth game. The Archmage of BTD6 is its own take on the idea, as it gains the Shimmer and Dragon's Breath powers of the other upgrade paths but doesn't feed on other towers.
- Power at a Price: The Wizard Lord is very strong, but he removes the most expensive tower on the map every other turn, and he'll leave if there are no towers for him to consume, which counts as a Non-Standard Game Over.
- Purposefully Overpowered: The Wizard Lord is broken in terms of power, but also unwieldy because of his need to sacrifice expensive towers. Part of the challenge's difficulty is supporting the Wizard Lord (since he can't handle every round by himself) without wasting money on costly towers that will be lost.
Its final upgrades are Offensive Push, which allow Bloons to be sent a round earlier than the one they usually become unlocked at, and Misdirection, which lets it periodically move the highest level enemy Bloon to the opponent's side.
- Dual Wielding: Its Double Tap upgrade has it wield two guns at once.
- Fun with Acronyms: The COBRA stands for Covert Ops Battles Response Agent.
- Hoist by His Own Petard: The Misdirection ability allows the COBRA to send the strongest bloon on their side to the enemy's instead. If the enemy has been investing in offense or is otherwise unprepared to defend against the bloon they just sent to attack, they're in big trouble.
- Life Drain: With its Attrition upgrade, it will periodically steal two lives from the opponent. For balance reasons, while this can't outright defeat an enemy (if they're at 1 HP, it'll give you $30 instead), it will still leave them on the brink of defeat while keeping you healthy - making a battle against a COBRA user a race against time unless you also have one on hand. On Defense mode, it just causes you to regenerate 2 lives instead.
- Mechanically Unusual Class: It's the only tower in the game which affects the players instead of just attacking the bloons.
- Money Multiplier: With Wired Funds, the COBRA will give the player an additional $80 each round, which stacks.
- My Rules Are Not Your Rules: Offensive Push allows the user to unlock the next tier of bloons one round earlier than usual, which usually also means one round earlier than the opponent unless they're also packing a Path 1 COBRA of their own. Furthermore, this stacks if you send out multiple - it's not unheard of for Z.O.M.Gs being sent out in half the time' they'd normally take to unlock.
- Support Party Member: Its entire gimmick is the wide array of unconventional support buffs it can give the player. These range from giving you extra cash and regenerating/stealing lives, to decreasing cooldowns on special abilities, to lowering the minimum round requirement for certain Bloon attacks, to even sending the enemy's forces back at them.
- Weak, but Skilled: The COBRA isn't a very strong attacking tower, but its upgrades can help harass your opponent or even defend yourself.
Towers introduced in Bloons Tower Defense 6:

The alchemist throws acid potions which splash onto bloons and gradually melt them. Unlike most towers, these potions are lobbed at Bloons, meaning the Alchemist can ignore walls and other line-of-sight blockers and hit targets wherever they are.
Its first upgrade path focuses on buffs: Acidic Mixture Dip allows any monkey to pop lead and deal extra damage to ceramic and MOAB-class bloons, and Berserker Brew increases damage, range, and attack speed, which can be further increased with the Stronger Stimulant and made permanent with Permanent Brew. The second path is a more straightforward attacker, using Stronger Acid to dissolve bloons faster, Perishing Potions to remove fortification from lead and ceramic blooms, Unstable Concoction to make MOAB-class bloons explode violently when popped, and Transforming Tonic to turn into a powerful attacking monster, with the final upgrade, Total Transformation, also affecting nearby monkeys. Finally, the bottom path focuses on transmutation: Lead to Gold grants lots of extra money when popping lead bloons, Rubber to Gold splashes bloons with a potion that extends this effect to any kind of bloon, and the Bloon Master Alchemist wields a powerful shrinking potion that can turn any bloon into a basic red bloon.
- Alchemy Is Magic: The Alchemist is classified as a Magic monkey, capable of creating various potions with powerful effects.
- Awesome, but Impractical: The Bloon Master Alchemist can turn almost any bloon into a red bloon, even a ZOMG! While the prospect of taking out the second-strongest enemy in two attacks might sound enticing, this has a serious drawback: you don't get any money from the layers removed by the shrinking potion, which can seriously cripple your income. It's especially bad on CHIMPS mode, where you can't use Farms to make up for the lost money.
- Eye Beam: The attack monsters from Total Transformation shoots blue beams from their eyes at a really fast rate.
- HP to One: What the Bloon Master Alchemist's shrink potion essentially is. It transforms any Bloon it hits into a Red Bloon, which only requires 1 damage to pop.
- Jekyll & Hyde: The Transforming Tonic ability turns its owner Alchemist from a somewhat-unhinged scientist into a savage beast of incredible power. Bonus for the mechanism being a clear shout out to the trope maker.
- Mad Scientist: The middle path Alchemist looks more and more unhinged with each upgrade. It also gains the ability to transform itself and other monkeys into savage monsters.
- Money Multiplier: The "Lead to Gold" upgrade grants extra money when the alchemist pops a lead bloon, while "Rubber to Gold" increases the value of affected bloons. Inverted by the Bloon Master Alchemist, whose shrinking potion turns any non-BAD bloon into a red bloon, but also gives them the money bounty of one.
- Non-Indicative Name: The "Rubber to Gold" upgrade allows the Alchemist to partially turn the affected bloons into gold - even Lead, Ceramics, and MOAB-Class Bloons, which are clearly not made of rubber.
- No Self-Buffs: An Alchemist cannot benefit from its own potions.
- One-Hit Kill: The "Lead to Gold" upgrade makes the Alchemist's potions and acid pools completely pop any Lead Bloon that gets hit, regardless of whether it was Fortified or not.
- Pimp Duds: The Bloon Master Alchemist is decked out in a golden, jewel-encrusted uniform with cool shades.
- Power Nullifier: Perishing Potions can remove the fortified property off of Lead and Ceramic Bloons.
- Shrink Ray: The Bloon Master Alchemist has a shrink potion which turns any bloon into a red bloon. This works on anything up to a Z.O.M.G, effectively one-shotting them.
- Status Buff: One upgrade path specializes in this. Acidic Mixture Dip allows allies to pop lead bloons and deal extra damage against ceramic and MOAB-class bloons, and Berserker Brew increases damage, range, and attack speed.
- Super Mode: Transforming Tonic turns the alchemist into a monster with powerful attacks. The Total Transformation upgrade turns up to five other nearby monkeys along with him.
- Support Party Member: The Alchemist's damage output in the top and bottom paths, outside of what is provided by the "Lead to Gold" and "Bloon Master Alchemist" upgrades, is very limited, so an Alchemist on either of these paths is almost exclusively used to provide buffs towards other monkeys or generate extra money.
- Transmutation: The bottom path Alchemist specializes in this, with Lead to Gold instantly turning lead bloons into gold, Rubber to Gold applying a debuff to bloons with a special potion that makes them grant increased cash, and Bloon Master Alchemist being able to transform any bloon up to a ZOMG into a lowly Red bloon.
- Weapon of X-Slaying:
- Perishing Potions deals bonus damage to MOAB-class bloons as well as removes the Fortified property off normal bloons. These properties combine to do a whopping 20 damage to fortified blimps.note
- Lead to Gold potions deal bonus damage to Lead Bloons- enough to pop them in one shot. This damage bonus also applies to DDTs.

The druid attacks by throwing a volley of sharp thorns at bloons.
Its first upgrade path grants it command over air: Heart of Thunder fires an arc of electricity, the Druid of the Storm can blow bloons towards the entrance with a tornado, Ball Lightning fires an orb which zaps nearby bloons, and the Superstorm boosts the tornado to affect any bloon type. The second upgrade path, Druid of the Jungle, allows the druid to summon vines to immobilize a bloon, use Jungle's Bounty to earn extra money from nearby farms, and eventually become a Spirit of the Forest which covers the whole path with thorny vines and earns extra lives and money. The bottom path allows the druid to channel his wrath: the Druid of Wrath gains attack speed the longer targets remain in range, Poplust further boosts the speed of all nearby druids and can stack with other Poplust druids, and the Avatar of Wrath deals more damage the more RBE there is on the map.
- Blow You Away: A Druid of the Storm can create a tornado to blow bloons back to the entrance. The Superstorm upgrade takes this even further by letting it blow back anything that isn't a B.A.D.
- Chain Lightning: The Heart of Thunder upgrade grants the druid a lightning attack that hops from Bloons to Bloons. The Ball Lightning upgrade lets the druid shoot a ball, which then shoots at Bloons with chain lightnings which can also freeze Bloons.
- Decomposite Character: The druid's storm upgrade path is based on the apprentice's air path, having a Chain Lightning and tornado spell.
- Druid: The "priest of nature" kind. Its basic attack is throwing a flurry of wooden thorns at Bloons. One of its upgrade paths focus on controlling the storms, and another focuses on the power of plants.
- Flechette Storm: The druid's base attack consists of throwing a flurry of small thorns in a Spread Shot. It can be boosted to a truly ridiculous level if you have several Poplust druids in close proximity boosting each other's attack speed.
- Green Thumb: A Druid of the Jungle can summon vines to immobilize a bloon. Further upgrades allow it to instantly make nearby farms produce extra money, or create a huge patch of vines along the path.
- Lightning/Wind Juxtaposition: His top path upgrades allow him to use thunder magic and to summon tornadoes. The last upgrade of that path allows him to summon electrified tornadoes.
- Money Multiplier: Jungle's Bounty instantly grants you money for each banana farm in range of the druid.
- One-Hit Kill: A Druid of the Jungle is able to instantly destroy any single non-MOAB class bloon with a slow-attacking vine. Upgrading to Nature's Bounty lets it do this to two bloons at a time.
- Red Eyes, Take Warning: The Avatar of Wrath has 'em. As the Druid with the most offensive strength, it's best to take heed. Poplust druids' wolf pelts also have red eyes.
- Red Is Violent: The bottom path of the Druid, which specializes in overwhelming attack power, has a predominant red motif to highlight this. Druids with the Heart of Vengeance wear a ruby gem on their head, and Poplust druids throw black horns that are tinted with red. The Avatar of Wrath culminates this with its red eyes and fur.
- Spam Attack: The bottom path specializes in raising the druid's attack speed to ludicrous levels: Heart of Vengeance can up to double the druid's attack speed, the Druid of Wrath can double it again if it continuously attacks long enough, and having nearby druids with Poplust can add even more speed to that.
- Spread Shot: Throws a spread of thorns.
- Unstoppable Rage: The bottom path of upgrades increases the druid's power as it grows angrier, and its artwork portrays it becoming more and more furious as it's upgraded. Heart of Vengeance increases its attack speed when you lose lives, and the Avatar of Wrath gains more damage the more bloons (based on RBE, not total numbers) are on the screen.

A Support Tower that was introduced in the 36.0 update. It normally uses a melee attack, but its upgrades let it summon various beasts to fight the Bloons in its stead, and multiple Beast Handlers can merge their beasts together to increase their individual power.
The top path specializes in aquatic beasts that strike foes from the water, with higher tiers becoming able to drag larger bloons into the water to instantly defeat them. The middle path summons land-based dinosaurs that bite at bloons, with higher tiers improving their damage output and providing extra utility like an area stun and boosted damage against impaired targets. The bottom path focuses on birds of prey that strike from above and drag bloons to a designated point, with higher tiers being able to drag more and larger bloons at once. Uniquely among towers, the Tier 5 Beasts are so fearsome that they require four Tier 4 Beast Handlers of that path to even use them.
- Attack Animal: The eponymous "beasts" they handle are as varied as they are deadly:
- The top path uses aquatic animals, such as piranhas, great whites, orcas, and even a mighty Megalodon.
- The middle path uses land-dwelling dinosaurs, from the humble Microraptor to the cunning Velociraptor to the mighty Tyrannosaurus rex, and even greater beasts beyond...
- The bottom path relies on falconry, using birds like horned owls, great eagles, and condors. At max power, they can control the legendary Pouākai!
- Attack! Attack! Attack!: For a Support category tower, it's very damage-oriented across all of its paths; the most support-related aspect being the birds of prey's ability to drag bloons back towards the entrance.
- The Beast Master: It's in its name, using various animals such as birds, fish and reptiles to pop Bloons.
- Double Unlock: Tier 5 Beast Handlers don't just need to be unlocked and then bought. Due to the sheer power of the beasts in question, you need a minimum of three other Tier 4 Beast Handlers of that type, merged into the same handler, in order to actually control and upgrade to a Tier 5 beast.
- Fusion Dance: Starting at Tier 2, Beast Handlers can merge other beasts of their kind into one, drastically increasing that one beast's attack power. Higher tiers contribute more power but also have a higher maximum strength.
- Injured Vulnerability: Starting from the Velociraptor, dinosaurs will deal bonus damage to stunned bloons. This comes in handy with the fourth and fifth tiers, which have wide-reaching stuns.
- Land, Sea, Sky: The three types of beasts it can control. The middle path focuses on land-based predators, the top path on ocean-dwelling ones, and the bottom path on predatory birds.
- Magikarp Power: Beast Handlers are somewhat unremarkable without sufficient upgrades or beast power, and will need a ton of additional leveled Handlers if they want to acquire a max power Beast, on top of the Tier 5 upgrades outright being barred unless at least four Tier 4 Beast Handlers of that type are on the screen. All of this is a process that can take an extremely large money and space investment, especially since the Handlers assisting the primary one are effectively dead weight. However, investing in Beast Power will dramatically improve their abilities and sometimes give them completely new ones - any max power Beast is a force to be reckoned with for its tier, and a max power Tier 5 is one of the strongest normal towers available.
- Mechanically Unusual Class: Is it ever! For starters, the moment you upgrade a Beast Handler, it's no longer the monkey itself that does the attacking, rather relying on its animal to do all the fighting, which can be repositioned to any location in its range. Additionally, Beast Handlers have their own unique "merging" system, where multiple beasts of one type can combine into one to dramatically increase its power. On top of that, the Beast Handler also can't be sacrificed, buffed by Alchemists, nor are able to be repositioned with Support Chinook (a restriction that is typically for the non-monkey towers).
- One-Hit Kill: At its top path, starting from the Great White, it’s able to instantly pop bloons by dragging them to the water. As it gets upgraded into higher tiers and increases in Beast Power, it can drag stronger and stronger bloons. At its strongest, it can even do this to BADs (though only until Round 150. They attack like normal otherwise).
- Shockwave Stomp: Starting from the Tier 4 Tyrannosaurus Rex, the dinosaur beast will gain the ability to stomp the ground, damaging and stunning all bloons up to ZOMGs in range. The Giganotosaurus improves this ability by extending its duration and making the shockwave hit the whole map.

A secret tower exclusive to the map "Frozen Over". It is stuck under the frozen lake, but can be freed if a Mortar Tower shoots at its location enough times, which causes it to appear in a set location near the start of the map. Its only attack consists of swinging its club, which stuns affected Bloons (including MOABs), and it cannot be upgraded.
- All Cavemen Were Neanderthals: The Cave Monkey is bigger and more brutish than most other monkeys.
- Big Ol' Eyebrows: Its bushy eyebrows contribute to its savage, primitive look.
- Contemporary Caveman: After being frozen under the surface of a lake for who knows how long, it can be freed by a modern artillery cannon and recruited to join the fight against the Bloons.
- Easter Egg: Only appears on one map, and has a specific requirement to get him.
- Human Popsicle: It can be seen frozen solid in the ice of the "Frozen Over" map.
- Pelts of the Barbarian: The Cave Monkey is dressed in a generic spotted fur drape similar to those worn by stereotypical cavemen.
- Primitive Clubs: Befitting a caveman (or, cave monkey in this case), it wields a large wooden club capable of stunning even MOAB-class bloons.
- Secret Character: Prior to BTD6 Patch 17.0, it was just a background decoration on one map. After that patch, it can be temporarily unlocked for a single game by having a Mortar Tower fire at it several times.

A secret tower that only appears in "Dark Dungeons". By clicking on both torches and then the statue in the middle and then paying $50,000, the statues comes to life and starts attacking the Bloons. It can be upgraded to deal more damage.
- Awesome, but Impractical: Despite dealing a lot of damage, it is very expensive to summon and upgrade so it isn't used very often.
- Recurring Element: Like the temple on the Monkey Temple track in BTD4, it's a map fixture which can be turned into a powerful tower by paying money.
- Secret Character: Only appears on one map, and the requirement to unlock it isn't said in-game.
- Shock and Awe: Its orb shoots a bolt at the Bloons.
- Shout-Out: Its pose is a reference to the cover of the The Lord of the Rings gamebook Middle-Earth Quest: A Spy In Isengard.